- Introduction
- Applicable and Reference Documents
- Terms, Definitions and Abbreviated Terms
- VA BASICS
- VA DEVELOPMENT PROCESS
- VA Selection and Initial Analysis
- VA development
- VA development process
- VA personality, ethics and language style
- Dialogue scenarios
- Dialogue types - guided, free form, combined
- Dialogue States, Transitions, Intents and Actions
- Entities
- Topics
- Questions and Answers
- Data tables
- Preparation of VA training data
- Integration with external information systems
- Knowledge sharing with sub-bots
- Recommendations
- VA Acceptance Testing and Public Launch Process
- VA operation and maintenance process
- VA MANAGEMENT SITE
- Conversations
- Analytics
- Training
- Scenario
- Outputs
- Intents
- Entities
- Functions
- Resources
- Data tables
- Quality
- Knowledge base
- Prompts
- Unrecognized questions
- Try-out
- Users
- Management
- VA settings
- User Profile
Introduction
The Virtual Assistant Creation Manual includes guidelines for creating virtual assistants, as well as the instructions for the VA (Virtual Assistant) management site interface. It is an aid and reference material for anyone participating in the process of creating or developing the VA on a virtual assistant management site. Working with the VA on the aforementioned platform does not require special IT expertise or in-depth professional skills.
The VA Creation Manual is an informative and explanatory reference guide and instruction for creating a new VA or developing and maintaining an existing assistant.
The document provides a description of the views of the VA management site, available functionality, guidelines for using script elements and buttons, for completing and fields, and instructions that are useful for VA trainers and developers working on the creation of an assistant on the site.
The instruction is designed to provide practical support to VA creators doing independent work on creating and developing assistants.
The document is designed so that, reading it in order, it can provide a general impression of the VA management site and its elements, as well as to start work on the creation of a new VA. The instruction contains information about the VA management site and its various elements, explaining various terms encountered during the VA creation process, as well as providing a "step by step" description of the creation process itself. Users of the document are invited to study its content in sequence, as well as to use its descriptions and explanations in the process of creating and developing the VA.
The structure of the instructions is divided into four parts:
- "VA Basics" Chapter
- "VA Platform Overview" Chapter
- "VA Development Process" Chapter - general guidelines for developing the assistant
- "VA Management Site" Chapter - provides a sequential description of the VA management site interface, its views and other elements, main functions and their use.
Applicable and Reference Documents
Applicable Documents
ID | Title | Reference |
|---|---|---|
AD-40C | Space engineering / Software | ECSS-E-ST-40C |
Reference Documents
ID | Title | Reference |
|---|---|---|
Terms, Definitions and Abbreviated Terms
Term or Abbreviation | Explanation |
|---|---|
API | Software interface (Application Programming Interface). |
CSV | Comma-Separated File Format (Comma-Separated Values file; RFC 4180) |
Entity | A designation of any specific or abstract object that can be recognized in user messages: cities, numbers, addresses, and other names. |
Function | A range of operations that ensures the execution of a specific action or algorithm in order to resolve a task. |
Input | A user message to a virtual assistant that can be written in the form of a question, requirement or any other expression. |
IS | Information system. |
Output | A virtual assistant answer message for a user that can be displayed in the form of text, button, picture or in another way. |
JSON | (JavaScript Object Notation) data exchange format consisting of data-attribute pairs and arrays. |
Intent | The sense of the outcome of the user's message or what he wanted to ascertain. Anticipated, intended and achievable result. |
Transition | A set of conditions for switching from one state to another and so that the call can continue. In virtual assistant scenario view, transitions are designated with arrows that lead from the rectangle of one state to another, or which return to the starting position (self-loops). |
Scenario | A graphic display of the conversation flow; a plan how communication should progress and a depiction of the sequence of actions. |
State | A place in the dialogue, where an action is carried out: an answer is given, a question is asked, clarifying information is ascertained, a link is shown to other sources, or connection to an external service occurs. |
Topic | A place in the dialogue that can be accessed at any time during the conversation. The topic consists of the initial state of the topic, associated transitions, and sub-states. |
VA | A virtual assistant (in other words, a chatbot or a bot) is a computer program that maintains communication between a person and a computer in natural language, executes human orders, performs data acquisition and presentation. |
VA BASICS
A virtual assistant (VA) (also referred to as - a chatbot) is a computer program that creates a dialogue between a person and a computer, executing human orders and acquiring and presenting data.
VA is widely used in user support and customer service areas, reducing employee workloads and offering users answers to questions on any day of the week and at any time of day. When putting such technologies into companies, their customers are more efficient because the VA is more responsive than the person, while talking with many people can take place, so users can get the answer they need right away, don't need to wait long for an answer in e-mail, stay on the phone while the service professional will stop talking to another customer, or stand on the line at reference specialist.
VA can be trained to answer questions and perform various tasks. The most common uses for assistants are obtaining information and asking for services.
- Obtaining Information.
- Frequently Asked Questions. VA is especially suited to providing answers to questions that customer service professionals are frequently asked. Most likely, the answers to these questions have been prepared and are known in advance and are simply rewritten to customers in letters or mechanically agreed. A trained VA answers most questions asked by users, saving employees time and allowing them to tackle more difficult tasks.
- Information Search. To make it easier for users to find information, the VA can be used as an assistant on a website. It can greet a user, who has opened the site, ask what information he is searching for, and guide him to it.
- User Support. The VA successfully deals with uniform and mechanically-performed tasks - asking the user for data, obtaining information about customer bills, requests, orders, or billing dates, and performs other simple tasks, e.g. resetting passwords or updating contact information. By developing the VA as a customer service tool, the institution becomes more efficient, which in turn also benefits its employees, who don't have to perform monotonous activities.
- Receiving News. The latest news and events can be communicated directly to the user by the VA.
- Requesting Services.
- Requesting and Receiving Services. VA is a good assistant to the customer in searching for the services they require. The customer can find what he's look for faster, ascertain more detailed information and find out the relevant costs and prices. With VA support, the client can request and pay for the service faster.
- Reminders and Recommendations. The VA can provide customers with the information they require in the form of reminders and recommendations.
- Offering Services Proactively. By anticipating user needs in a timely manner, the VA can offer appropriate services.
In order for the VA to function successfully in businesses and organizations, research should be conducted into customer needs and it should be kept in mind that the assistant's capabilities are not endless, specifying clearly achievable goals. It is best to start with a small, narrow and limited goal, ascertained by studying users' needs and through discussion with customer service specialists, and then proceed slowly and carefully, augmenting the knowledge of the VA. The most efficient way how to serve customers well is for customer service specialists to collaborate in tandem with the assistant: VA does monotonous, technical and uniform jobs, while employees answer the most challenging questions that it can't.
The VA can be introduced in different businesses and in institutions in various sectors and trained to provide answers about relevant areas. In order to not get lost amidst the large volume of opportunities and information, and to successfully provide answers to customer-important issues, and henceforth in work to adhere to the positions originally postulated, before creating the VA, it is vital to define its purpose, which must be kept in mind throughout the VA creation process.
VA DEVELOPMENT PROCESS
The overall process of developing the VA includes four main processes:
- VA selection and initial analysis.
- VA development.
- VA acceptance testing and public roll out.
- Operation and maintenance of the VA.
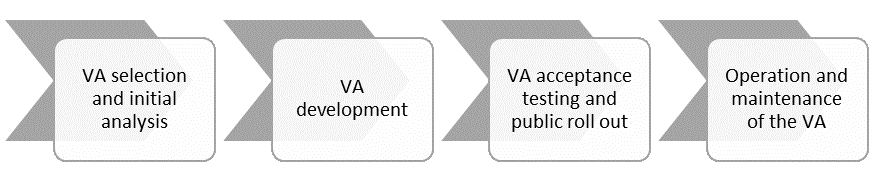
Figure 1. VA development overall process scheme
The following sections provide a description of the steps to be taken within each process with recommendations for their implementation.
VA Selection and Initial Analysis
VA Selection and Initial Analysis Process
The process of selection and initial analysis of the VA involves identifying the business's objectives and needs, defining the scope of the VA's operating scope, as well as obtaining access rights on the VA management site. Each of the VA's choices and initial analysis steps is described below.

Figure 2. VA selection, initial analysis process scheme
- VA Functionality Research.
To get an idea of VA development and placement capabilities, the company conducts a VA functionality study, including reading this document.
Under the auspices of the VA functionality study, research should be conducted into other companies' VA applications. Likewise, for experience exchange purposes, communication with any of the organizations or companies that have already introduced the VA could be useful. If it has any questions, the Authority may also contact MLSOVA administration. - VA Initial Analysis.
After, or parallel to the VA functionality study, an initial analysis of the VA should be carried out in order to identify the business's operating areas, where the introduction of the VA is most needed and where this can deliver the greatest benefits. As part of this step, the company should perform an analysis of its services, customer collation processes and needs. The precise methods to be used as part of this step should be identified individually for each company, taking into account the specifics of the services it provides.
Regardless of the chosen methods, the company should take the following steps:- Definition of the purpose of the VA;
- Determination of the areas of VA requirements;
- Identifying the resources and roles needed to implement the VA;
- Defining the VA's personality.
More information on each of the defined activities is provided in the following chapters.
- Obtaining Access Rights.
The company that wants to develop and deploy the VA on the VA management site contacts MLSOVA administration.
MLSOVA administration grants access rights on the basis of the application.
At the discretion of the VA, at the end of the process of initial analysis, the institution starts work on the development of the VA.
Purpose of the VA
Creating the VA starts with defining its purpose.
The aim of the VA names the specific area in which the assistant will work, which is just like a brief job description for a new employee. The objective should be clear and achievable. For example, in the case of an NGO, the VA's goal may be as follows: to introduce the organization and answer frequently asked questions.
In determining the target, it helps to have knowledge of your institution's customers or target audience and its needs.
The VA's objective influences the creation of its personality, scenario development and the language style used.
VA Requirement Areas
VA requirement areas are the most important VA functional requirement groups that determine what kind of VA the company wants to develop. These are the requirements to be defined first when planning the development of the VA. Table (Table 1. VA Requirement Areas) summarizes the areas of requirements as well as examples of implementing requirements.
Table 1. VA Requirement Areas
Scope of requirements | Example |
|---|---|
VA usage type |
|
VA Knowledge Contents |
|
VA communication channels |
|
VA communication language |
|
User authentication |
|
VA answer scenarios in cases where the VA cannot to answer the user's questions |
|
Oversight of VA conversations and intervening in conversations |
|
Required Resources and Roles
Information Resources. One of the most common purposes of the VA is to make work easier for customer service professionals by relieving them of the burden of monotonous questions by entrusting the task of answering them to a virtual assistant.
In addition, it is planned to provide users with another type of reference information, it is important to be aware that VA training is available only with existing specific data: the most frequent customer questions, prepared answers and solutions.
It is possible to use data that is already ready if the institution has such collated information resources. Data can also be created anew. Data on existing information systems can be accessed through the API.
Human Resources. Human resources are as important as information resources.
In creating the VA, it is necessary to plan the team of people that will maintain the assistant on a daily basis, and what the organization of this job will be. It should be kept in mind that the VA needs to be trained and, if the institution wants to create it, at least one workload should be planned for this purpose.
In order for a successful VA to be created, continuous management support is vital. The assistant needs a patron.
The size of the VA team (Table 2. VA team) depends on the scope of the VA. If the assistant is expected to learn a large amount of information and provide customers with different functions, the team will be large and could even employ several trainers and customer service professionals.
Table 2. VA team
Role | Description |
|---|---|
Implementation Manager |
|
Trainer |
|
IT specialist |
|
Customer Service Professional |
|
Marketing Specialist |
|
All VA team roles can be combined and an assistant can also be created by one person. Likewise, in some cases, if the volume of data that the VA needs to acquire is particularly large or specific, the work can be segmented and assistants can be recruited from the side - e.g. the required assistant texts are prepared by other employees who may not be familiar with the creation of the VA, but in this scenario the trainer inserts this information.
Ethics, Data Protection
The VA is used for communication with persons who may be identified; conversations are recorded, stored and analyzed, whereby users' personal data is processed. Therefore, the VA controller (the entity or body that creates and uses the VA) must comply with General Data Protection Regulation 2016/679. According to the Regulation, it is the personal data controller, who controls VA data and determines its purpose. Data processing is carried out with the goal of improving the service, ensuring proper communication with the user and providing the user with the services he requests.
The activities to be carried out by the VA controller in order to ensure the data processing requirements laid down in the Regulation are also dependent on the chosen scenario.
In the simplest case, if the user is not identified in a conversation with the VA, the data to be analyzed after the conversation may be considered to be anonymized and therefore no longer considered as personal data.
In the event that the user is identified and, for example, is provided with customized information as part of the service, the Regulation's requirements regarding the of storage duration of the data to be analyzed, requesting and deletion of information, etc. must be fulfilled. In these cases, the VA controller should certainly engage a data protection specialist from an organization or business.
Every VA controller must adhere to the general principles of data processing: personal data processing must be lawful, fair and transparent.
Article 5 of the General Data Protection Regulation stipulates the principle of the lawfulness and fairness of data processing. In other words, there must be a legal basis for any processing of personal data. In processing personal data, the controller shall ensure that personal data is treated fairly. In essence, the principle of integrity incorporates all the other principles, because they are all aimed at ensuring that the controller treats the data subject fairly, i.e. the person whose data is being processed.
The legal grounds for data processing can be the consent of the user itself, the controller's legal duty or contractual relations with the customer. The legal grounds could also be the controller's legitimate interest, but only in cases where this has no major impact on persons whose data are being processed.
In processing data, the VA controller should adhere to the following general principles:
- Transparency.
The principle of transparency is essentially the requirement that all information and communication related to personal data processing is readily available to the data subject in clear and simple language, bearing in mind the maturity of the data subject and other characteristics, so that the person whose data is being processed can understand who is collecting his data, to what extent and for what the data is being processed, and how long it be stored, etc. - Purpose limitation.
This means that personal data is collected for a specific, clear and legitimate purpose. Its subsequent processing shall not be carried out in a manner incompatible with the relevant purpose. This principle precludes the collection and processing of data without any specific need or purpose. The data is not collected for the purpose that it "could be useful some day". - Data minimization.
Personal data shall only be processed in accordance with the intended purpose and in the scope necessary for this. This means fulfilling the legal objective set out above with the minimum necessary data to fulfill it. - Storage limitation.
Personal data shall be processed so as to allow identification of a person until such time as the purpose of processing the relevant person's data has been achieved. - Integrity and confidentiality.
Personal data shall be processed, ensuring corresponding security, including protection against unauthorized or unlawful processing, accidental loss, destruction or damage, using appropriate technical or organizational measures. - Report accountability.
The principle of report accountability obliges the controller to clearly show how it complies with data protection principles.
Practical tips for VA controllers
Each VA needs a privacy policy. The link to the privacy policy should be shown to the VA user immediately together with the initial introductory text.
The privacy policy should describe the following information in detail:
- who the data controller is;
- how to contact it in the event of questions;
- the purpose for which this data is being processed;
- who can access conversation data;
- whether the VA's conversation data is transferred to another processor;
- how long the data is stored.
The VA controller also requires an internal data processing policy. This policy is intended for those employees, who are directly involved in the development of the VA. This policy should describe internal data processing procedures. Where conversation data is stored, how user conversation data is processed, etc.
The VA controller should define which company employees are entitled to access conversation records. These employees should be specially trained in basic personal data protection principles and should be reminded about confidentiality which is most likely already covered by the employment contract of employees.
When planning VA conversation scenarios, it is necessary to data processing principles in mind. The principle of data minimization must be adhered to. The virtual assistant does not have to ask the user for any personal information that is not directly required for the purpose of the conversation, e.g. his home address, personal identity code, bank account number, etc.
When taking part in a conversation, the VA should not under any circumstances ask the user for sensitive information, such as data regarding personal health, race or ethnicity, political beliefs, religious or philosophical beliefs, etc.
The user should also realize that in cases where the VA is integrated into social networks like Facebook, the user has agreed to Facebook's privacy policy, which stipulates that all of his personal data is stored on Facebook and passed onto other data processors at Facebook's discretion.
VA development
VA development process
The development process of the VA includes a sequence of actions to be implemented to develop the VA. Each step in the VA development process is described below.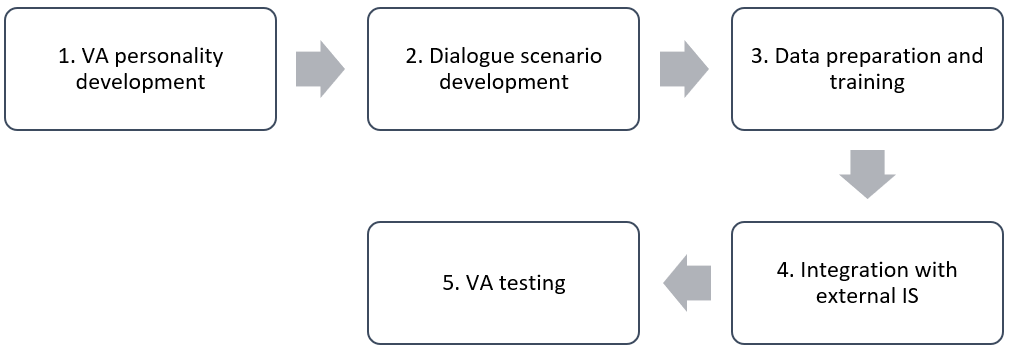
Figure 3. VA development process scheme
- VA personality development.
One of the first steps in the VA's development process is the development of the VA's personality. Although this step can be carried out parallel to other development steps, it should be implemented at the earliest opportunity, because the decisions to be taken in the implementation of this step have an impact on the other development steps (e.g. the selection of the VA's gender and speech style, which has a bearing on the process of preparing dialogue scenarios and answers). As part of this step, the institution must define the visual image of the VA (gender, age, appearance), character, language, speech style and tone, and visual appearance characteristics. The VA's personality must be consistent with its purpose of use, the organization's public image and communication standards, and the channels on which the VA will be available. More detailed information is available in Chapter "VA personality, ethics and language style". - Dialogue scenario development.
The preparation and development of dialogue scenarios is one of the most important stages of the development of the VA, because any dialogue between the user and the VA takes place according to a set scenario. In creating the VA, these potential conversation scenarios should be described by specifying the topics that the assistant will talk about, what actions will be taken and when. More detailed information about creating VA dialogue scenarios is provided in Chapters "Dialogue scenarios" to "Topics". - Data preparation and training.
During the preparation and training phase, parallel to drawing up a scenario, the site will collect and produce all the data required to run the VA. The data should be prepared carefully in accordance with the company or institution's chosen VA personality model and speech style. VA answers are prepared during this phase, and VA training or teaching is conducting, implementing planned VA operating scenarios. More detailed information is provided in Chapters "Questions and Answers" to "Preparation of VA training data". - Integration with external IS.
The VA knowledge can also be expanded by connecting external information resources, i.e. information that is maintained and restored to external IS. As part of this step, an interface is developed to ensure data exchange, as well as defined locations in VA action scenarios where the VA will use information from external IS. More detailed information is provided in Chapter "Integration with external information systems". - VA testing.
In this step, the VA's internal testing is conducted, verifying that the assistant's performance is compatible with the set goals and the company's requirements. If necessary, the company (and the developer, if one has been engaged) will augment the dialogue scenarios and data.
VA personality, ethics and language style
When creating the VA, time should be devoted to creating the assistant's personality. If the VA's personality and character are properly developed, users will not be able to project imagined characteristics and inappropriate associations that don't match the brand. Knowledge of the VA's personality also helps VA coaches to devise conversation scenarios and the assistant's cleverness.
The VA's personality is closely linked to the understanding of the company's customers and the assistant's anticipated target audience. The more precise the company's customer profile is, the greater the likelihood of creating the most appropriate VA image for this target audience.
The VA's personality must match the purpose of its use, the company's public image and communication standards and the channels on which the assistant will be available.
The main elements that make up the VA's personality are described below.
- Visual image, including gender, age, appearance and style.
In general, the image must be designed in line with brand or campaign style guidelines. The VA is part of the brand.
The range of VA image types is extensive. The VA may appear to be a simple brand element without a distinct visual personality, in which case it is not defined by either gender or age. It can also be an abstract image with a marked robot personality. The VA can also be presented as a human person - caricatured or illustrated (flat, spatial, isometric, etc.). - Character.
To acquire personality traits, some of the characteristics that an assistant needs to have are defined. The expression of these characteristics is directly manifested in the speech style used by the VA, including in the dialogue scenario, conducting a conversation.
It is generally accepted that politeness ("please", "thank you" and other linguistic constructions that prompt the use to speak in a reserved manner) and honesty are integral VA character traits. Both of these characteristic traits adhere to the VA's ethical principles. Honesty includes the acknowledgement of limitations and giving true answers. (For example, a user asks: "Am I talking to a real person?" The assistant admits without being misleading: "I am a virtual assistant.") Ethical principles also provide for data transparency: the user is provided with information about the knowledge at the disposal of the VA and is provided with an explanation of the rules on how personal data is processed, if such is obtained during a conversation. - Language, speech style and tone.
In creating the VA, you define the language in which the VA will answer users – whether this will only be in English or where the assistant will also answer in a foreign language.
More detailed consideration should also be given to the language tools that will also be used to address the user and how formal or informal the language style will be ("you" informally, "you" formally, emoticons, terms, abbreviations, etc.). The choice of language features is influenced by both the VA's defined nature and image and the target audience that the assistant is expected to have to address. - Various (variable) image attributes - hair, eyes, clothing, background.
If the chosen VA image permits minor visual changes, various elements tend to be envisaged that amend and augment the image so that the assistant "stays in tune" with the institution's overall communication with clients and the current situation (e.g in winter, the assistant is shown wearing a scarf, while in summer flowers are seen in the background; Figure 4. Variable Attributes of the Image).
Figure 4. Variable Attributes of the Image
The scheme that is the basis for the definition of the VA's personality consists of a sequential description of the seven features mentioned below (Figure 5. VA personality definition example):
- purpose;
- character;
- gender, age, name;
- visual image;
- language;
- speech style and tone;
- communication channels.
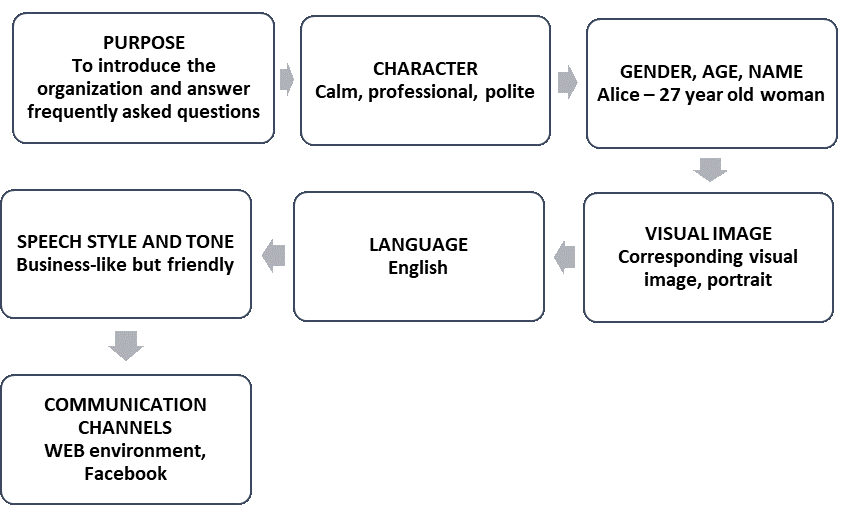
Figure 5. VA personality definition example
Dialogue scenarios
The VA is a computer program intended to facilitate a conversation between a person and a computer. This conversation is called a dialogue. The word "dialogue" is to be perceived in the broadest sense, because besides asking elementary questions and providing answers to the user, the VA can also perform various commands — display images, open other websites, read to the user, e.g. his billing information, connect to an external service, and perform other activities that its creator has envisaged.
The dialogue between the user and the VA takes place according to a specific scenario. Just as when communicating with people on a daily basis, the dialogue scenario, or the anticipated course of the conversation, can be both more strictly limited or less inhibited. When, for example, we call the support section of a service, employees conduct the call by asking pre-prepared questions and progressing through a pre-defined conversation scenario to get specific answers from us on which the next question in the dialogue depends. Such service support sections usually have a whole set of scenarios, because different dialogue scenarios have been prepared for the different problems to be resolved.
Even an everyday conversation at the store cash desk takes place according to a specific scenario: "Do you have a discount card?"; "Would you like to buy our special offer today?"; "Do you need a bag?". After every question asked by the cashier, depending on the customer's answer, the next question is asked (if there is no discount card, it is offered for sale) or the require action is taken (if the customer wants a bag, it is handed out and added to the bill). These examples demonstrate that the dialogue scenario is clearly defined and pre-prepared, but in all probability the dialogue will become much less inhibited and more unpredictable if an old friend or acquaintance enters the conversation: "Do you have a discount card?"; "Oh, it's hard to recognize you! How are you?"; "Will you give me your phone number?", etc.
Nevertheless, in creating the VA, the course of the conversation — it is either very specific, or very free — must always be described. The VA creator should clearly specify which topics the assistant will discuss, what additional actions it will take and when, and how the conversation with the user will be conducted. Each VA action and the answer that the user will be shown to his questions, as well as potential questions and answers from the user himself, must also be clearly planned and envisaged by the VA creator. This description of the pre-planned user questions and corresponding answers from the VA is called a dialogue scenario.
The scenario describes the sequence of actions and the progress of the conversation: it is a specific plan that explains, step by step, how the dialogue will proceed.
Dialogue types - guided, free form, combined
According to the structure, three types of dialogue are distinguished: guided, free form and the combined dialogue.
Each type of dialogue is appropriate for a different speech situation. One of the simplest ways is the guided dialogue.
The guided dialogue gets its name because the conversation really is being guided by the VA. The assistant is the main driver of the conversation, and the user's ability to influence the conversation is negligible — it can only do so by selecting one of the answers on offer.
For example, the evaluation scenario for the new ice cream (Figure 6. Guided Dialogue) is designed as a guided dialogue. In the guided dialogue, the main conversation driver is the VA. Answer choices are given to the user, often including specific button names, and the course of the conversation has been developed in advance and clearly identified, and is therefore entirely predictable.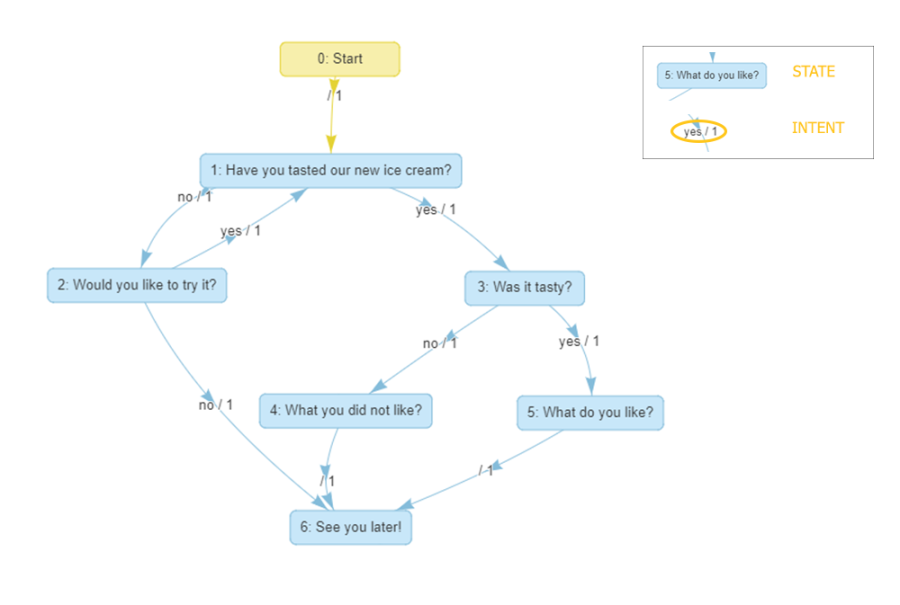
Figure 6. Guided Dialogue
The conversation (Figure 6. Guided Dialogue) is initiated by the VA, offering the user choices and passing through a scenario that has been finely thought-out in advance.
All rectangles contain an answer or question that should be displayed by the assistant to the user at the moment specified by the dialogue. These VA stopping points are called states. Each state has its own unique number, which appears before the name. The most important thing that transitions show, which connect one state to another, — is the user's choice or intent. This means that if the user, in answer to the user to the VA question "1: Have you tasted our new ice cream?" chooses the answer "No," the conversation will progress through the transition from state "1: Have you tasted our new ice cream?" to state "2: Would you like to try it?" The user's intent prompts the conversation to proceed and indicates which direction it will take.
Here are two examples of how a conversation with the user could proceed according to the aforementioned guided scenario (see Figures 7 and 8).
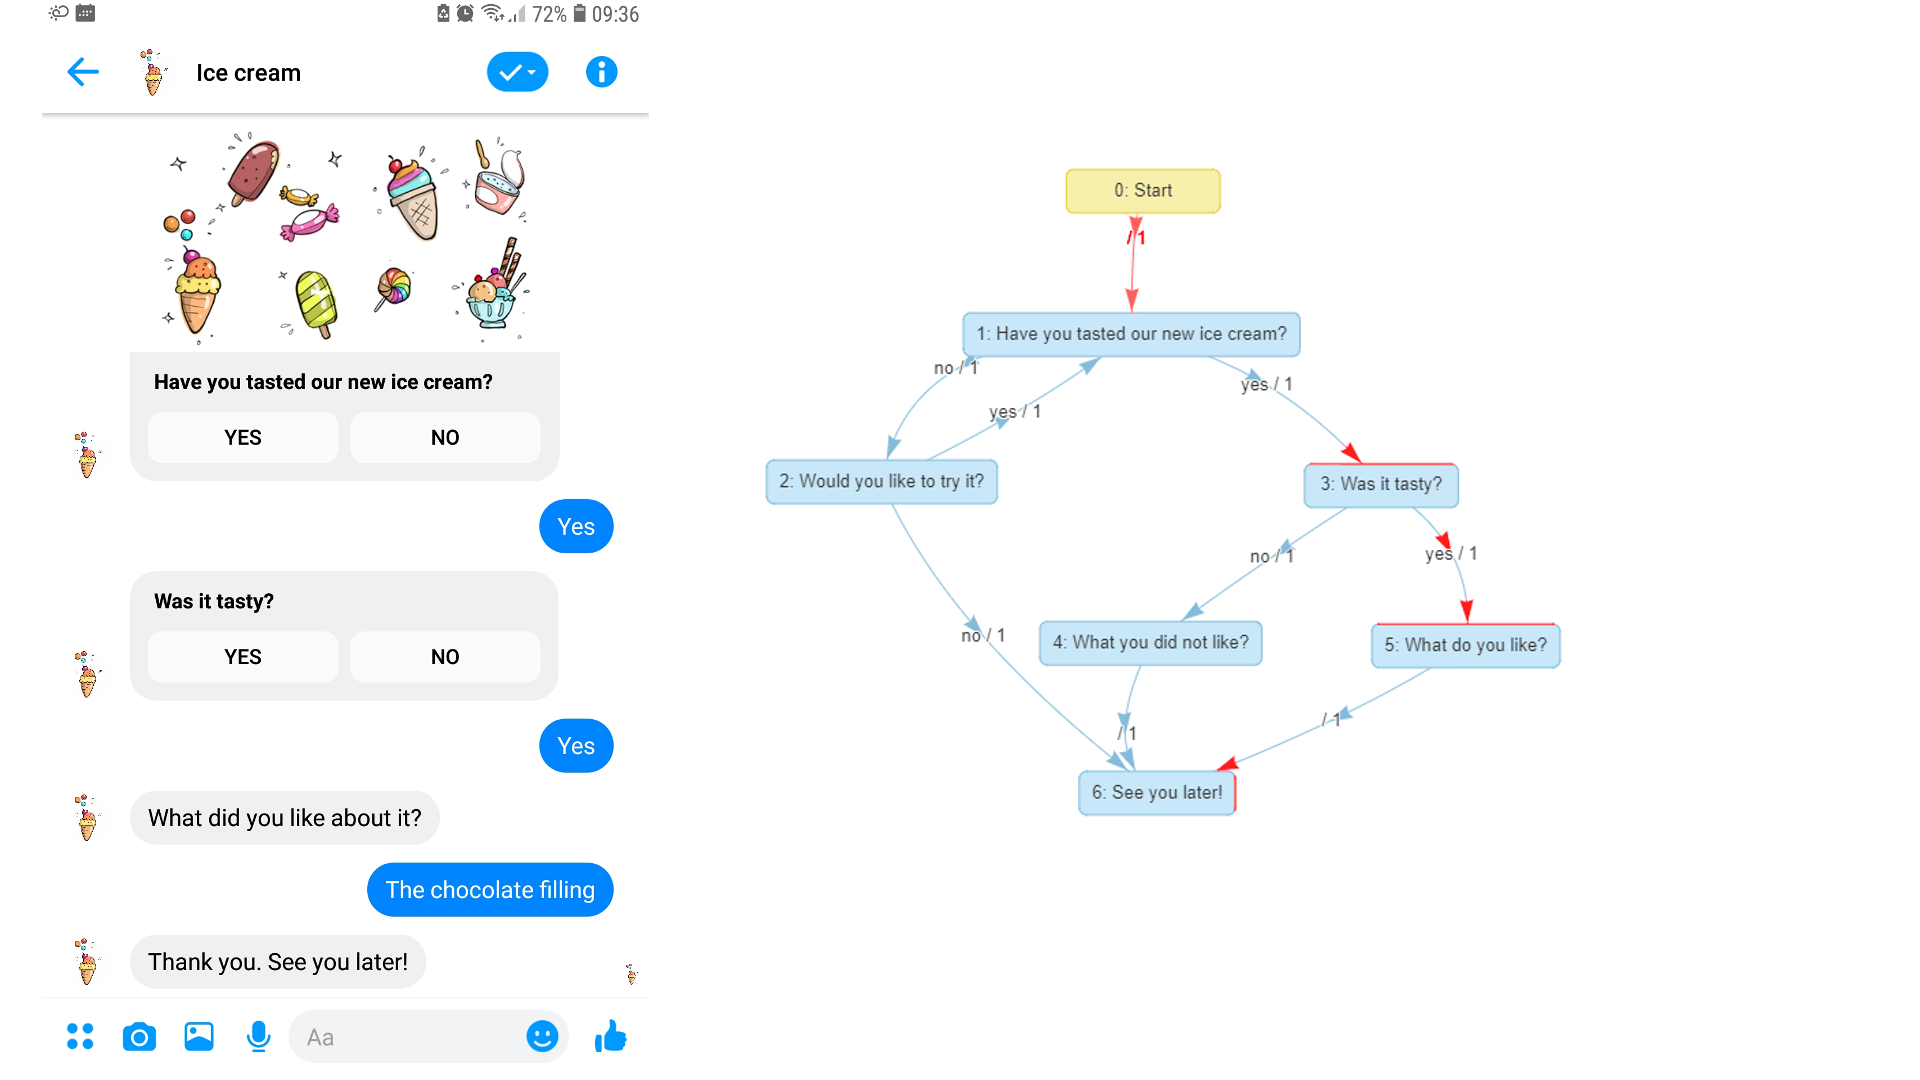
Figure 7. First example
In the first example (Figure 7. First example), when the assistant asks the question, the user clicks the "Yes" button from the answers available and with his choice makes the conversation to proceed from state "1: Have you tasted out new ice cream?" to the next VA question, "3: Was it tasty?" In turn, if the user also answers "Yes" to this question, the scenario will be followed by a transition, moving the conversation on to a state where the virtual assistant is prompted to ask supplementary question "5: "What do you like?" The user can offer his opinion, and the scenario will conclude with the VA expressing its gratitude and saying goodbye (6).
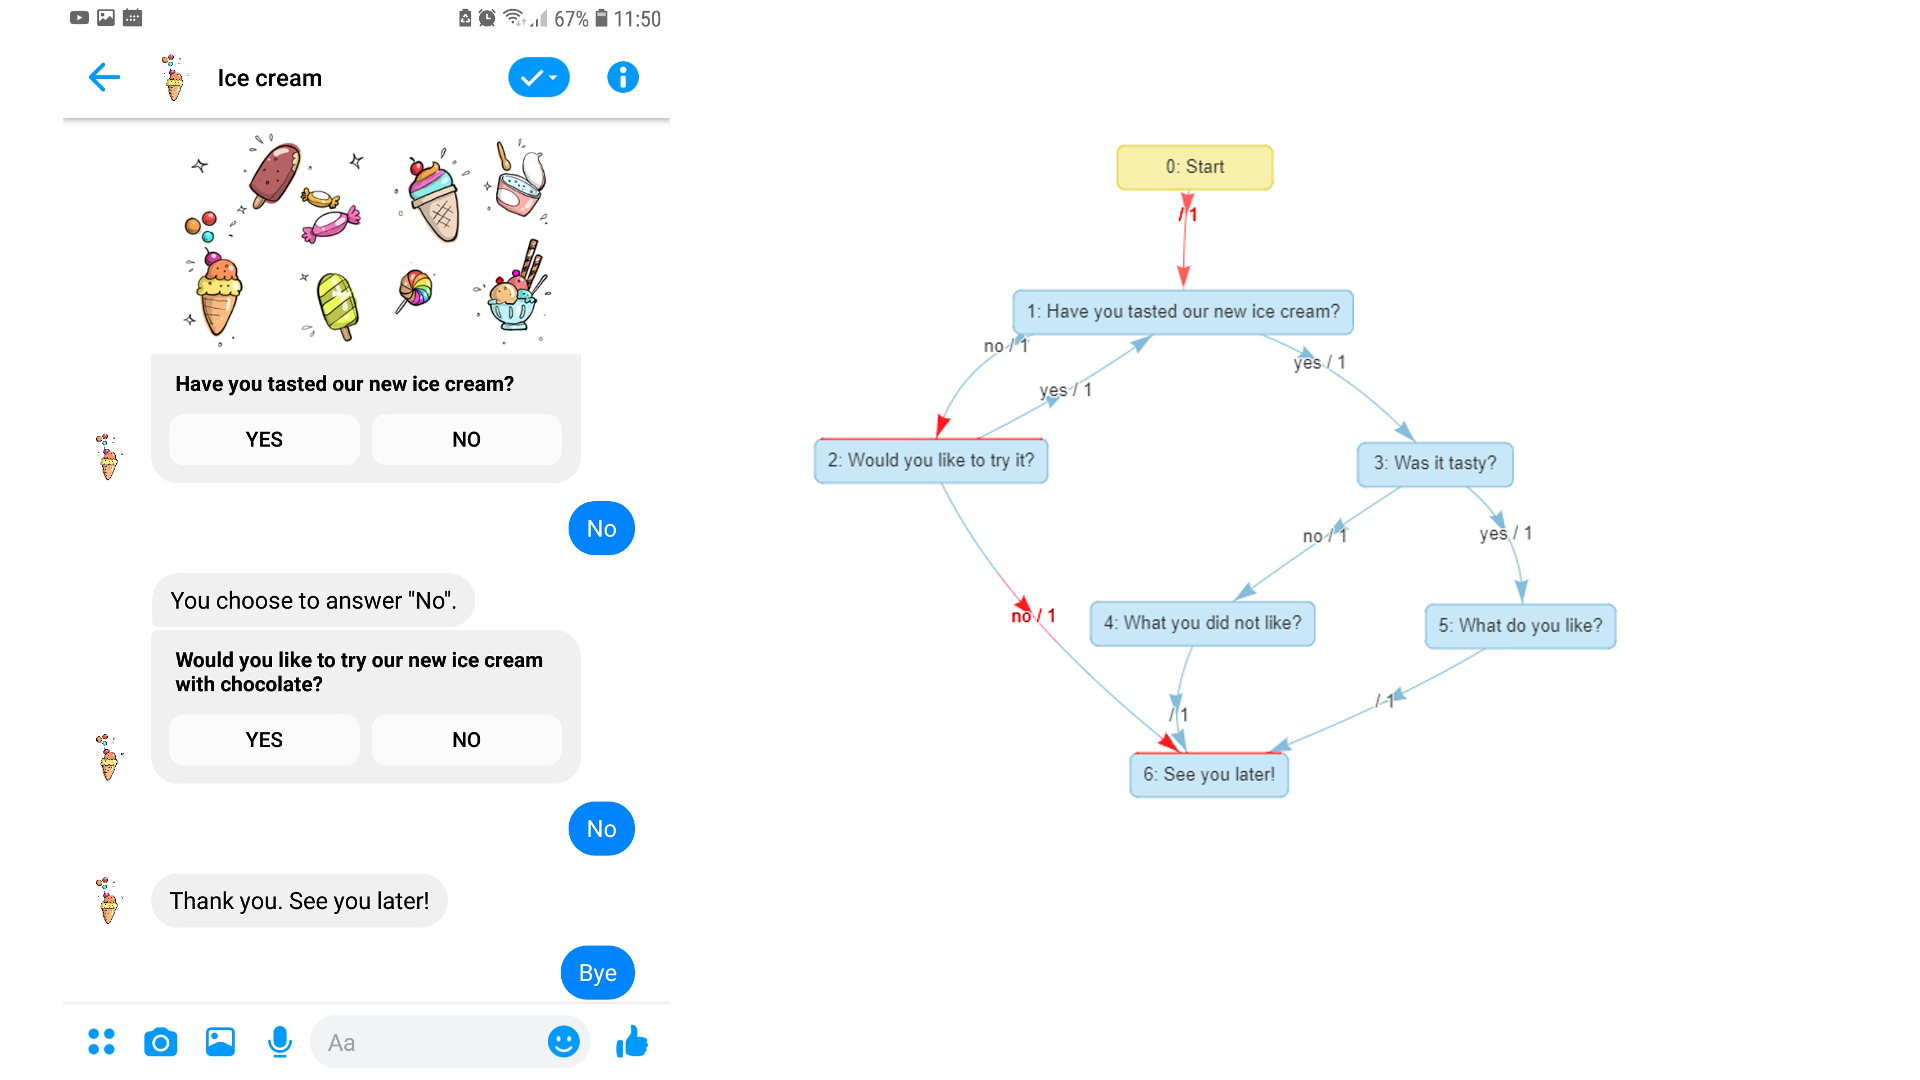
Figure 8. Second example
In the second example, the user addressed has not yet tasted the new ice cream, and answers accordingly. If the user answers "No" to the VA's question, the scenario indicates activating the transition that leads to state "2: Would you like to try it?" In this state, the VA asks the user whether he would like to taste the ice cream, but in this case the user declines and once again answers "No", thus reaching the end of the dialogue.
In both examples it is clear that in the guided dialogue, the user does not have much room to influence the conversation – it proceeds in a strictly set order. This type of dialogue is usually used when the VA is required to find out some information or to conduct a survey or evaluation.
The guided dialogue is used to allow the user to choose one of the conversation topics that the VA knows, especially at the start of the conversation, as well as when the VA cannot straight away provide an appropriate, clear and simple answer; clarifying questions can help to obtain the specific information missing and offer a sufficiently short and concise answer.
However, a user may have some freedom of expression in a conversation with the VA. The user does not have to click either of the choice buttons, but can instead type his own text in free form with the appropriate intent. VA will understand this because it works with a special artificial intelligence solution called the intent detector. Each time a user records a text, the intent detector analyzes it and determines its intent. The ice cream conversation considered above in which a user does not click the buttons offered by the VA but records his answer options, looks like this:
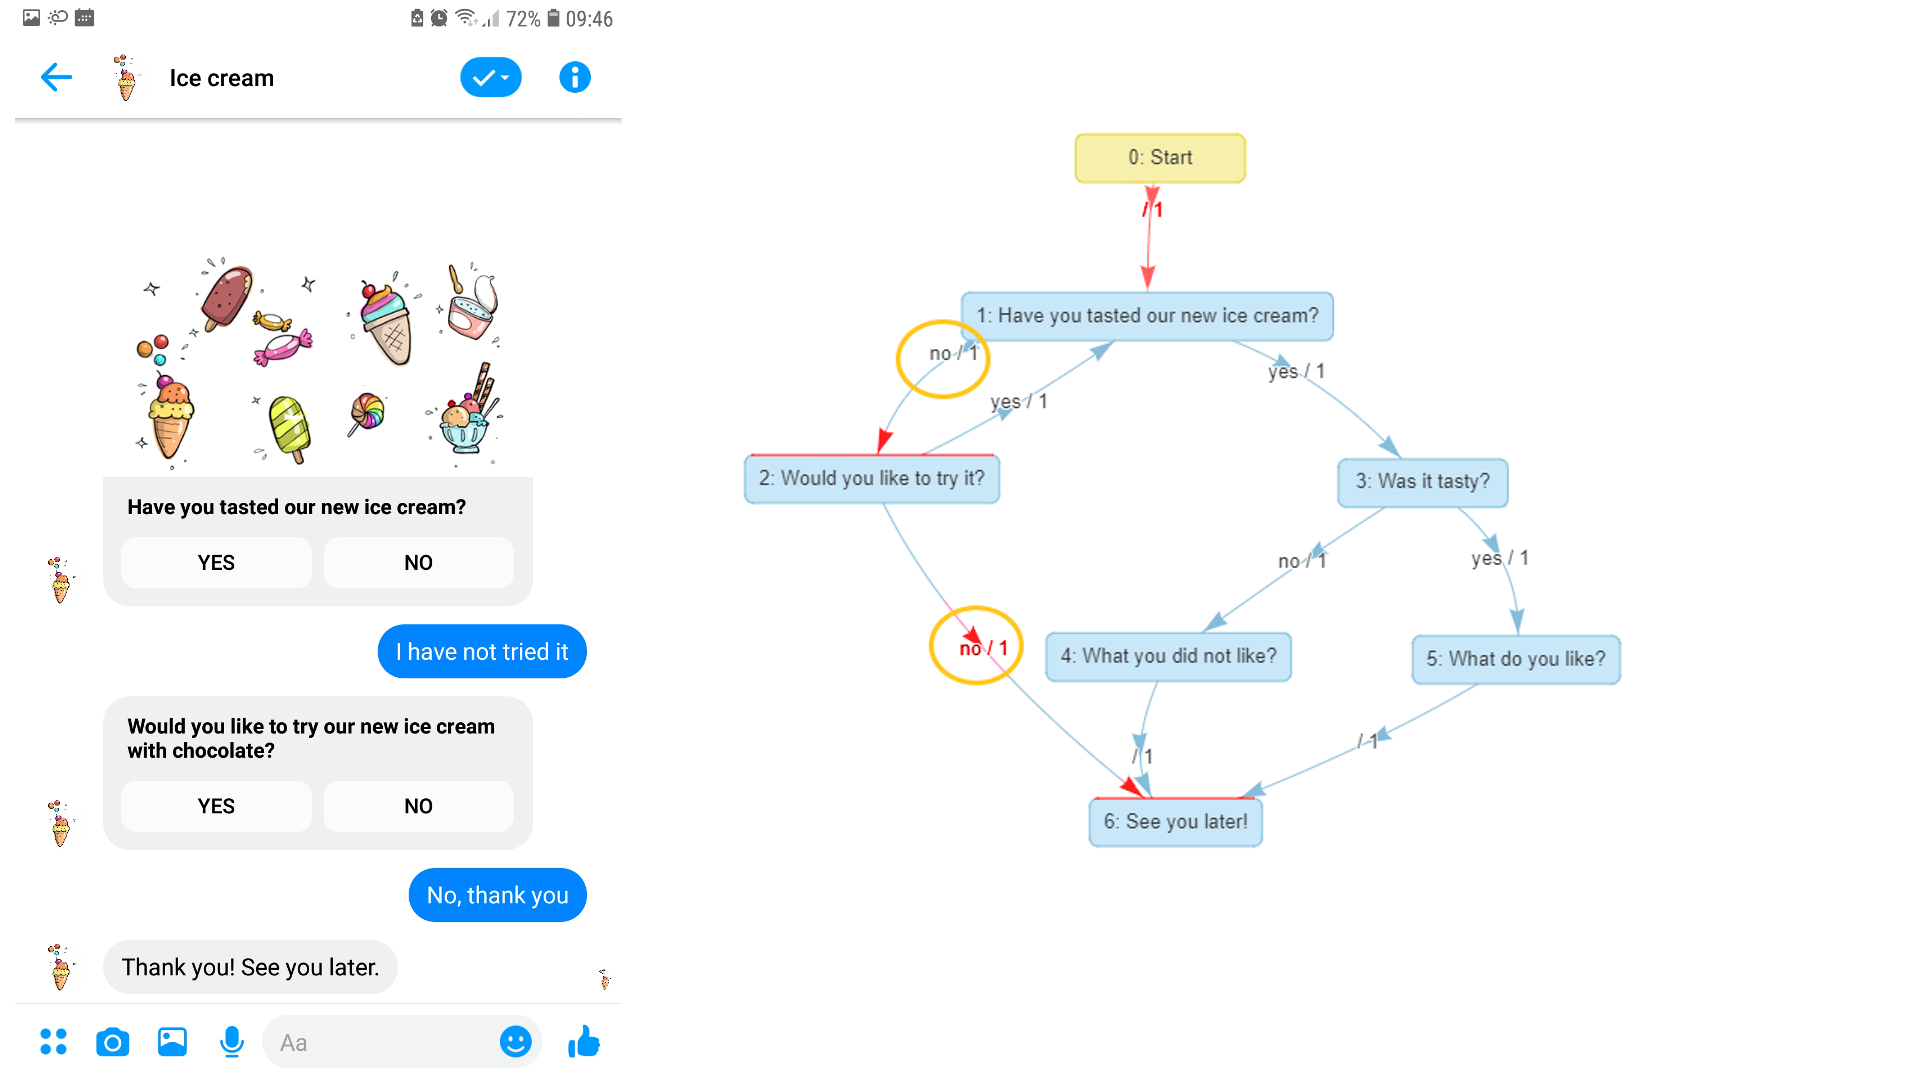
Figure 9. Third example
When the VA has asked the user whether he has tasted the ice cream (Figure 9. Third example) and has offered choice buttons, the user does not click any of the buttons, but answers the assistant with his own text, "I have not tried it". At this point, the intent detector goes to work, which, in analyzing the text and comparing it to others in its knowledge, concludes that the intent of the user's text is "No." So the conversation goes from state "1: Have you tasted our new ice cream?" to state "2: Would you like to try it?" In this state, the VA offers the user the chance to taste the ice cream. The user once again declines, moreover not by choosing the button, but in his words, "No, thank you" Detection of the intent of this text takes place once again and ascertains that the intent of this text is "No". The conversation arrives at the final state of saying goodbye (6).
In order for the user to further influence the conversation and change its subject, more freedom must be introduced in the guided dialogue. Freedom in the dialogue is ensured by topics. They act as input points that allow you to access the information you need at any time. A free form dialogue does not entail a specific sequence of questions and answers. Each VA action depends on the input of the user. The user is the active conversation leader and mover, because with each subsequent input it determines which topic the assistant should provide an answer about.
If we are introducing topics in the guided dialogue we have already discussed, it becomes a combined dialogue (Figure 10. Guided Dialogue with Topics).
The combined dialogue is a combination of a guided dialogue and a free dialogue. The user can be guided by a pre-arranged conversation plan, prompting him to click on a button, but it is possible to deviate from the conversation provided for in the scenario at any moment by asking for other information in free form, which is not thematically related to the VA's guided dialogue, or by accessing the required state of the guided dialogue.
The combination dialogue type is the most flexible and useful, because it allows different information to be processed with different techniques, giving the user the chance to have a successful experience in conversation with the VA.
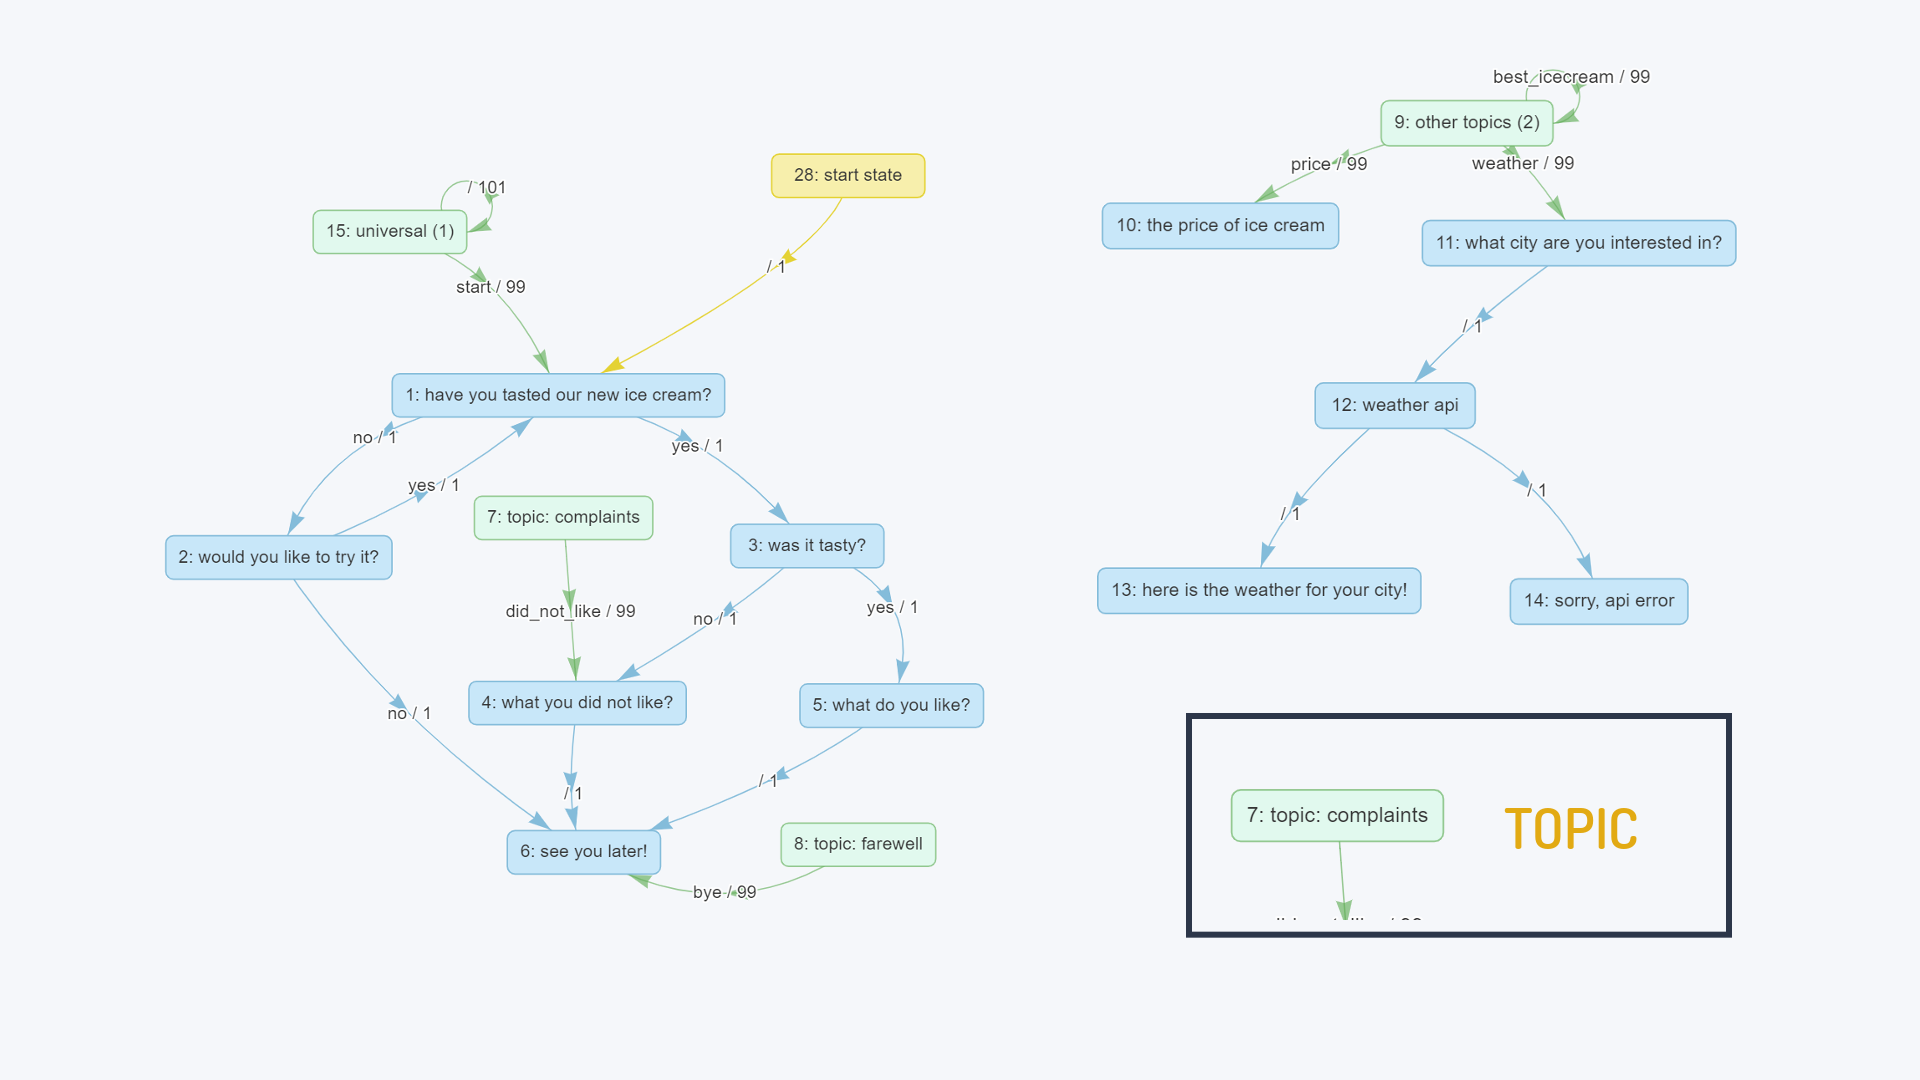
Figure 10. Guided Dialogue with Topics
The topic scenario is marked with green ovals (Figure 10. Guided Dialogue with Topics). Each topic has its own unique number. If the scenario along the blue states of the guided dialogue is always moving forward, it can jump into topics at any time from any point. Completely separate from the guided dialogue is a topic, which collates information about the price of ice cream ("9: other topics"). In turn, the guided dialogue may not go through the entire sequence, but instead jump straight into state 10 via topic 9 if the user records text whose intent corresponds to state 10. However, if the user says goodbye, the final answer of the guided dialogue in state 6 can be accessed immediately via topic 8.
In Figure 11, one can see how the progress of the conversation is taken over by the user without continuing the dialogue guided by the VA.
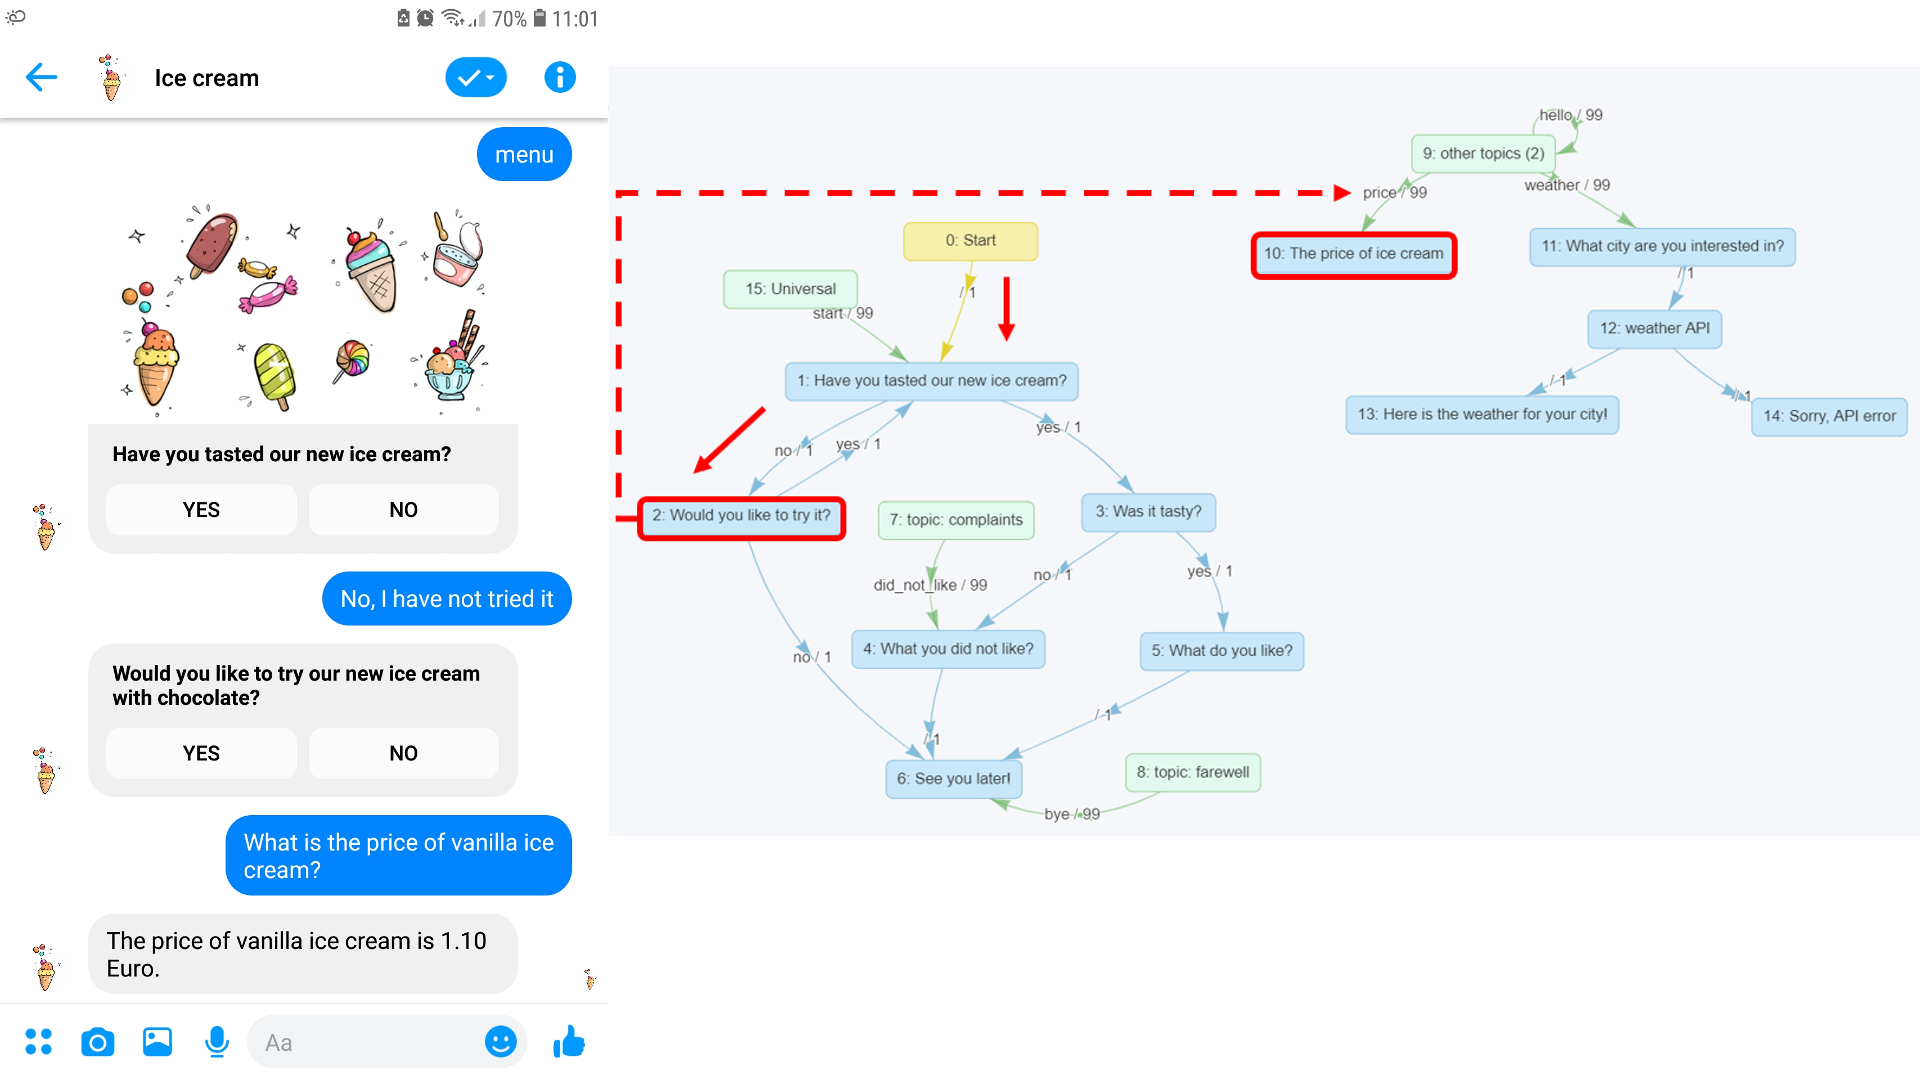
Figure 11. Fourth example
The VA starts the conversation. The user responds with the intent "No", prompting the conversation to switch to state "2: Would you like to try it?" VA asks the question specified in the relevant state and offers answer options, but the user does not answer any of the answers required, but instead asks a completely different question: "What is the price of vanilla ice cream?" The intent detector states that this intent corresponds to the intent of the ice-cream price, which in turn appears on the transition from topic "9: other topics" to state "10: the price of ice cream", and the conversation jumps to state 10 via topic 9, where the assistant is instructed to provide an answer about ice cream prices.
Topics allow you to enter the guided dialogue at the required state and continue the conversation by moving forward through the transitions and states as usual (see the fifth and sixth examples in Figures 12 and 13).
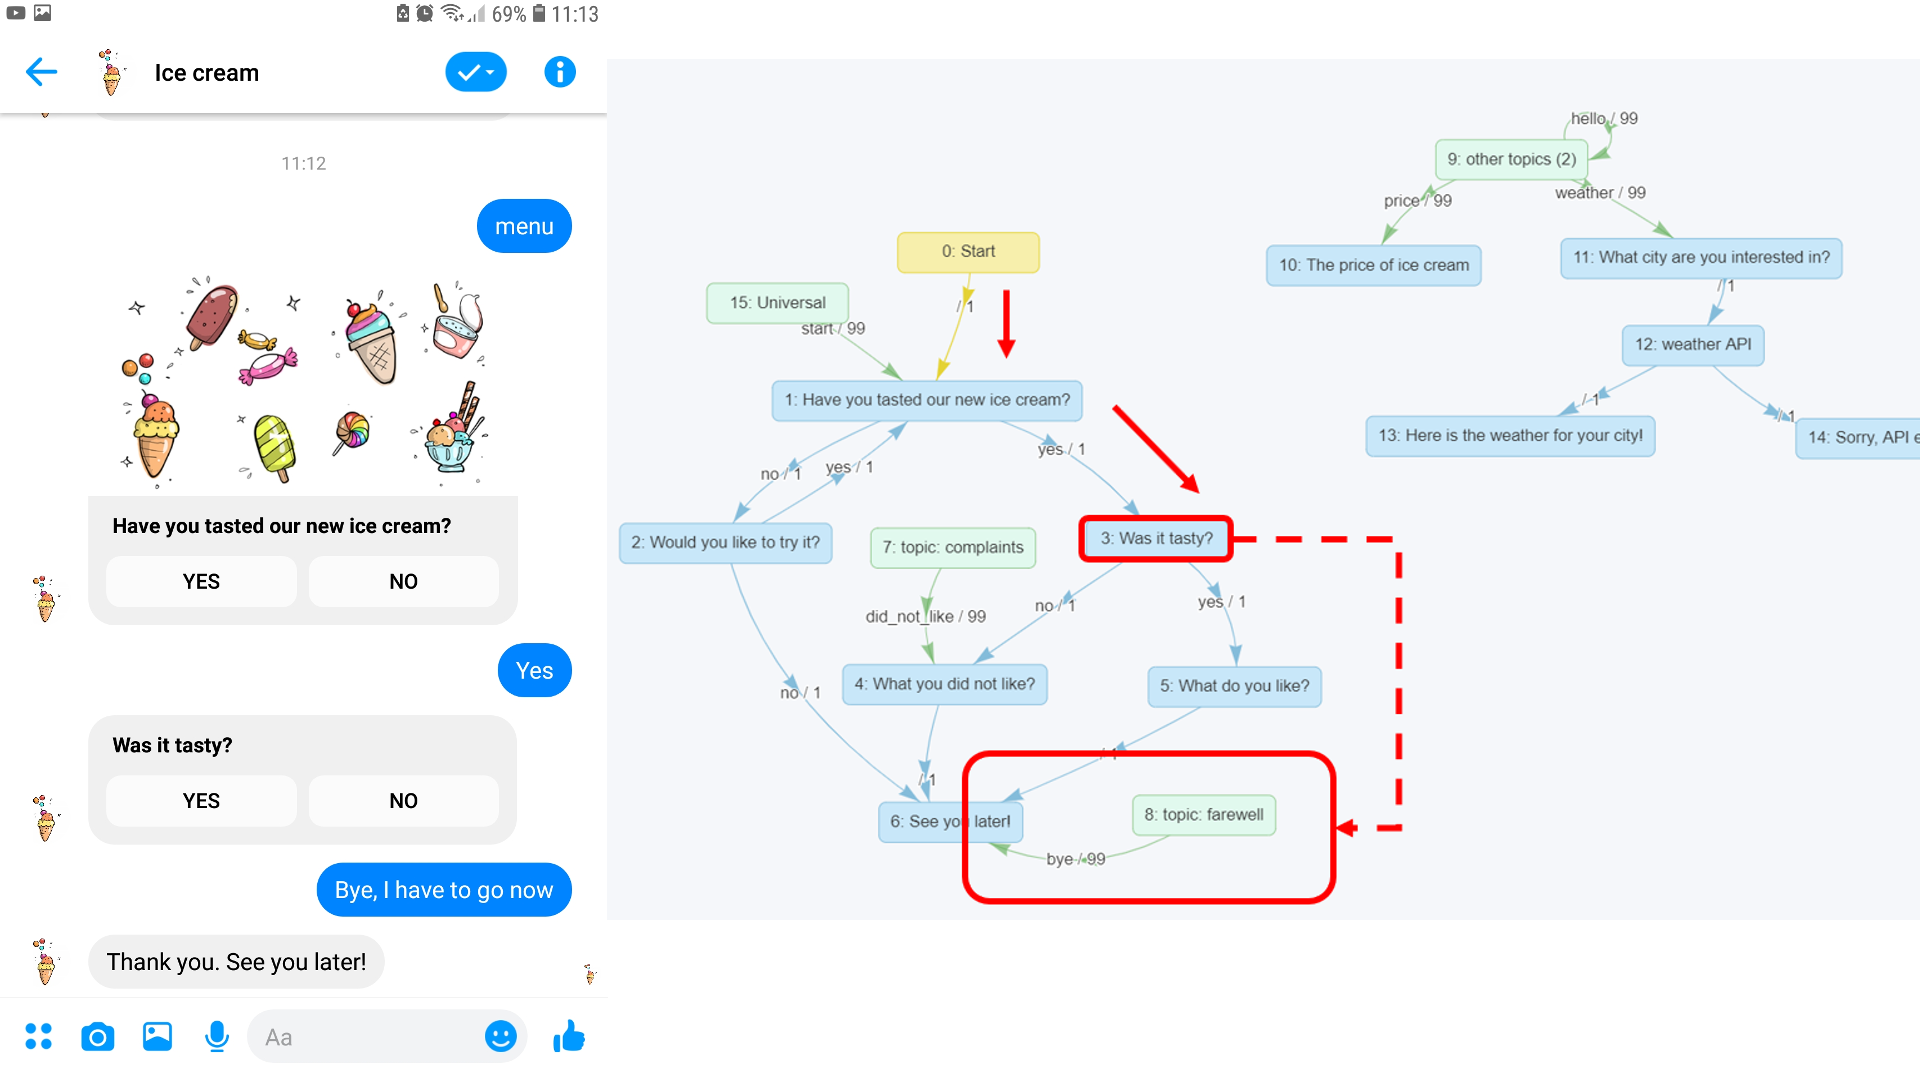
Figure 12. Fifth example
For example, in Figure 12 the VA asks the user if he has tasted the new ice cream. The user responds that he has done so, prompting the conversation to proceed to state "5: What do you like?" VA asks the user specified in the state and offers answer choices, but the user no longer has time to continue the conversation and enters "Bye! I have to go now" The intent detector states that this user phrase has the intent of saying goodbye and is called "bye" and the conversation ends through topic 8 in state 6.
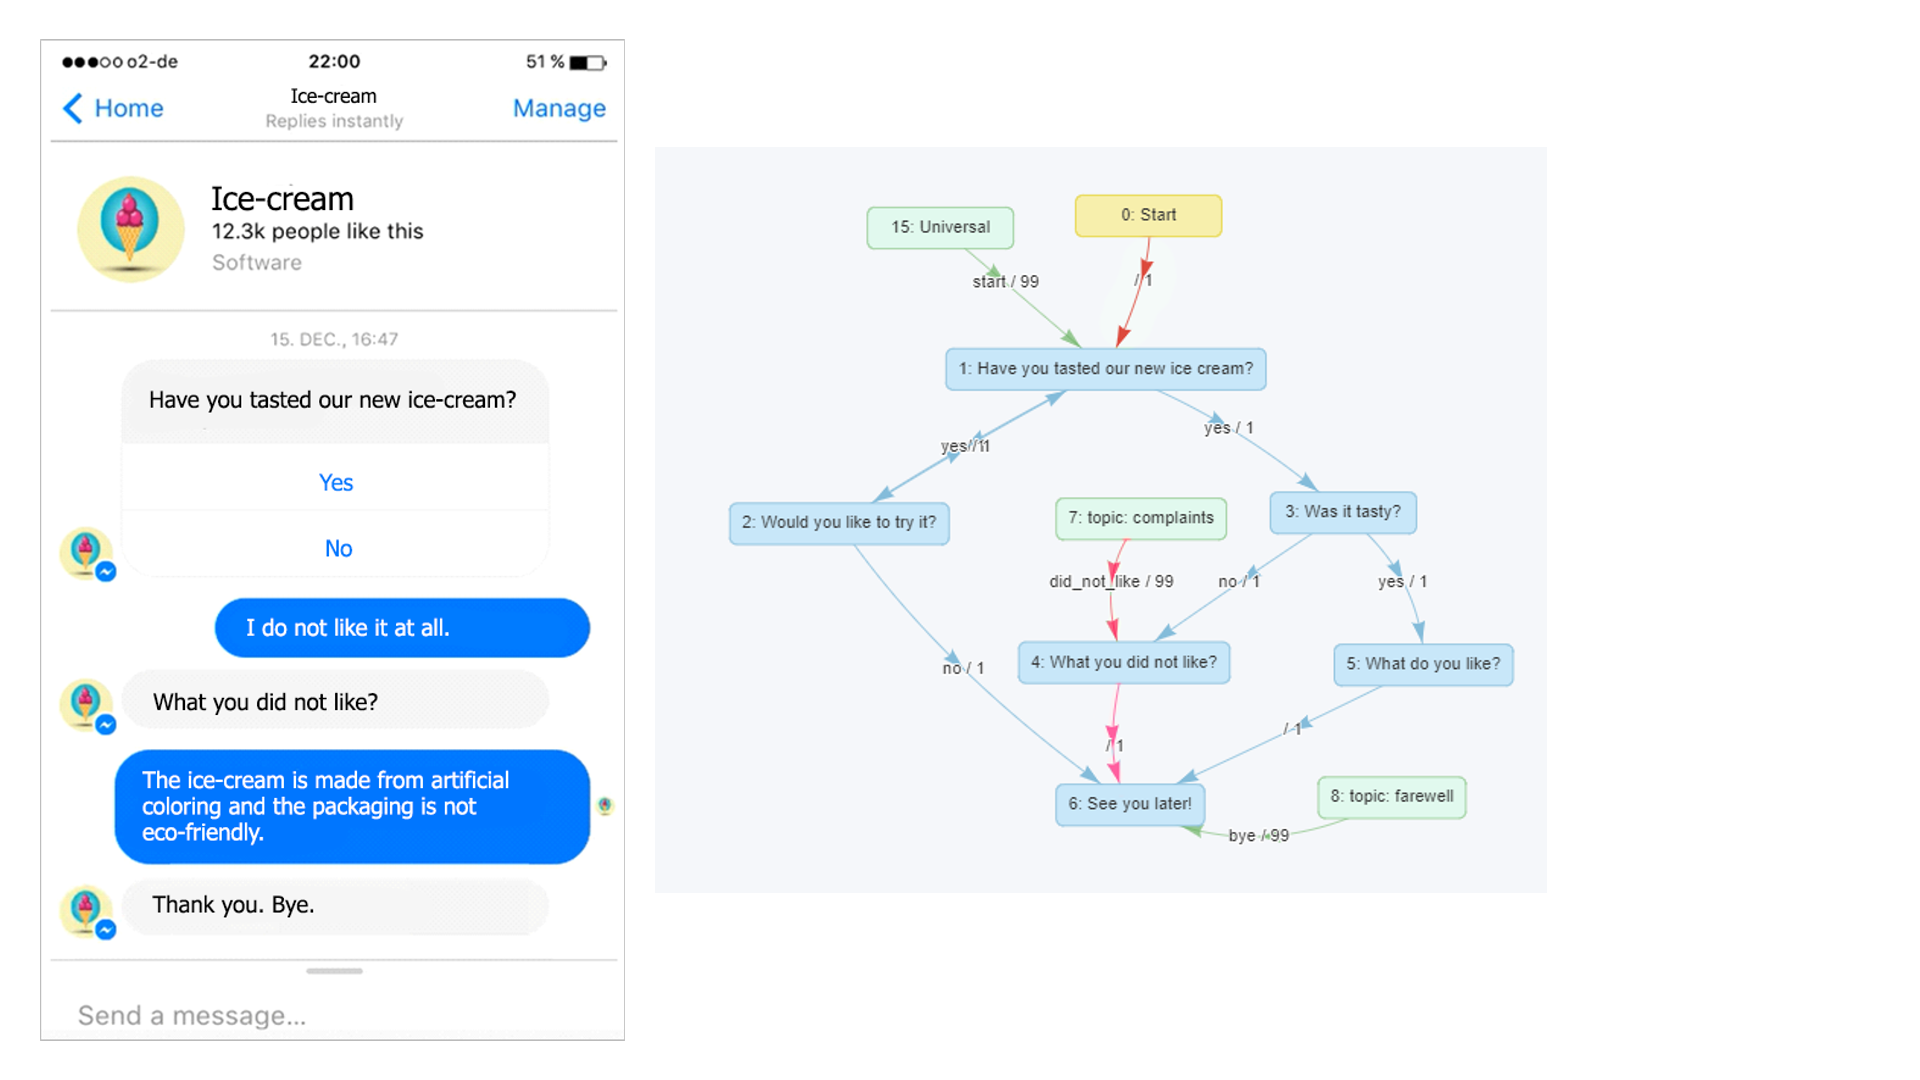
Figure 13. Sixth example
If the user expresses dissatisfaction at the start of the dialogue (Figure 13), the intent "did_not_like" is determined and the conversation is redirected from state "1: Have you tasted our new ice cream?" to topic "7: topic: complaints", through the transition of which you enter dialogue state "4: What you did not like?" In this state, the VA asks a question, and the user can explain the cause of his or her frustration in more detail.
Dialogue States, Transitions, Intents and Actions
Simply put, the VA dialogue is the transition from one state to another (Figure 14. States of dialogue with transitions).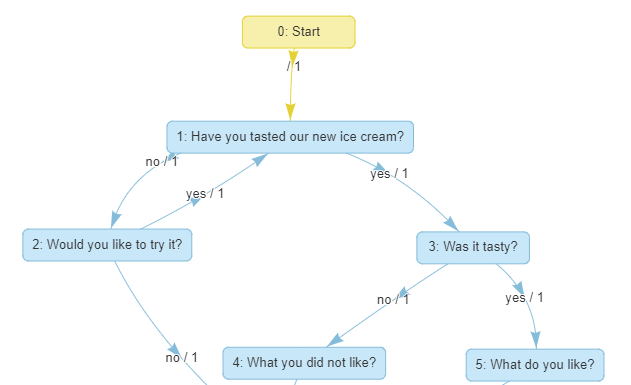
Figure 14. States of dialogue with transitions
The state describes how far the conversation has progressed. If the conversation is in the starting state – we know that nothing has happened yet, but when the conversation has reached a subsequent state, it is clear that the user has previously made some choices or expressed specific intents. The state shows what has already been covered by the conversation and what could occur from this point onwards, given what has already happened. For example, let's consider the example of ice cream. If the conversation is in state "5: "What do you like?" - we know that the user has greeted the VA, has tasted the ice cream and acknowledged that he likes it. All the aforementioned information is the current state or context of the conversation. Subsequently, by knowing this context, the VA can perform the next action, such as clarifying the user's opinion of the ice cream in more detail with the question "What do you like?"
From the previous examples regarding ice cream, one could see that the state (depicted as a blue rectangle) is connected with the VA's actions. The state is a place in the dialogue where an action takes place. As soon as the conversation is under way and its thread reaches a certain state, the VA responds. The VA's action is usually visible to the user in the form of an output. It may take the form of:
- giving the user an answer;
- asking an additional question;
- summoning an external function (integration with other systems, such as clarifying weather conditions, performing different calculations, retrieving information from an external system, etc.).
Information for the user can be displayed as plain text, a link, picture, audio file, video file, or choice button.
Ordinarily, when a conversation enters a state, the VA:
- performs an action,
- allows or requires the user to enter something,
- clarifies the intent of the user's input,
- depending on the intent, switches to another state.
In the dialogue scenario, transitions are displayed as arrows. A transition makes it possible to move from one state to another so that the conversation can continue. Usually, the transition includes various conditions so that the VA can find exactly which state it is supposed to proceed to.
The transition is usually very closely linked to input (the user's answers, questions and comments) and provides instructions to the assistant on how to respond to the specific message, i.e. which state, with appropriate actions and options, to choose as a continuation of the conversation.
A transition from one state to another shall take place if the transition condition is fulfilled.
One of the simplest, but most important and most commonly used conditions that help you understand the direction the conversation is going in is its intent. The intent is the sense of the outcome of the user's message or what he wants to ascertain. This is the user's planned or intended purpose to be attained. For example, the questions "What do they call you?" and "What's your name?" have one intent: to find out the name of the conversation partner.
The transition may indicate that the VA is progressing along it if the user's input expresses the specific intent (Figure 15. VA operation with a transition in which the intent is specified). In turn, in order for the VA to understand what the user is saying, an intent detector is used - this is an artificial intelligence solution, which analyzes each text recorded by the user and determines what its intent is.
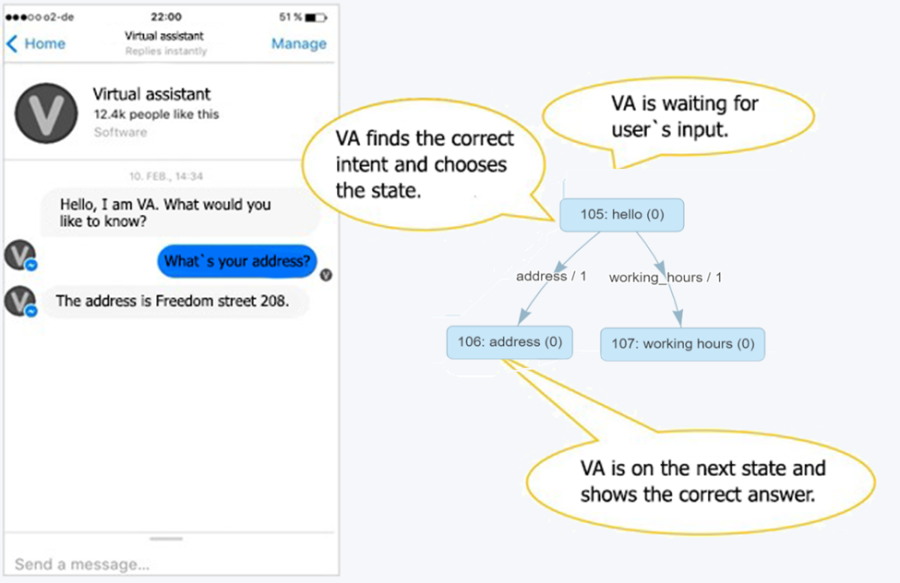
Figure 15. VA operation with a transition in which the intent is specified
The intent is not the only possible transition condition, transitions may also have other types of conditions. For example, transition conditions can depend on variable values. And there may also be transitions that have no conditions at all, i.e. the transition to the next state always takes place, without even giving the user a name. For example, from the starting position to the welcoming state, the transition usually does not have any conditions.
Actions may also be linked to the transition, i.e. as soon as the dialogue goes from one state to another, the VA can tell the user something. Thus, actions can take place both when the call reaches a certain state and when the conversation proceeds from one state to another. The way in which actions are executed during transitions and upon reaching a state is well illustrated by this example (Figure 16. Activities in Transitions and States). The green-colored actions are carried out when the transition takes place, the pink-colored ones are carried out when the dialogue reaches the relevant state.
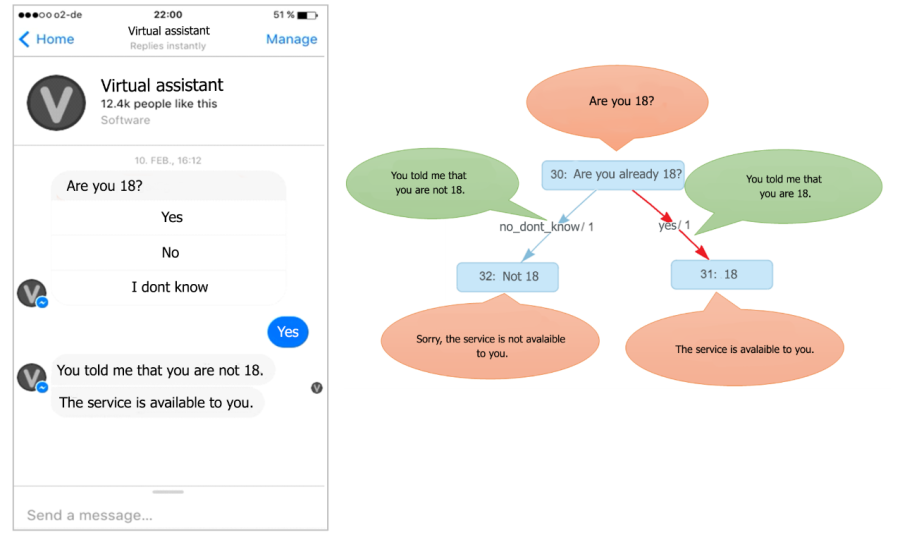
Figure 16. Activities in Transitions and States
Entities
Sometimes, in order to better understand what the user is saying, intent is insufficient and the assistant must be able to accurately recognize additional information. The VA's knowledge database, for example, has knowledge about 20 types of ice cream ("Eskimo", "Solo", etc.) and their prices. The user asks "How much does Eskimo ice cream cost?" In order to give a precise answer, the assistant must define both the intent (in this case the intent is "how much does it cost") and the precise name (in this case - "Eskimo") that the user mentioned. All additional elements of this type, names, precise numbers, and e-mail addresses, are referred to as entities.
An entity is a designation of any specific or abstract object that can be recognized in user messages: cities, numbers, addresses, dates and other names. Entities also possess a type. For example, the entities "London", "Riga", "Tallin" and "Vilnius", etc. are of the type "city".
When using entities, it is possible to indicate in the transition that the VA will only allow the conversation to proceed along the prescribed course if a city name appears in the user's input.
Entity values are often used when storing certain data, such as variable values, in the VA's memory. If, during the transition, the desired value is found in the user's input, it is stored in the VA's memory or context. In the VA's next state, this stored information will be used in providing the required answer. For example, if the VA is meant to address the user by name, it can ask the user its name in a particular state: "Let's get to know you!" "What's your name?" and use the memorized name during one of the following dialogue states: "Thanks for the information, John."
Topics
To ensure that any state can be accessed at any time during the conversation, a transition should be drawn up from each blue state to each one, but this would be opaque and time-consuming. However, the topic can be used to access the required subject from any place in the dialogue.
Topics function as a place in the dialogue that can be accessed at any time during the conversation. Each topic consists of the starting state of the green oval theme and its associated transitions and sub-states (topic limits marked in red; Figure 17. Topics in Scenario).
After input, when analyzing the text entered the user and which conditions defined in the scenario it corresponds to, only the blue transitions leading beyond the state that the VA is in at the time are checked. If none of these transitions is valid, all green topic transitions are checked, i.e. whether the conditions defined in them correspond to the user's input. Therefore, one could say that the green topics provide a free-form dialogue: the possibility of changing the subject at any point in the conversation.
Topics are used to combine issues under one theme (label (1), Figure 17. Topics in Scenario) and to access the required topics and states in the guided dialogue (label (2), Figure 17. Topics in Scenario). When the assistant has reached the last state of a guided dialogue (such as "services" or "address"), it is possible, after the user's input (e.g. "Hello!"), to return to one of the previous blue states ("74: hello") via the appropriate the green topic ("topic: hello") transition and to get an answer.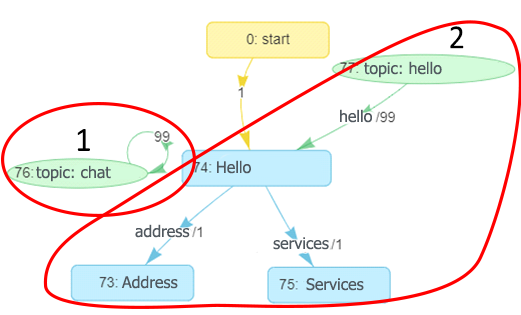
Figure 17. Topics in Scenario
Questions and Answers
In most cases, questions asked by users can be answered immediately and do not require drawing up a complicated scenario scheme to clarify additional information.
In order to save time and make the scenario as clear as possible, the questions in the scenario that can be answered immediately tend to be added to a topic with a self-loop that indicates both the intent of the user and the action of the VA (read more about adding questions and answers in Chapter "Virtual Assistant Replies") that would otherwise appear in a separate state (Figure 18. A topic with collated questions related to one subject).
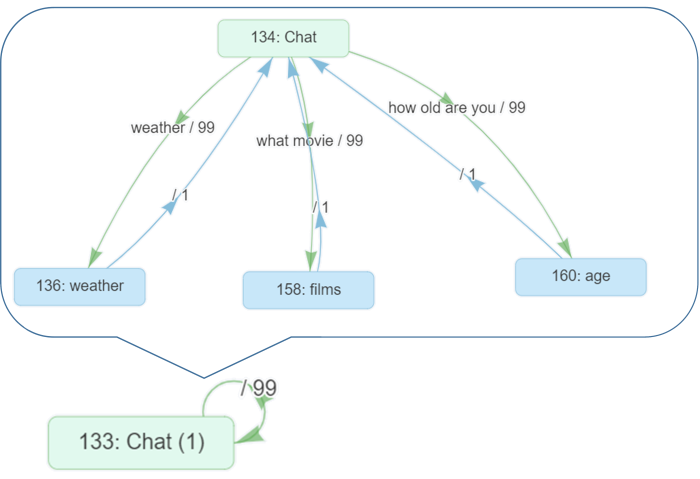
Figure 18. A topic with collated questions related to one subject
You can specify the transition of countless quantities under a single topic. This type of entry allows you to process information quickly and easily review it in the future.
Data tables
On occasion, the virtual assistant needs to clarify information and be prepared to provide a lot of answers to one question, depending on the additional information obtained. For example, the company could have fifteen structural units located in different places across the country. If the user asks for an address, the VA's knowledge must include fifteen answers. Similar data lists can be comprised of phone numbers, names of contact persons, e-mail addresses, and other items.
Data tables are a convenient way to write down and link the aforementioned lists of data in a scenario. Data tables collate uniform list information.
In data table view, each table has a name and two columns. The first column contains a parameter - the identifier of the specific value, while the second column contains the value itself (
Figure 19. Data table).
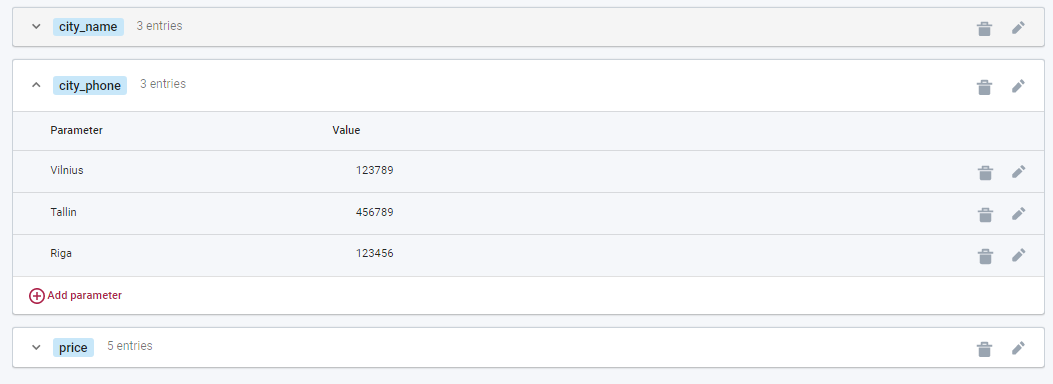
Figure 19. Data table
When creating a scenario in future, you can refer to the table with the necessary identifiers. For example, in a VA action, enter a text that specifies reading data from the table about the city that the VA has previously identified from the user's input and stored as a variable in the dialogue context. In the action, a specific phone number, for example in Riga, can be referred to with the following output: dt(city_phone,riga). Its transcript: "dt" - data table; "city_phone" - table name; "riga" - parameter.
Preparation of VA training data
VA training starts by separately drawing up a scheme or draft sketch for a scenario that indicates what type of user questions the VA will answer and what the order of questions and answers will be.
When this is clear, the data is carefully prepared. A scenario is drawn up on a site, at the same time recording all VA outputs or answers, collating and recording all intents and entities. The training process of an assistant inside a company is organized, taking into account both the amount of information to be processed and the number of employees available. If there is a larger VA creation group, job duties can be shared. One option is for one trainer to work at each branch of the scenario. Data preparation and scenario drafting can also be divided: some of the VA makers, who are specialists in a certain field and work with clients on a daily basis and are familiar with, and have maybe even already collated, clients' most frequently asked questions and the answers to them, can prepare text data, which could even be done outside the site. The assistant's trainers would then import the prepared questions into the site, concurrently drawing up a scenario and specifying the prepared values in the required place in the scenario.
An assistant can just as well be created by one person.
VA outputs or answers
Outputs are VA answer statements to the user that appear in text, buttons, pictures, and in other forms.
Any unit of text (output) that is intended to be released to the user on the screen during an action must be composed and recorded. In turn, each output that is added to the VA site, - be it a button title, or a link, or a text that asks a question, givens an answers or provides an explanation to the user has its own identifier (Figure 20. Outputs with identifiers). If the output is prepared on the site, an identifier will be assigned to it automatically in accordance with the information specified in the output.
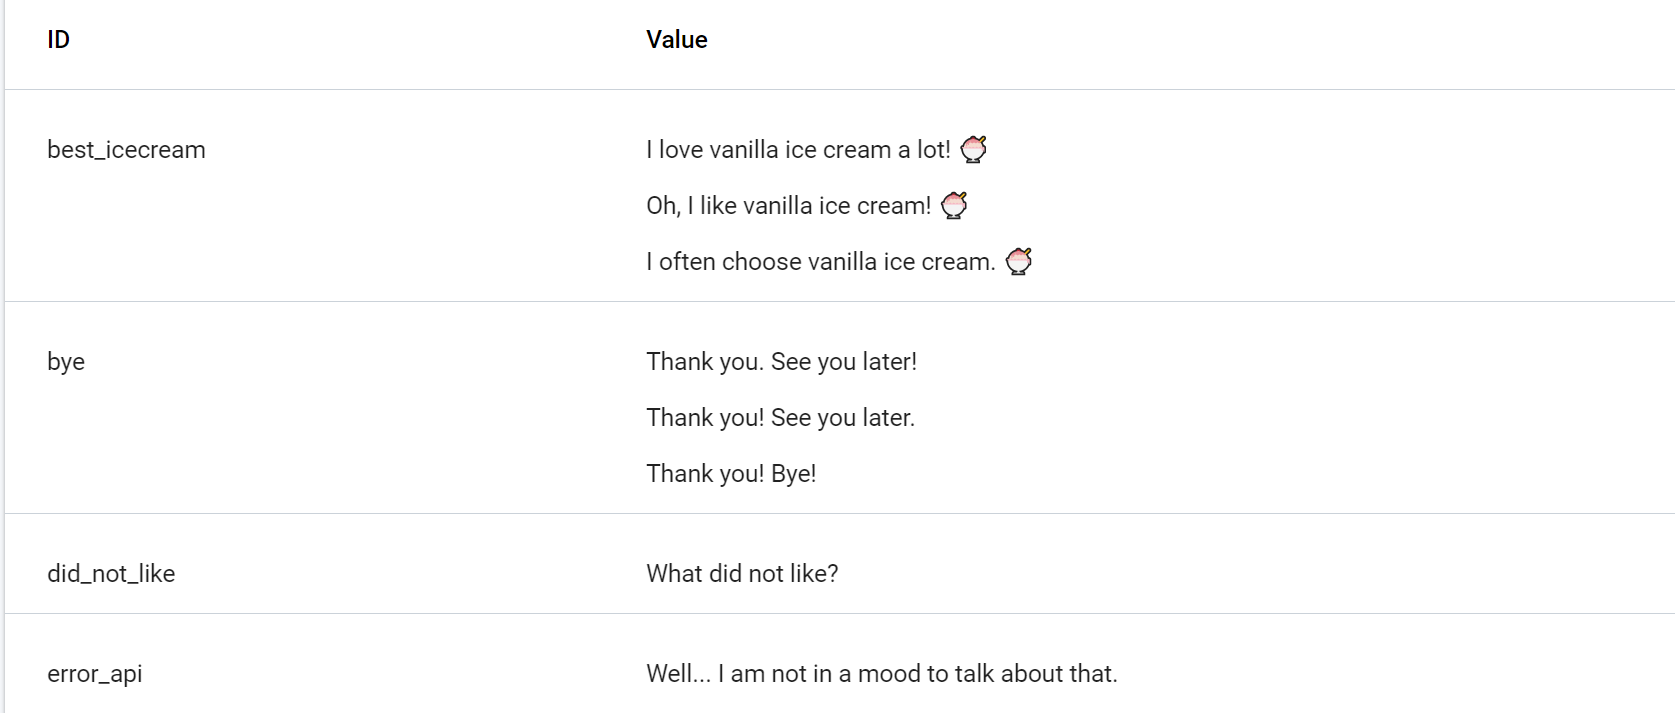
Figure 20. Outputs with identifiers
Outputs form an assistant's knowledge, create the VA's image and help the scenario proceed in the intended direction. Therefore, when writing them (especially texts asking questions, giving answers or providing explanations to the user), it is recommended that certain basic principles should be adhered to.
Monitoring should be conducted to ensure that VA outputs are:
- Clearly understandable. Clear, simple words and expressions must be used. Foreign names, abbreviations, complex and incomprehensible notes should be avoided.
- Targeted. The answers should lead the conversation to the desired culmination and provide a reminder of the purpose of the VA.
- Laconic. There is no room for verbosity, the answer must be a focused thought, and all words must be meaningful.
- With a complete thought. The answer must be provided in a full sentence and be understandable without context.
- Grammatically correct. Grammar must be adhered to and the chosen terminology and forms of greeting must be used consistently.
- Consistent with the bot's personality. Answers should be business-like and avoid excessive familiarity.
Since answer texts are one of the most important tools for creating the VA's image, when initially thinking about the assistant's personality, you should define what means of language will be used in communication: what form of speech will be used (singular, plural); how much friendliness, formality and reserve will be expressed by the VA's answer forms and constructions; whether emoticons will be used; and to what extent.
Cleverly conceived answers from the assistant can also advance the conversation, therefore it is worth keeping the VA's big scenario in mind and, composing specific output texts for narrow questions, if necessary, answers should include links or instructions that nudge the user towards other topics in the knowledge.
Training Data for Intent Detection
In order for the VA to be able to engage in a full-fledged conversation with the user and understand the user's input, a special artificial intelligence solution called the intent detector analyses each text recorded by the user and determines its intent.
However, the VA only understands what it has been taught. In order for an assistant to be ready to understand the meaning of what the user is saying and to find the correct answer, it must be taught in what form the user can communicate the intent in question. In life, there are hundreds of ways to ask the same thing. VA teaching takes place by providing lots of examples of an intent such as user statements.
To train the intent detector, at least 5 examples are needed for each intent. The more intent examples it is taught, the smarter the VA is and the more accurate the answers it gives.
When adding a new intent to the VA site, it must be assigned an identifier. The identifier represents the entire set of intent examples. One intent consists of an identifier and, as far as possible, as many intent examples as possible by which it can be expressed (Figure 21. Intent Identifier with Examples).
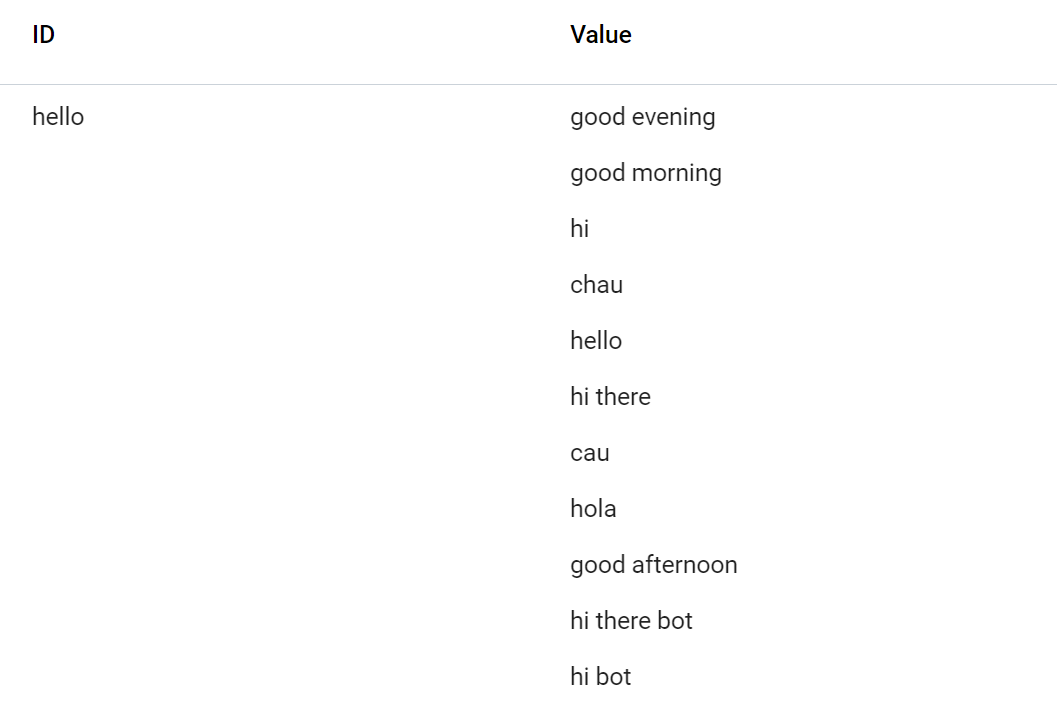
Figure 21. Intent Identifier with Examples
For intent examples without an identifier, an identifier is generated automatically from the first intent example, therefore it is recommended that you start writing a set of intent examples by first mentioning the intent in the most neutral, clearly understandable and laconic basic form, so that all the intent that each identifier represents can be easily reviewed and understood during the course of work.
If the institution already has collated customer questions at its disposal, they can be used to train the VA. If no such compilation is available or it is hard to retrieve, intent examples must be devised. In particular, a number of ways must be devised in which the user could ask a specific question. Intent examples must be freely and creatively composed and closely adapted to the language spoken everyday. It should be remembered that user questions tend to be
- extensive and verbose;
- with a sequence of words used colloquially;
- contain incomplete discernible content (incomplete sentences and phrases);
- with colloquial words and inaccurate names and terms.
When the intents are added to the VA site, the assistant learns to identify them. When analyzing the user's input, an indicator is determined as to how high the VA's confidence is that the text entered by the user corresponds to the intents in its knowledge information. If the confidence is sufficiently high, the intent with the highest confidence indicator is detected for the user's input (Figure 22. Detection of Intent). If all returned confidence indicators are too low, the intent is not detected at all.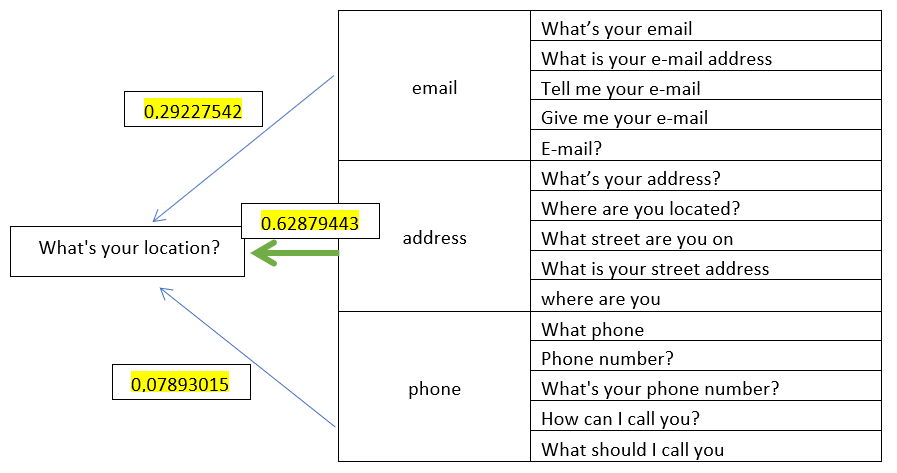
Figure 22. Detection of Intent
Training Data for Entity Detection
When analyzing user input, the VA can define not only the intent but also very specific designations - entities. In order to detect the entities and their values in users' texts, the assistant must be taught them in advance.
For each entity, its type must be entered and all values belonging to this type of entity must be listed. Since, in setting entities, exact text matches are sought in the user's inputs, when recording entity values, it is vital to either specify all forms in which the word being searched for could appear in the text or the non-inflectible part of the word (for example, in the case of the Latvian word "R?ga", this could be "R?g" because it does not change depending on the inflection) if it is unequivocal and does not match part of another word (Figure 23. Entity with identifier "city" and values).
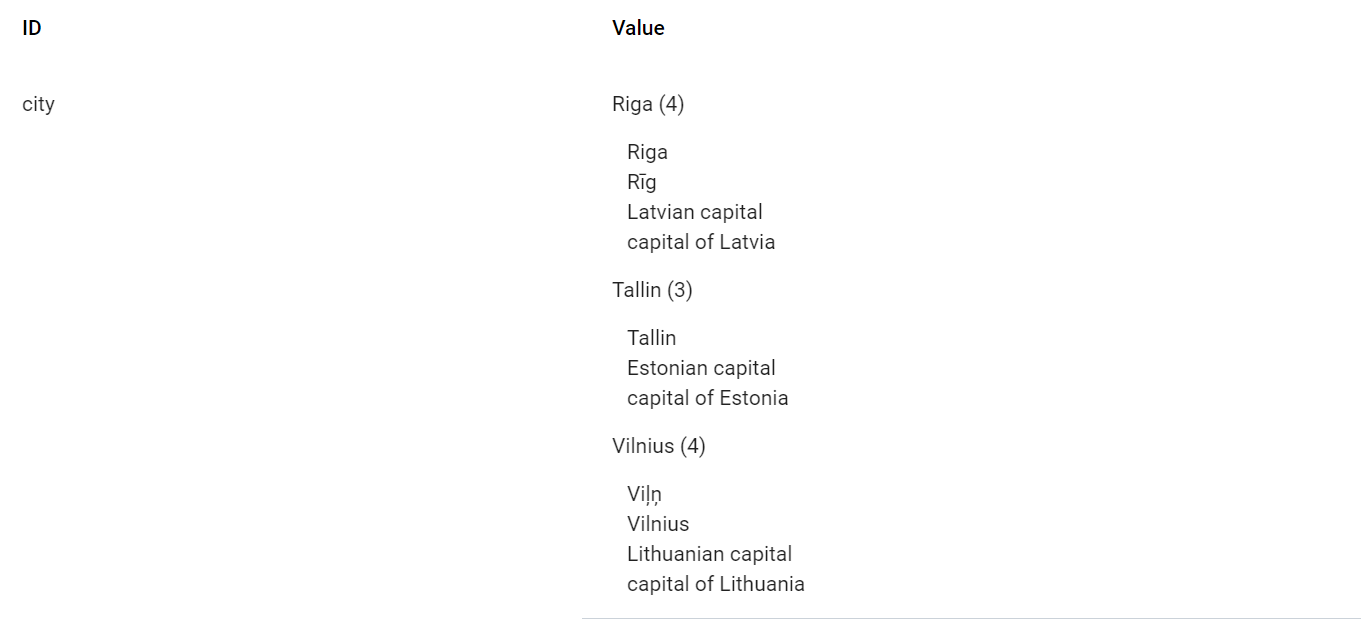
Figure 23. Entity with identifier "city" and values
In a scenario, entities and their values can also be used without intents, as well as in order to keep a variable value in context.
Integration with external information systems
The VA's knowledge information can be expanded by connecting external processes - software interfaces (APIs). When you connect to an API, you can read various information from an external resource - weather conditions, exchange rates, distances between cities, translating the required words, etc.
Websites offer both free access and paid APIs.
When the appropriate software interface is found, its parameters must be defined (in the "Activities" view) and the VA scenario should provide for, upon detecting a certain intent, the assistant answering with knowledge from an external service (API).
In this example (Figure 24), we see how the scenario includes connection to a software interface that provides the VA with knowledge of weather conditions.
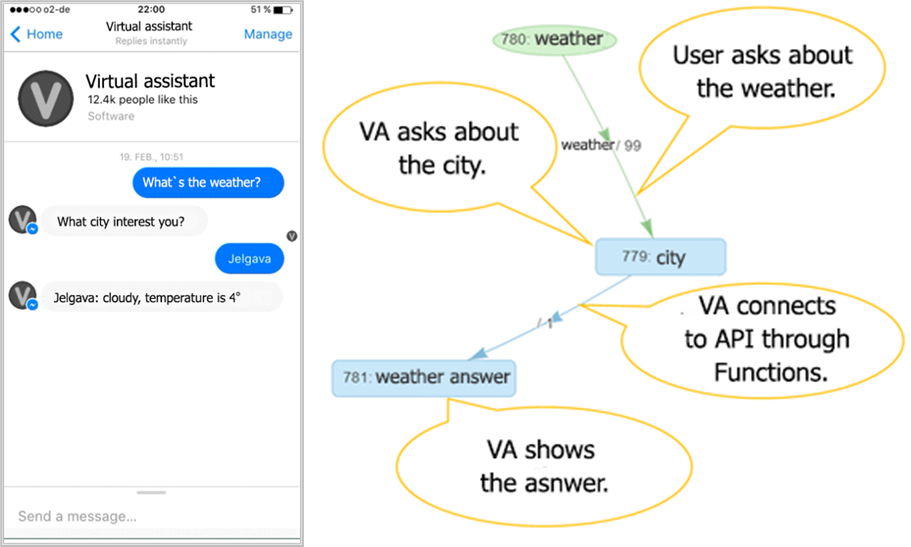
Figure 24. VA scenario with reading data from an external service
A typical VA provides communication with external information systems using RESTful (https://restfulapi.net/) web services with JSON (https://www.ecma-international.org/publications/files/ECMA-ST/ECMA-404.pdf) data exchange format. In the event that the VA is required to communicate with an external IS that does not provide such an API, an API will be provided in a different format, or there is a need to use more sophisticated business logic or user authentication in the course of communication, software development may be required. Typically, in such cases, it is necessary to create a module that is half way between base VA and the external IS (or several). This integration module provides both the protocols required for communication, as well as business logic and authentication.
The integration of external systems is described in the System View "Functions" (Figure 25). Each external system call is a VA function. The functions are described firstly (Figure 26) by specifying their name, web address, or URL, HTTP call type, input parameters, expected return result type, and how to save returned results in context variables.
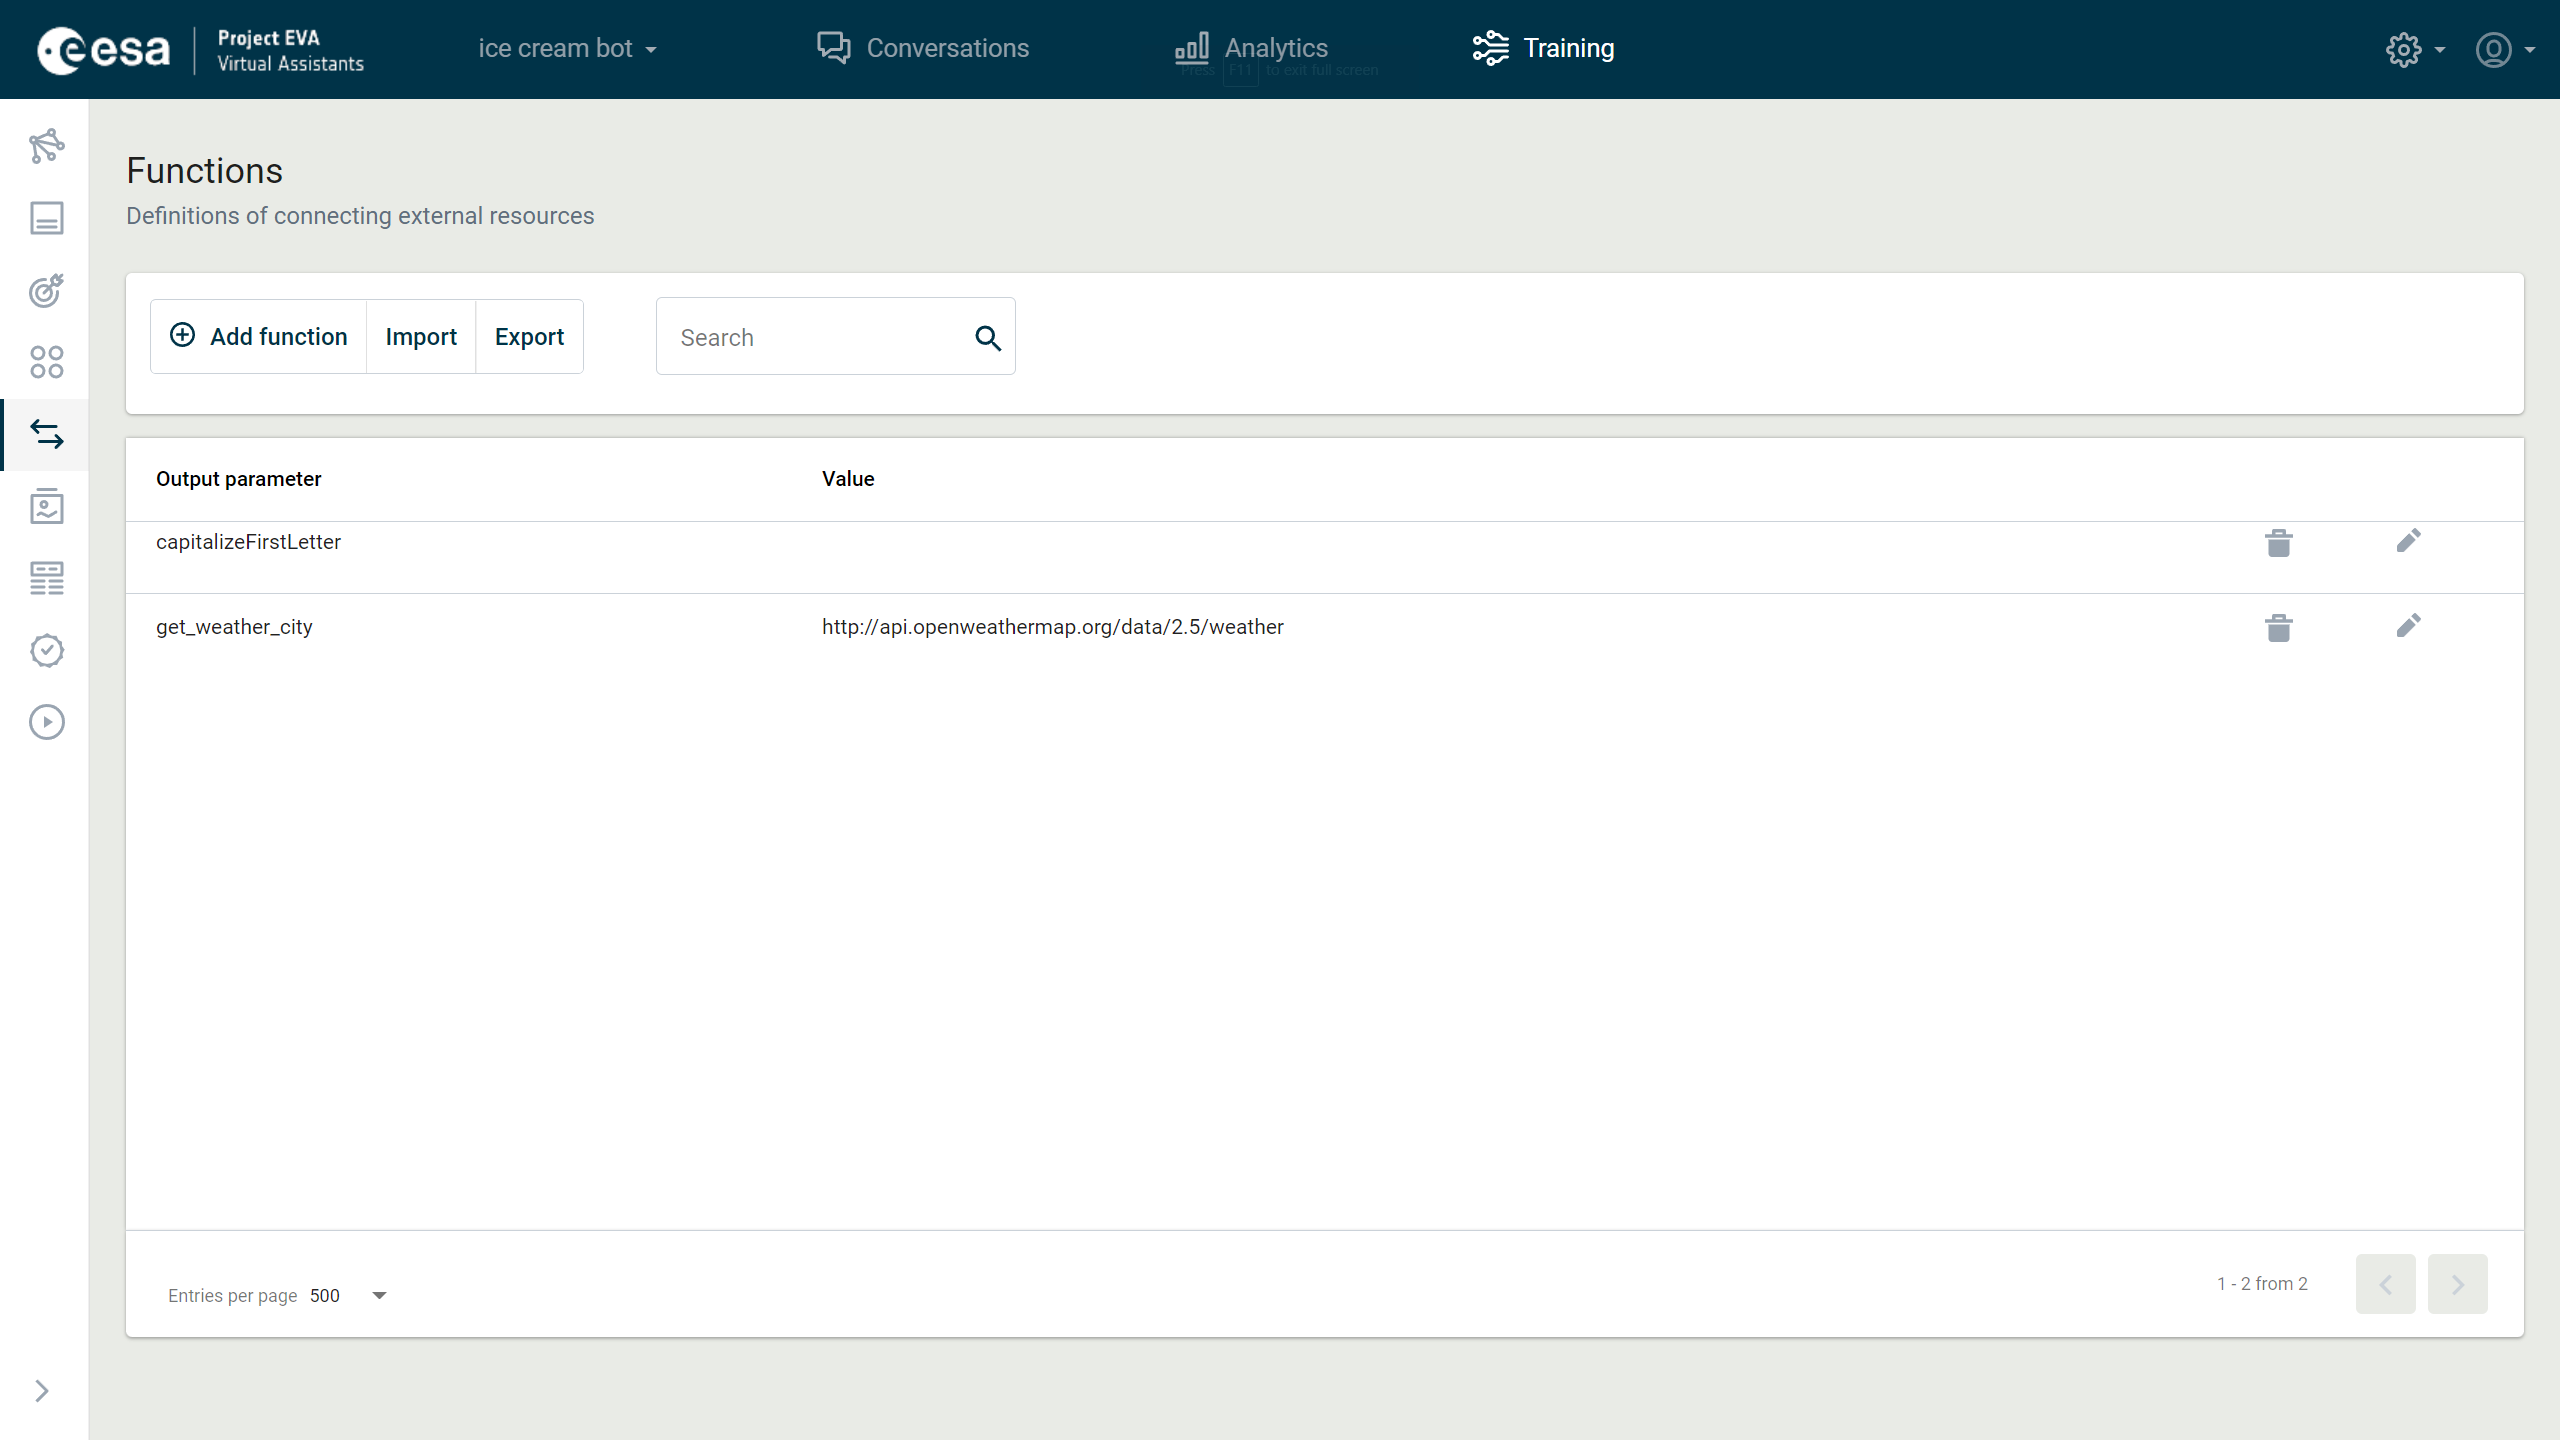
Figure 25. VA "Functions" view
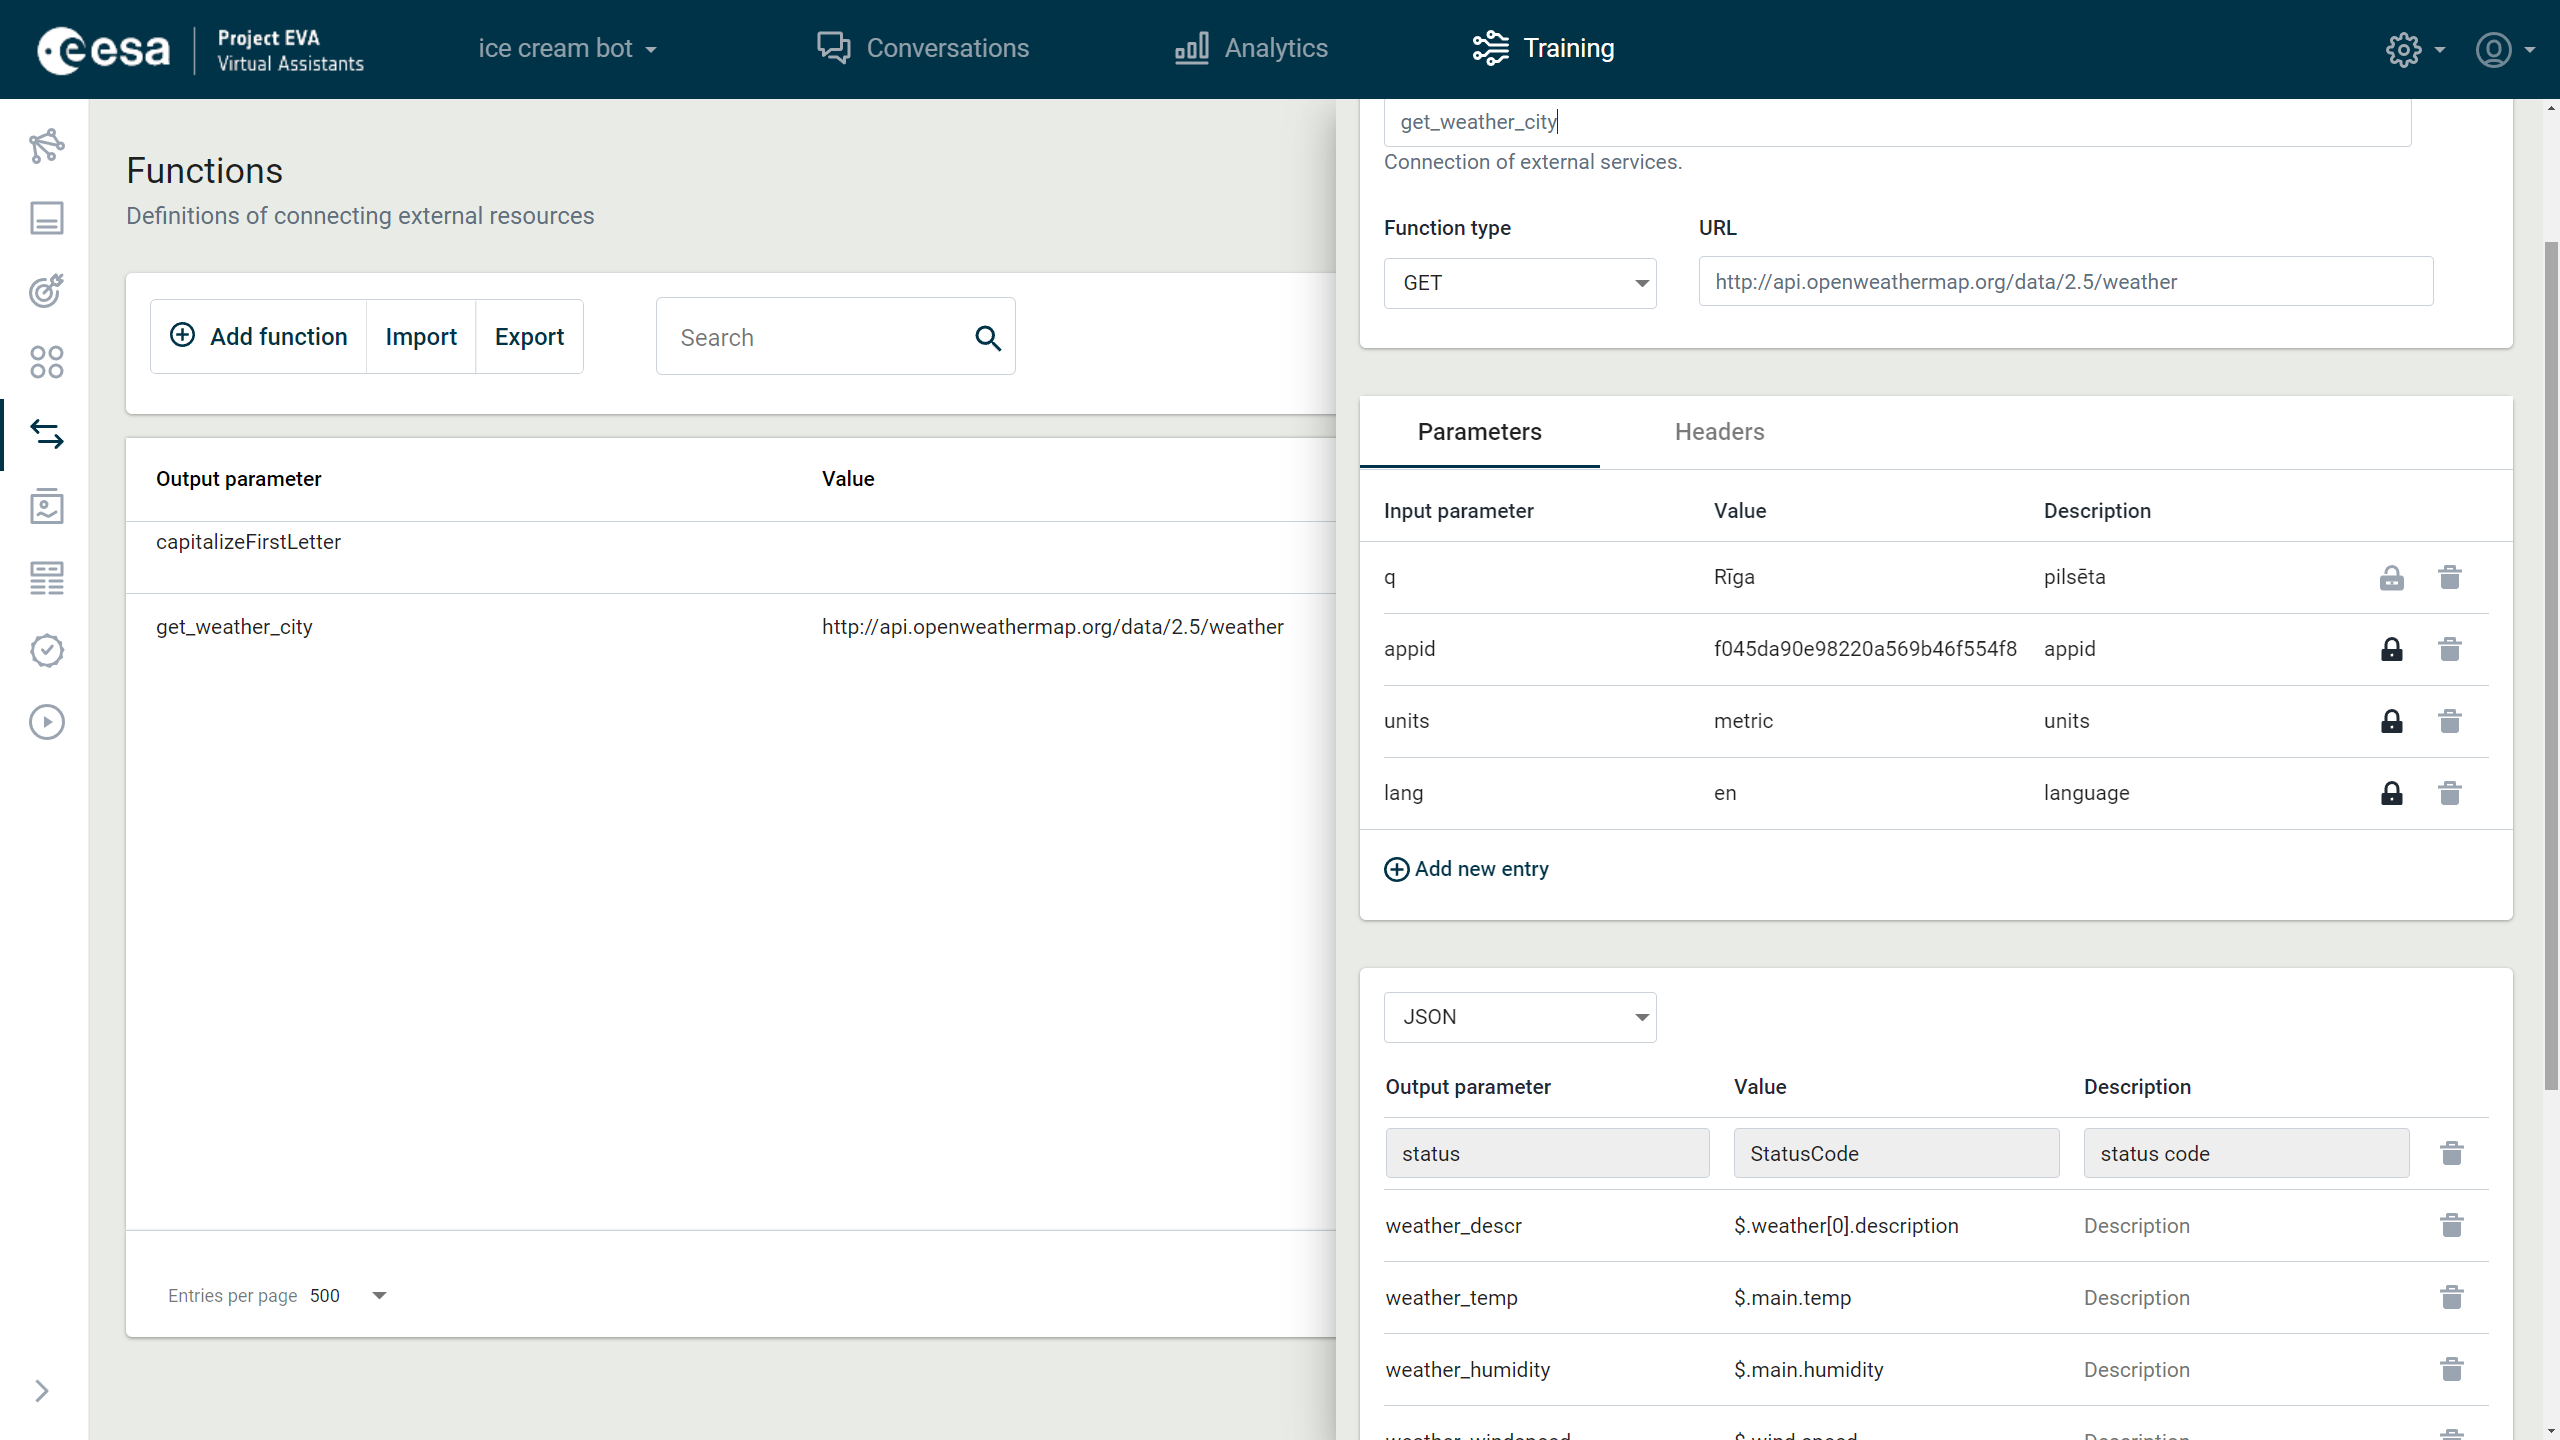
Figure 26. Description of the VA function
Example (Figure 26) shows how the function of obtaining weather news information is described. This function has been given the name "get_weather_city", the web service address is specified and the HTTP GET request must be used. The function has variable parameters - q (the city whose weather conditions we want to know, e.g. Riga) and non-variable parameters that will be the same for all calls in this method, the authentication key (appid), unit of measurement unit system (units), and language (lang). Thereafter it is stated that an answer in JSON format is expected from the web service and that information from the returned JSON object should be read and placed in VA context variables.
For example, temperature information should be read with the JSONPath request "$. main.temp" and saved in the context variable temp.
Once the action has been described, it can be used in the VA dialogue scenario. In the dialogue scenario, the VA can perform different actions (see Chapter "State Editing Window") including outputting text and calling external systems. Each external system call should indicate its variable parameters and VA context variables, in which its call return values are saved, which can subsequently be displayed to the user or used in the dialogue transition conditions to guide the further course of the dialogue.
Knowledge sharing with sub-bots
The functionality of sub-bots in the platform allows platform users to build separate sub-bots and include them in the other bots (master bots).
It is possible to implement each shared knowledge, functionality, or skill as a separate bot. For example, there could be sub-bots with different types of knowledge – Smalltalk, Weather, etc. Sub-bots are fully functional bots, they can be developed, tested, and deployed independently. They can even be published and made available to the end-users as standalone bots if there is such a need. See in picture 26.1 below the example of the sub-bot “What is”.
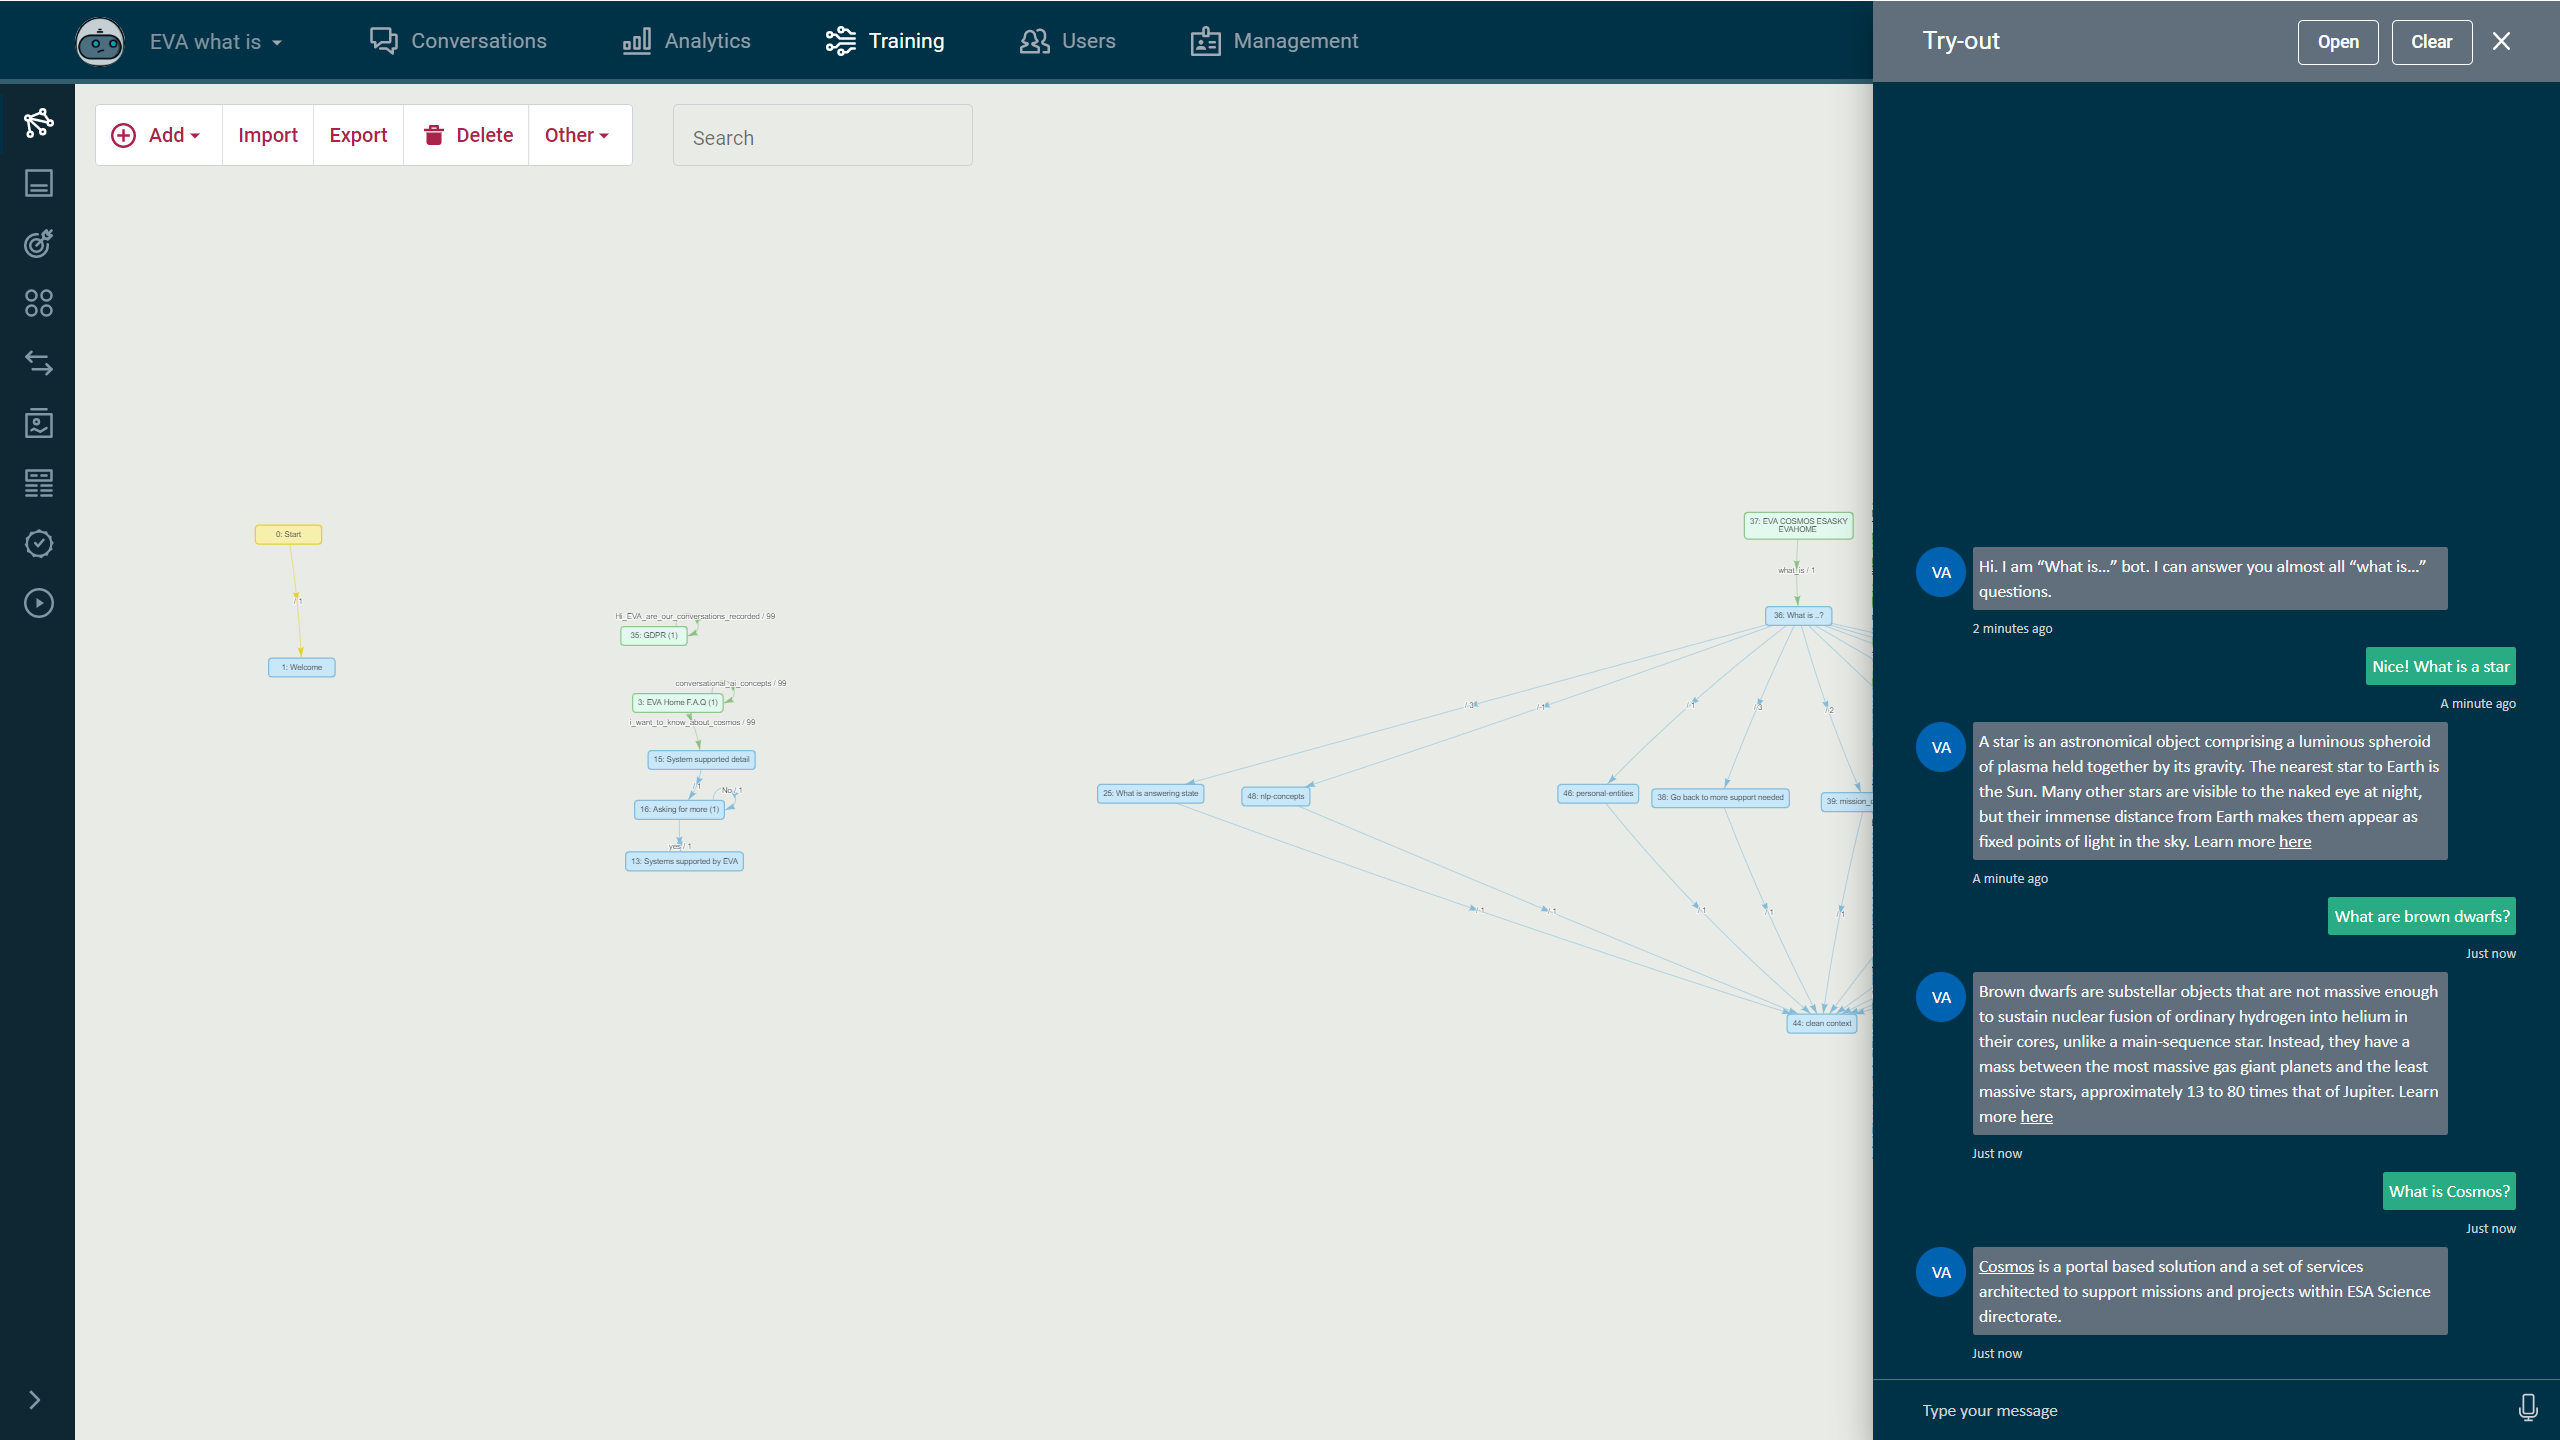
Figure 26.1. A "What is" sub-bot
Sub-bots can be included in other bots – master bots. Each master bot can be developed completely independently from sub-bots, but developers of the master bot can specify which sub-bots to include. To include the sub-bot in a master bot, open the “Management” view (see Figure 26.2 below) and click on Settings (1) next to the master bot in which you would like to include a sub-bot. For the parameter “SubBots” type in the ID of the sub-bot, you would like to include (2). To add several sub-bots, type each ID separated with a comma. Save and close (3) the window and commit settings.
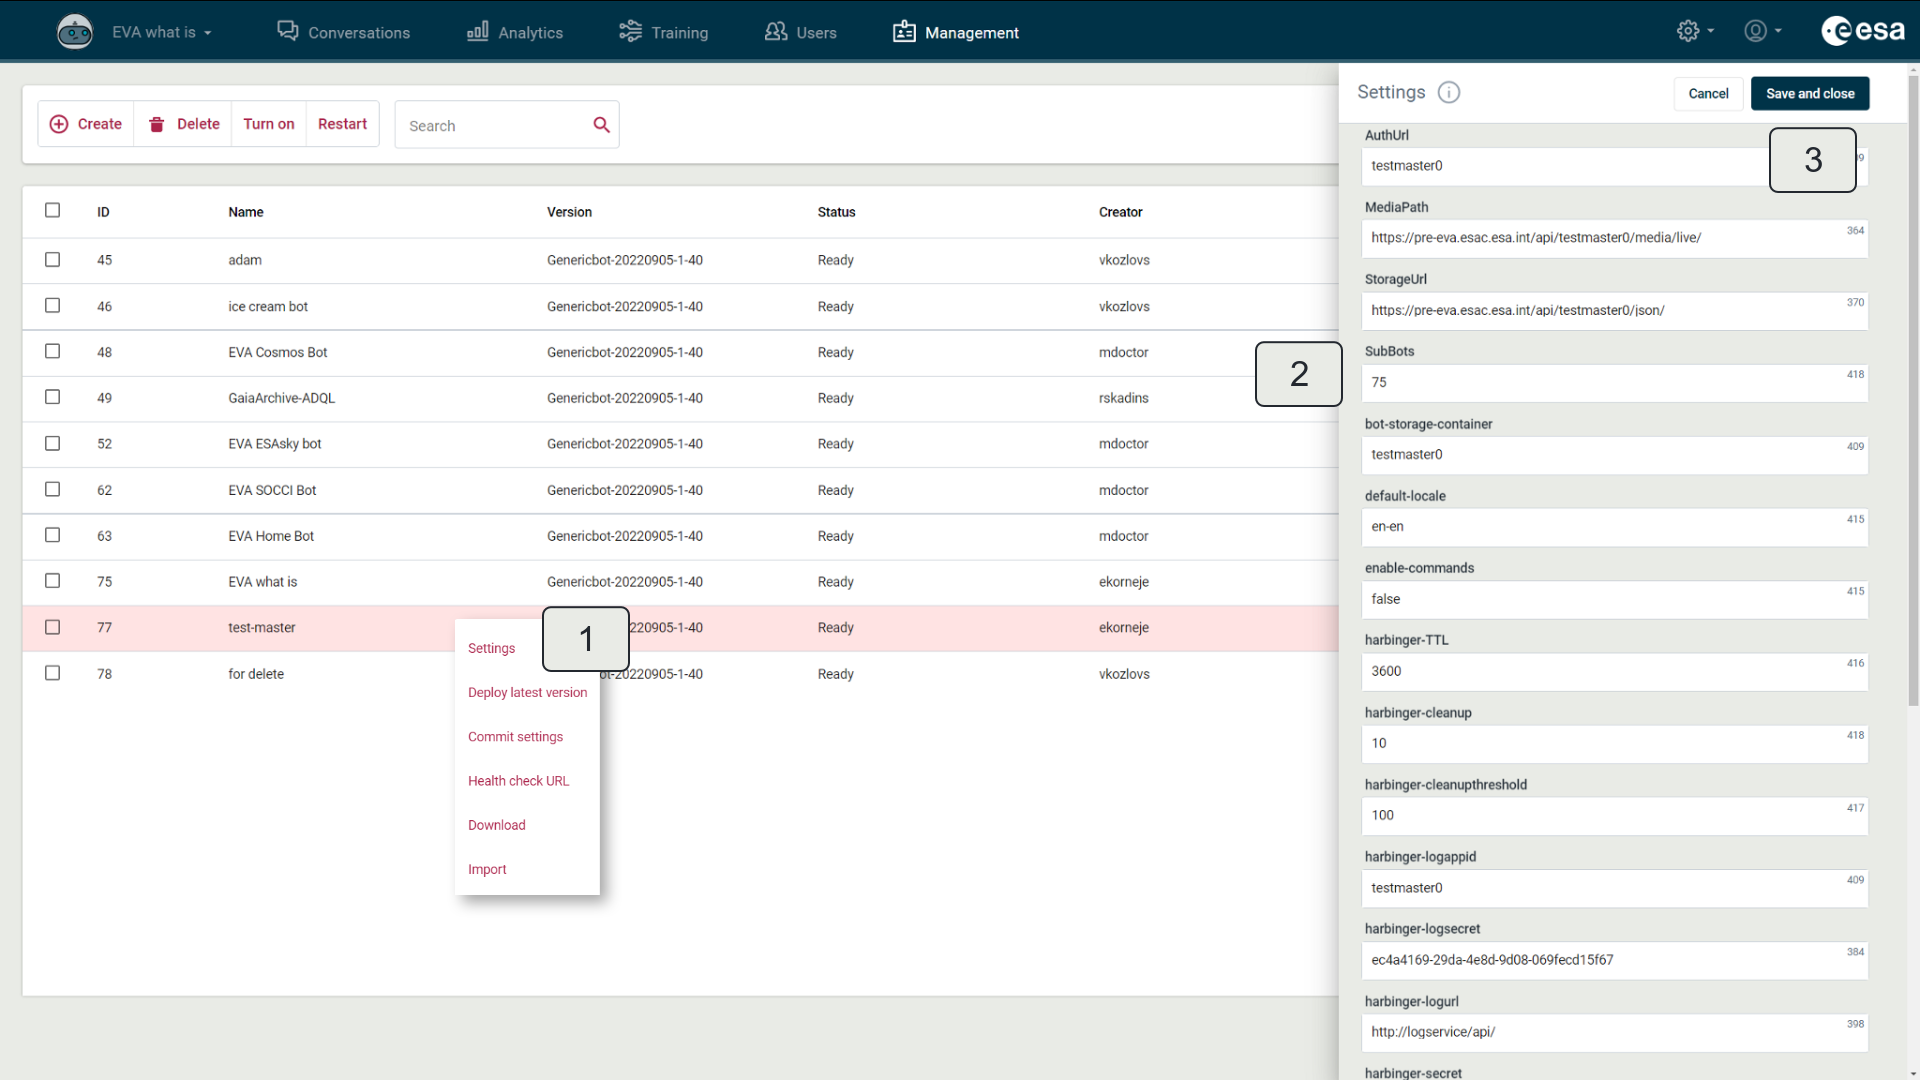
Figure 26.2. Including a sub-bot
The VA trainer can add sub-bots to a master bot from the Scenario toolbar by clicking Other- >Linked bots. (Figure 26.3) A list of the sub-bots available to the VA trainer will open – all the virtual assistants the trainer has access to.
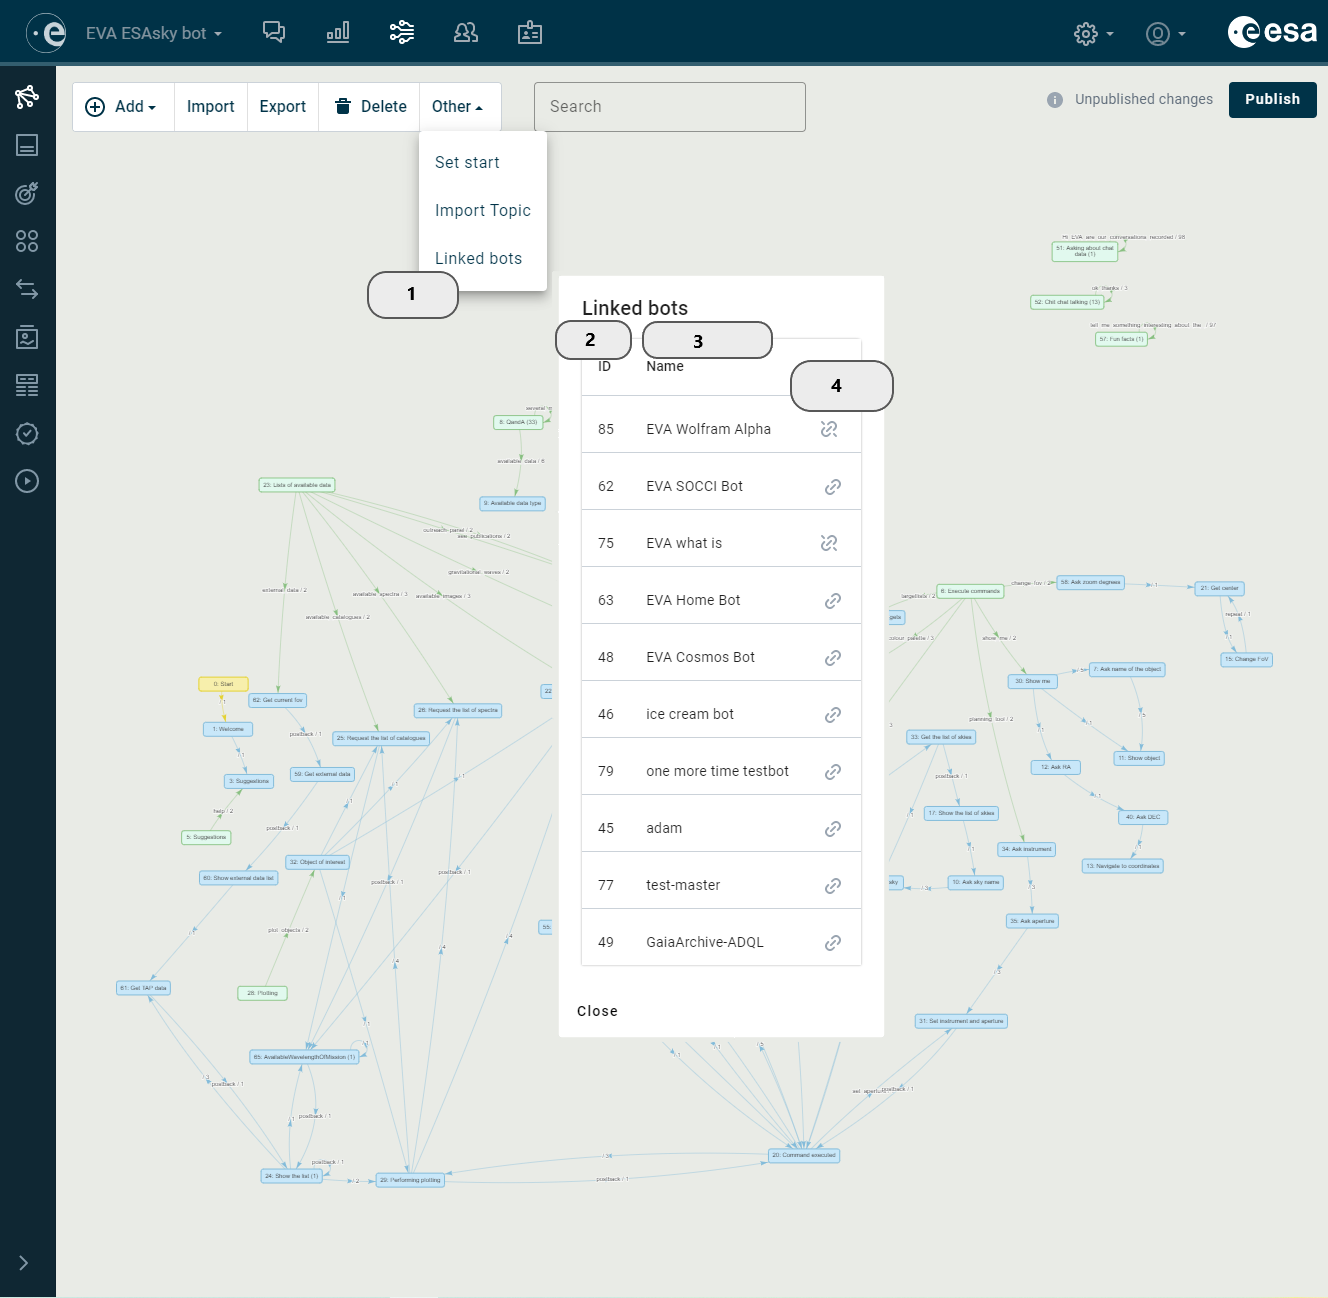
Figure 26.3. Including a sub-bot from scenario
The list shows the following information about the sub-bots:
The ID (2);
The name of the virtual assistant (3);
The status whether the virtual assistant is linked (4).
The VA trainer can link or unlink a sub-bot.
Similarly, the VA trainer can see in the list if a sub-bot that trainer does not have access to has been added to the master bot. In this case the trainer can unlink the sub-bot from the master bot.
Developers of the master bot do not need to take care of the content included in sub-bots. Internals of the sub-bots are hidden, no states, intents, outputs, or functions are shown to developers of the master bot. The sub-bot is visible for the global administrator as a number in the Settings of the master bot (see Figure 26.2 “Including a sub-bot”). Whenever the master bot is published (in the master bot all the sub-views - scenario, outputs, intents, data tables, entities, etc. - must be published), all the latest versions of the sub-bots are included in it. When information in sub-bots is changed, one must also publish changed sub-views in a master bot. In the master bot’s conversation, the knowledge from the sub-bot is available (see Figure “Master bot uses knowledge from sub-bot”).
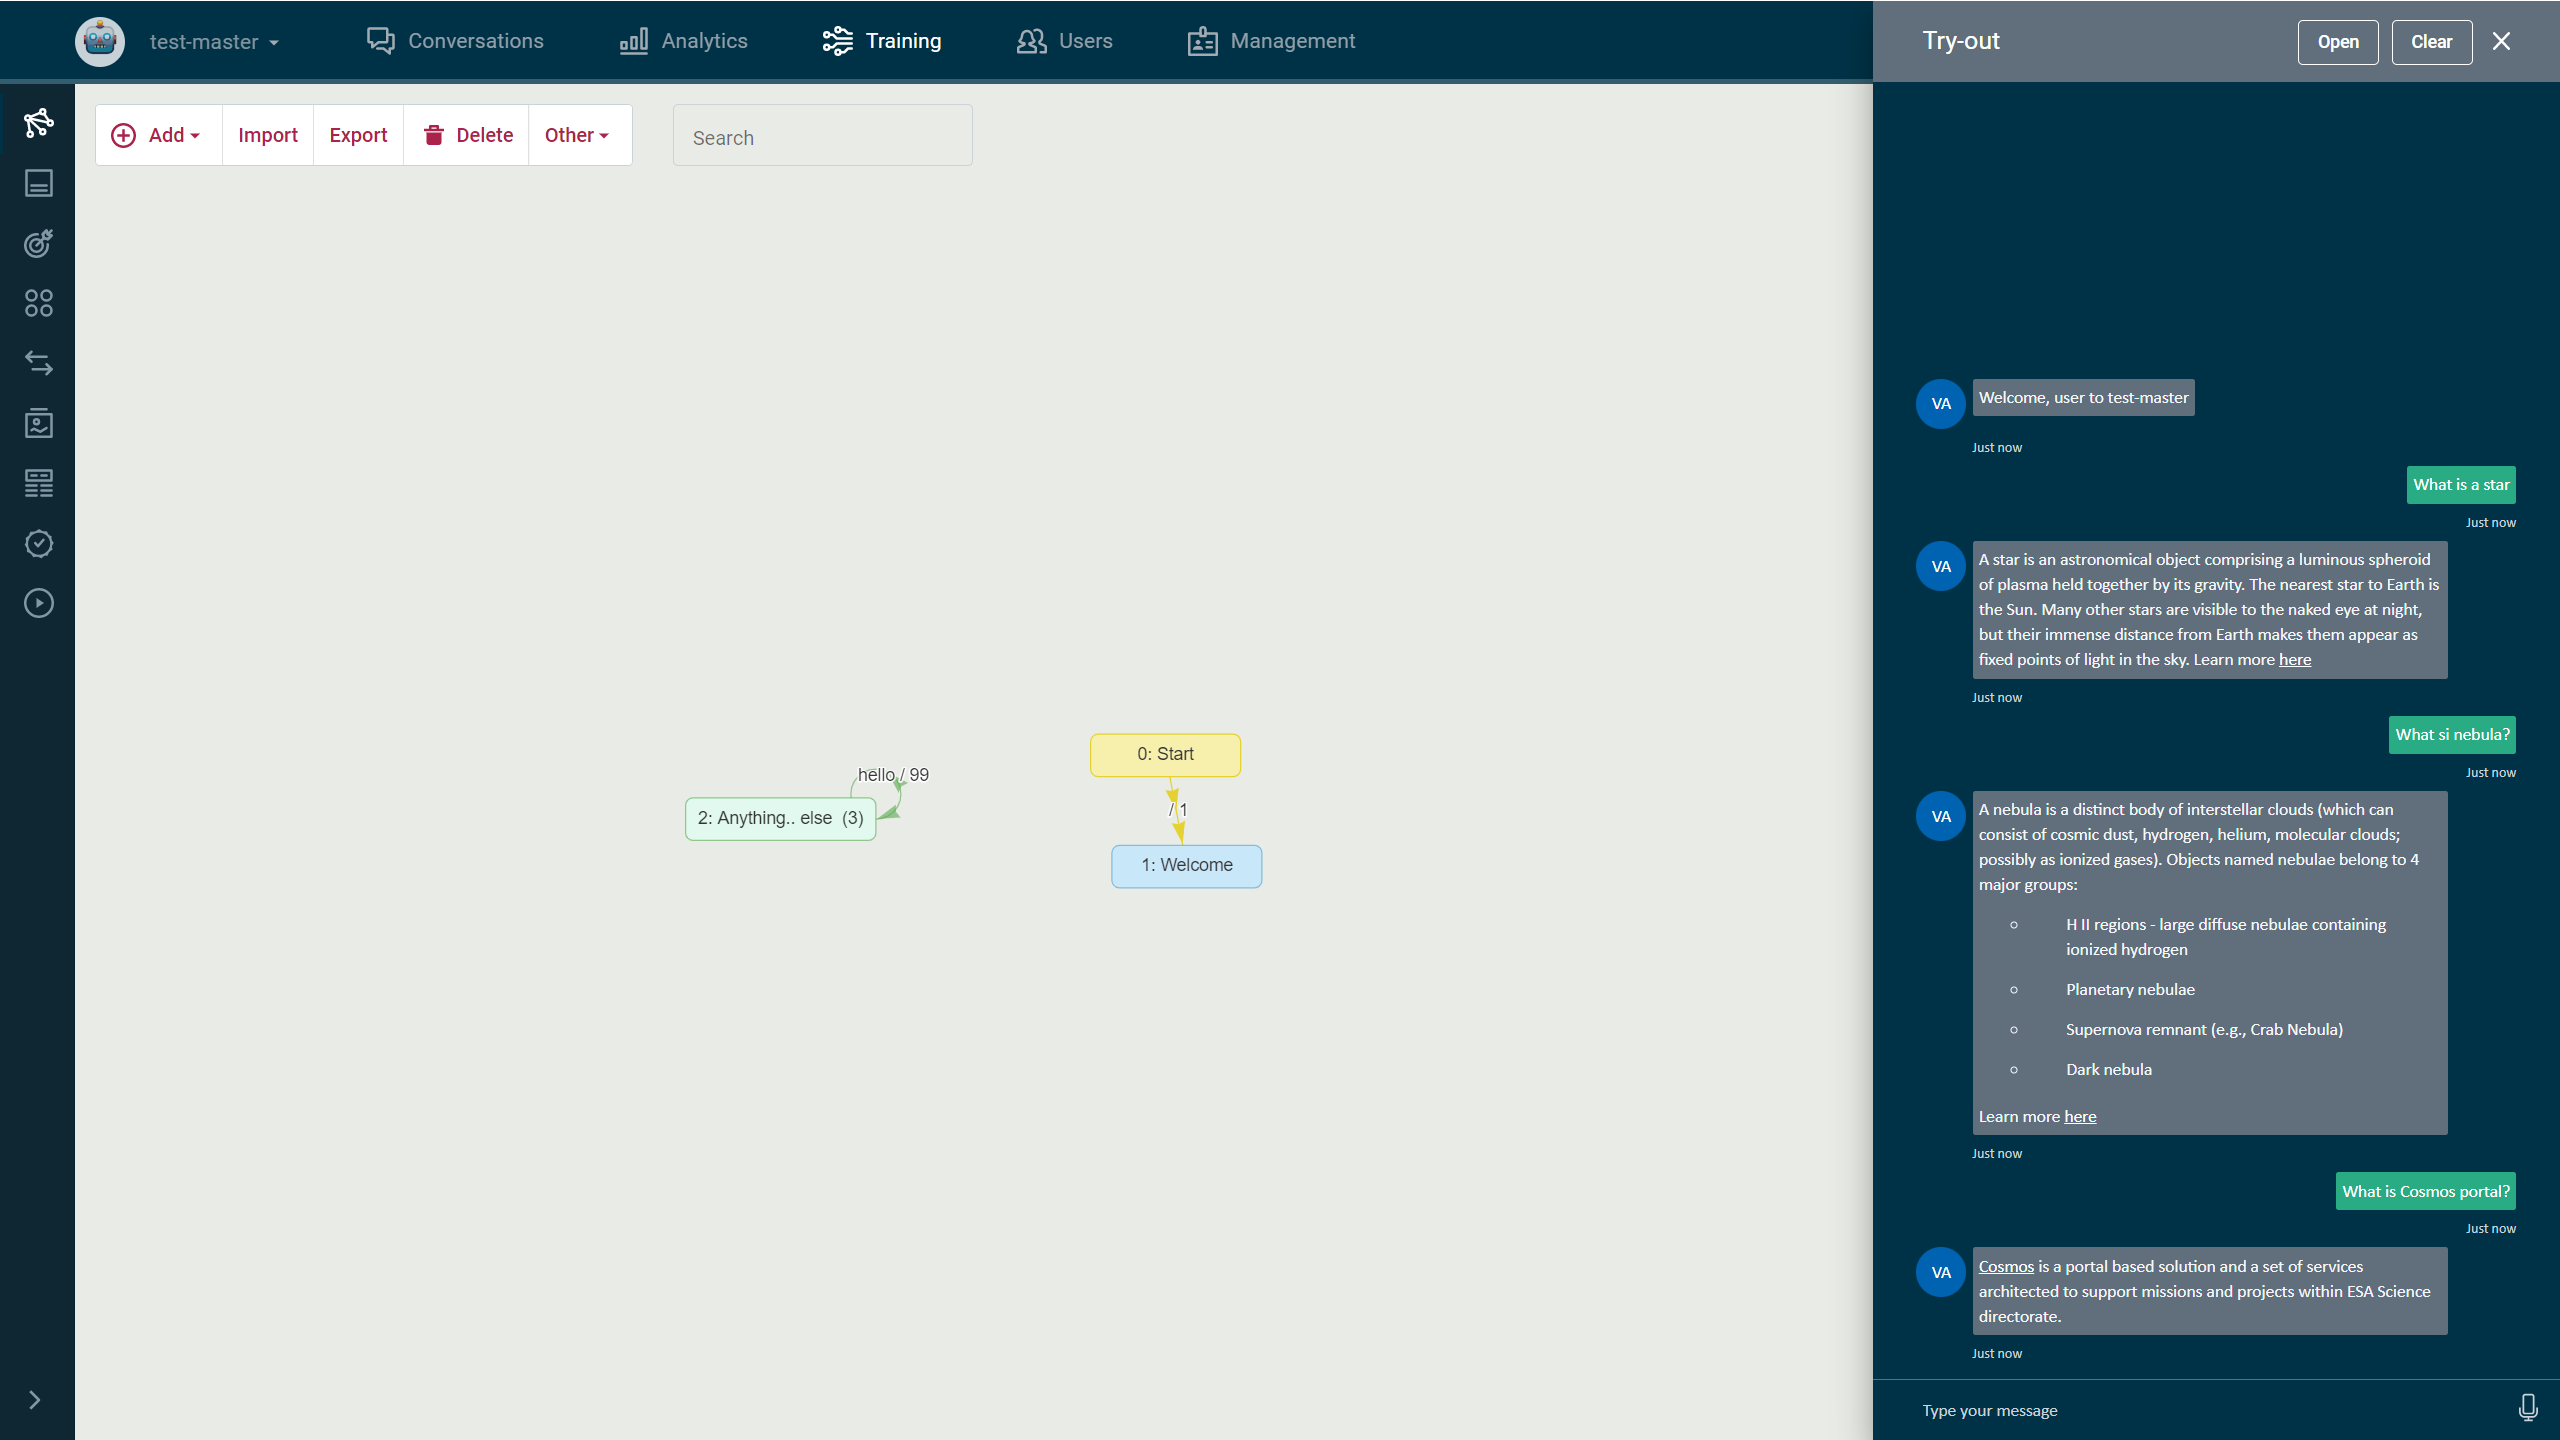
Figure 26.4. Master bot uses knowledge from sub-bot
Recommendations
This chapter collates practical advice for companies on creating the VA's personality, language, conversation and communication process.
- Personality.
Analyzing existing assistants, it is evident how different they can be. The visual depiction of the assistant must be in line with its personality. The range of potential images is very extensive, ranging from the elementary logos and simple stylized human drawings to representations of three-dimensional animals. (Figure 27).
Figure 27. Various VA images - The personality and nature of the VA is revealed in the course of scenarios and means of language used in the assistant's answer texts. Therefore, when working with them, the user's convenience and needs should always be kept in mind, and it is recommended to judge the conversation from the user's viewpoint and to ensure that the user receives the required information as quickly as possible. If a person's conversation with an assistant is pleasant and smooth, the VA will seem friendly, helpful and intelligent to it.
- The start of the conversation.
At the start of the conversation, it is good if the VA states its name and immediately mentions the topics that it can provide answers about. When introducing topics, the assistant enables the user to feel more assured and to understand which questions can be answered.
In order to help the user get his bearings more easily, at the start of the conversation, a guided dialogue offering specific choices is recommended. - Successful communication.
Each VA response must provide a solution. This means that the answer to a user's question must be logical and clear. It is not recommended to use answers that transfer responsibility or do not provide anything useful in terms of information.
For communication to be effective, all words in the VA's text must have meaningful substance. Phrases that teach, express emotions or which are verbose should not be used, i.e. which do not express anything meaningful and are not geared to resolving the user's issues.
If the answer is long and varies depending on various prerequisites, clarification is required about what the user is interested in order to provide specific information. However, if the answer is very long and it is not intended to compose it in more detail in a scenario, the best solution is to simply say that which is most essential in simple words and to offer the user a link to additional information.
The VA's answers must be laconic. It is recommended to keep them to 250 characters. Special consideration should be given to the display of buttons on different communication channels, where the length of their names tends to be limited.
Answers should be structured so that they are transparent and understandable clearly and easily. - Language.
Quality in VA texts is the most important condition. It is recommended that someone with a good knowledge of VA used language or a language editor reviews all the VA texts that have been composed and checks for any errors and for consistency in the use of speech and other features of language.
In order for the user to feel as if the service he has received has been kind, friendly and warm expressions should be used: avoiding the passive voice and impersonal structures ("will be resolved", "should preferably be clarified", "recognized as the most appropriate", etc.).
It is recommended that colloquial language be used, not specific terms or formulations that correspond to professional jargon ("formulate your question", "this is outside the competence of the UR", "the document specified above", etc.).
The use of terms and unfamiliar phrases and abbreviations should be avoided, whenever their use can be avoided ("legal subject", "registration of legal facts", etc.).
If, however, the terms or any other vague abbreviations or concepts are used, the VA scenario should anticipate that the user will try to find out what they mean. The answer must be prepared.
The VA's answer must consist of a complete thought. It must also be understandable without the question.
The chosen usage of expression and words must be clear and unequivocal.
Boundaries should clearly be set regarding how much freedom of expression the VA can afford - whether playfulness is appropriate for the company or assistant, or if the spoken language used should be business-like and reserved. The way in which an assistant expresses itself should not become too familiar, vulgar or offhand. Kindness and witty humor are permissible, sarcasm is not.
Consideration should be given to the use of emoticons. If your company's relationship with a customer is business-like, you should limit your use of emoticons, but if your company's subject matter allows it and if your assistant's audience is youth or kids, it would be appropriate to use emoticons.
When responding to user chat issues that do not correspond to the VA's goal, it is recommended that you guide the user to a topic known to the assistant.
VA Acceptance Testing and Public Launch Process
The VA acceptance and public launch process involves actions performed by the VA development team prior to the VA is activated in practice.
The team shall conduct the acceptance test and present the VA and its scenario to the patron and management. If any flaws are discovered during the acceptance test, the performance of corrections will be organized. Changes proposed by management will also made until the desired result is attained and everything is coordinated.
Once accepted, the company shall make publicly available to the VA, i.e. make it available for use. Once the VA has received its public launch, the company will inform the public (in a press release or another form of notice) about the developed VA.
VA operation and maintenance process
After the public launch of the VA, the VA will be operated in production mode.
As part of the VA operation and maintenance process, the company will:
- Analyze the VA's conversations, including questions asked by customers and the VA's answers to them. This is necessary both for fast correction of the answers provided by the VA and to ensure the long-term development of the VA (e.g. for planning new VA dialogue scenarios).
- Develops new dialogue scenarios and augments VA data. This can be done reactively (in response to questions raised by the public) and in a planned way (systematically planning and implementing the extension of the VA's scope of action).
- If the VA has been introduced with conversation takeover functionality, the course of the VA's negotiations will be regularly monitored and conversations with customers will be taken over according to the defined process (at the request of customers, according to specific conversation criteria).
- Plans and implements the further development of the VA, including analysis and marketing of VA functionality upgrades.
- Notifies problems and requests for changes according to the findings of the VA action process.
VA MANAGEMENT SITE
The MLSOVA Management site provides functionality for creating and managing virtual assistants.
The site is available only to authenticated users. You can access the site by specifying your CAS user name and password in the site login window (Figure 28) and clicking "Login".
Figure 28. VA Management Site Login Window
The site interface (Figure 29) is made up of the main toolbars at the top of the window (1) and the menus, toolbars, buttons and windows of the selected view, which occupy the rest of the interface (2). A total of seven views are available with different interface elements, which are described in sequence in the following chapters. Two of them (see chapters "Users" and "Management") are available and viewable for users with global user rights.
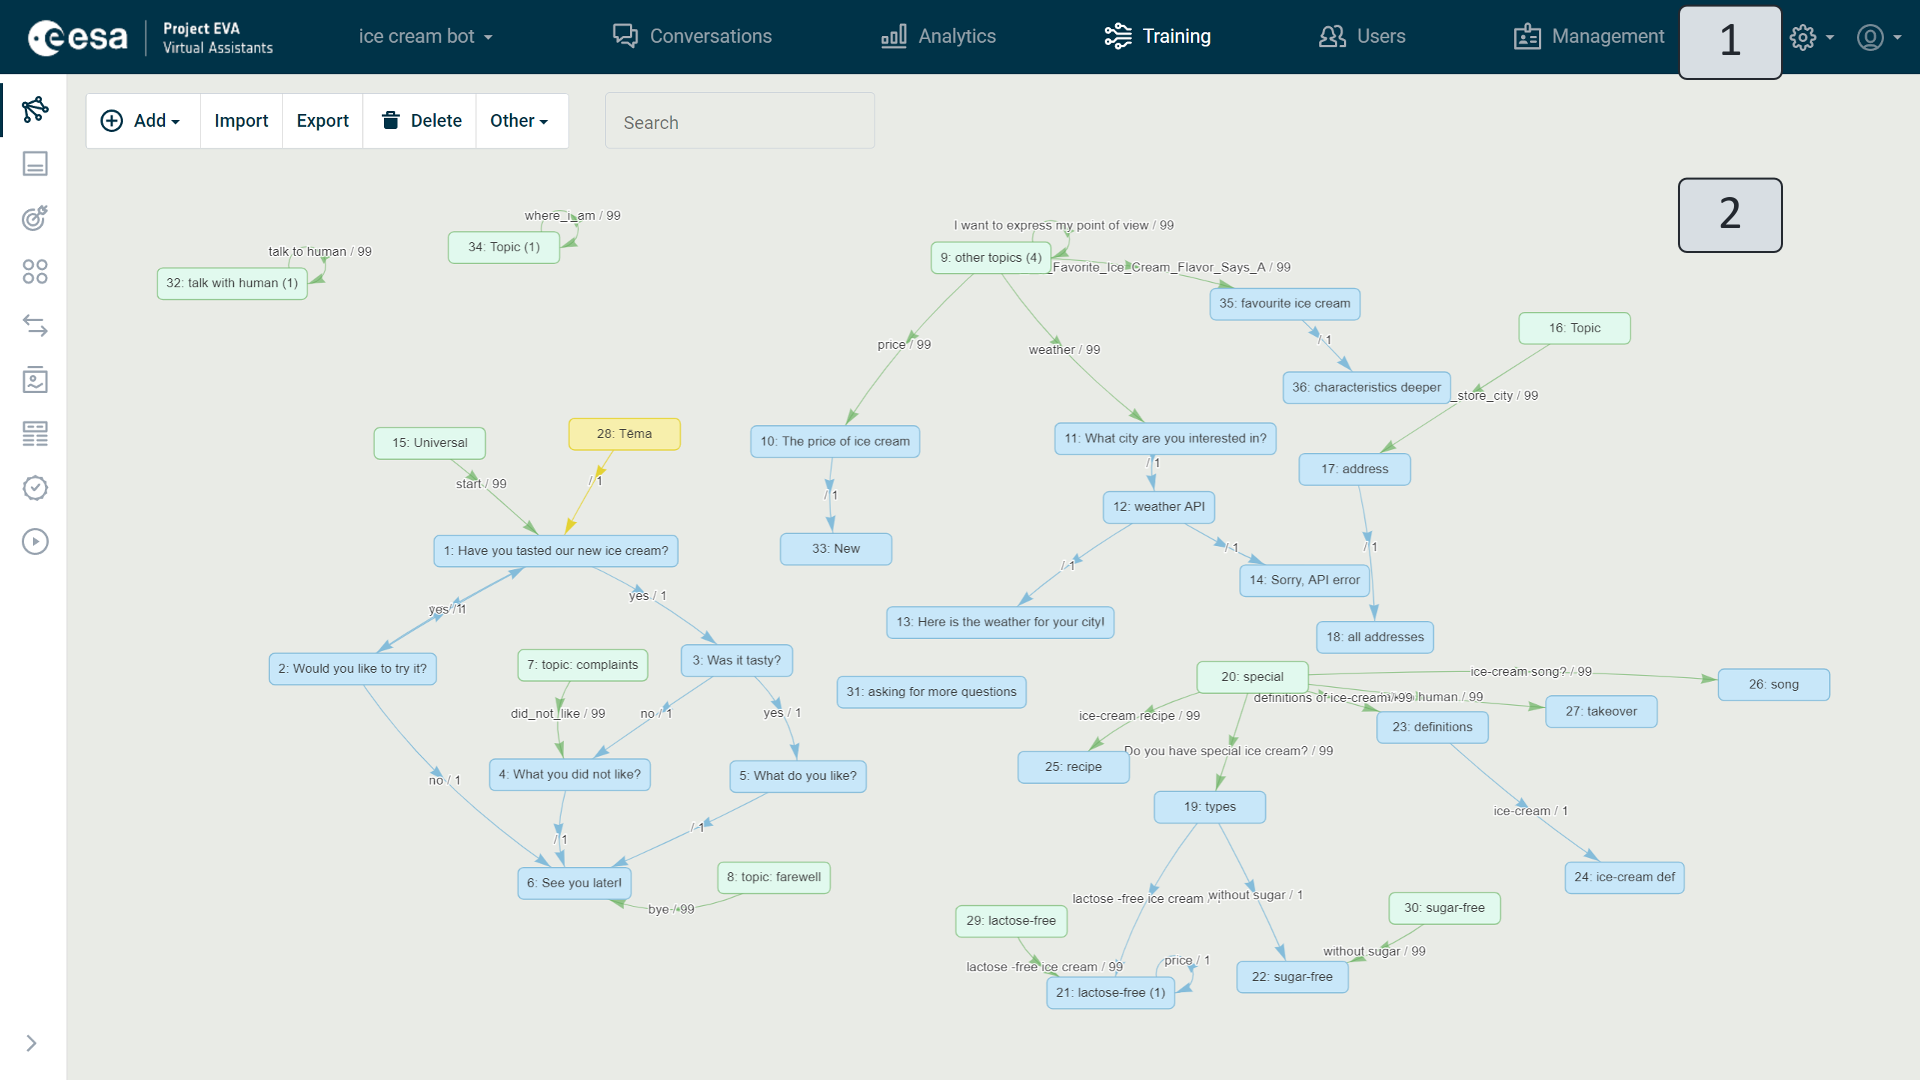
Figure 29. VA Management Site Interface
The main toolbar (Figure 30) provides the option to switch views of the management site. All conversations with users are viewed by clicking the title "Conversations" on the toolbar (2). In the conversation view, you can analyze each individual conversation in more detail, and follow the communication process and take it over. The analytic view opens when you click the title "Analytics" (3). The information available here includes a general overview of VA communication with users, user activity and topics most frequently discussed with the assistant. The broadest is the training view (4), which is primarily used when creating and teaching the VA. It also has its own separate toolbar and subviews. For global users two more views are available for managing user access rights and VA technical information - "Users" (5) and "Management" (6). General VA settings, such as assistant profiles, language skills, communication sites and management rights for different users can be viewed by clicking the gear icon (7). In turn, the specific user's profile information opens when you click on the stylized human image icon (8). You can also stop the user's session and return to the home login window.

Figure 30. Main toolbar
On the left hand side of the management site toolbar, you can see the name of the open VA (1). If the user has the right to operate with more than one assistant, clicking on the virtual assistant name displays a menu with a list of managed assistants from which you can choose what you want.
Conversations
The Conversation View (Figure 31) is intended for browsing and more detailed analysis of user conversations and for taking over conversations.
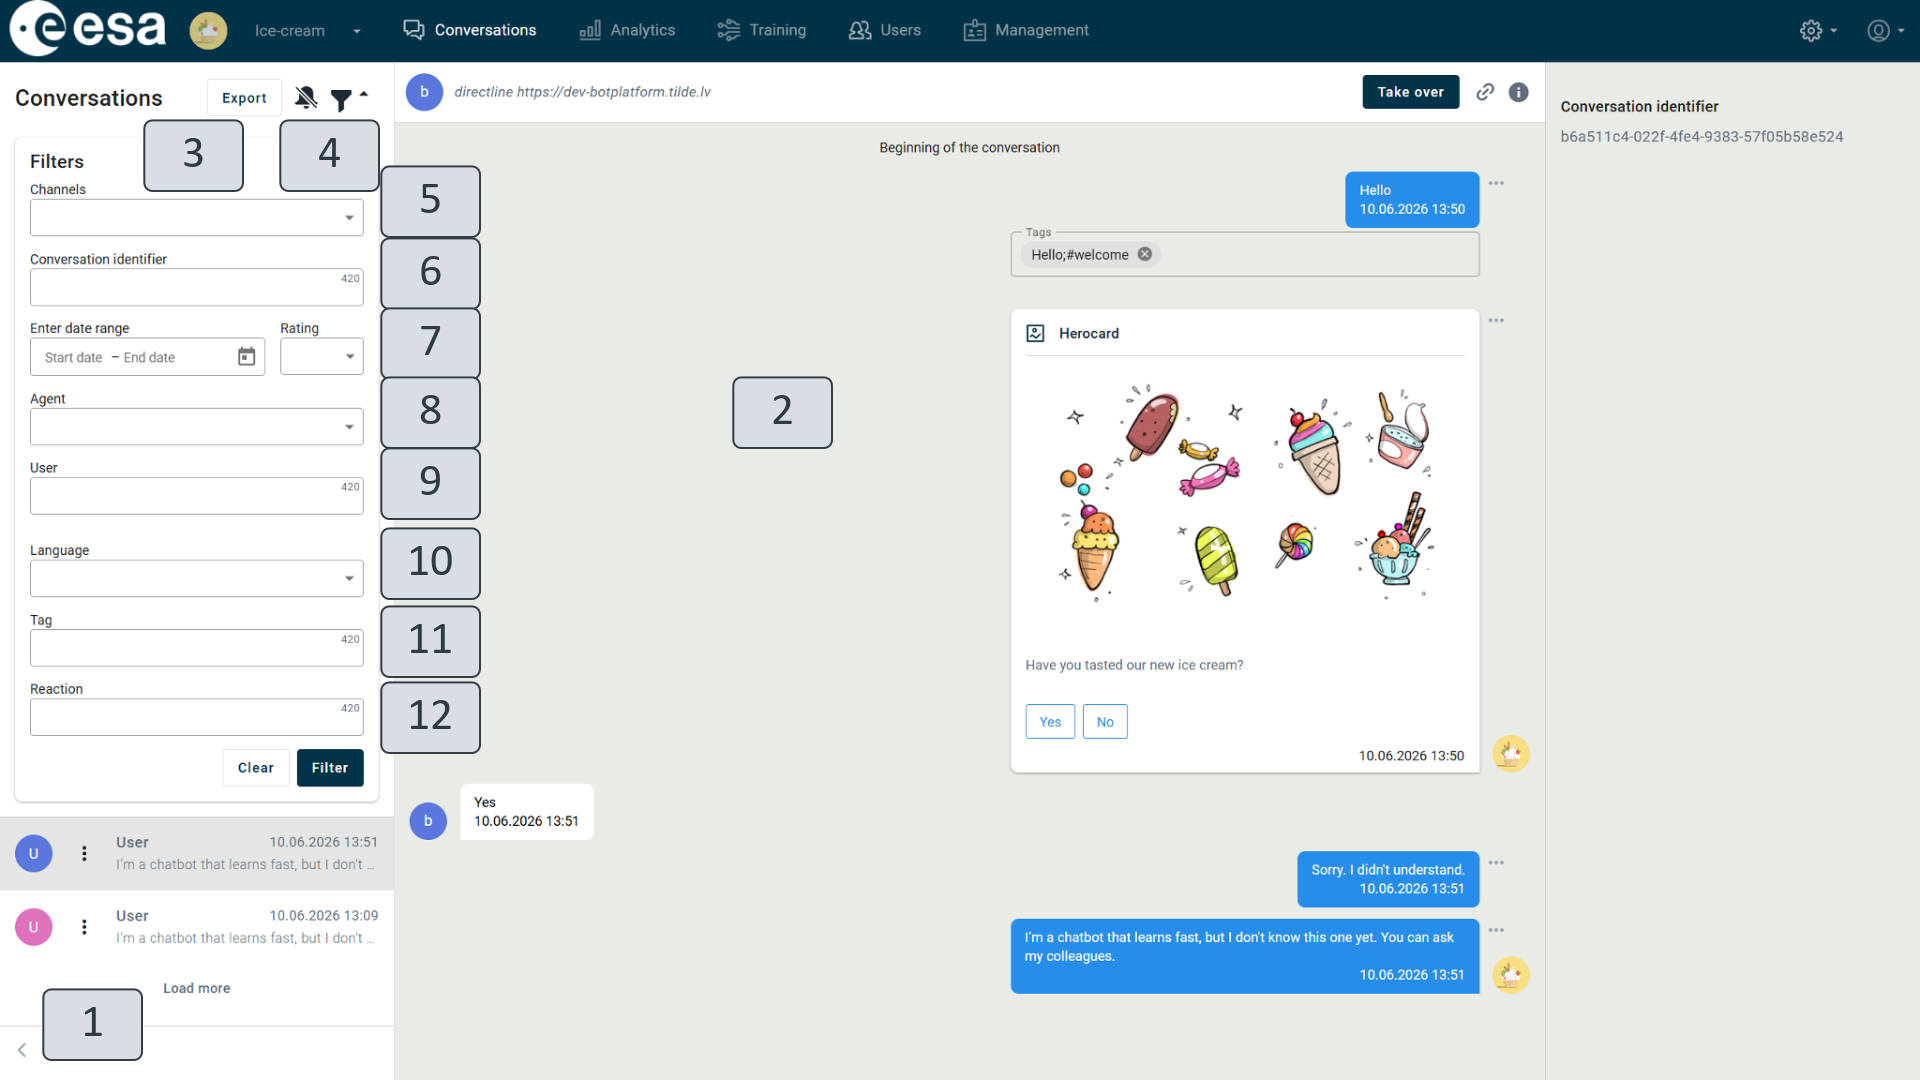
Figure 31. "Conversations" view
In the bottom left-hand corner of the view, clicking the arrow on the right (Figure 31) (1) expands the list of all conversations. At the top of the conversation list, conversations can be filtered by clicking the filter icon and seeing those required. The selection can take place according to the following criteria:
- following the communication channel (5) in which conversations are being conducted (the field contains search functionality that you can easily use to select one of the channels if the VA is on many sites at the same time);
- by the conversation identifier (6);
- by the selected date (7).
- by the rating (7) provided by the user in the conversation;
- by the customer service professional / agent who took over the conversation from VA (8);
- by the user who negotiated with the assistant (9), if known (the user name can be set with the “setname” function, see the chapter "Function “setname”);
- by colloquial language used by user in the conversation (10);
- by tags added to VA actions (11);
- by user reactions in VA conversation (12).
By clicking the bell icon (4), you can turn messages on or off about taking over conversations. (If notifications are turned on but still not displayed, check that site notifications are allowed in web browser settings, usually next to the address field and marked with the lock icon.) In the list, each conversation with the user is marked as a separate entry, clicking on which open it up in full view in the center (2).
The list of conversations shows the most recent conversations first, setting priorities. If the user scrolls through messages to the end of the list, additional conversations will be loaded. The top of the first list shows conversations taken over, followed by conversations arranged by conversation time, starting with the latest.
All conversations for a specific period of time or the selected conversation channel can be browsed together by exporting them (3). Data is exported in TSV format (Table 3. Data Exported for Conversations).
Table 3. Data Exported for Conversations
Field Name | Value Format | Explanation |
conversation | text | The conversation identifier identifies a specific conversation. All messages within a single conversation between the relevant user and the virtual assistant have one conversation identifier. |
user | text | The name of the user who has spoken to the VA, if identifiable ("setname" function). |
from_bot | boolean | Indicates whether the message was sent by the virtual assistant or the user. |
time | datetime | Date and time when the message was sent. |
message | text | Report |
attachments | text | VA response to the user, which can consist of several outputs. Button names are separated by a vertical line. |
intent | text | The identifier of the detected intent. |
confidence | numeric | The confidence level of the detected intent. If not detected, data can be filtered and sorted. |
locale | text | The language of the input detected. |
taken over by | text | Displays the name of the person taking over the conversation. |
transfer | text | Indicates the state the VA was in prior to user input and the state it was in after user input. |
host | text | The channel in which the conversation is taking place. |
rating | numeric | Shows the rating of the conversation, if given by the user in the conversation. |
tags | text | Displays tags added to the scenario. |
reactions | text | Displays reactions with comments added to the scenario |
Closed by | text | Indicates who closed the chat:
(Not available on the ESA platform.) |
Lost chat | text | Indicates whether the consultant has responded to the user's message.
(Not available on the ESA platform.) |
Conversation analysis
Conversations with the user can be analyzed in more detail - this is a useful function for VA trainers to understand how the VA responded to the user's input.
To get better feedback from virtual assistant users, there's an option in a webchat for the virtual assistant to turn on user reactions - a way for users to rate the assistant's knowledge. The user can click a thumbs up icon if the virtual assistant's answer is positive, or a thumbs down icon to indicate that the virtual assistant's answer is not trustworthy. In addition, the user can comment on each case by entering an explanatory text and sending it to the virtual assistant management platform. See Figure 31.1.
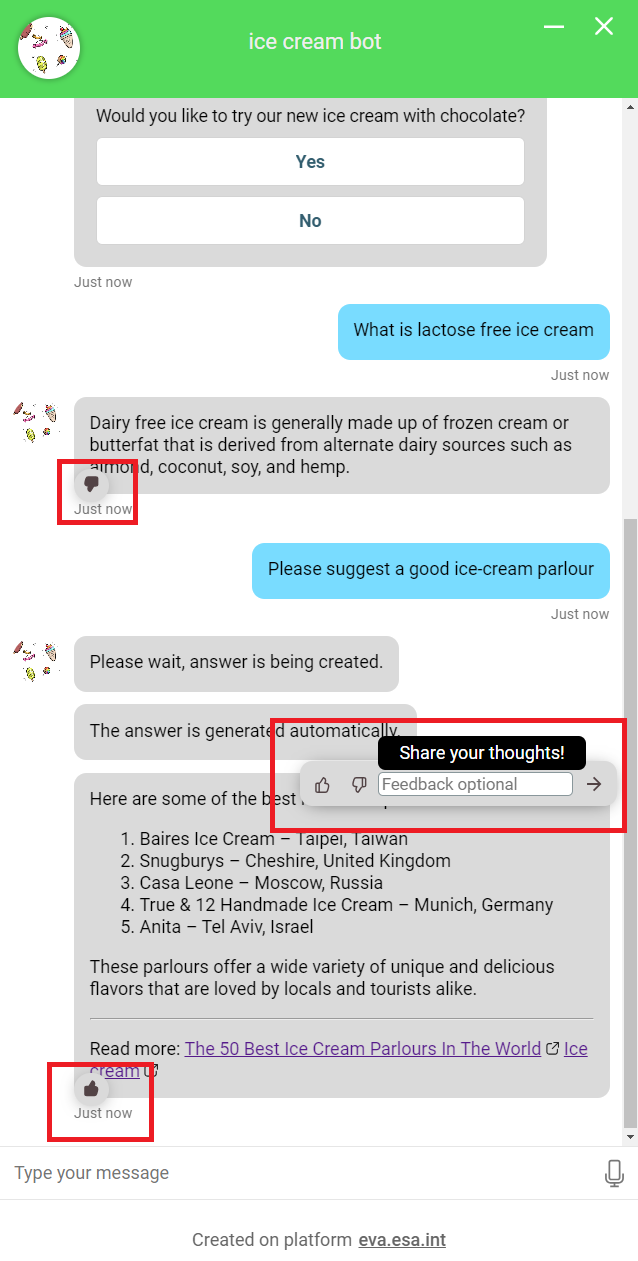
Figure 31.1. User reactions in a conversation
If user reactions are enabled for a virtual assistant, the Conversations view will also show all user reactions and comments in that conversation.
You can access a more refined analysis of a conversation by clicking the letter "i" (Figure 32) (1) in the upper-right hand corner of the conversation window. On the right hand side of the view, a conversation analysis window (3) appears, which includes information about the VA's activities and movements in the scenario. The information is displayed for each particular user input by clicking on it (2). Tag information, if added, will be displayed below each VA response. A VA trainer can define a tag by clicking the three dots on the right hand side of the bot message, and then clicking "Add tags" in the drop-down menu. After clicking, the action window will be augmented with the tag field, where one can enter a tag value. (7)
If, during the conversation, the user evaluates a separate virtual assistant's response, the reaction is displayed with a thumbs up or thumbs down icon directly below the virtual assistant's message, with an accompanying user comment if the user has added one (8).
To close the conversation analysis information, but to keep the window open (for example, when working with pre-set options), click “Cancel”(4).
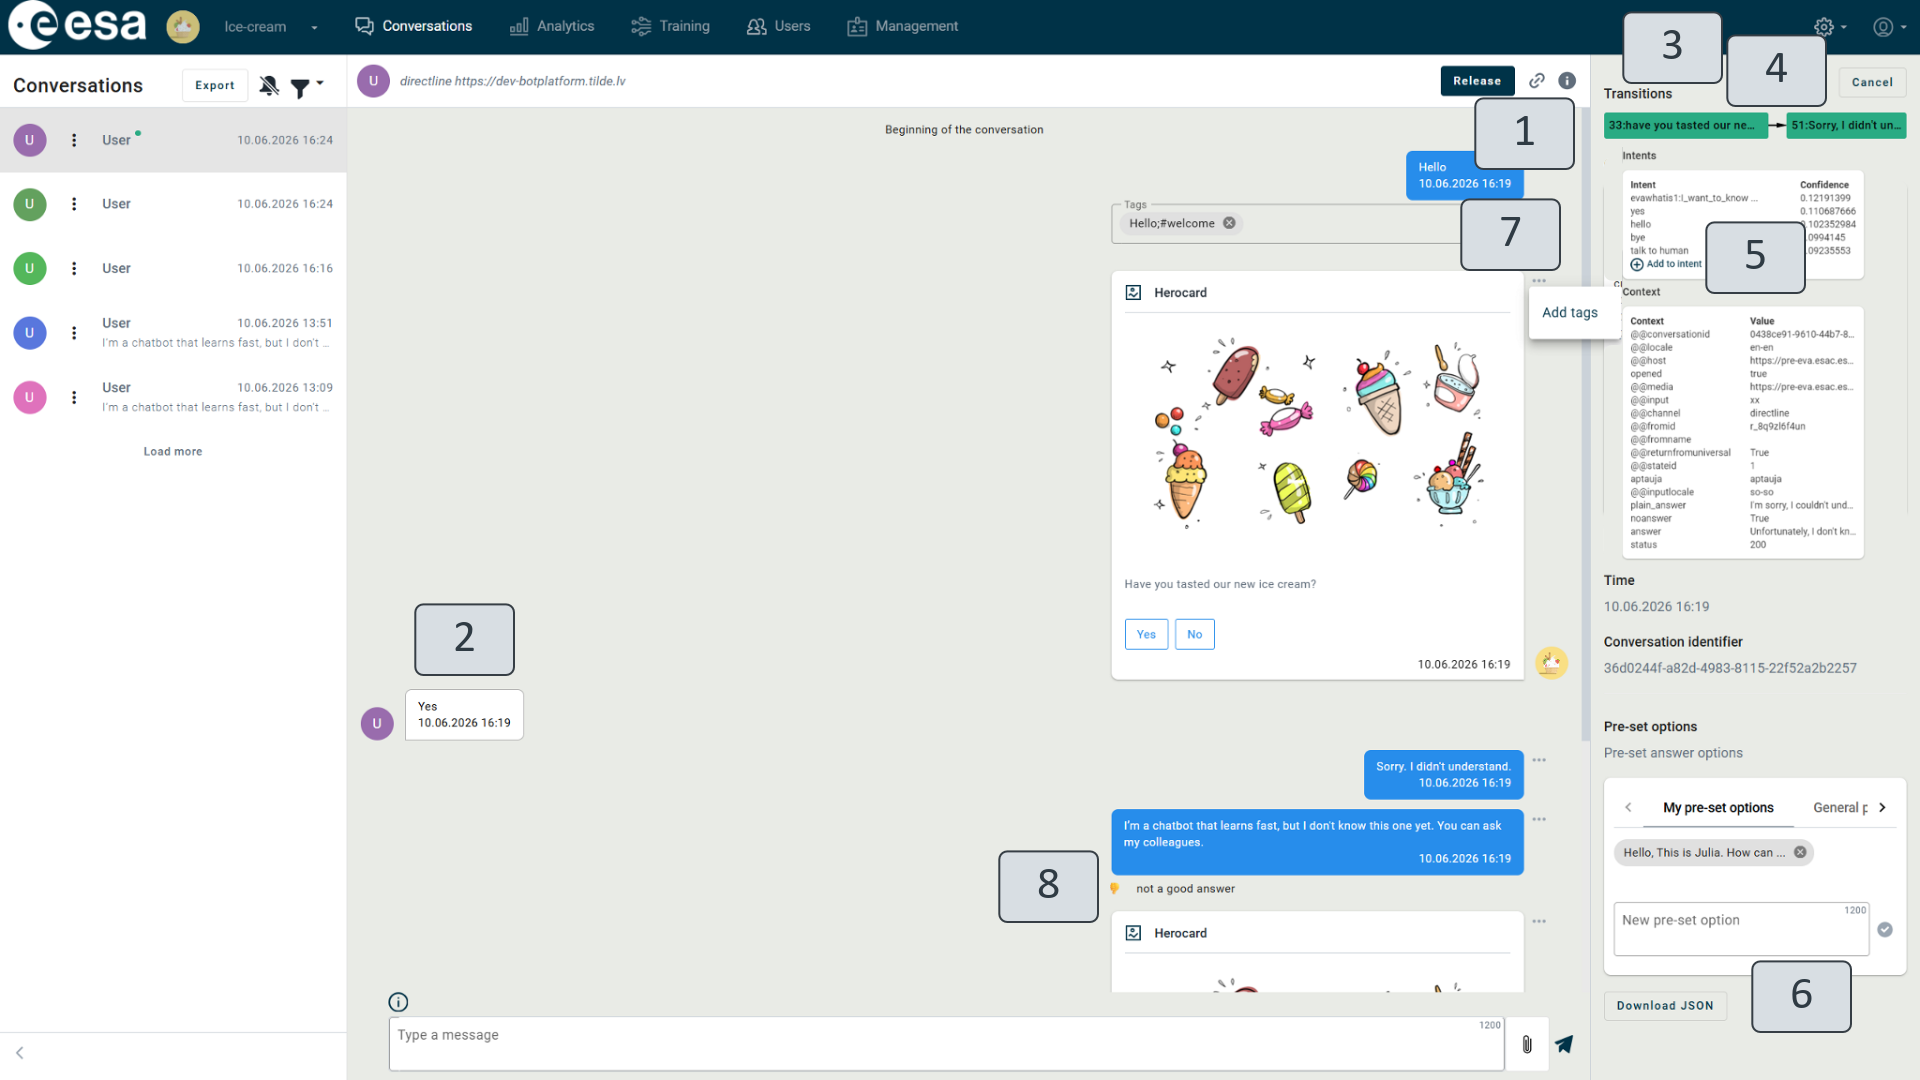
Figure 32. Conversation analysis
You can obtain the following information from the displayed data (Figure 32) (3):
- transitions - indicate the state from which the VA has moved in the scenario;
- intents - indicate the intent determined by the intent detector, immediate intents and confidence regarding such;
- entities - indicate the entities found;
- context - indicates variable values saved in context;
- time - shows the time and date when the message was received.
- conversation identifier - the conversation identifier is displayed.
- pre-set options – clicking the “Take over” button (Figure 34) (1), displays available text templates (Figure 35) for use in taking over the conversation.
- Current conversation data for download in JSON format (6).
By clicking "Add to intent" (Figure 32. Conversation analysis) (5), you can add a user phrase for which the intent was incorrectly detected to the correct intent. The example adding window opens (Figure 33) (1), and you can choose the required intent (3) where to add the phrase. If none of these options is valid, you can look for appropriate one (4) in the search field. For the new intent to work, the intents must be published before in the intent view or scenario view. When information is specified by clicking the "Save and close" button (6), it is saved and the example adding window is closed. If the changes made do not need to be saved, click on the "Cancel" button (5) - no changes will be made and the example adding window will be closed.
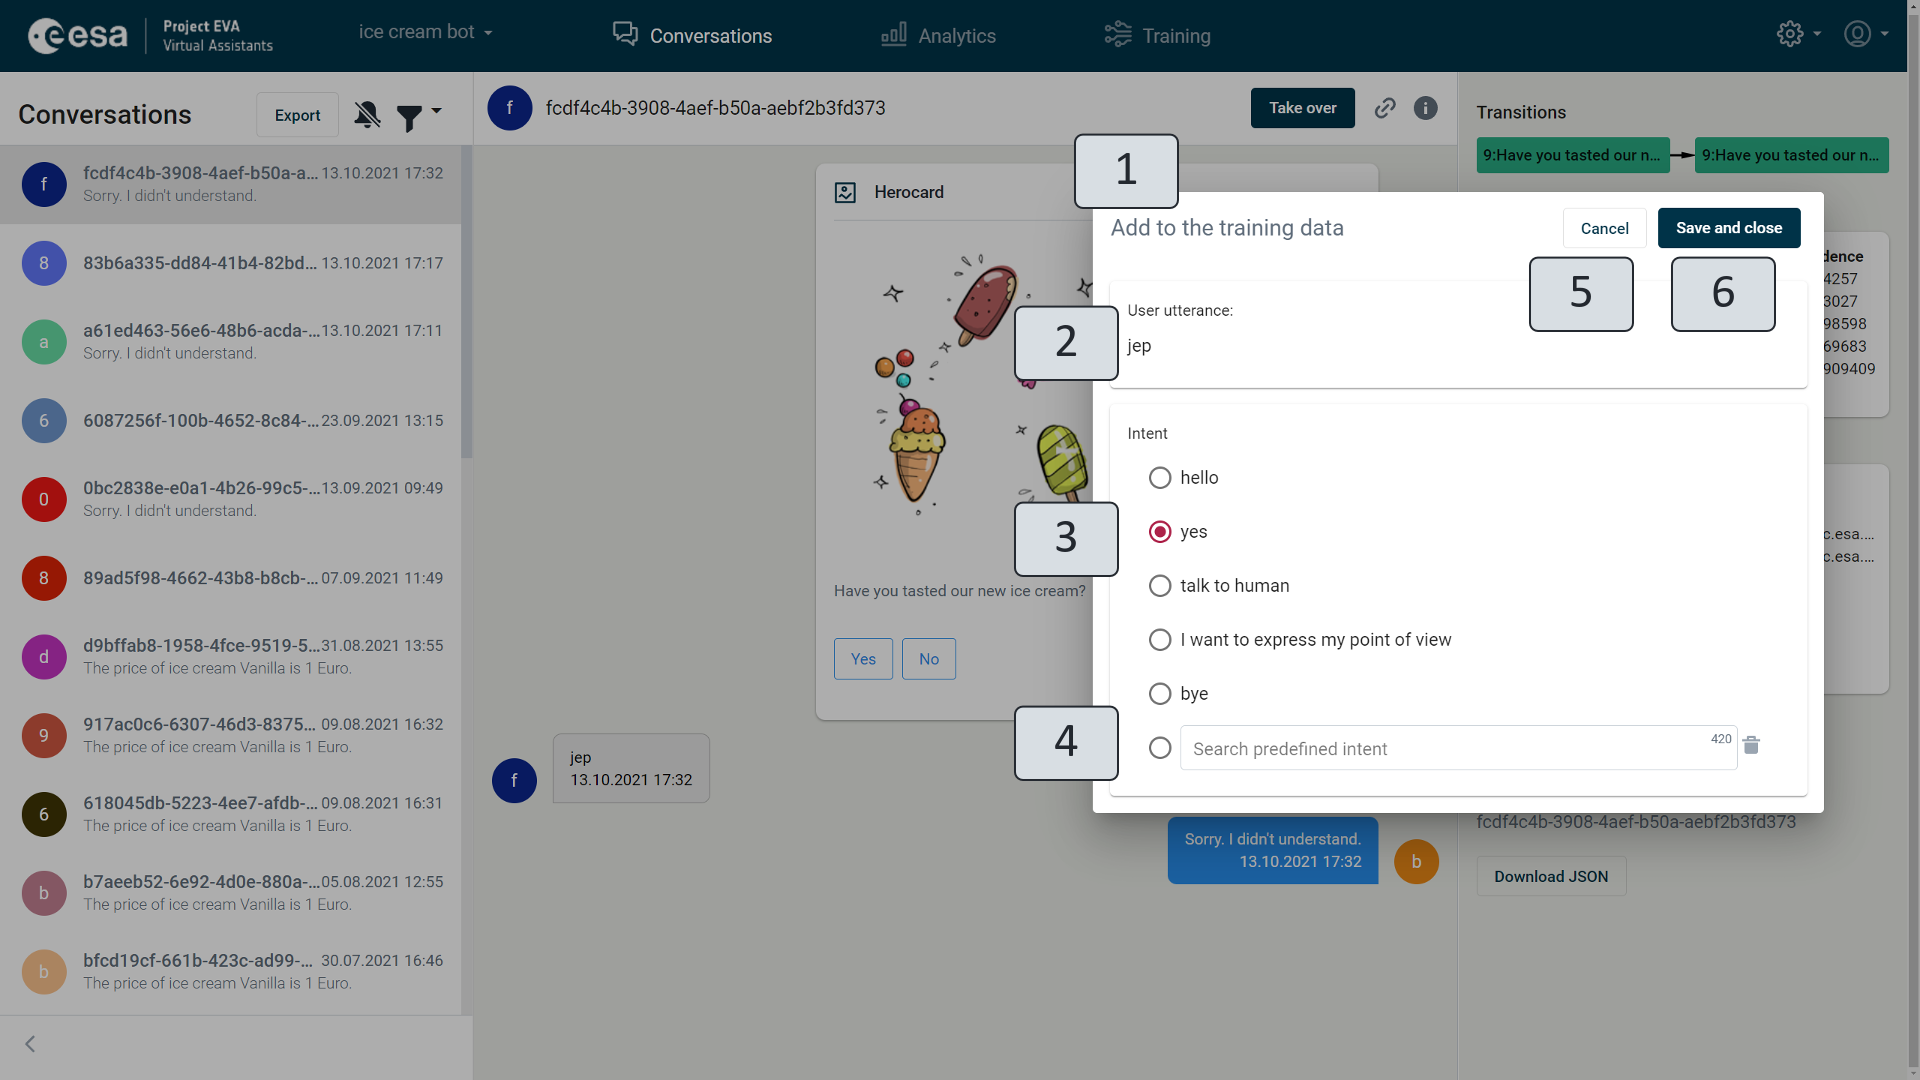
Figure 33. Example adding window
Conversation takeover
The conversation can be taken over by clicking the "Take over" button in the open conversation (Figure 34. Conversation takeover) (1).
By taking over the conversation, the VA's conversation specialist can take over the conversation and proceed in place of the VA. If the conversation is taken over, the VA doesn't respond to it. Taken over conversations are marked with a green dot in the list, whereas conversations with new messages are shown in bold.
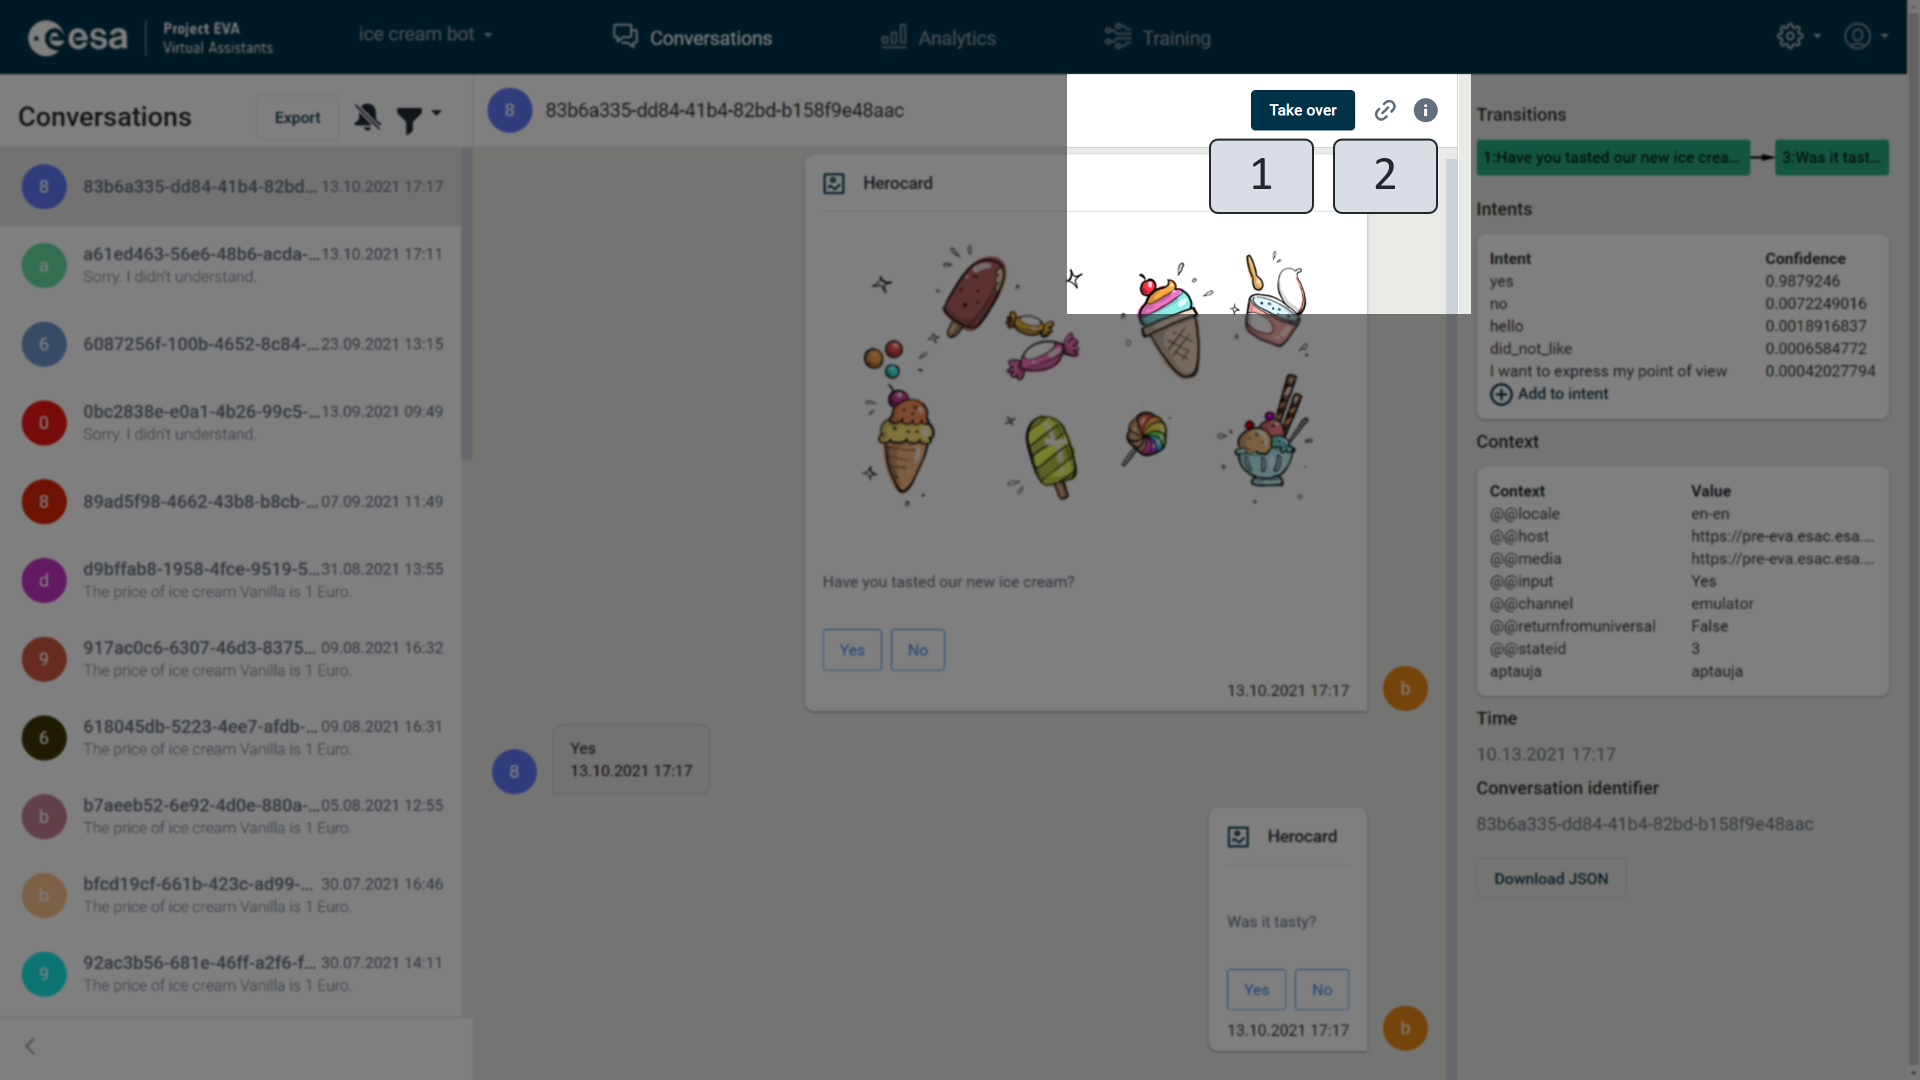
Figure 34. Conversation takeover
Next to the takeover button is the clip icon (2). By clicking on it, you can copy the conversation link to be viewed so that you can share it.
During a conversation, a VA user may request a conversation with a person. In this case, the conversation is marked with a gray dot and moved to the top of the conversation view.
When a conversation is taken over, the text input field (Figure 35. Taken Over Conversation) (2) appears at the bottom of the conversation window, where you want to specify the message to the user and click on the arrow (3). If the operator who has taken over the conversation wishes to send an image or document to the VA user, click on the clip icon (4).
Next to a taken over conversation, you may see a green point (1) (an indicator that someone has taken over the call and answered the user in question).
During taken over conversations, if the user has sent messages that the virtual assistant administrator has not read, notification counters appear under the "Conversations" view name and the name of the relevant virtual assistant is shown.
Once a customer service professional or the user of the site takes over the conversation, information with the username appears in the conversation window (11).
A person taking over a conversation can obtain information about sensitive user data (read more at the end of the subchapter "Context" of the chapter Advanced), if available to a virtual assistant and included in a scenario, by receiving user data. This information is known only to the virtual assistant and the virtual assistant user who is interacting with it. It is not visible to anyone else on the site unless specifically requested. The information is defined in the output with the identifier "get_client_info_msg", which specifies in a special way the identifier of the context variable (with two underscores in front of it) in which the user data is retrieved. Information is retrieved by clicking on the information icon marked "I" in the conversation. The conversation will display previously undisclosed user data. (12) If you switch to another conversation, release a conversation or later view a conversation with other conversations in the conversation history, the user data will not be visible, only the message "Client info requested" (13) will appear to indicate that the person who has taken over the conversation has viewed the user data.
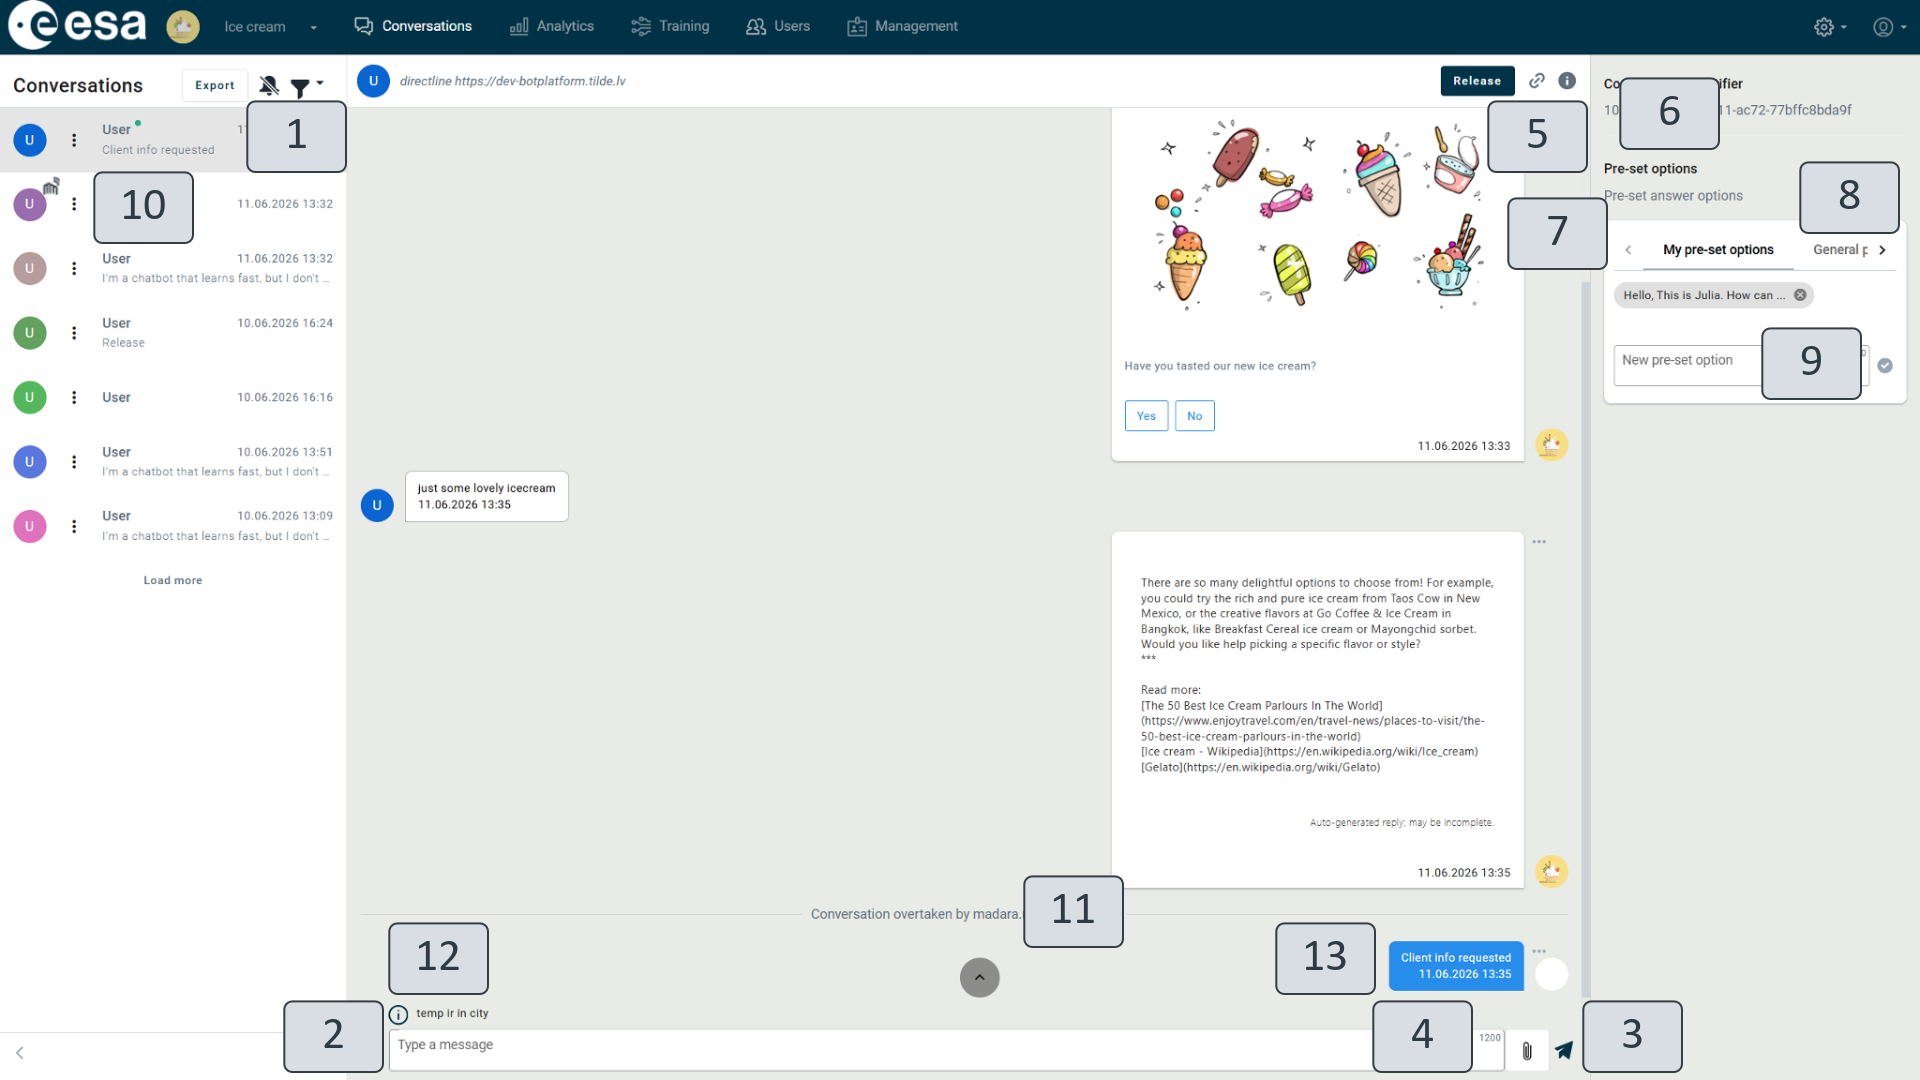
Figure 35. Taken Over Conversation
You can use pre-prepared text fragments in a conversation with the user. When you click the information icon (5), a conversation analysis window appears on the right side of the screen, with pre-prepared response messages – pre-set options (6). Two types of pre-set options are available:
- “My pre-set options" (7) – personal responses to different situations (private, available only to the person who took over the conversation);
- "General pre-set options" (8) – VA administrator can prepare response options available for all users of the Conversation view.
To create a new pre-set message, you must click “My pre-set options” (7) and type the text you want in the “New pre-set option” (9) field (for example, "Hello! My name is Sarah and I’m the support manager."). To save a record, you must click the tick mark icon  . To delete an unneeded response, you must click the cross icon
  next to the corresponding answer.
From the available options, you can select the most suitable for a conversation with the user. When you click a pre-set option, it is automatically copied to the conversation message field (2) and is ready to be sent or adjusted. To send the pre-set option to the user, click the arrow (3). When ending a conversation with the user, you must click on the “Release” button (14). The user sees the operator icon on his side in the chat window next to the answers belonging to the support specialist.
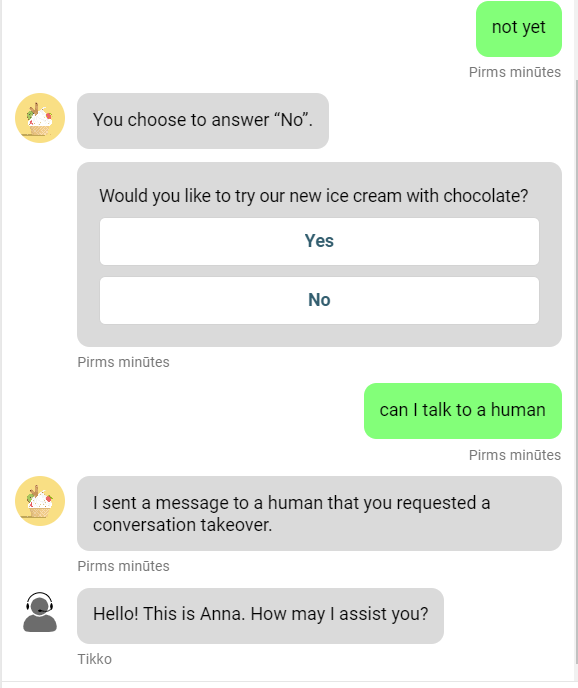
Figure 35.1. Taken over conversation in the chat window
When the operator releases the conversation, it is returned to the VA. However, the VA waits for the next user input to continue the conversation. If you need to provide the user with a start menu, a conversation evaluation questionnaire or some other information immediately after the conversation is released, the scenario can include a context variable with the identifier @ @releasestate (Figure 35.2.1), which can indicate to the VA which state to go to after the conversation is released by the operator (Figure 35.2. 2, 3).
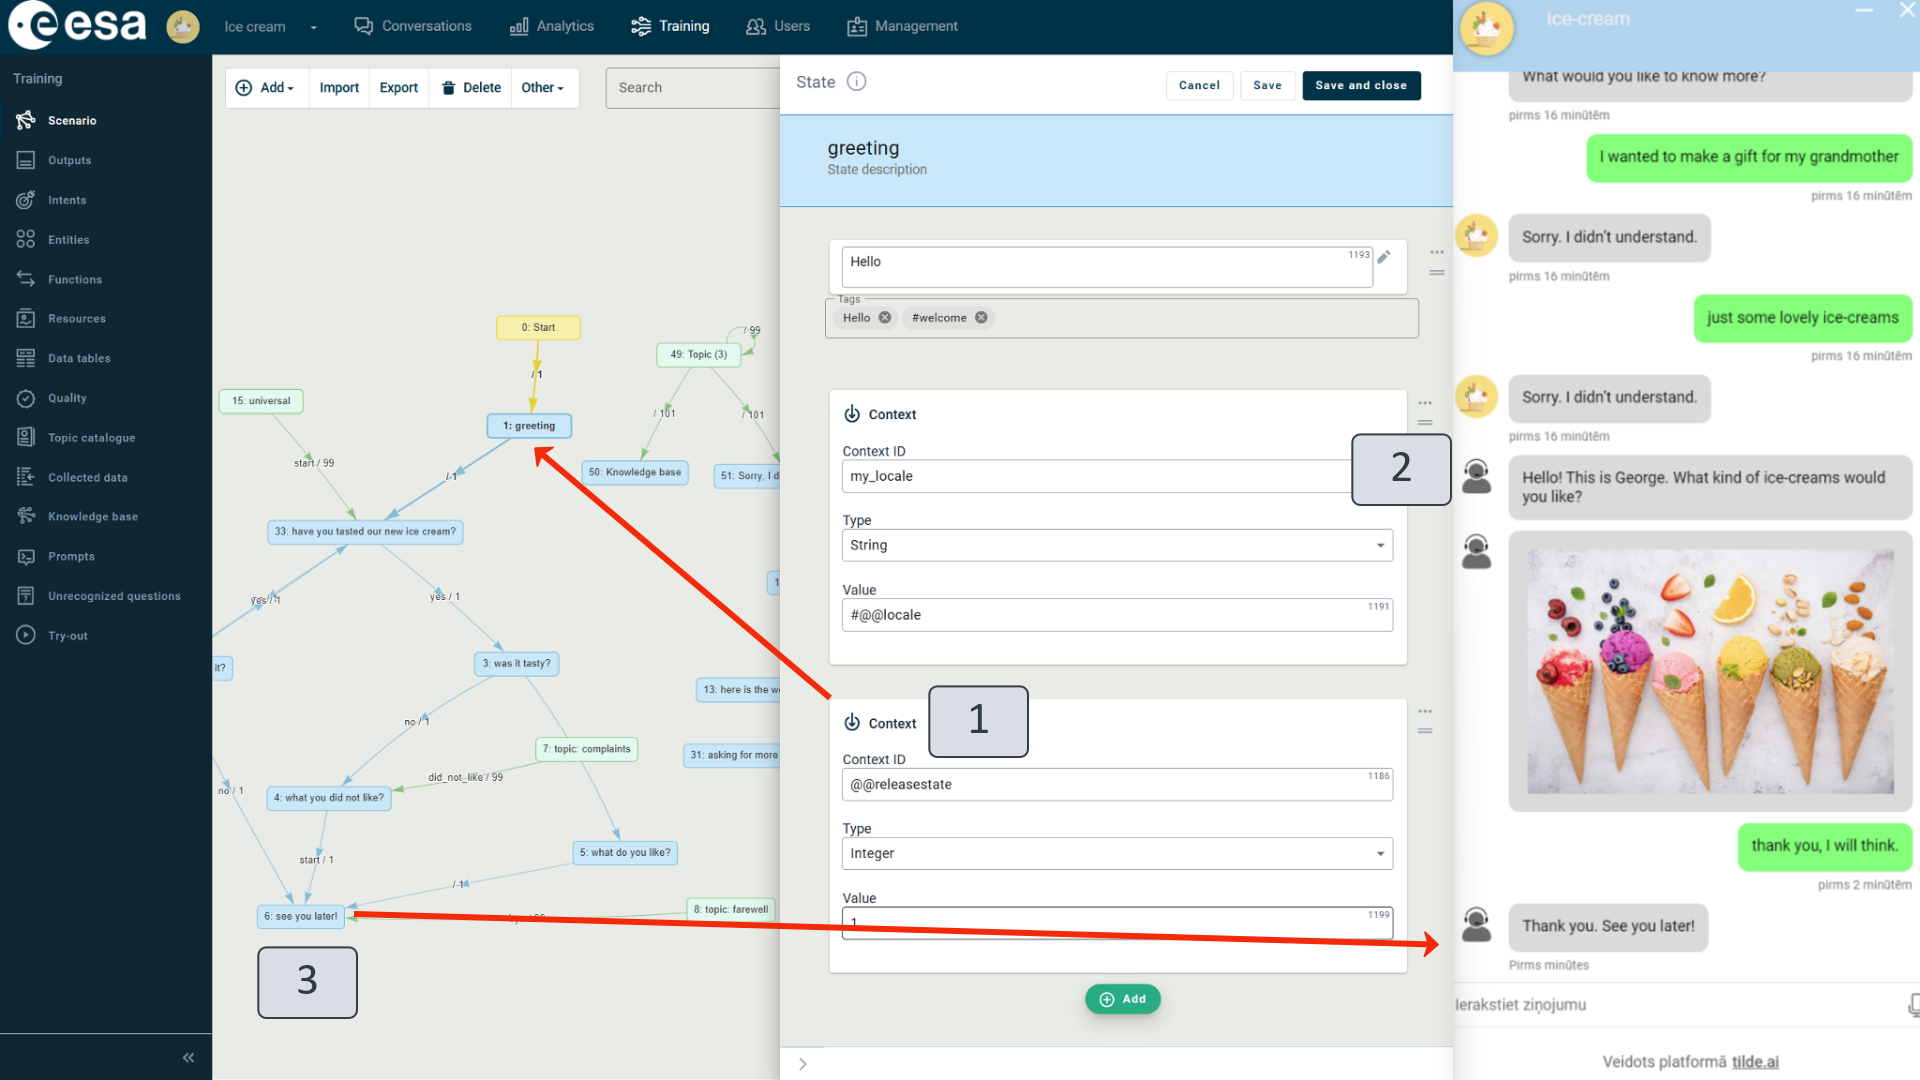
Figure 35.2. Release of the conversation and continuation
Analytics
Analytical data on VA usage is available in the "Analytics" view (Figure 36).
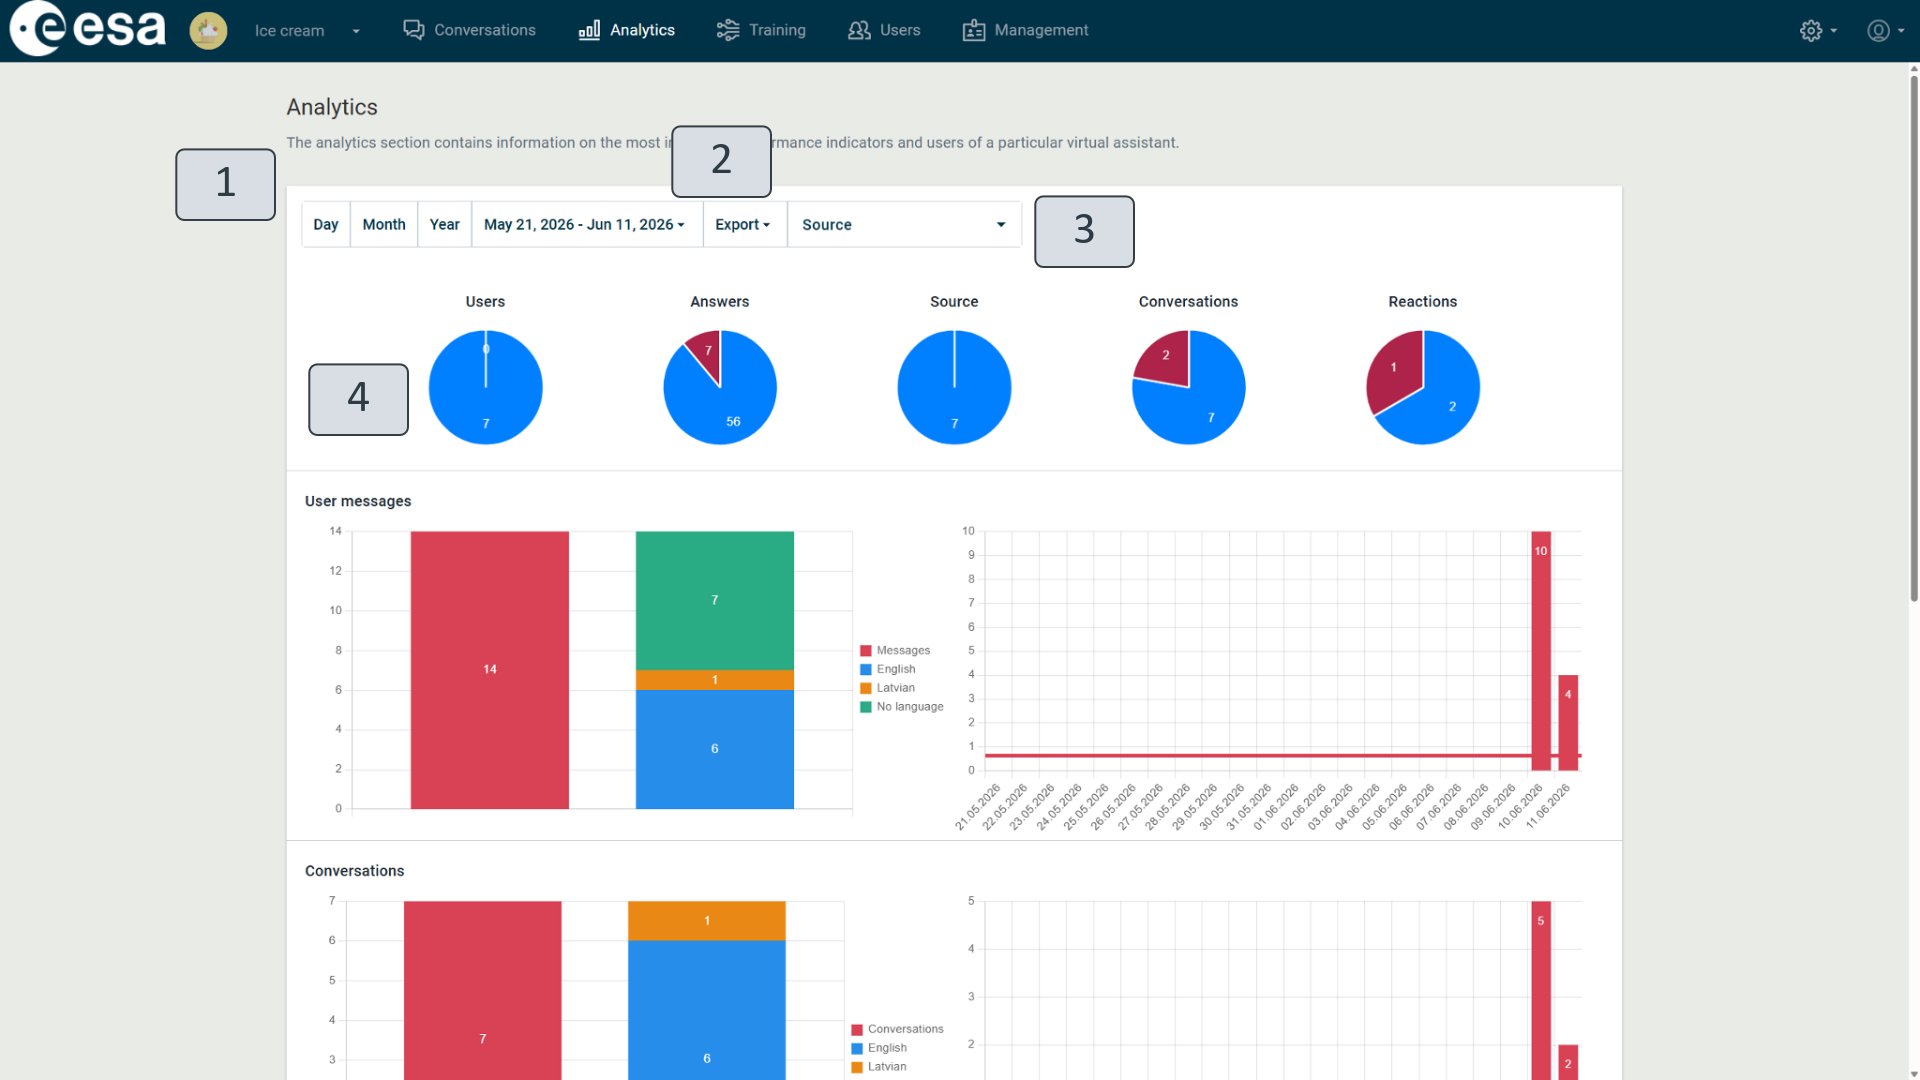
Figure 36. "Analytics" view
Data can be viewed by specific periods (Figure 36) (1): day, month, year, as well as a chosen period of time. Export for more detailed analysis is available for all data in this view in two formats: XLSX and CSV (2). If your virtual assistant is deployed across multiple channels, you can also view analytics data from each source separately. You can use the search option in the source selection field to find the source you're looking for more easily. (3)
By pointing the mouse pointer at a given diagram, a more detailed explanation of the displayed data and its breakdown can be obtained.
At the top of the view, the pie charts show this VA usage data (4).
- Users - new users and those who have contacted the VA repeatedly.
- Answers - VA answers answered automatically or taken over.
- Source - where users accessed the VA from (different sites).
- Rating - how users evaluate the conversation with the VA.
- Conversations - with content: the user has sent a message to the VA or has clicked on the button at least once; conversations - not started: the user has only opened the conversation window.
- Reactions – if the users evaluated the virtual assistant's responses with a reaction icon (thumbs up or thumbs down) during the conversation, the total amount of positive and negative feedback is displayed.
If more than one language is used in the VA's contact with users, language usage information is also available in analytical data. Column charts (Figure 37) provide information about user messages and conversations, as well as language statistics for the virtual assistant.
- User messages. The total number of messages received by the virtual assistant from users. Language breakdown of received messages: how many messages have been sent by users in one or another language. (1)
- Chart (2) shows the number of messages sent by users to a virtual assistant per day and per hour. The horizontal line shows the average number of messages sent during the selected period.
- Conversations. All conversations with content - those in which users sent at least one message to a virtual assistant or clicked at least one button. The overview of conversations by language. (3)
- The user activity chart (4) shows the number of user conversations with content (conversations in which the user has sent at least one message) by day. Selecting a day shows user activity in hours.
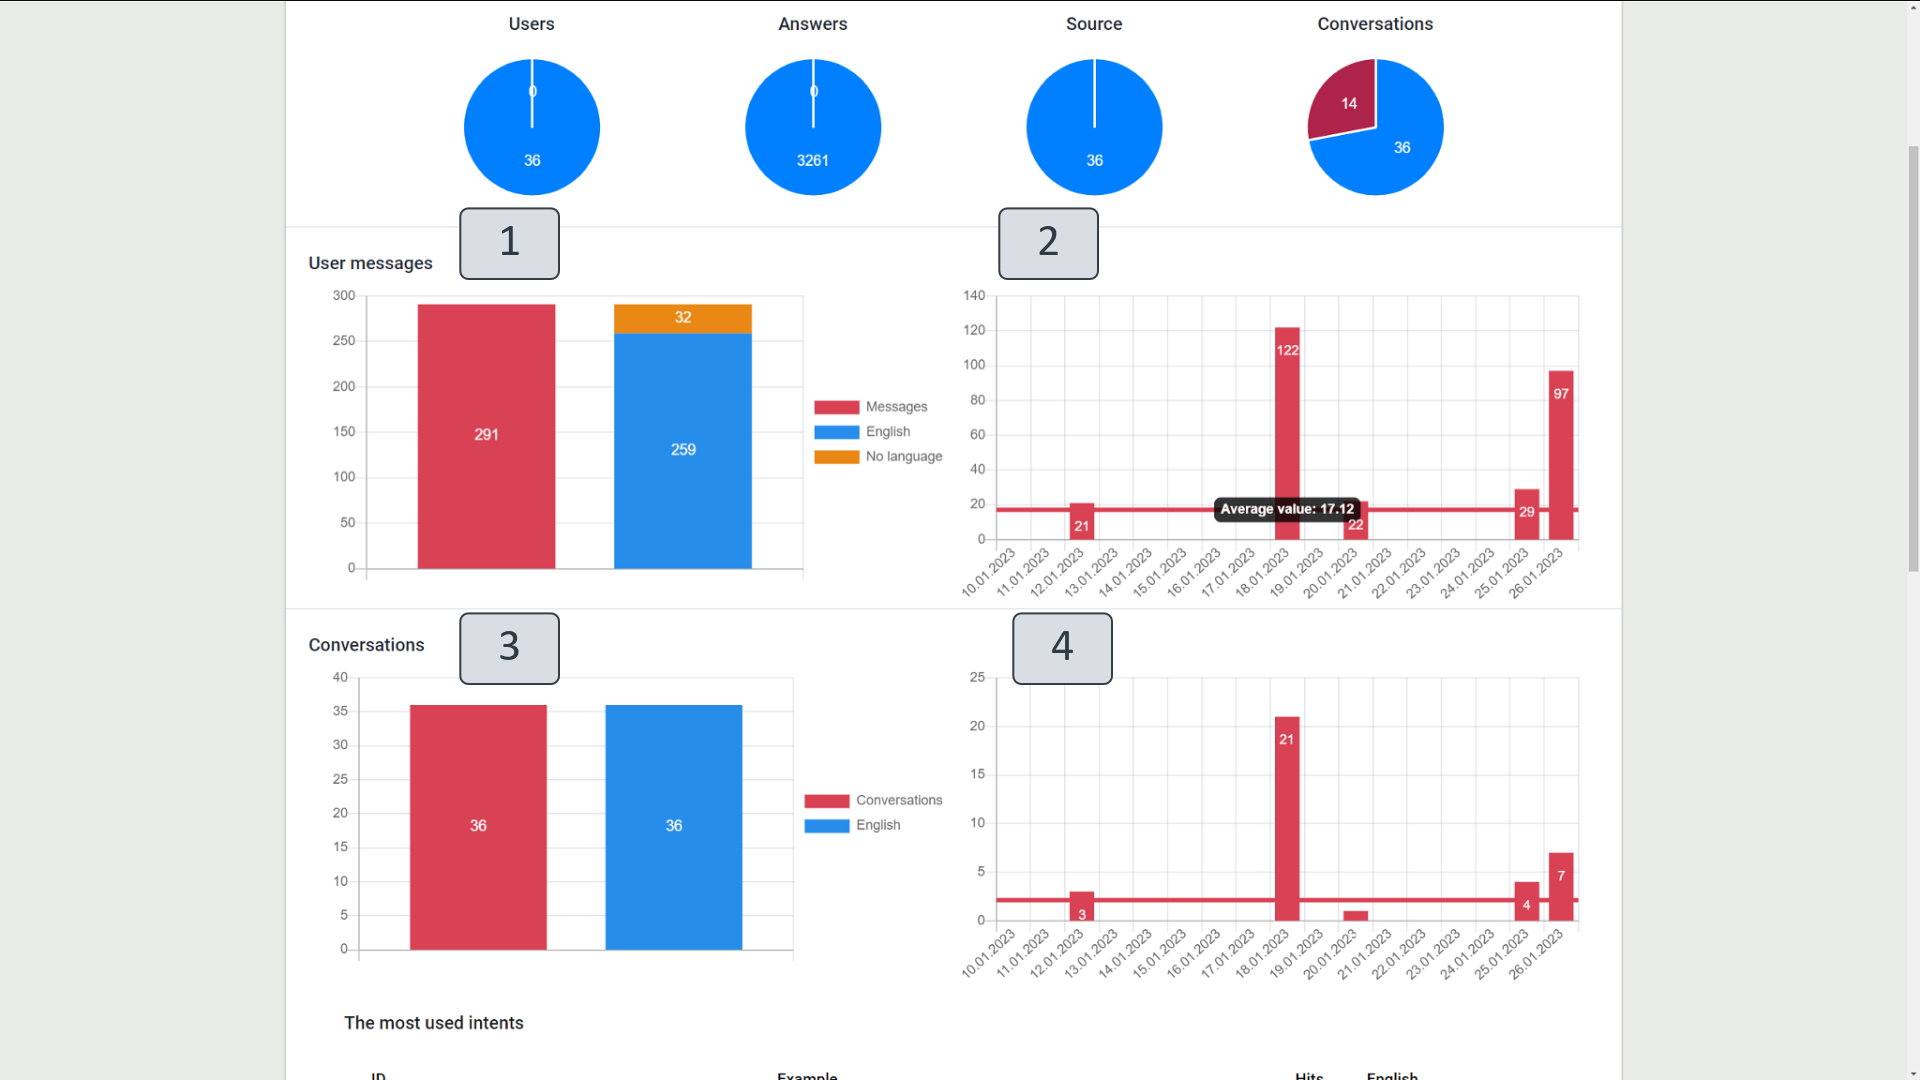
Figure 37. "Analytics" View - Languages and User Activity
By scrolling down the Analytical View window, you can get data about taken-over conversations (38. figure) (1) - which of site users has taken over conversations, the number of conversations taken over, and the total number of messages sent to customers. The second section shows typically used intents (2), that is, information about the questions most frequently asked by users. It is also possible to review the states in which the VA found itself the most during the scenario (3). This data should be used when planning the development of the VA and to understand which directions in the assistant's should be further developed if they are of greater interest to users, but which may not necessarily require a more detailed breakdown. The view will also display a list of the most frequently used tags (4) if they have been previously written in a scenario.
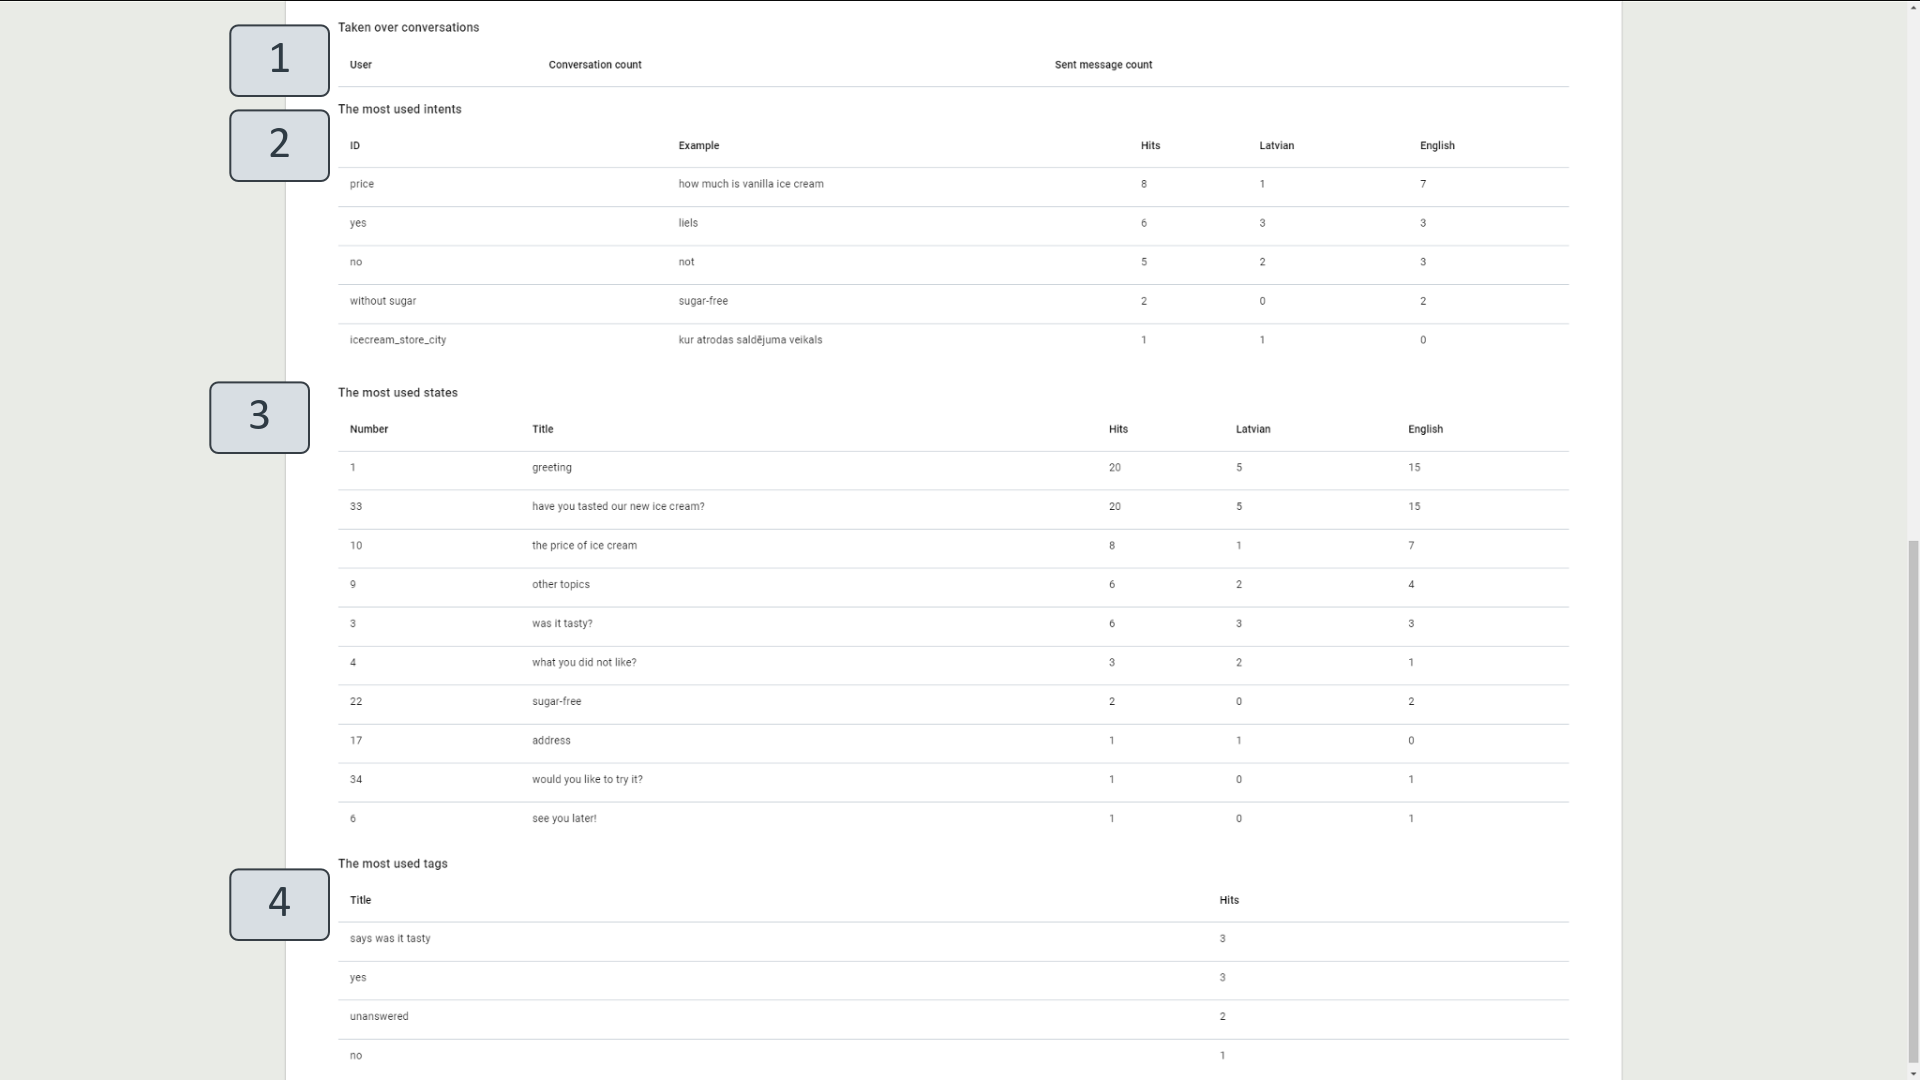
Figure 38. "Analytics" View – Most Common Intents, States and Tags
If a user wishes to receive a weekly summary of the Analytics view in their email, they must specify their email address in the StatEmailRecipient field (Figure 38.1.) (2) in the Management view in the settings for that VA (Figure 38a) (1). Once specified and the settings saved, the user will receive a message once a week from a Virtual Assistant at the specified email address with an Excel file attachment containing a weekly summary of the analytics data.
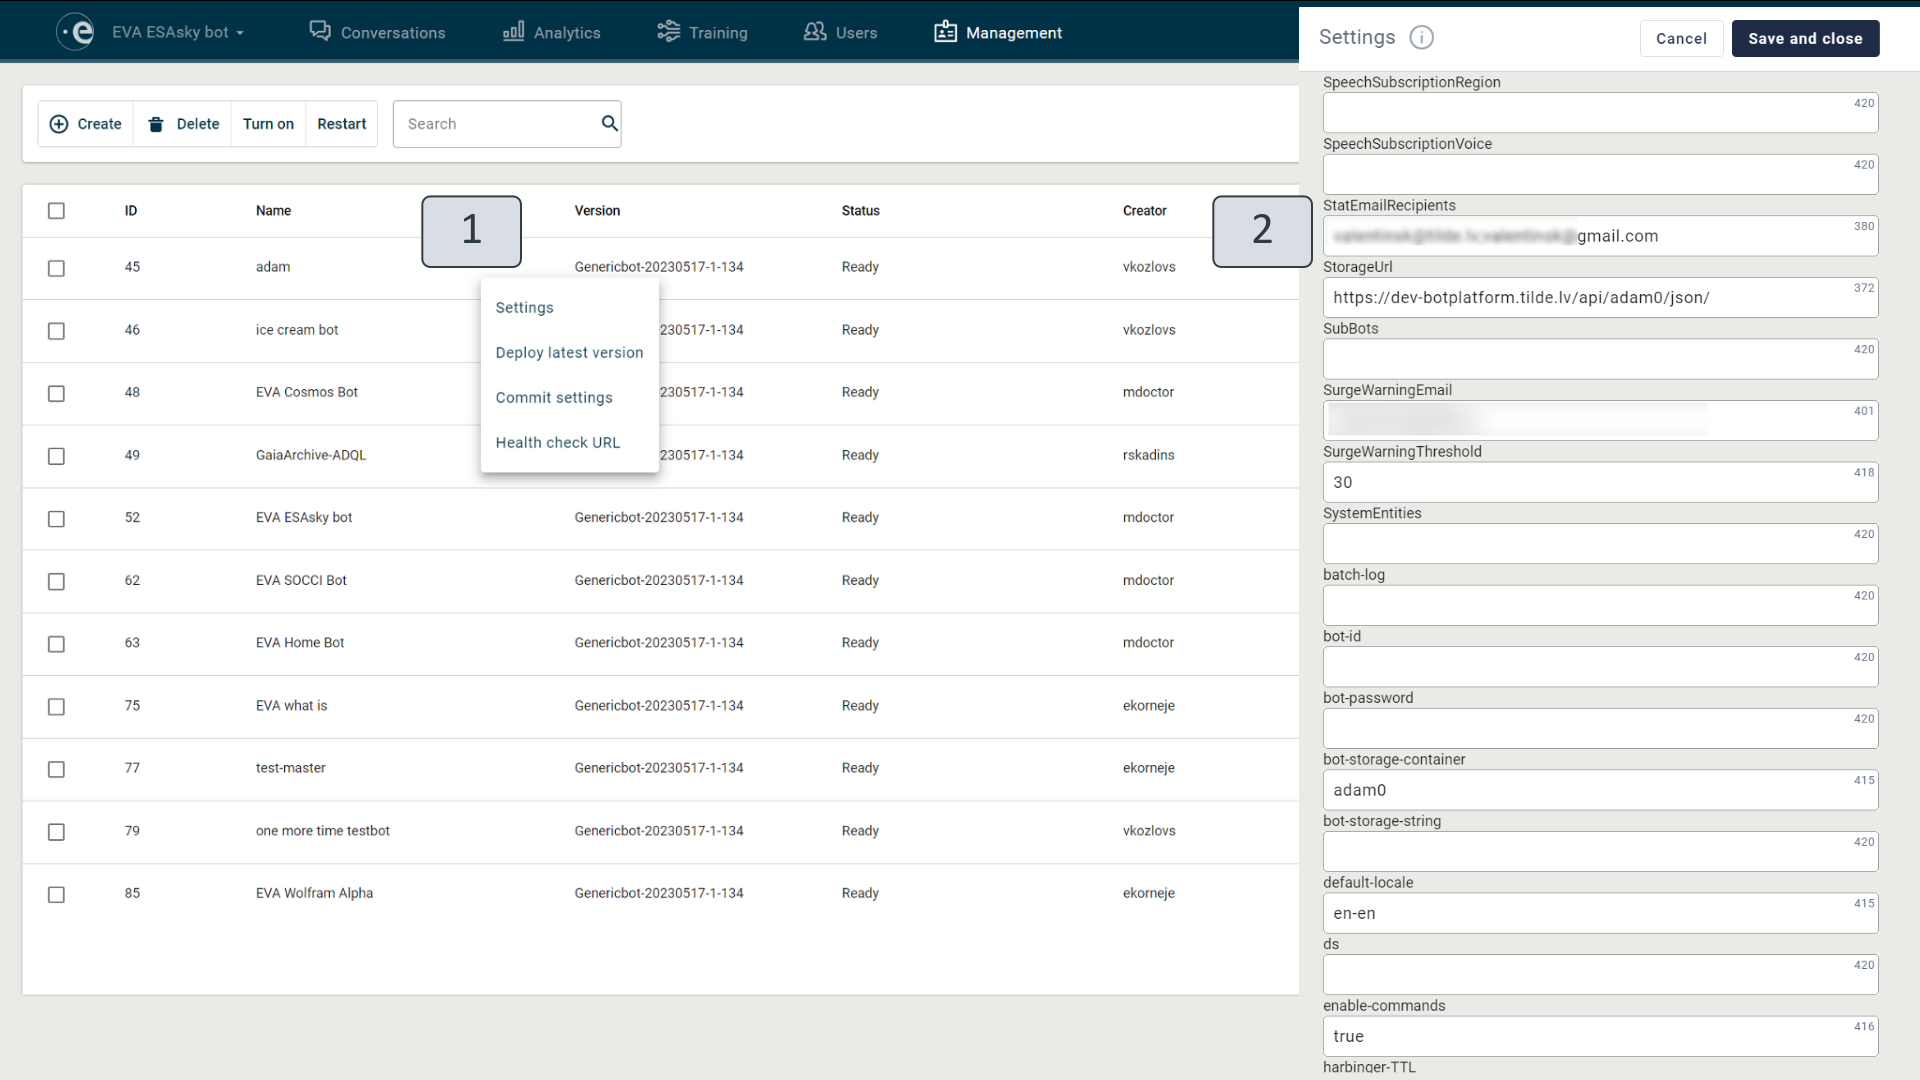
Figure 38.1. "Analytics" e-mail
Training
The training view is the most extensive of the VA management site views (Figure 39). It ensures that the VA can be set up in a convenient and functional way. The view can be accessed by clicking the title "Training" on the interface toolbar (1).
This view has its own separate vertical toolbar at the left hand edge of the interface (2). It has eight available subviews (3) and a try-out window that opens when you click the corresponding icon on the vertical toolbar. The view is the VA's trainer's chief tool.
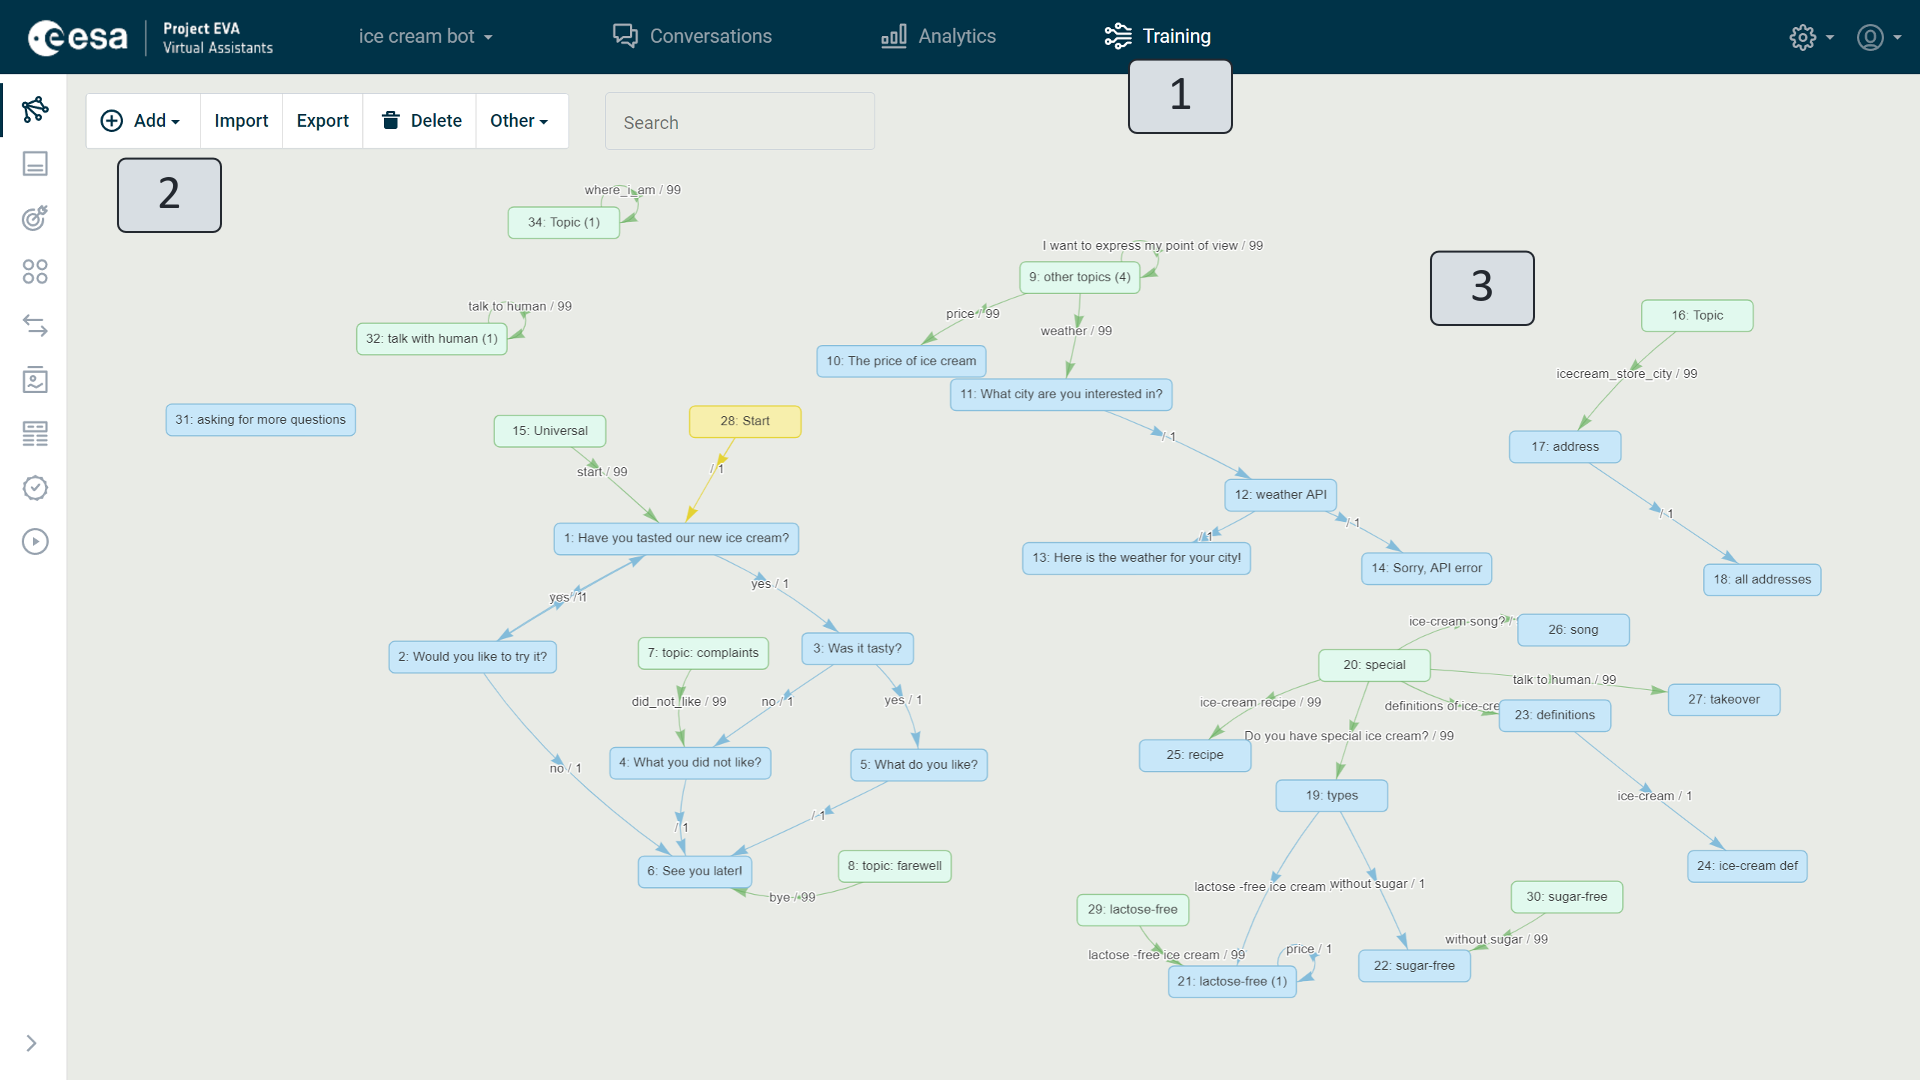
Figure 39. "Training" view
The training view toolbar (Figure 40) allows you to switch between the eleven training subviews (1-11) and open the tryout window (12).
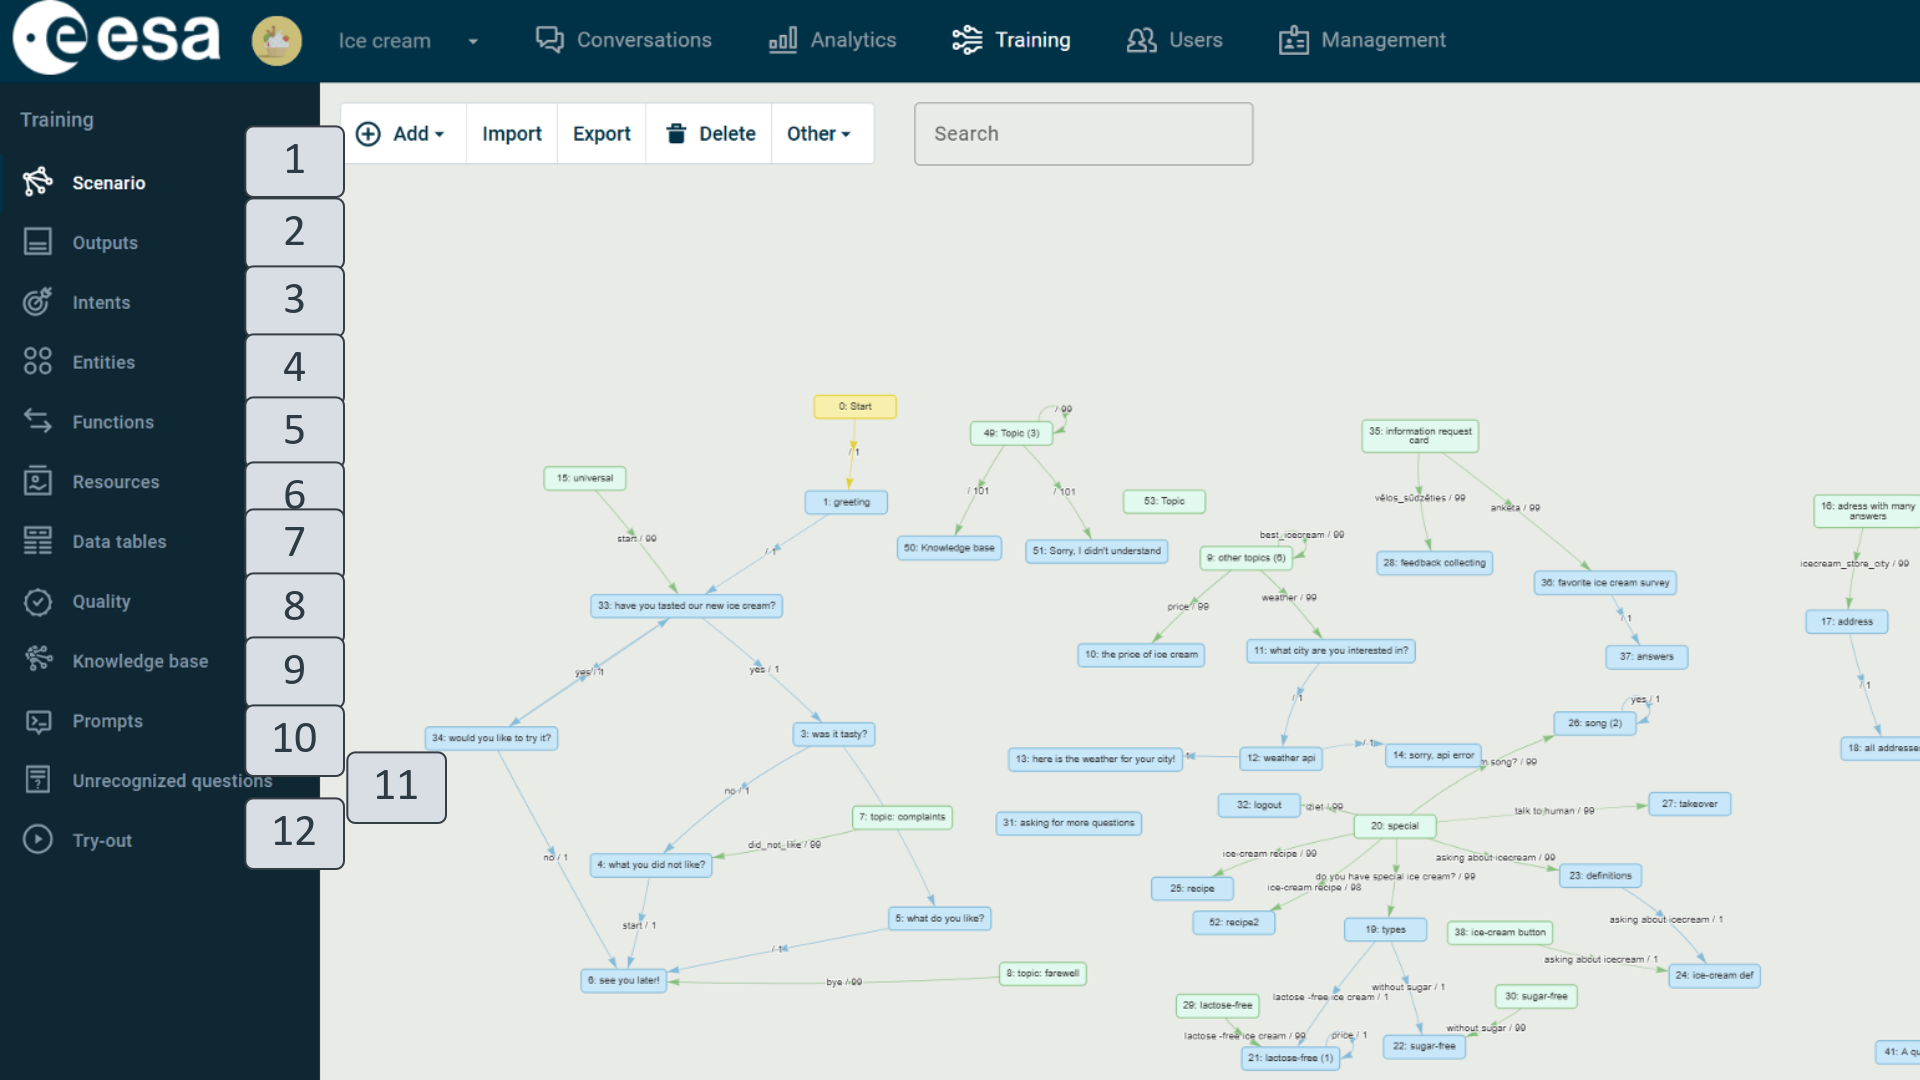
Figure 40. "Training" view toolbar
The VA training view toolbar icons, their titles, designated subviews and actions that occur when you click them are shown in the table (Table 4. "Training" view toolbar icons).
Table 4. "Training" view toolbar icons
Reference | Title | Action |
1 | Scenario | The VA scenario creation view opens. |
2 | Outputs | The VA output or answer message view opens. |
3 | Intents | The intent view opens. |
4 | Entities | The entity view opens. |
5 | Functions | The function view opens. |
6 | Resources | The VA resource view opens - including images, video files and audio files. |
7 | Data tables | The data table view opens. |
8 | Quality | The quality view - for estimating the quality of the intents - opens. |
9 | Knowledge base | The Knowledge base view opens with files and documents. |
10 | Prompts | The prompt view opens, displaying all the prompts used in the VA to automatically generate responses. |
11 | Unrecognized questions | The VA unrecognized questions opens. |
12 | Try-out | The try-out window opens for a trial conversation with the VA. |
Scenario
The "Scenario" training view (Figure 41) is designed to create a VA dialogue or scenario structure. It defines the order in which the assistant's conversation with the user will take place and on what topics. A schematic drawing of the dialogue is called a scenario (4). This view has a toolbar (1) at the top of the window immediately beneath the main toolbar. A search field (2) is also available, which is used if you want to find the desired state in the created scenario by name or number.
In the upper right hand corner of the view (3), a message is displayed to the user if the scenario has been change, which have not yet been published. For the scenario to be activated, you must publish it by clicking the "Publish" button.
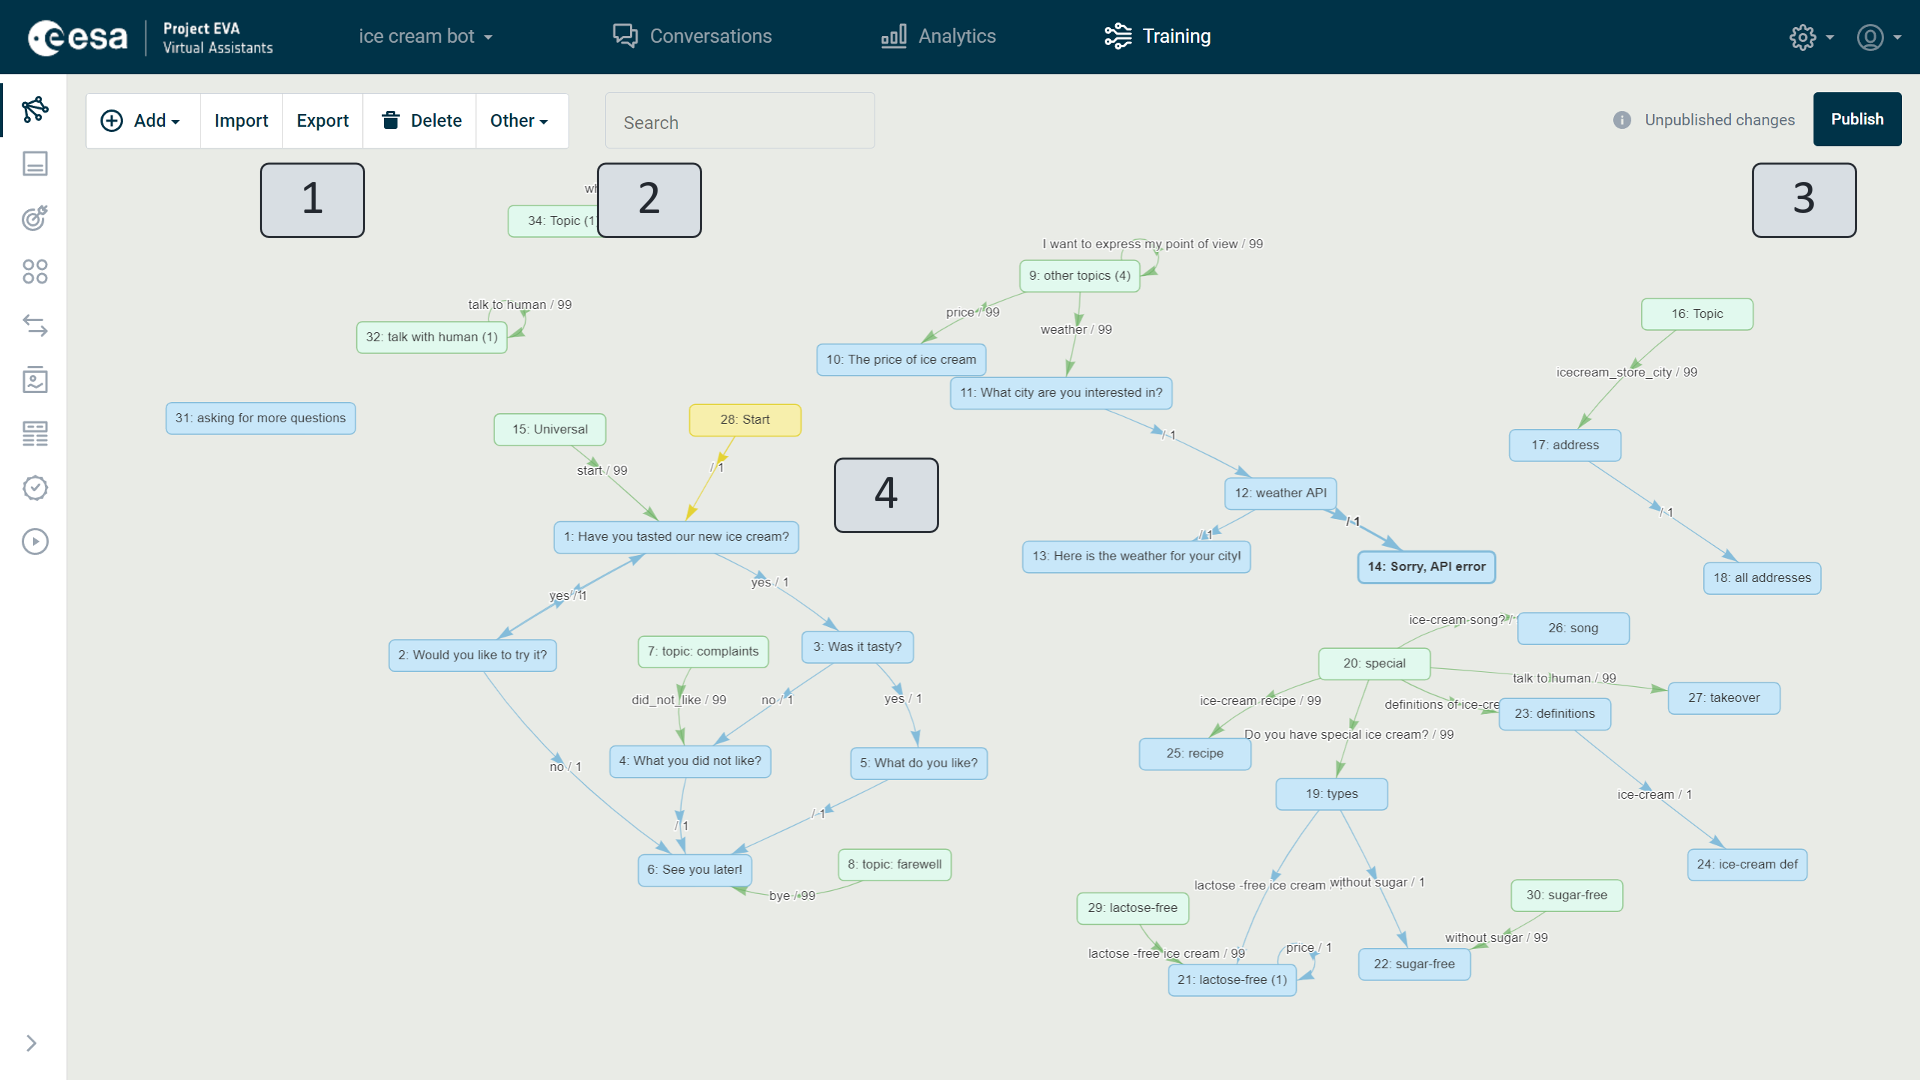
Figure 41. Training View "Scenario"
When you click a button, there are two options: "Publish" - only the scenario will be published - and "Publish all" will be published - the scenario and other changes made to the training intent and output views will be published. If there are errors in the scenario, a window with their list (Figure 42) appears before it is published.
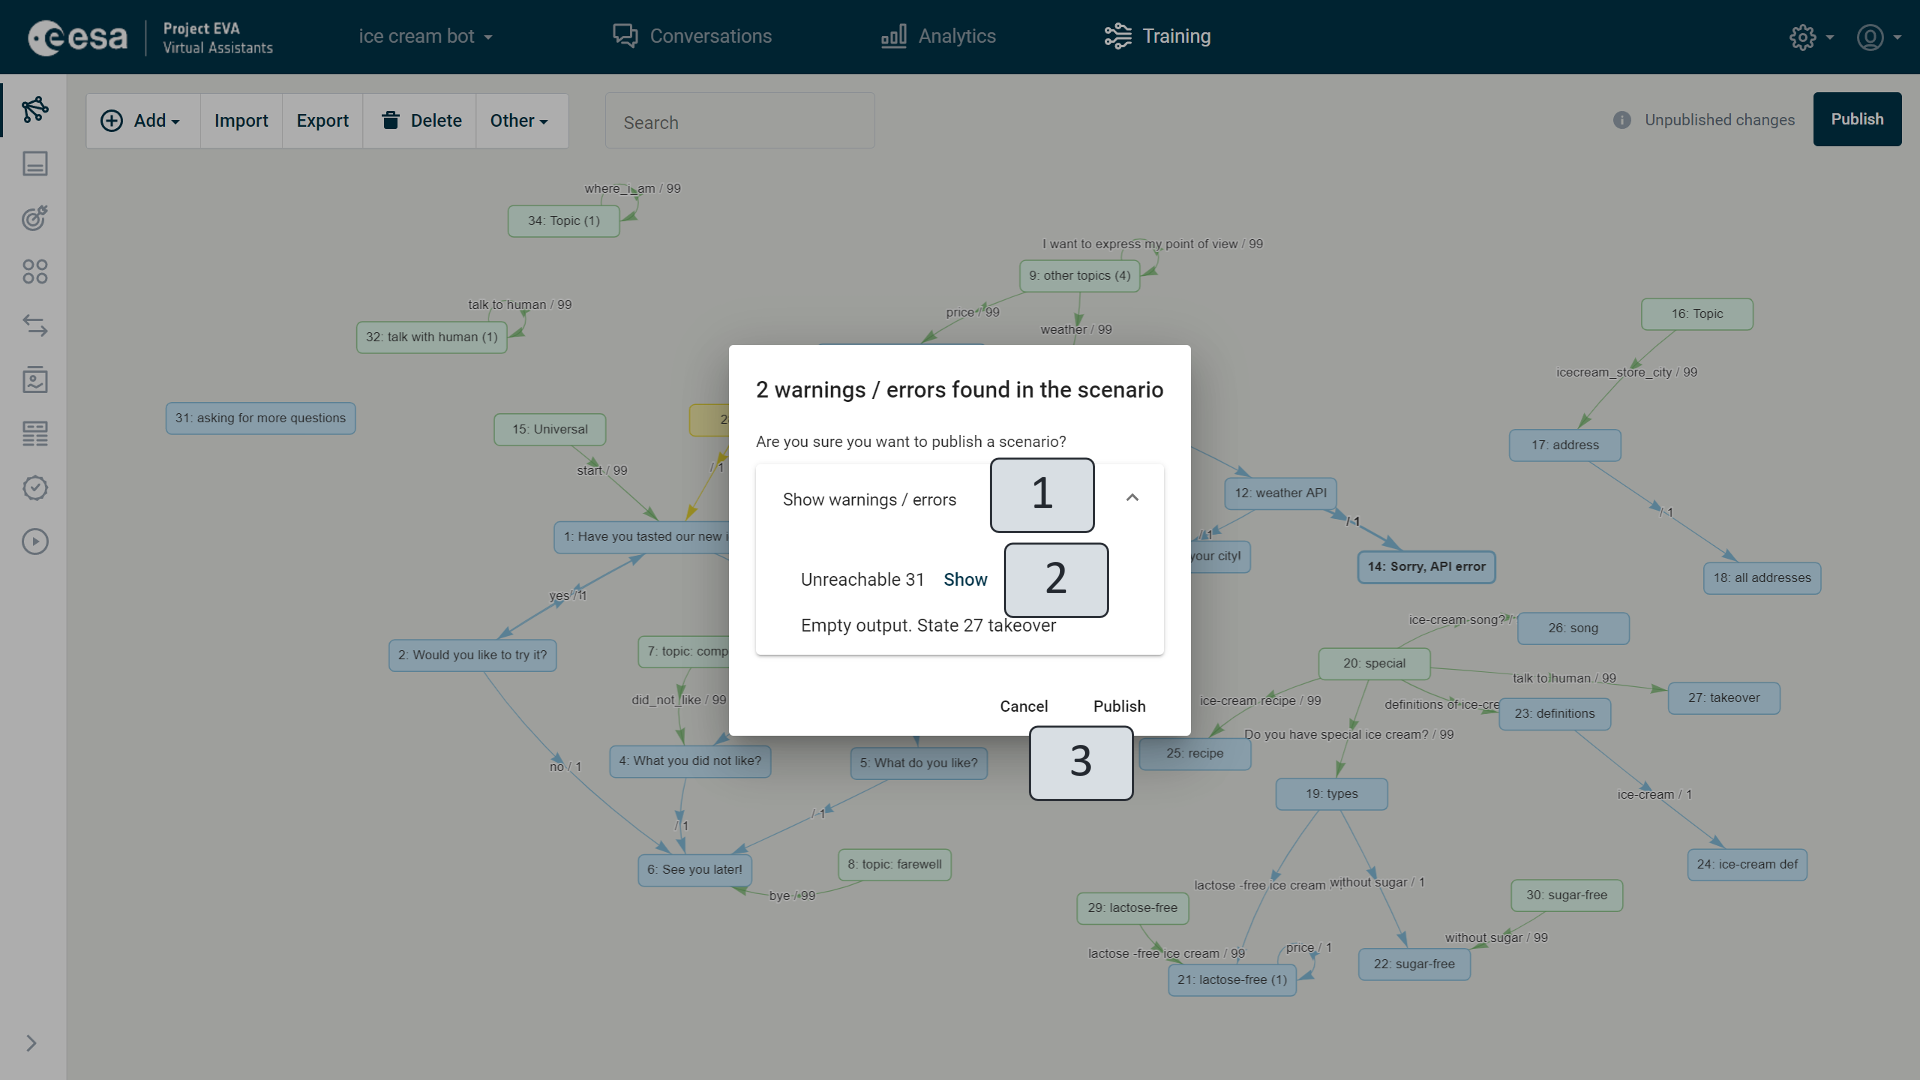
Figure 42. Window with scenario errors
You can expand the list by clicking the arrow (1) next to the title "Show warnings / errors." When you point to a specific error, the title "Show" (2) appears. When you click it, the scenario closes in on erroneous state or transition and opens the editing window so that corrections can be made. On the list, critical scenario errors are in red. Without correcting these errors, the scenario cannot be published and the title "Publish" (3) appears gray in the window.
When you click "Cancel" (3), the window is closed and the scenario is not published. When you click Publish, the window closes, the scenario is published, and the user is sent a message confirming that the scenario has been successfully published.
The scenario is drawn using the toolbar at the top of the view (Figure 43), the mouse, and the keyboard keys.
The main elements that the scenario is made up are shown in Table 5 and shown in Figure 43.
Table 5. Scenario elements
Reference | Title | Color | Description | How to add |
1 | Starting state | Yellow | Start of the dialogue. The conversation begins with this state. There is one of this kind. | On the Scenario toolbar: |
2 | State | Blue (usually);Dark blue (introduced but unsaved changes) | The place in the dialogue where action is taken: The VA provides an answer, asks a question, displays a link, or connects to an external service. | On the Scenario toolbar: |
3 | Topic | Green (usually);Dark green (introduced but unsaved changes) | The topic can be executed at any time in the conversation. May not be linked to any of the other states. | On the Scenario toolbar: |
4 | Transition | Green or Blue | A set of conditions that allow you to move from one state or topic to another state. | While holding the Shift key, the mouse drags the state or topic from which the transition starts to the desired state. Release. |
5 | Self-Loop | Green or Blue | Returns to the state from which it originated. Used to record simple questions and answers. | Click the state or topic where the transition should be and choose "Add question with answer" |
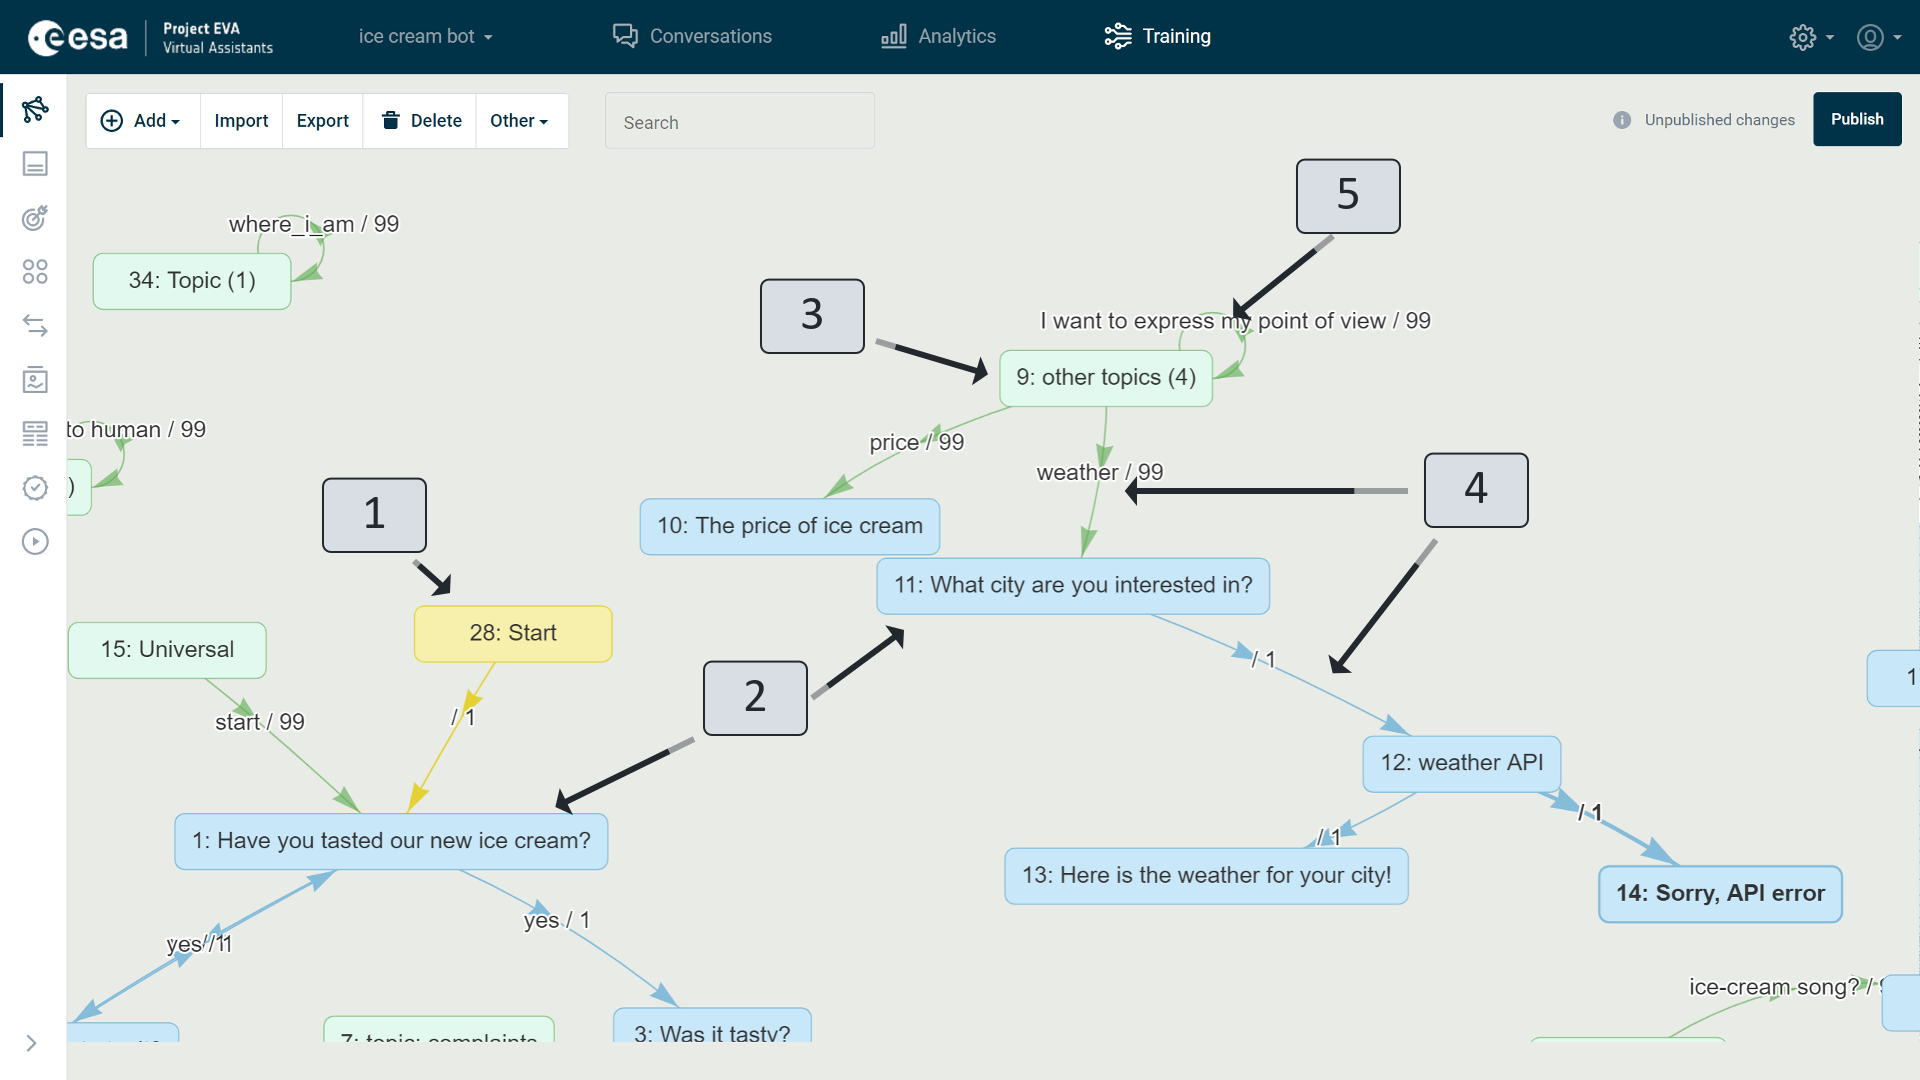
Figure 43. Scenario elements
The scenario view toolbar (Figure 44) enables you to interact with scenario elements.
In a dialogue, the yellow starting state is always the first. You can insert this into the scenario by clicking "Other" -> "Set Start" (5) on the toolbar. To add new states and topics, you must click "Add" (1). The drop-down menu offers two options: add a state or topic.
You can activate existing scenario elements – states, topics, and transitions – by double-clicking them with the left mouse button. When you double-click a state or topic, a red dot appears, and two types of action are available:
1. You can add a new state with a transition to the active state at once if you choose “Add” - > “New State” (Figure 44) (1) on the scenario toolbar.
2. Dragging the red dot with the mouse to another state or topic and releasing it creates a new transition.
After performing a double-click with the left mouse on the transition, two red dots appear, marking the transition borders – starting and ending points. You can change the transition location in the scenario by dragging the red dot with the mouse to the desired new location and releasing it.
A scenario that has already been created and is ready can be imported (2) from another VA or, if this assistant has been created, it can be exported (3). The scenario is imported and exported in JSON format.
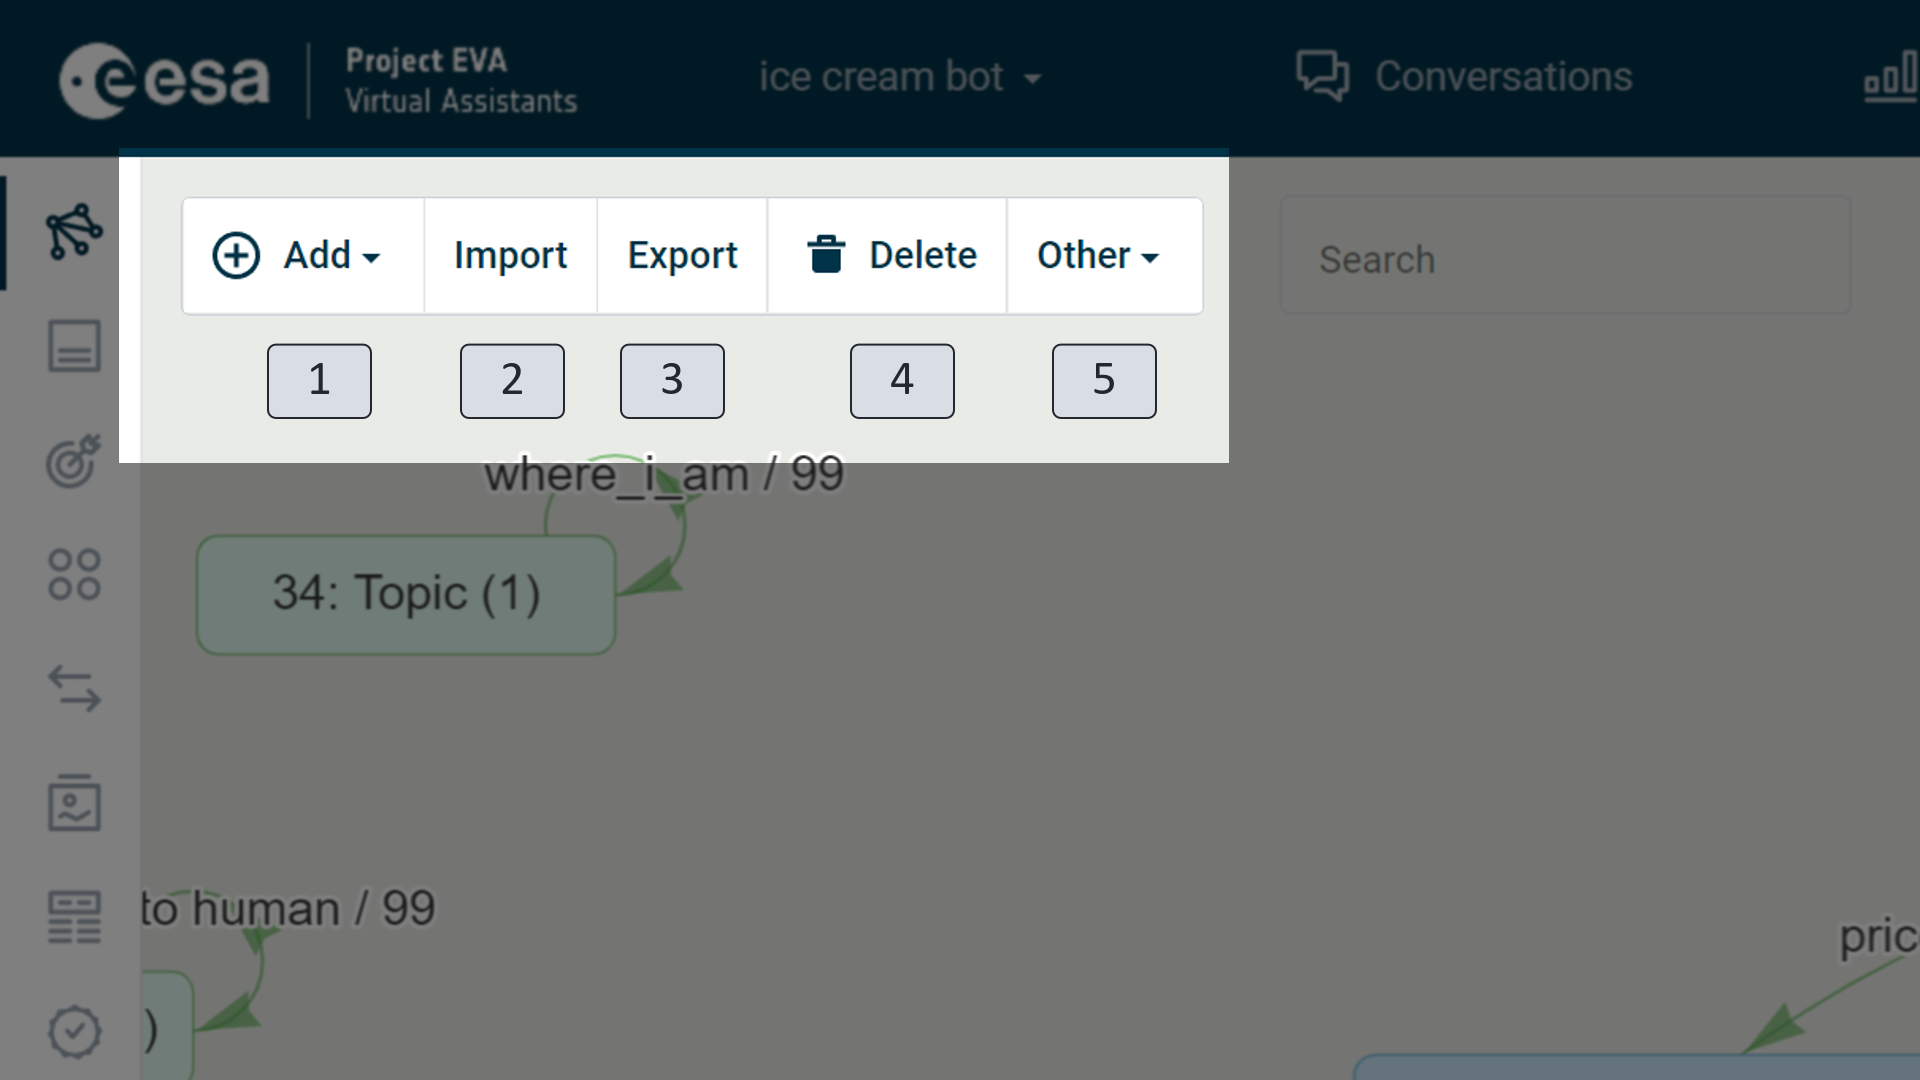
Figure 44. "Scenario" view toolbar
You can delete any element in the scenario, such as states, topics and transitions, by firstly clicking on it and then selecting the "Delete" button (Figure 44) (4) on the toolbar.
Work with the elements of the scenario mostly takes place in the editing windows. There are three types of editing windows: a state editing window, a topic editing window, and a transition editing window. The windows open on the right hand side of the view, adding a new state, topic or transition, and clicking the desired element in the scenario.
State Editing Window
When you add a new state or click a state scenario that has already been created, the state editing window (Figure 45) appears on the right hand side of the view, where you can fill in, change, and edit all information about the state, as well as the actions that the VA has to perform in this state. The only thing that cannot be changed is the unique number that is automatically assigned to each state and appears before the title of the state. This can be used to easily find the state in a scenario, even if the status titles are the same. When information is specified by clicking the "Save and close" button (5), it is saved and the editing window is closed. If the changes made do not need to be saved, click on the "Cancel" button (4) - no changes will be made and the editing window will be closed.
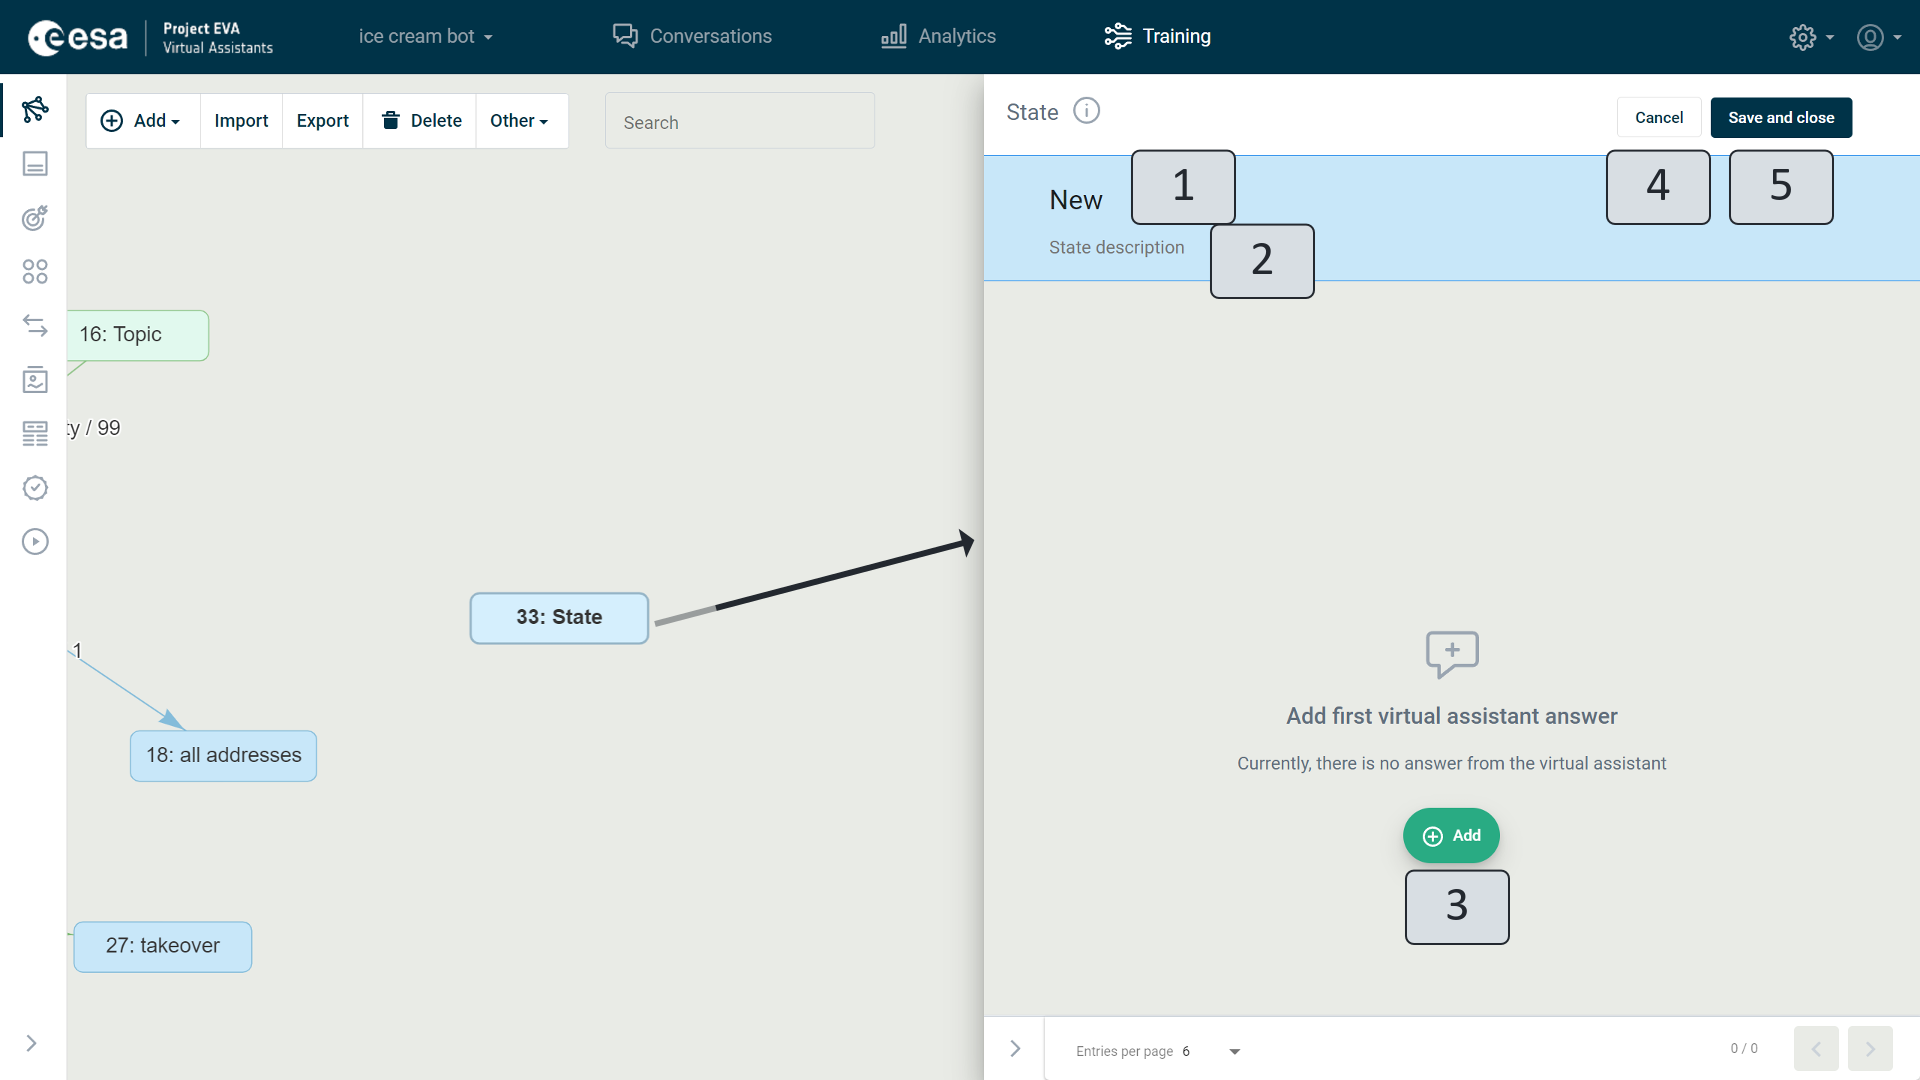
Figure 45. State Editing Window
In the "State" field (1) of the state window, you need to enter the state name. It is recommended to assign a name that clearly indicates the topic of the state, as this will be useful as the VA becomes smarter and the scenario expands. The state name will also be visible on the state's block in the scenario and can be used to locate a specific state in the scenario's search field.
To obtain even more insight into the actions defined in a certain state, you can also fill in the topic's description field (2), clarifying the description of the state. This field has is for information requirements only.
The specific action or virtual assistant's response to be expressed in the specified state should be indicated by clicking the "Add" button (Figure 45) (3). In the state, you can define one or more of the seventeen types of actions suggested (Figure 46) that the assistant needs to perform, as well as add a question with an answer. Further detailed discussion of each option.

Figure 46. Action types
Text
The simplest type of action is text (Figure 47). In this action window, you can specify what the VA should say to the user in the conversation.
In the output value field (1), you can add a text response in two ways.
- Record in full form immediately. (The composed text will also be automatically shown in the "Output" view as a new output with an identifier created from the first words of the text. When publishing a scenario, you should remember to choose "Publish all" so that new outputs also take effect.)
- Use a pre-prepared output published in the "Output" view. In this case, you have to start writing an output identifier in the output identifier field or a title from the output. By coincidence, available options will be offered. To choose the right one, click on it.
Options: sometimes, in order to give diversity to the VA's speech using of simple domesticated texts, answer choices should be specified. For example, the assistant not only answers a question about how it is with the words "Very good," but occasionally, in identical cases, "Excellent" and "Fine." By clicking on the plus sign icon next to the title "Add an option" (2), another output value field opens to type in an answer option. If several output values are defined alongside the same text action, the VA responds in a conversation with one of the options in a randomly selected sequence.
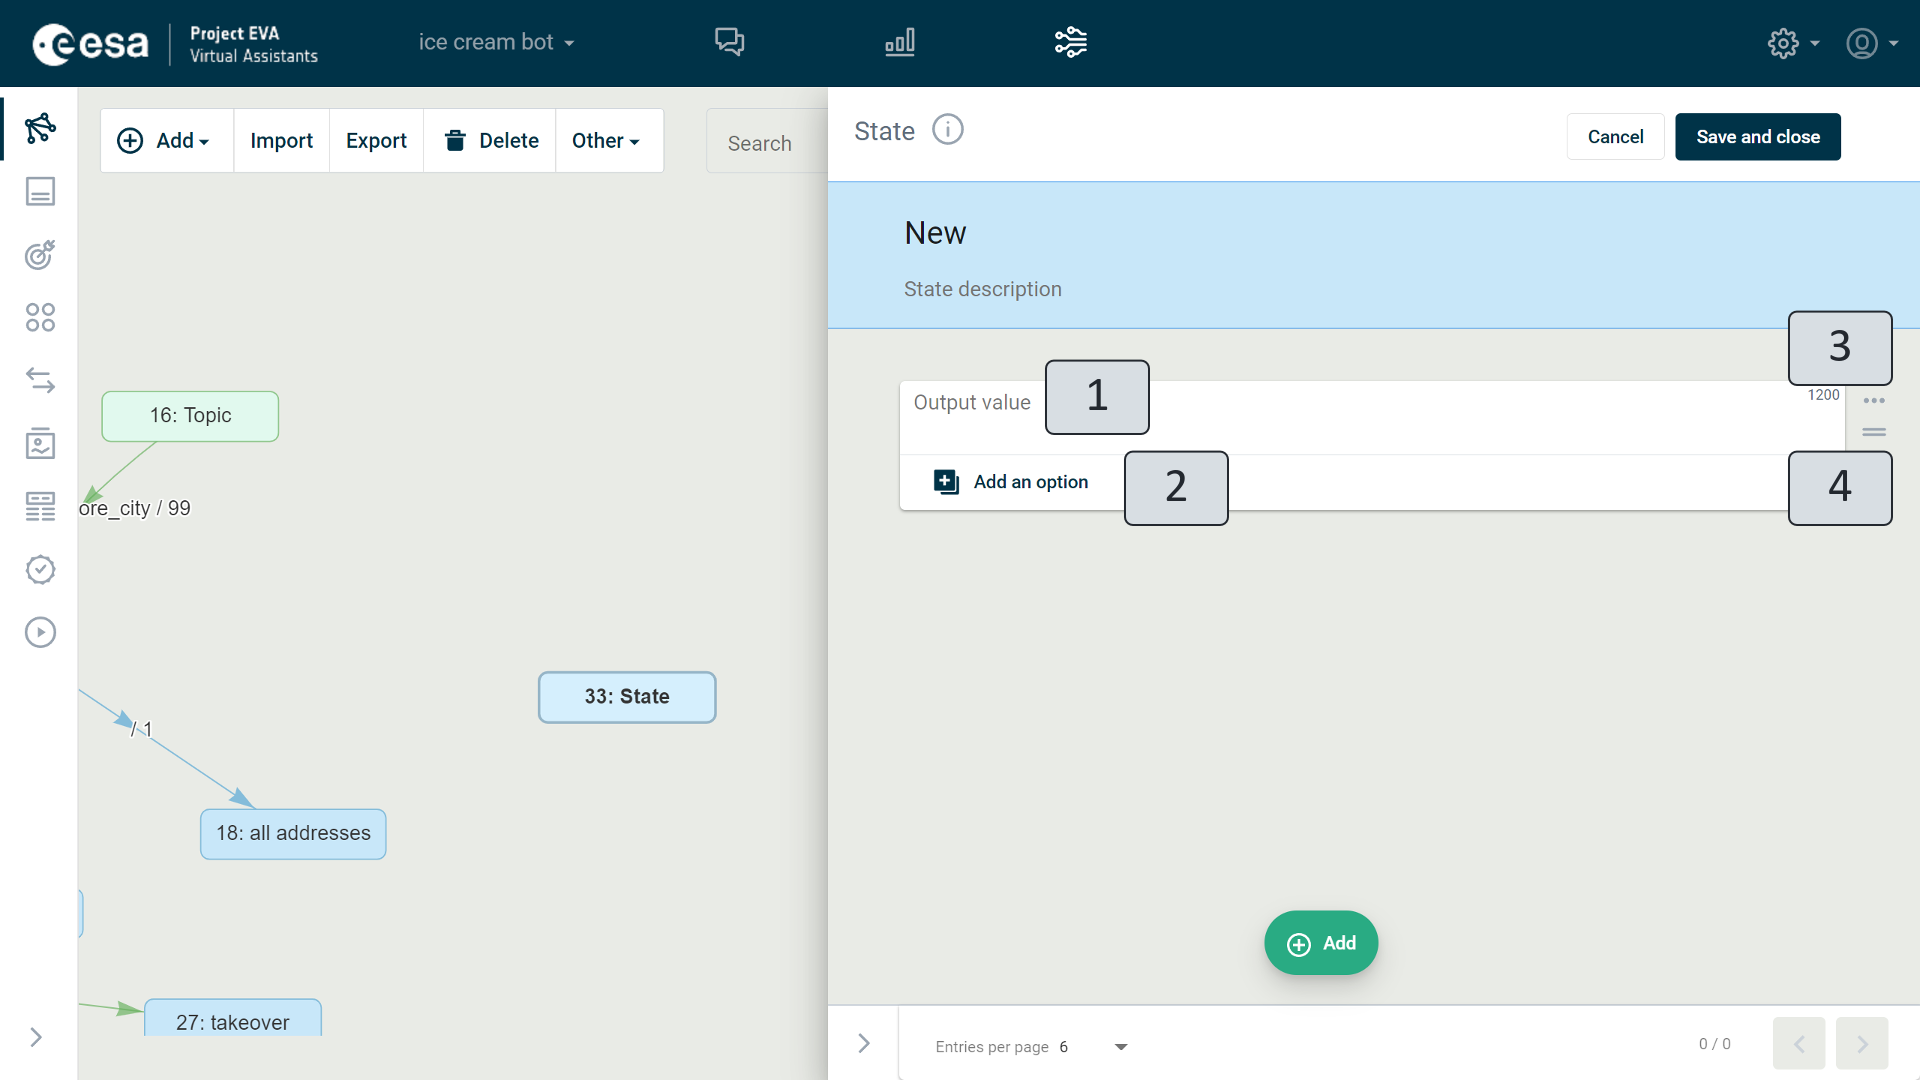
Figure 47. "Text" action
Delete action: You can delete any existing action by clicking three dots int (Figure 47) (3) on the right hand side of the window, and then clicking "Delete" in the drop-down menu.
Change the order of action: if several actions are defined for one state, you can change the order by clicking an icon with two horizontal lines (Figure 47) (4) and moving the action window to the desired place.
Prerequisite: the user is not always required to show a defined action during the conversation. For example, if there is a state in which answers are given about the addresses of all stores, and if the user has mentioned Tallinn when asking about the address of a shop , the answer about Riga does not need to be shown. In such cases, the action should include prerequisites. You can define a prerequisite by clicking three dots(3) on the right hand side of the action window, and then clicking "Add prerequisite" in the drop-down menu. After clicking, the action window will be augmented with the prerequisite fields (Figure 48).
Prerequisites are conditions that let you know in which circumstances to display the output texts of a virtual assistant. These are instructions related to variable values stored in context or in the virtual assistant's memory (read more in Chapter "Transition Editing Window" Sub-chapter "Advanced").
When defining prerequisites, you must select an identifier (Figure 48) (1) from the drop-down list in the text input field. An identifier is a preconceived term for certain text values. Each value has its own identifier, and there are also eight reserved identifiers:
- @@returnfromuniversal - can be "true" or "false". In the case of true, the last transition has led from the topic;
- @@locale - what the virtual assistant's communication language is;
- @@preuniversalstateid - the state in which the virtual assistant was before the topic;
- @@stateid - the ID of the current state;
- @@input - the user's latest input;
- @@media - a reference to the resource link;
- @@channel - specify a conversation channel (chat room, home page, social media sites);
- @@host - the site on which the conversation with the VA is taking place.
- @@jwtauthenticated – if the VA has authorisation and the user is authorised. Can be “true” and “false”. If the user is authorised, then “true”;
- @@rating – represents one of three possible ratings, designated by the numbers 1, 2, or 3, used in evaluating conversations. This context variable retains a value that can be utilized. You have the option to manually create your own action to store values of 1, 2, or 3 in the context, bypassing the predefined conversation evaluation action. This can be particularly useful if the conversation with a user occurs solely through voice interactions. By utilizing these values, you can then manipulate the data, and the outcomes will be displayed in the relevant data fields for the ratings in the Conversation and Analytics views;
- @@handovered – indicates whether the conversation has been taken over ("true" or "false"). If the scenario involves asynchronous activities (e.g. wait time), it should be noted whether the operator took over the conversation ("true");
- @@inforeqstate – the virtual assistant uses this when processing an information request card. The VA itself provides information about the state it is currently in at the moment;
- @@releasestate – sets the context for the state number that the VA reaches when the operator who took over the conversation releases it;
- @@jwtlogout – If you create a logout card, this generates a URL that enables the user to log out of the system;
- @@jwtlogoutlabel – the value on the button that enables you to log out of the system;
- @@lastupload – refers to the file uploaded by the user in the webchat;
- @@conversationid – the identifier of the particular conversation;
- @@fromid – refers to the user identifier who is conversing with the VA. If not specifically installed in the external system, a random identifier is provided;
- @@fromname – user’s name.
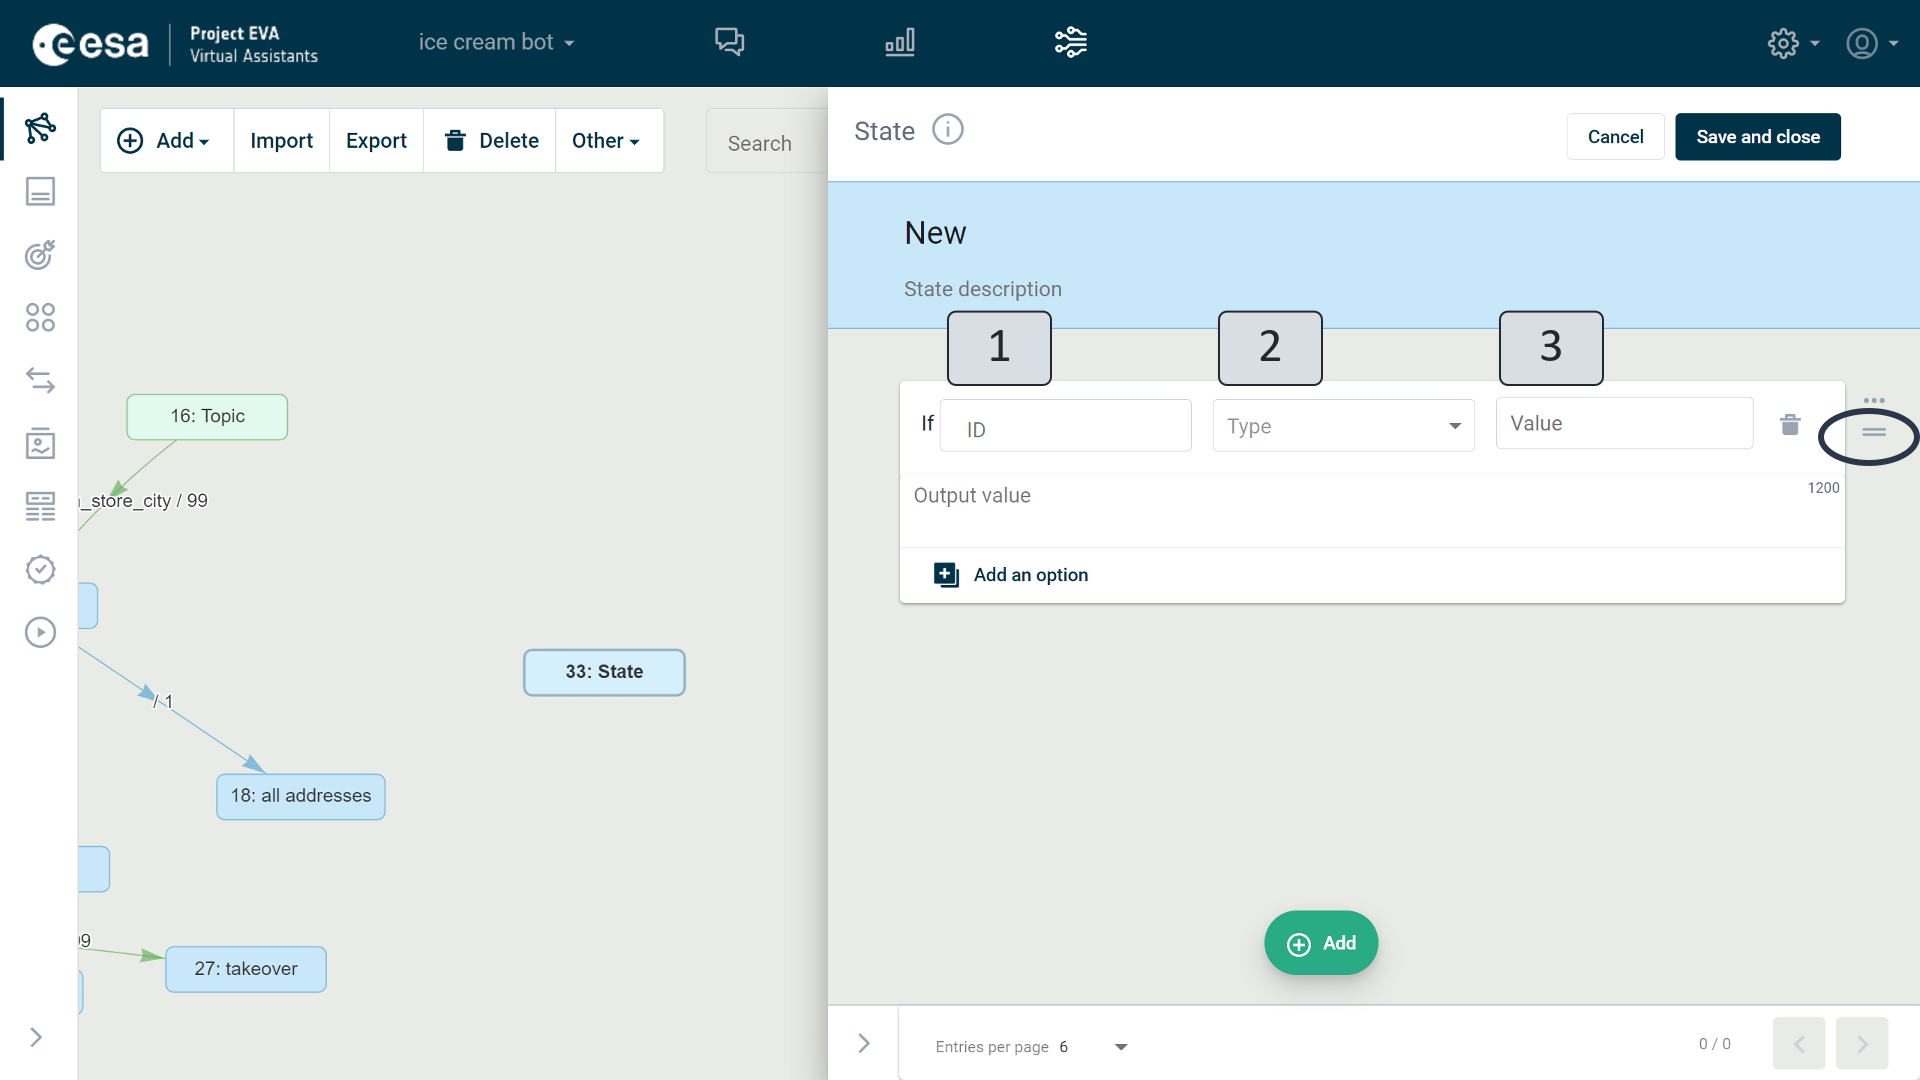
Figure 48. Prerequisite Fields
In the "Type" field (Figure 48) (2), you must select one of the eight pre-requisite types (Table 6. Prerequisite types) and specify the relevant value in the "Value" field (3).
Table 6. Prerequisite types
Type | Description |
Set | This identifier is saved in context. |
Not set | There is no such identifier in context. |
= | The variable value saved in context is identical to the specified value. |
!= | The variable value saved in context is not equal to the specified value. |
> | The context value is greater than that specified (digits). |
<= | Context value less than or equal to that specified (digits). |
>= | The context value is greater than or equal to that specified (digits). |
< | Context value is less than that specified (digits). |
For an example of an action defining a prerequisite with completed fields (1-3), see below (Figure 49 and Figure 50).
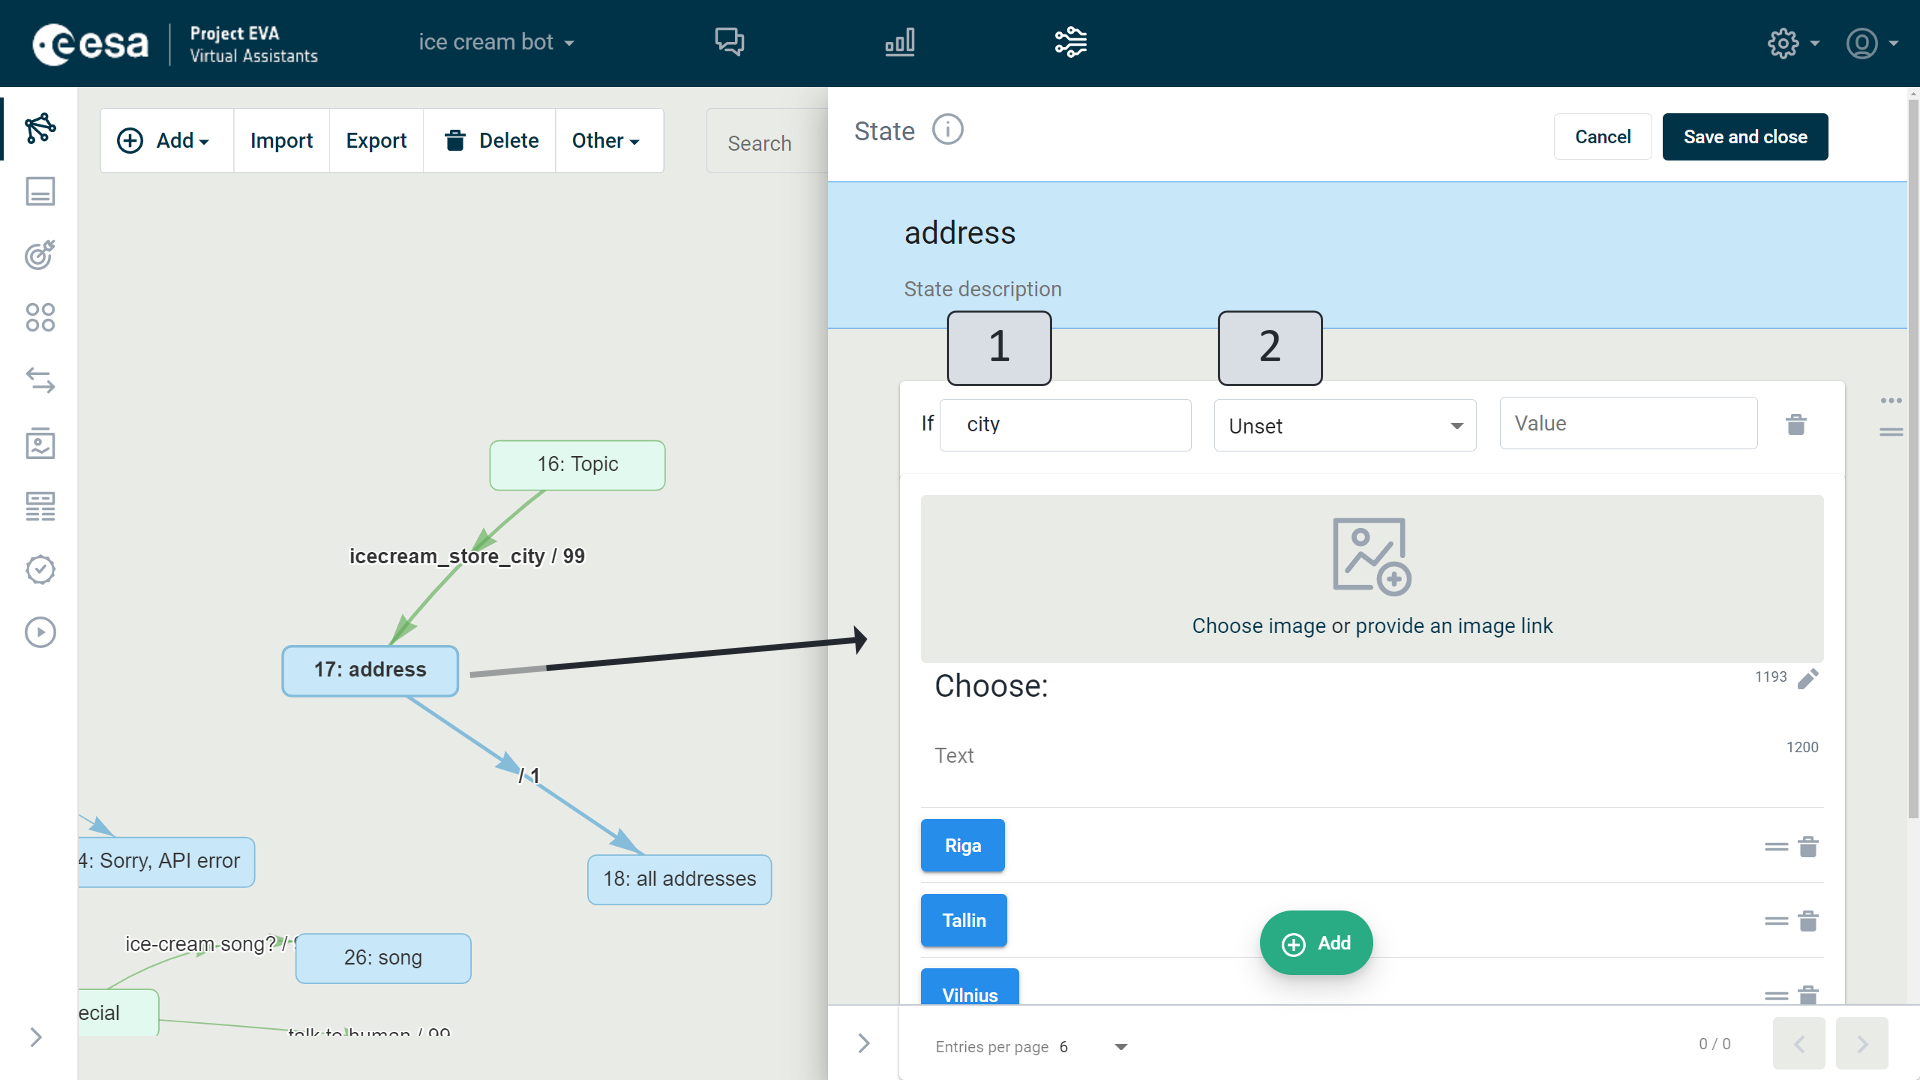
Figure 49. First example of defining a prerequisite
In image (Figure 49) state "17: address", a menu is shown to specify which store the user wants to visit. You can get to this state in the conversation by asking about the location of the store. Previously, in the transition from topic "16: Topic" to state "17: address", you are advised to save the variable with the identifier "city" in context if a user has already indicated a specific city name in the question (see information on saving the variable value of context and this example in detail in Chapter "Transition Editing Window" Sub-chapter "Advanced"). If this really is true, and in its input the user also mentioned the specific city name that is stored in context upon entering this state, the herocard with the button menu does not appear to the user because the card's prerequisite is defined to only show it if the "city" is not stored in context — "If "city" is not set" (1-2).
Thereafter, according to the scenario, the VA moves from "17: address" to "18: all addresses." The last state contains answers for all stores (Figure 50). They are also displayed to the user by reading the value from the information stored in context.
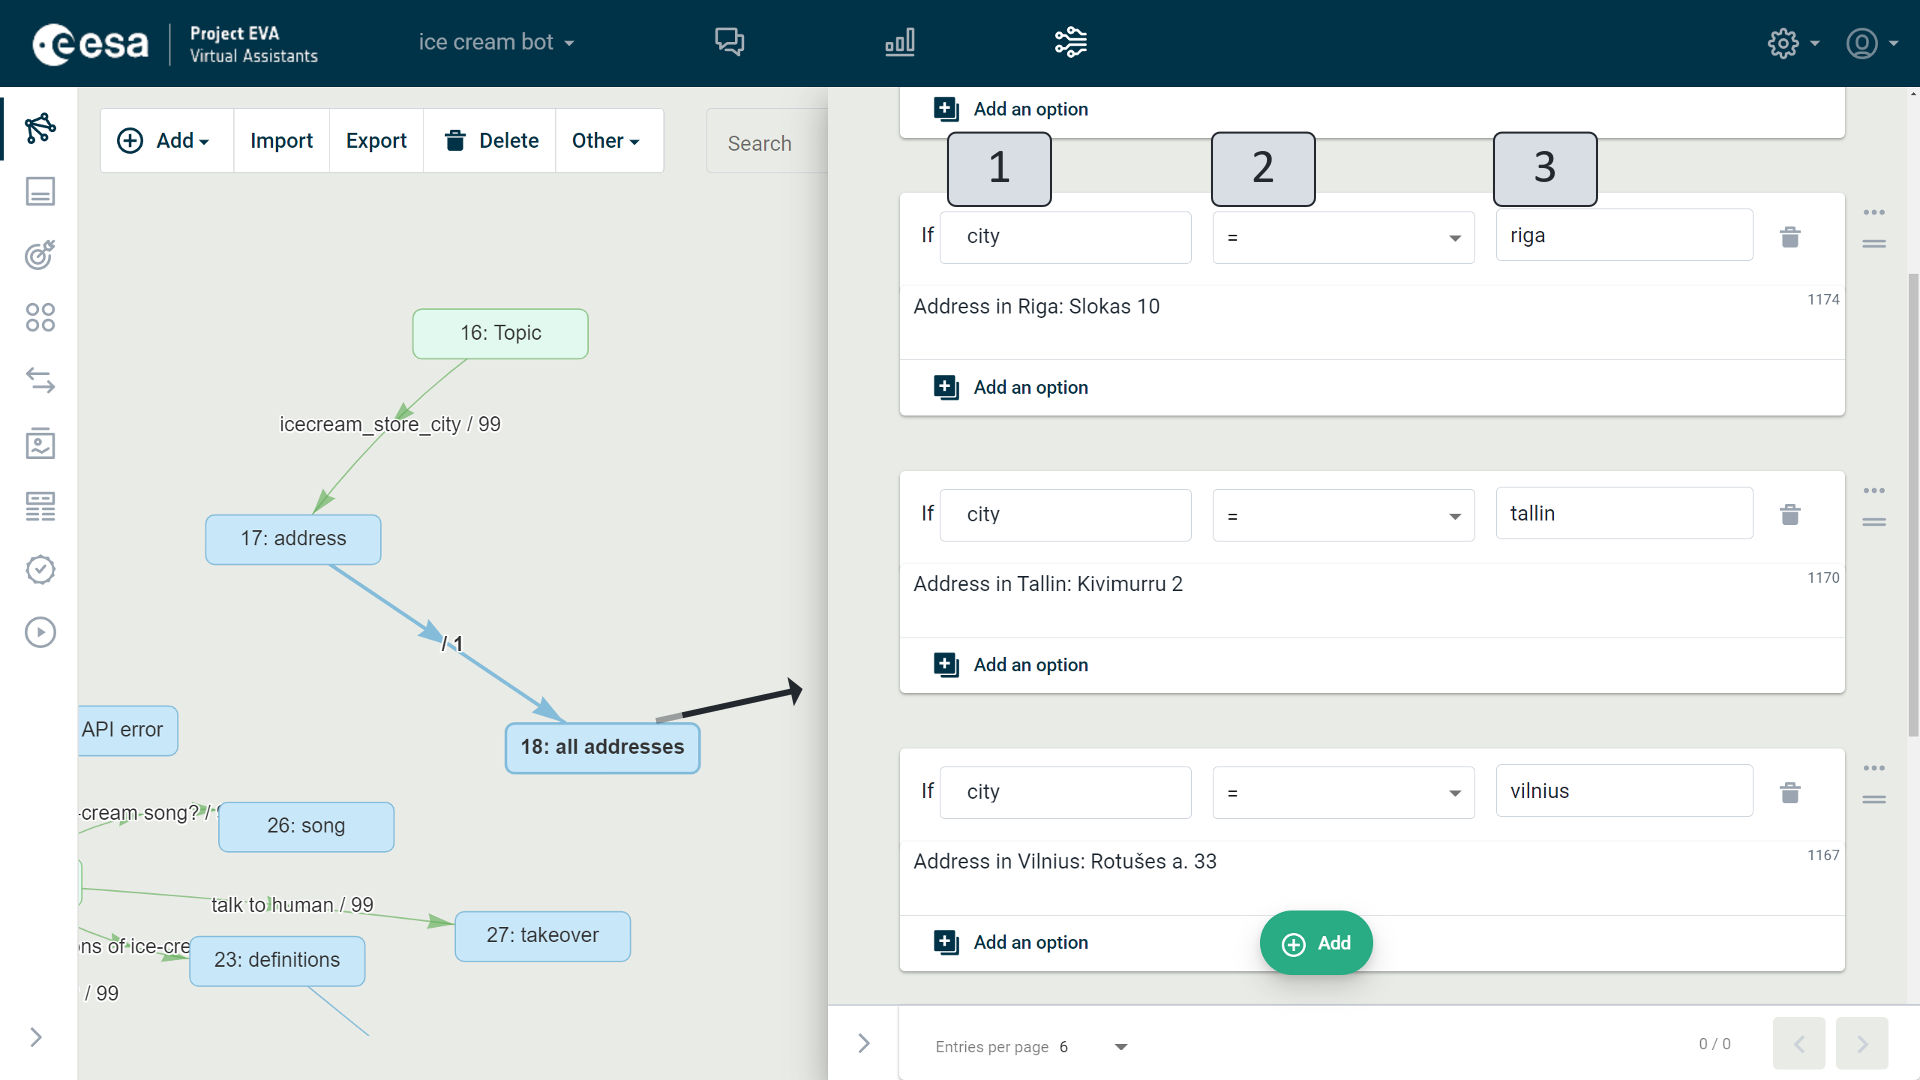
Figure 50. Second example of defining a prerequisite
The action (1-3) shown in the example can be read as follows: "If the saved variable value of the previously set identifier matches the value "Riga", the output "the Riga address is:" must be displayed. Slokas 10"." However, if the user has not mentioned the word "Riga" in his text, this output will not be shown.
Tags. For better analysis and review of conversations, VA trainers can tag virtual assistant actions in a scenario with the reference they need. You can define a tag by clicking three dots (3) (Figure 47) on the right hand side of the action window, and then clicking "Add tags" in the drop-down menu. After clicking, the action window will be augmented with the tag field, where you can enter your tag value (Figure 50.1.).
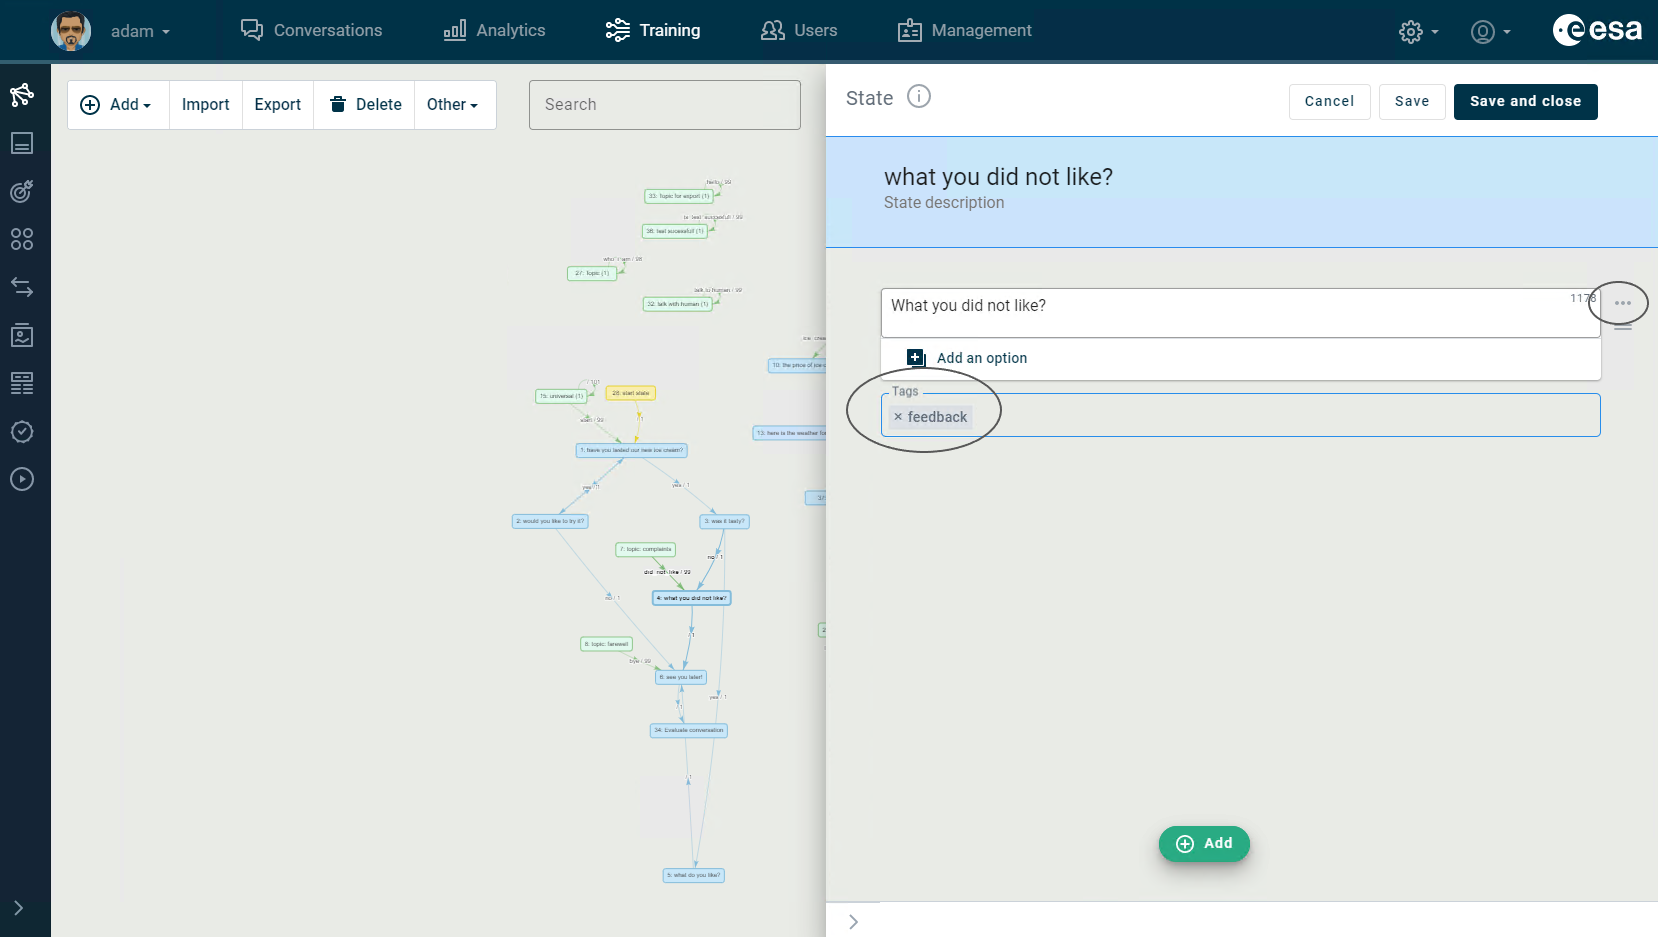
Figure 50.1. Added tag to an action
You can add tags not only in the Scenario view, but also in the Conversations view. Later, when you are analysing conversations, you can filter them by tag type in the conversation view and view tag data in the analysis view.
Rephrase. The Rephrase option is available when editing the output text, by clicking on the pencil icon. The automatic text generator (1) (Figure 50.2.) helps the trainer to easily change the output text with just one click. It is possible to choose between 4 text style options - shorter, longer, formal, friendly. To undo the previous text, click on the arrow icon next to the robot icon (2).
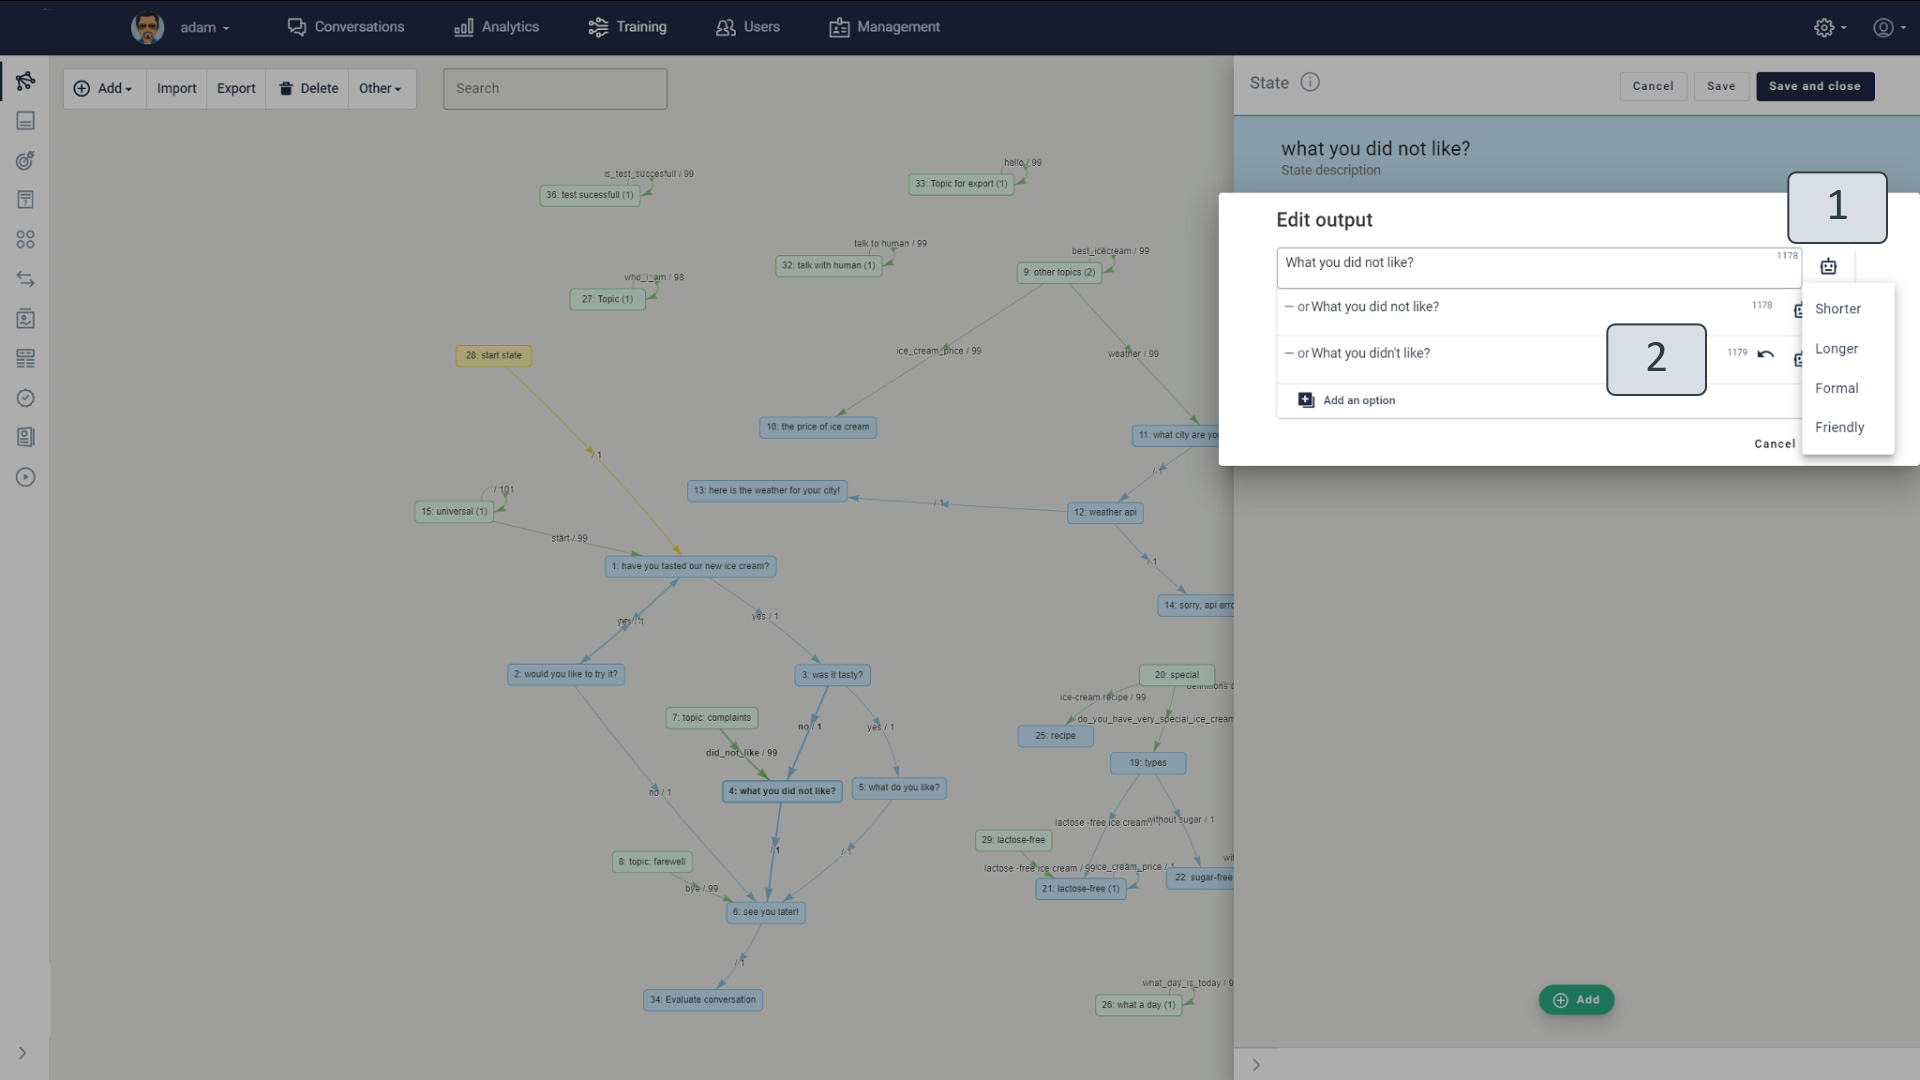
Figure 50.2. Rephrase option
Add answer. To add a new action to a state that already contains many other actions, you can use the Add answer option, which allows you to insert any action - text, hero card, etc. - immediately after the action in which you selected this option. You can insert a new answer by clicking the three dots (Figure 50.3) (1) to the right of the action, selecting Add answer (2), and then selecting the type of action you want from the drop-down menu (3). Once clicked, the new action will be added to the state immediately after the requested action.
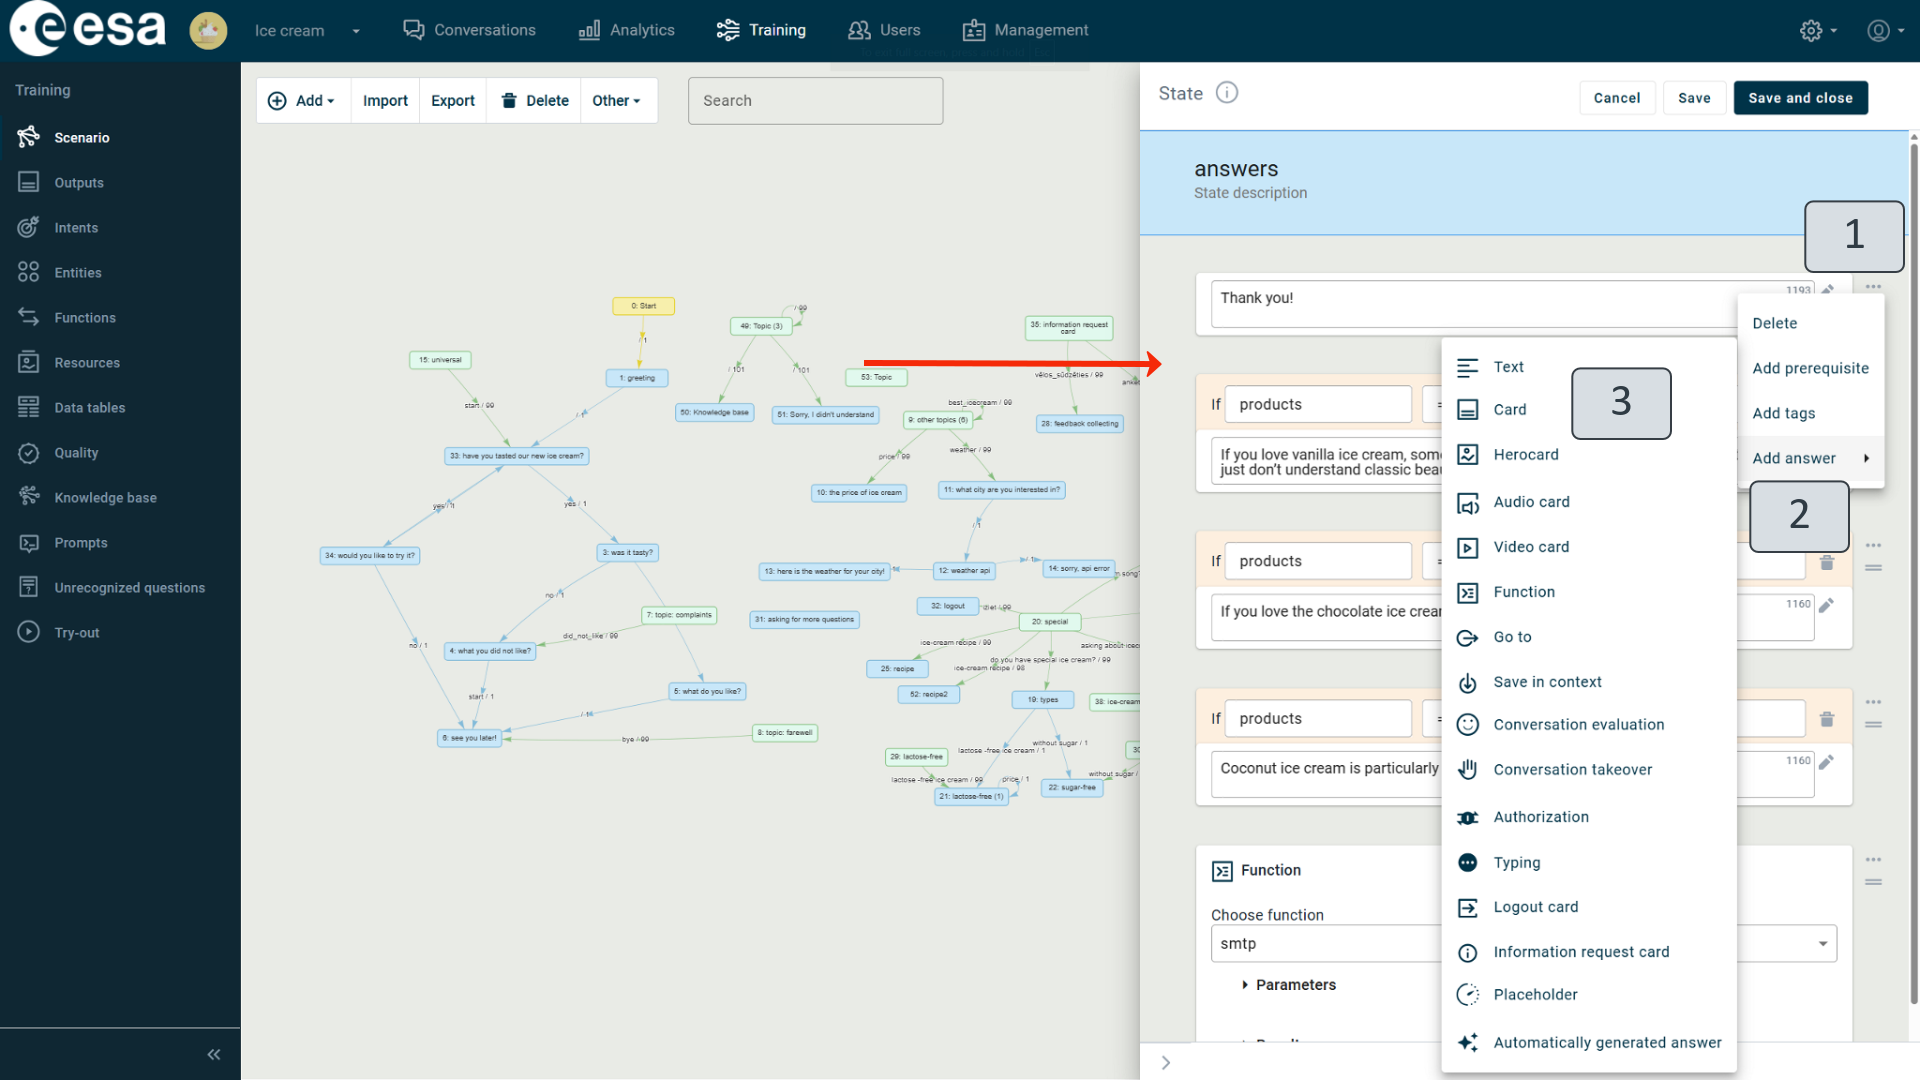
Figure 50.3. Adding an action to a state in a particular place
Card
If the action type "Card" (Figure 51) is filled in, in the conversation with the user, the VA's answer will be displayed as text and selection buttons. When a user clicks a button, the button text is sent from the user to assistant and processed just like any other input. You can also define the buttons on the herocard, but unlike the herocard, after the user has selected the choice that you want, the buttons specified in this action type in the conversation disappear and can no longer be clicked.
The action contains text (1), which is usually an explanation or introduction to the buttons subsequently offered. Apply the buttons you want by clicking the plus sign next to the title "Add Button" (2). After clicking, a blue button (3) appears with the title "Add information", which when clicked, opens the button's editing window. You must specify the title of the button in the "Value" field.
You can add the VA's answers to the aforementioned text (1) and button value fields in two ways just like all assistant outputs.
- Record in full form immediately. (The composed text will also be automatically shown in the "Output" view as a new output with an identifier created from the first words of the text. When publishing a scenario, you should remember to choose "Publish all" so that new outputs also take effect.)
- Use a pre-prepared output published in the "Output" view. In this case, you have to start writing an output identifier in the output identifier field or a title from the output. By coincidence, available options will be offered. To choose the right one, click on it.
Buttons can be deleted by clicking the Recycle Bin icon, or by clicking the icon with two horizontal lines and placing it in the desired location (5).
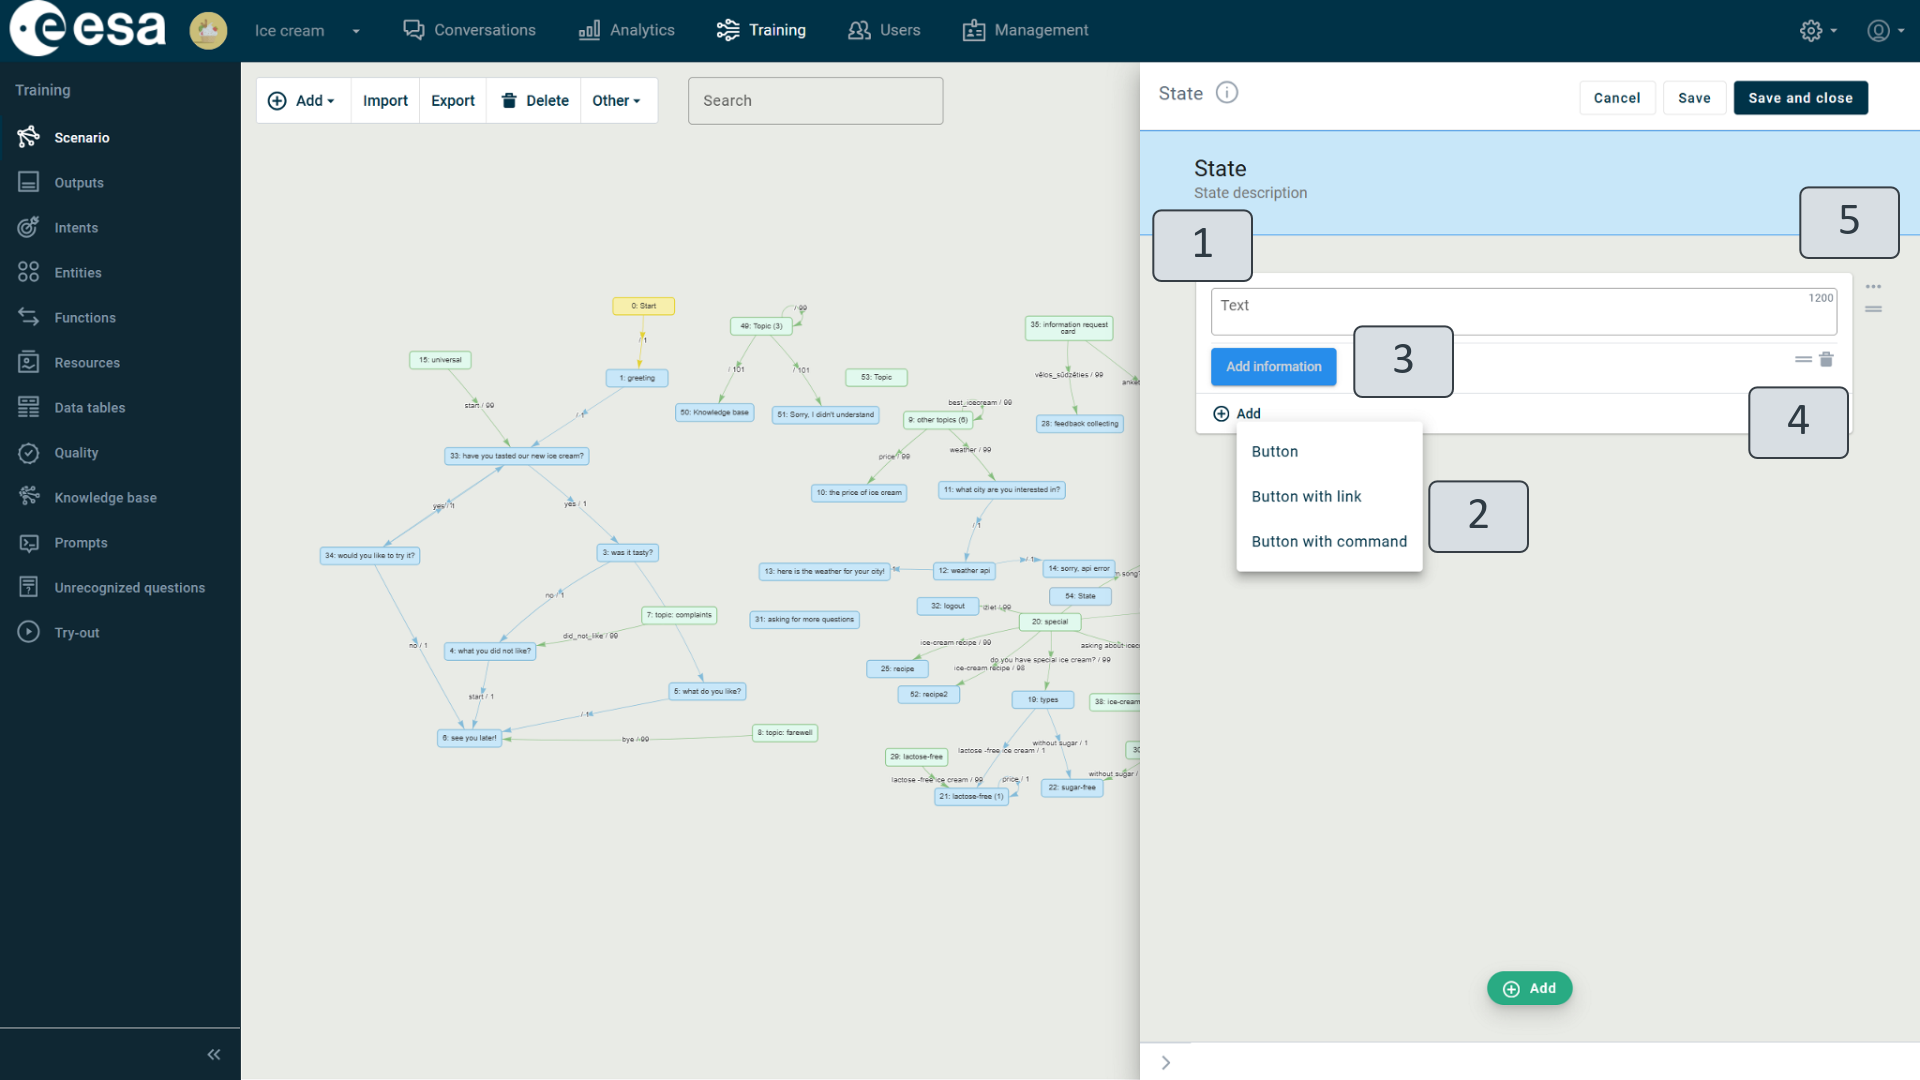
Figure 51. Card
You can also move, delete, and add prerequisites and tags to the entire action, along with the buttons just like for other actions. More details are provided in the description of how to delete an action, change the order of action, and the prerequisites in the Sub-chapter "Text".
In the card you can add three different types of buttons with different actions.
Button. Simple menu button. Use if you want to offer the user a choice. Card buttons disappear after the user makes a choice during a conversation.
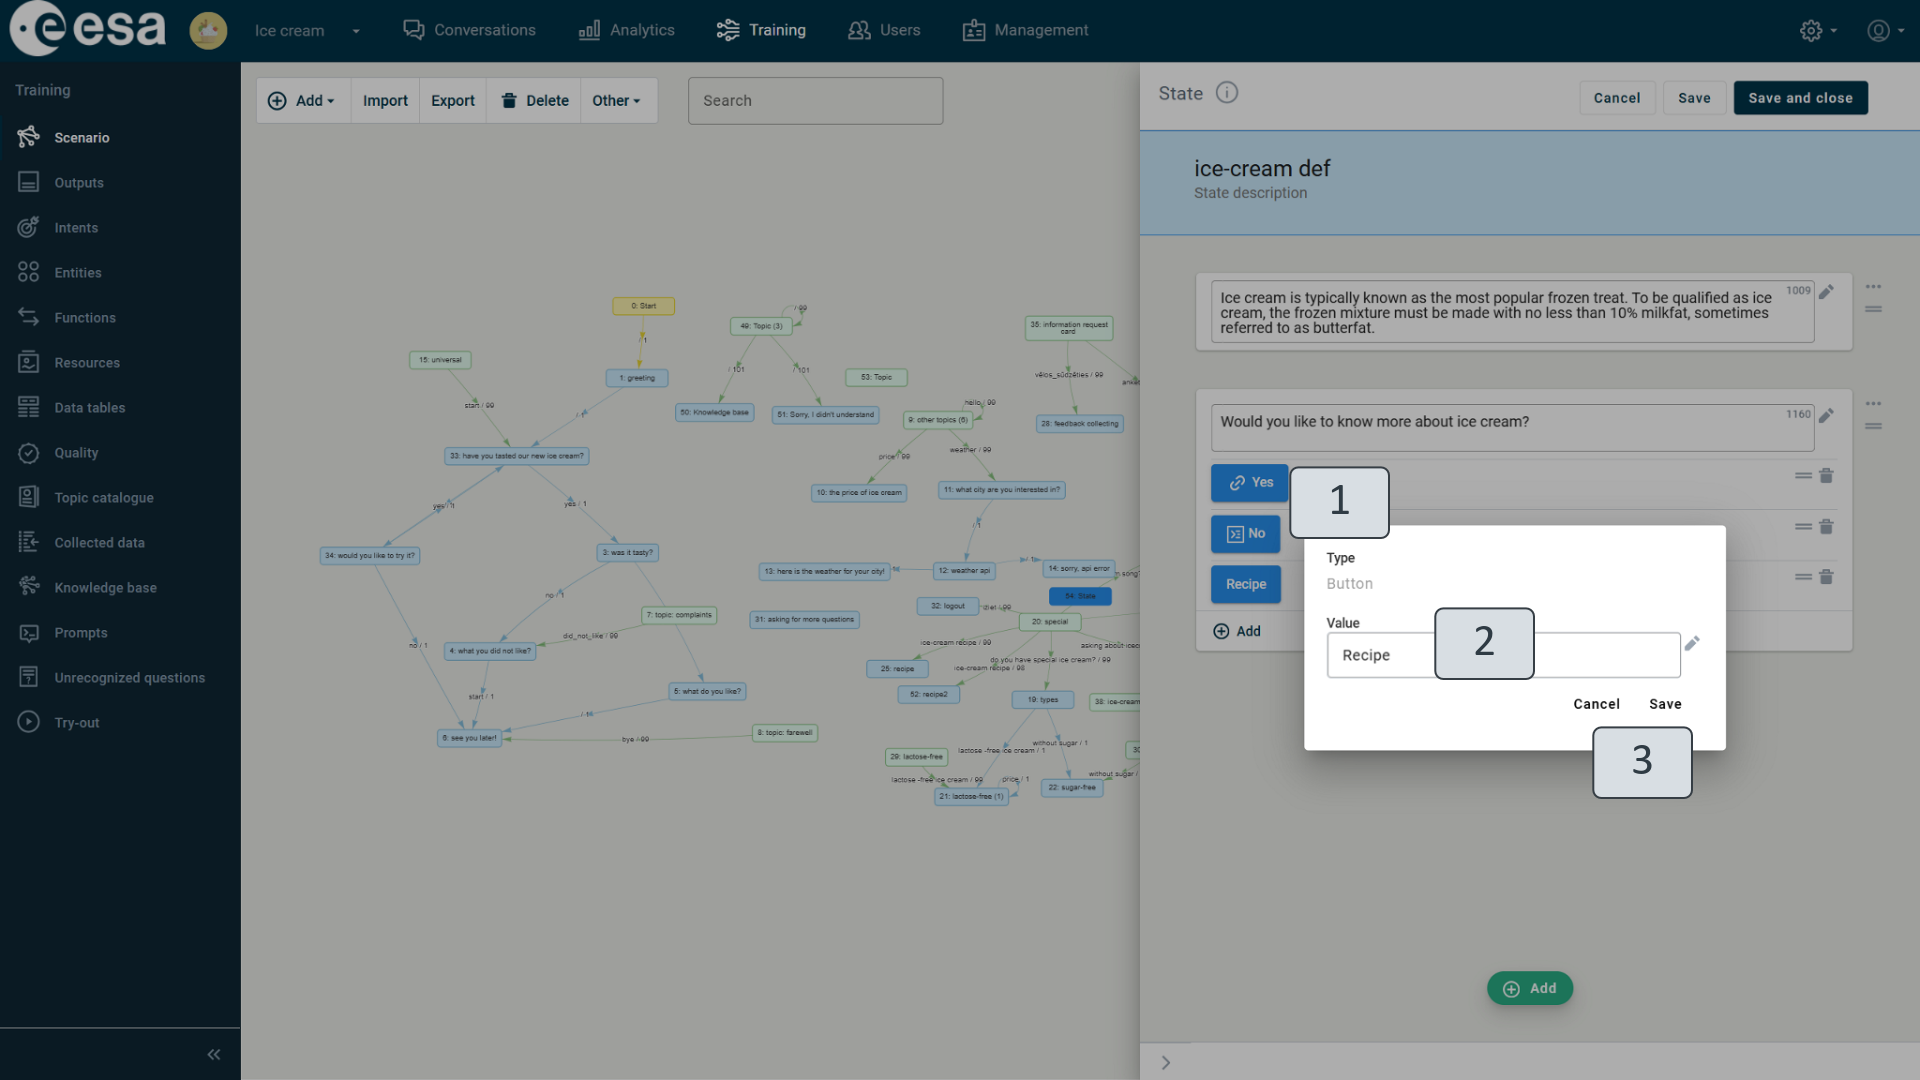
Figure 51.1 Card button
The button window (Figure 51.1) displays a button type (1). The type field is for information purposes only and cannot be changed. The button’s title must be added to the value field (2) just like any VA output. For the corrections to be implemented, you must click “Save”, but in order for the changes not to be saved - “Cancel” (3).
Button with link. A button, which when clicked, opens the specified website in a separate tab.
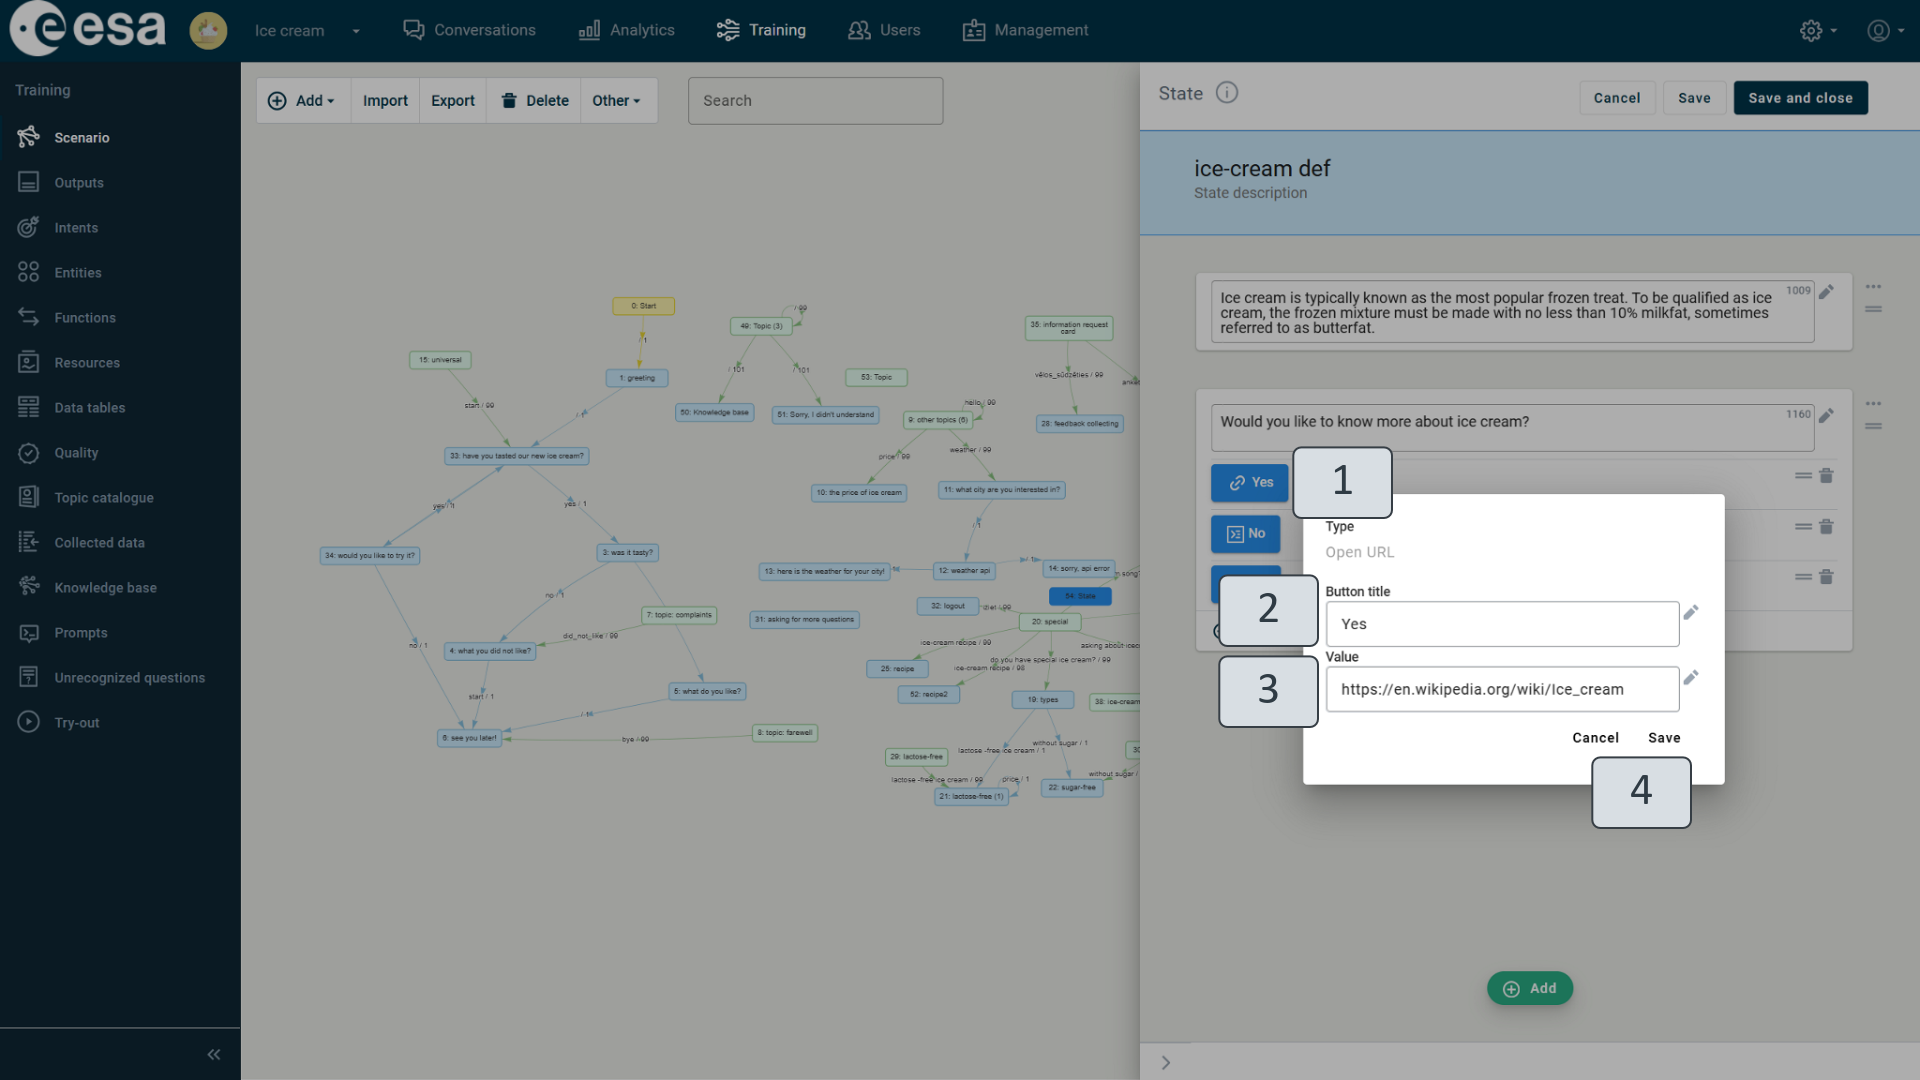
Figure 51.2 Card button with link
To define a button with a link, you must type it in the “Button title” field in the button window (Figure 51.2) (2). The “Type” field (1) cannot be changed; it serves an informative purpose by indicating that the VA will open the specified website when the user clicks the button. The address or link of the website must be specified in the “Value” field (3). By clicking the titles “Cancel” and “Save” (4), you can either discard or implement the new changes.
Button with command. When you click the button, a message or a command is sent to the assistant about the action to be performed.
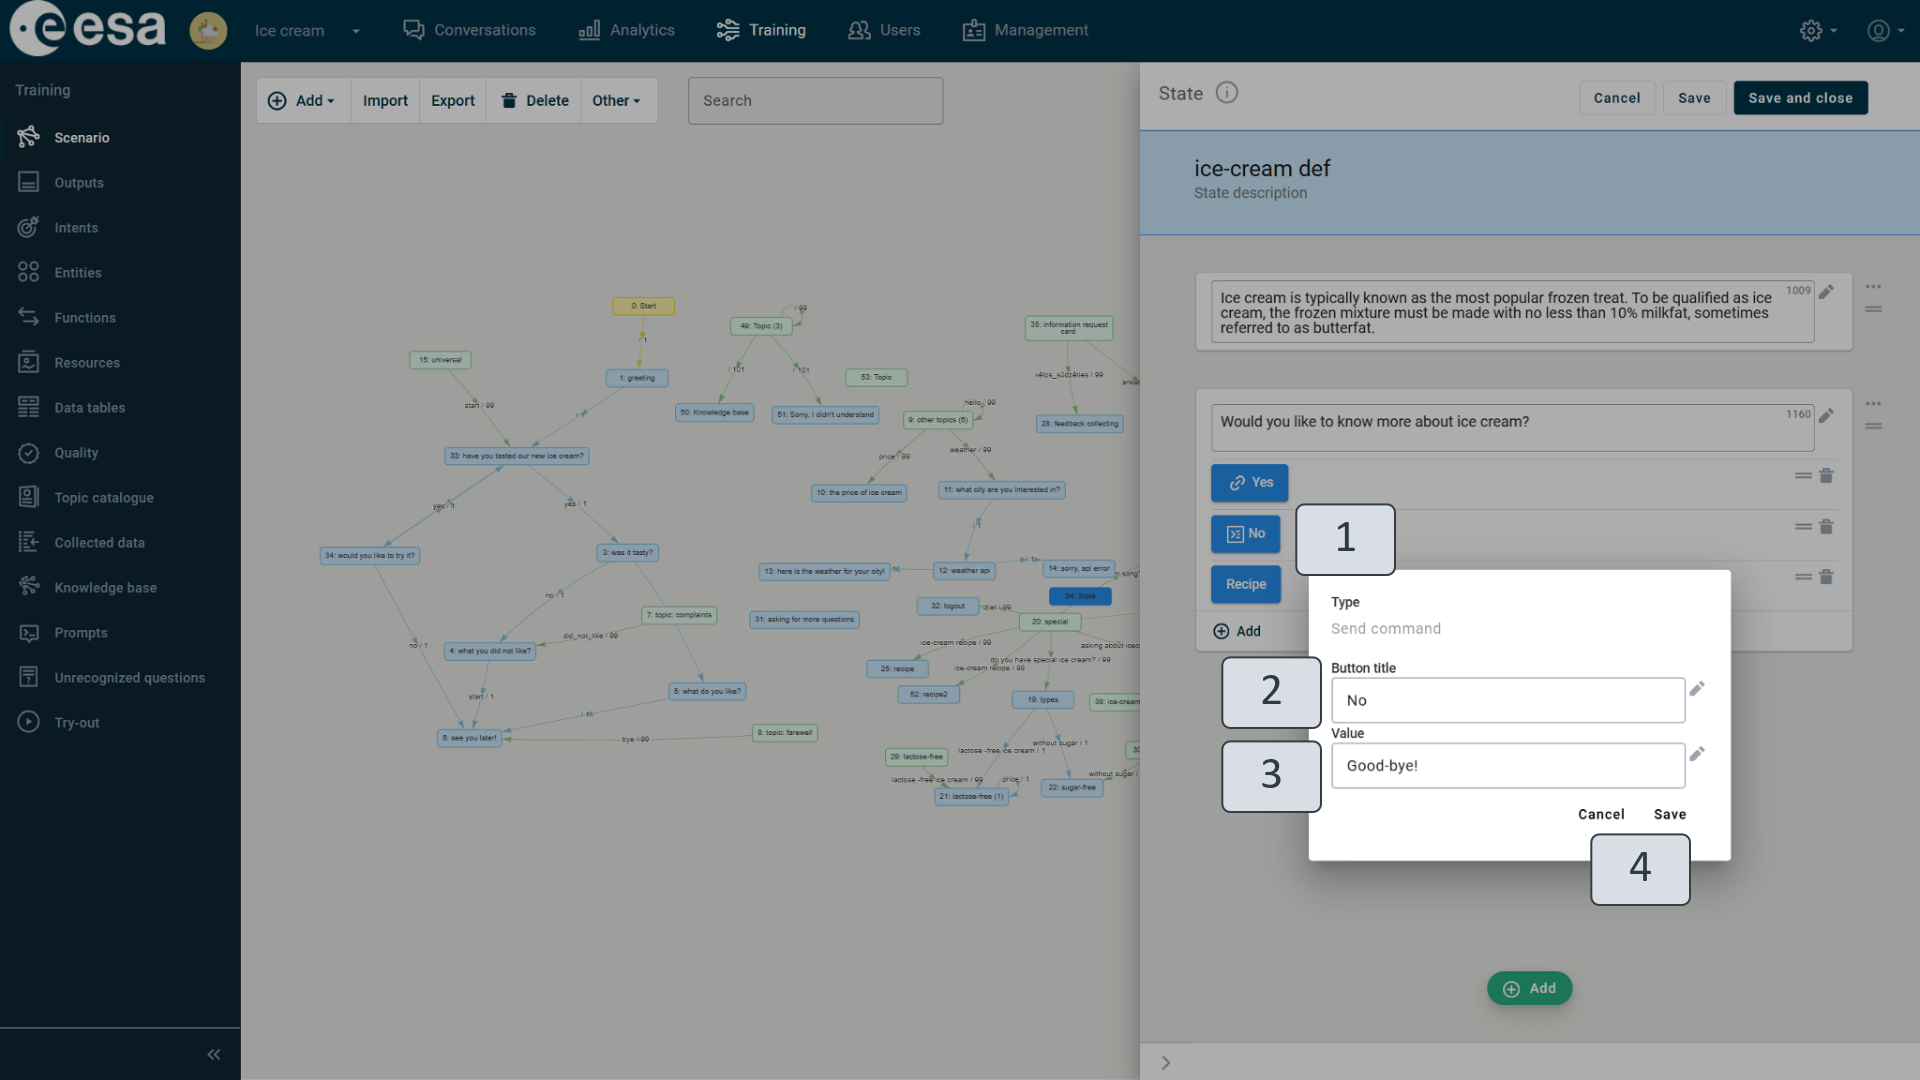
Figure 51.3. Card button with command
When you type a button with a command, you must type the title of the button in the “Button title” window (Figure 51.3) (2). The “Type” field (1) indicates that the task of the button is to execute a command. This field cannot be changed. In the value field (3), you must specify the command for execution that will be sent to the VA. By clicking the titles “Cancel” and “Save” (4), you can either discard or implement the new changes.
You can see a sample of a completed card in the following example (Figure 52).
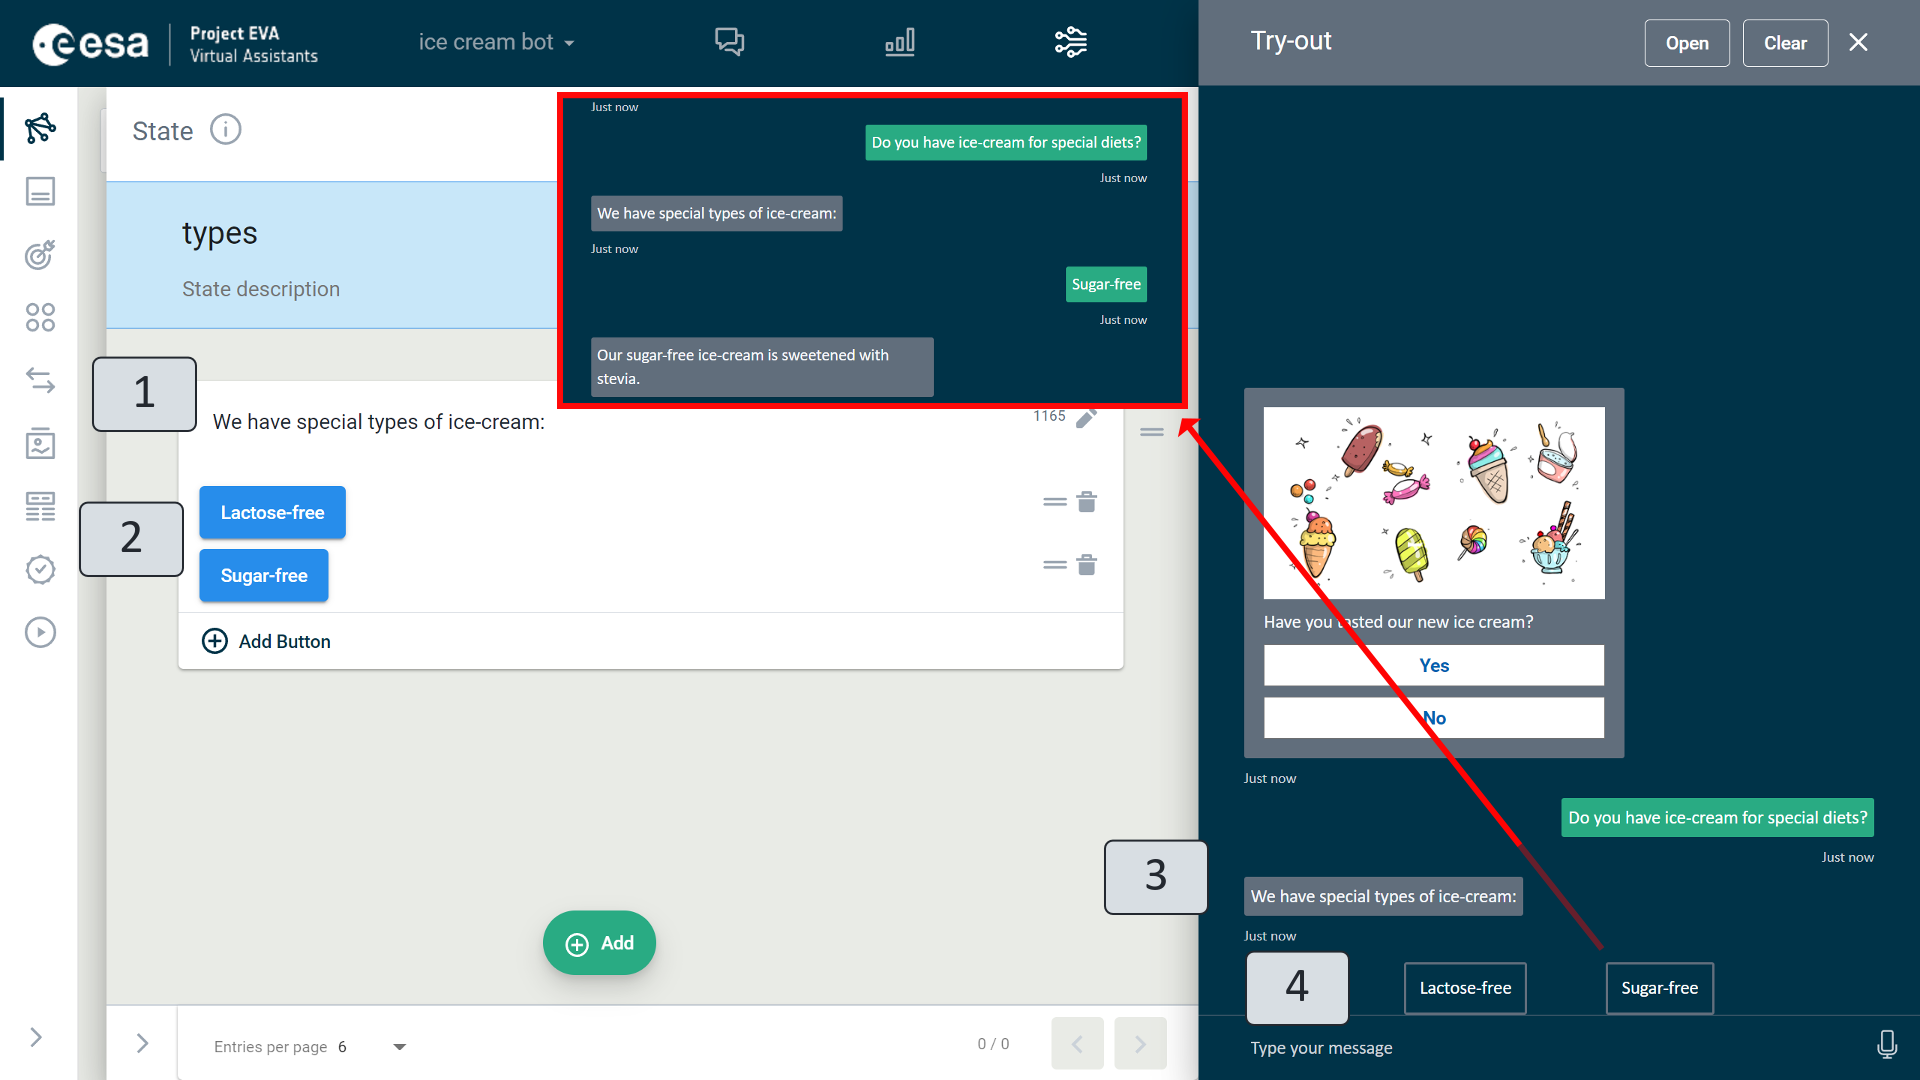
Figure 52. Example of filling out a card
In the example of filling out a card (Figure 52), the text (1) appears on the left hand side, which appears before the button titles (3) in a conversation with the user. All selection button titles are also filled in, which are offered to the user immediately after the input text (4) during the conversation. In the example, you can also see what the try-out window will look like as the conversation progresses and the user selects one of the buttons, i.e. the selection buttons will no longer be shown.
Herocard
Extensive answer display capabilities are available in the virtual assistant action type "Herocard" (Figure 53). This allows you to display text, pictures and buttons. The design and functionality of the action depends on the conversation environment (channel). Some values may be ignored or interpreted differently. The scenario allows you to define most of the values available in the Microsoft Bot Framework (https://dev.botframework.com/) standard.
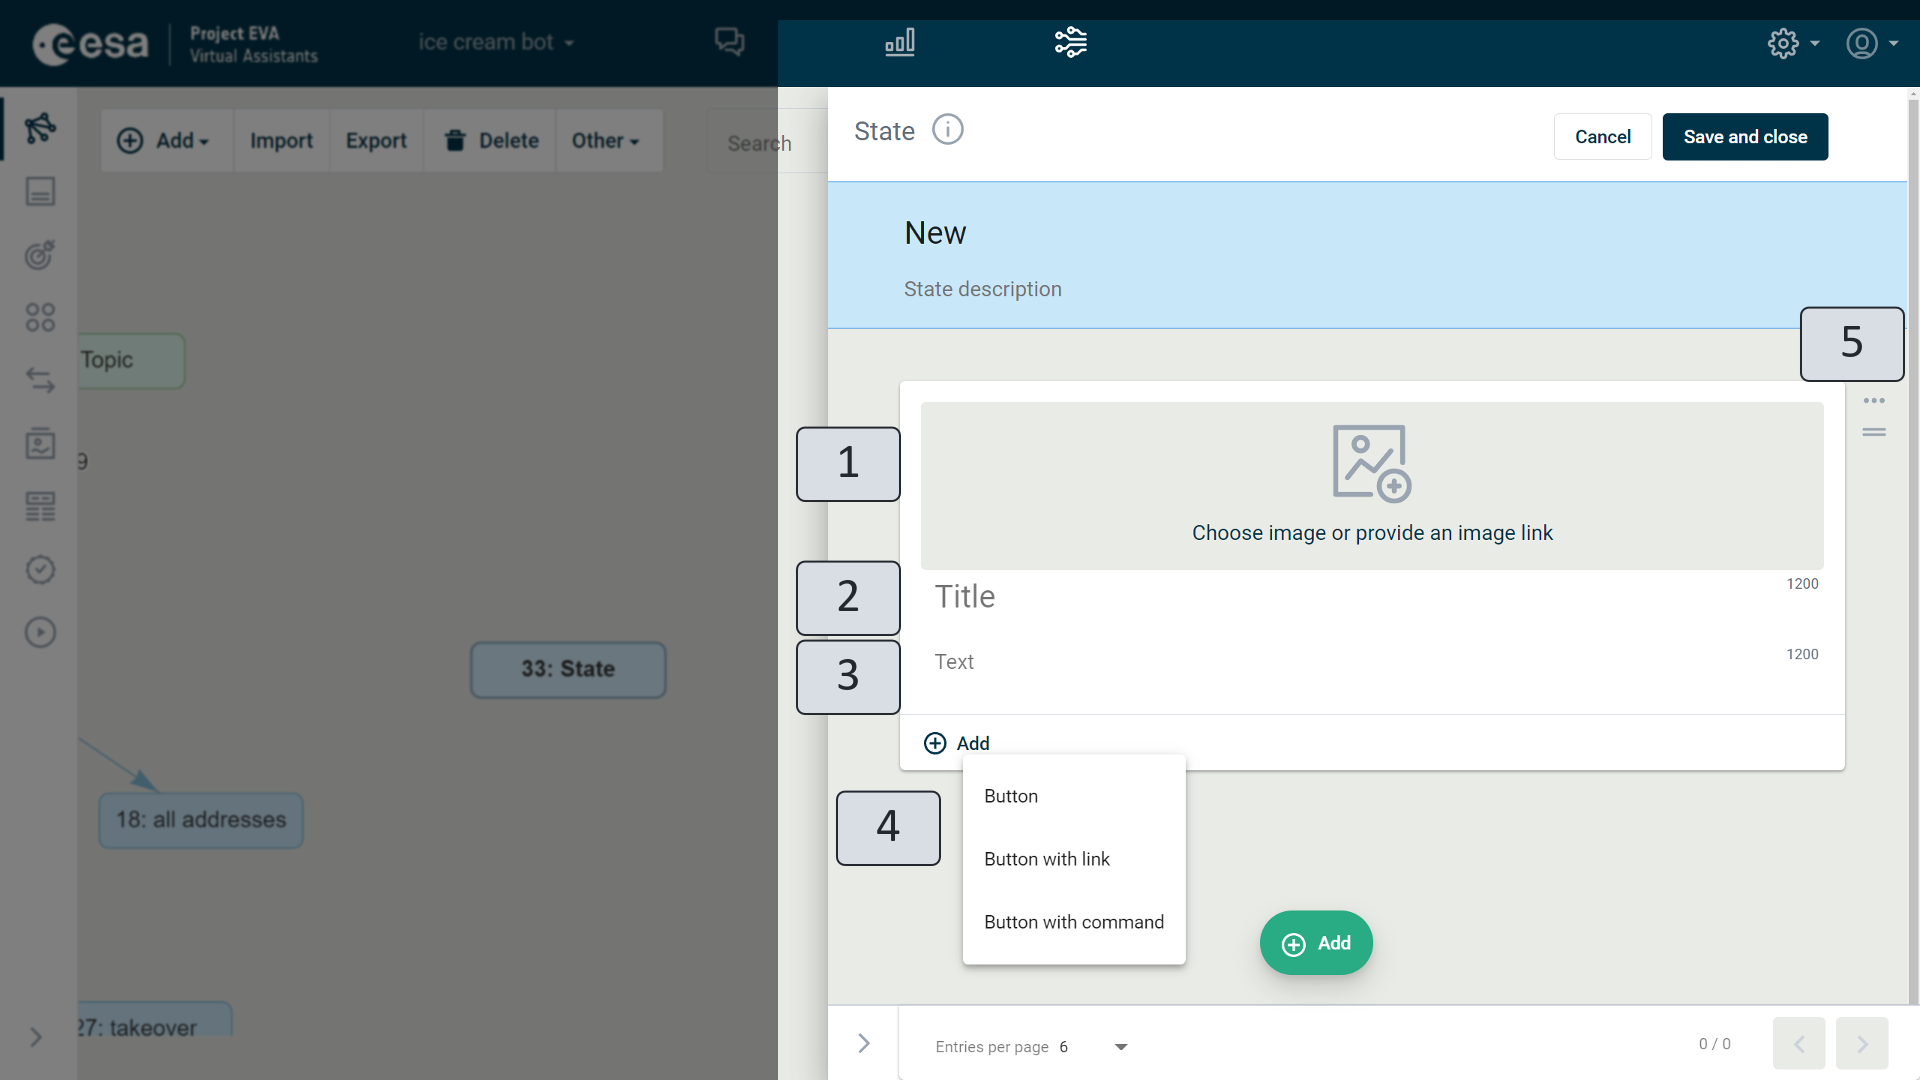
Figure 53. Herocard
On the herocard, you can add a picture (Figure 53) (1) to the VA answer. You can add a picture from both pre-prepared data, information stored on your computer, or a website.
Clicking "Choose image" will open a list of files (Figure 54) (1) with all files that have already been prepared in the "Resources" training view. You can select the desired picture from this list, but if it is not there, click "Upload" (2) in the open window to select the image you need from your computer.
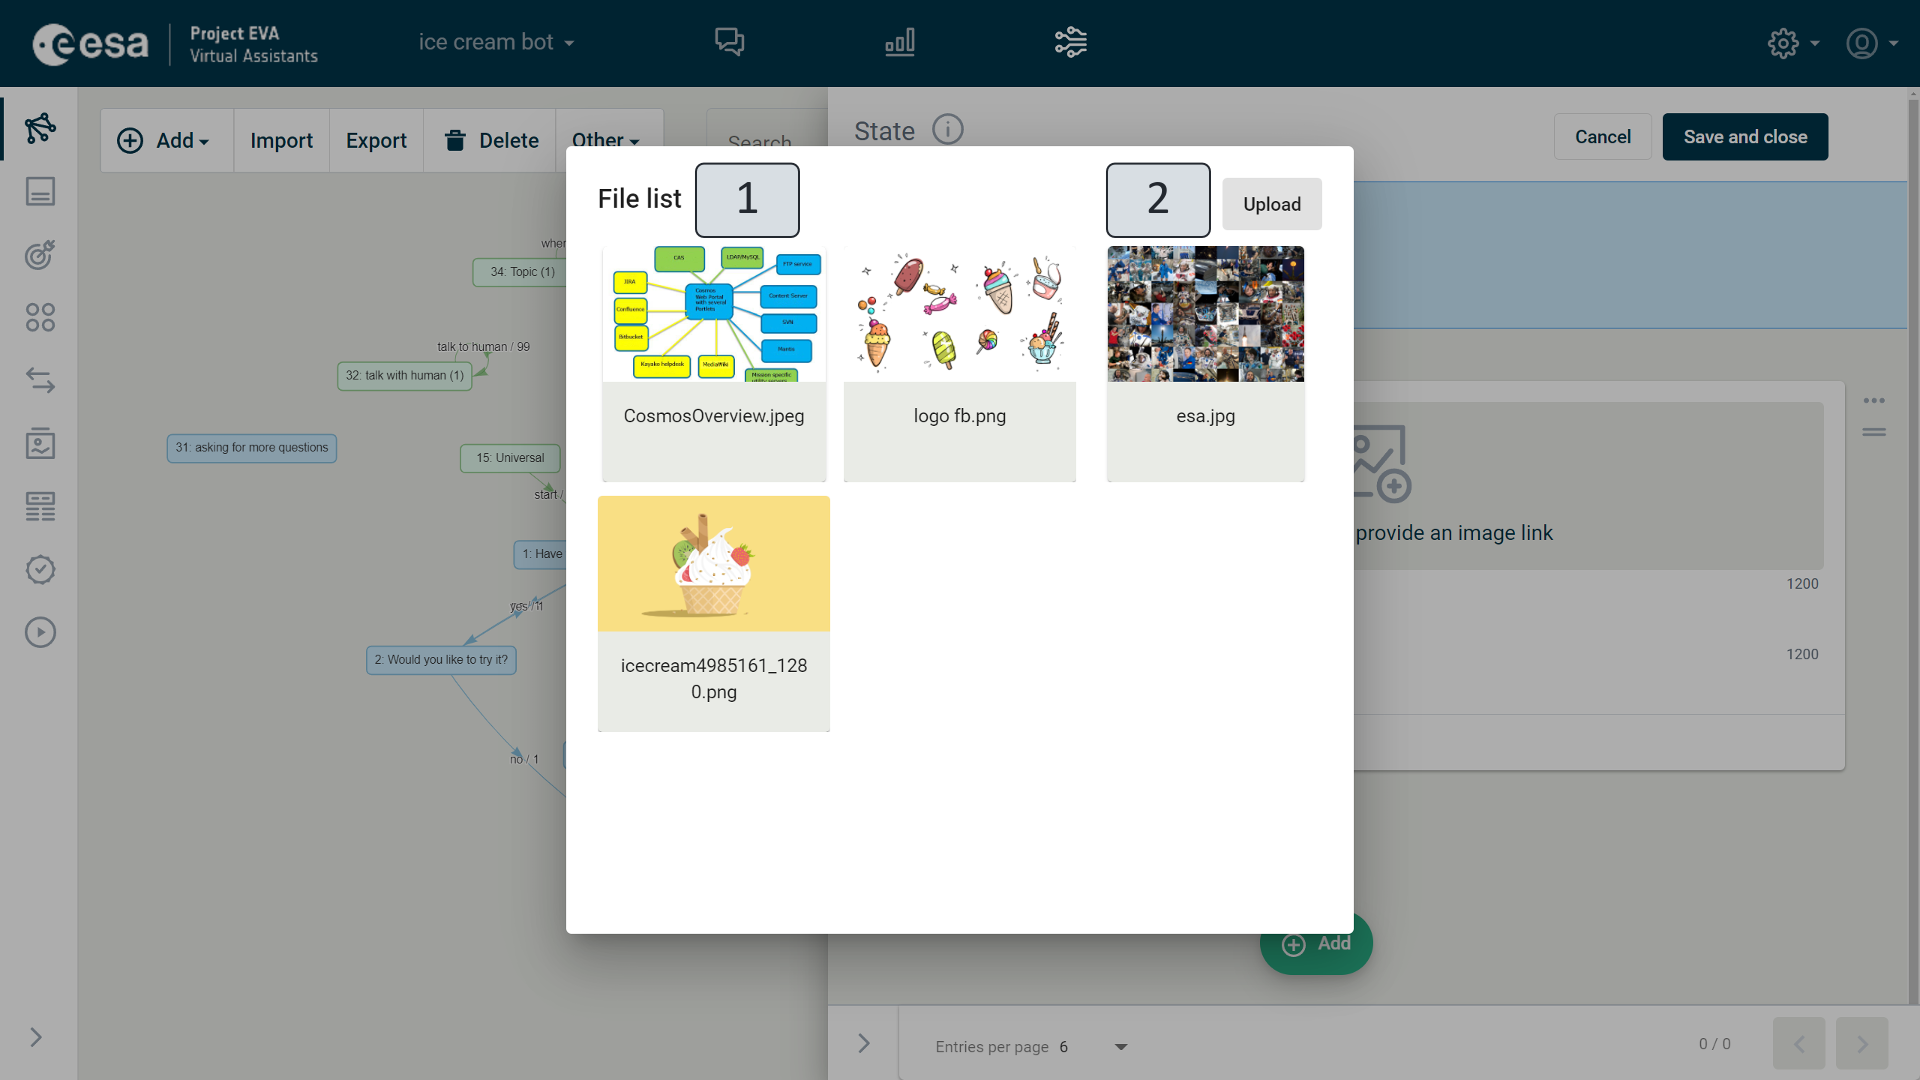
Figure 54. Picture File List
You can also insert a picture by indicating its link. Clicking the text "provide an image link" (Figure 53) (1) will open the field (Figure 55) (1) where you want to type or copy the picture link.
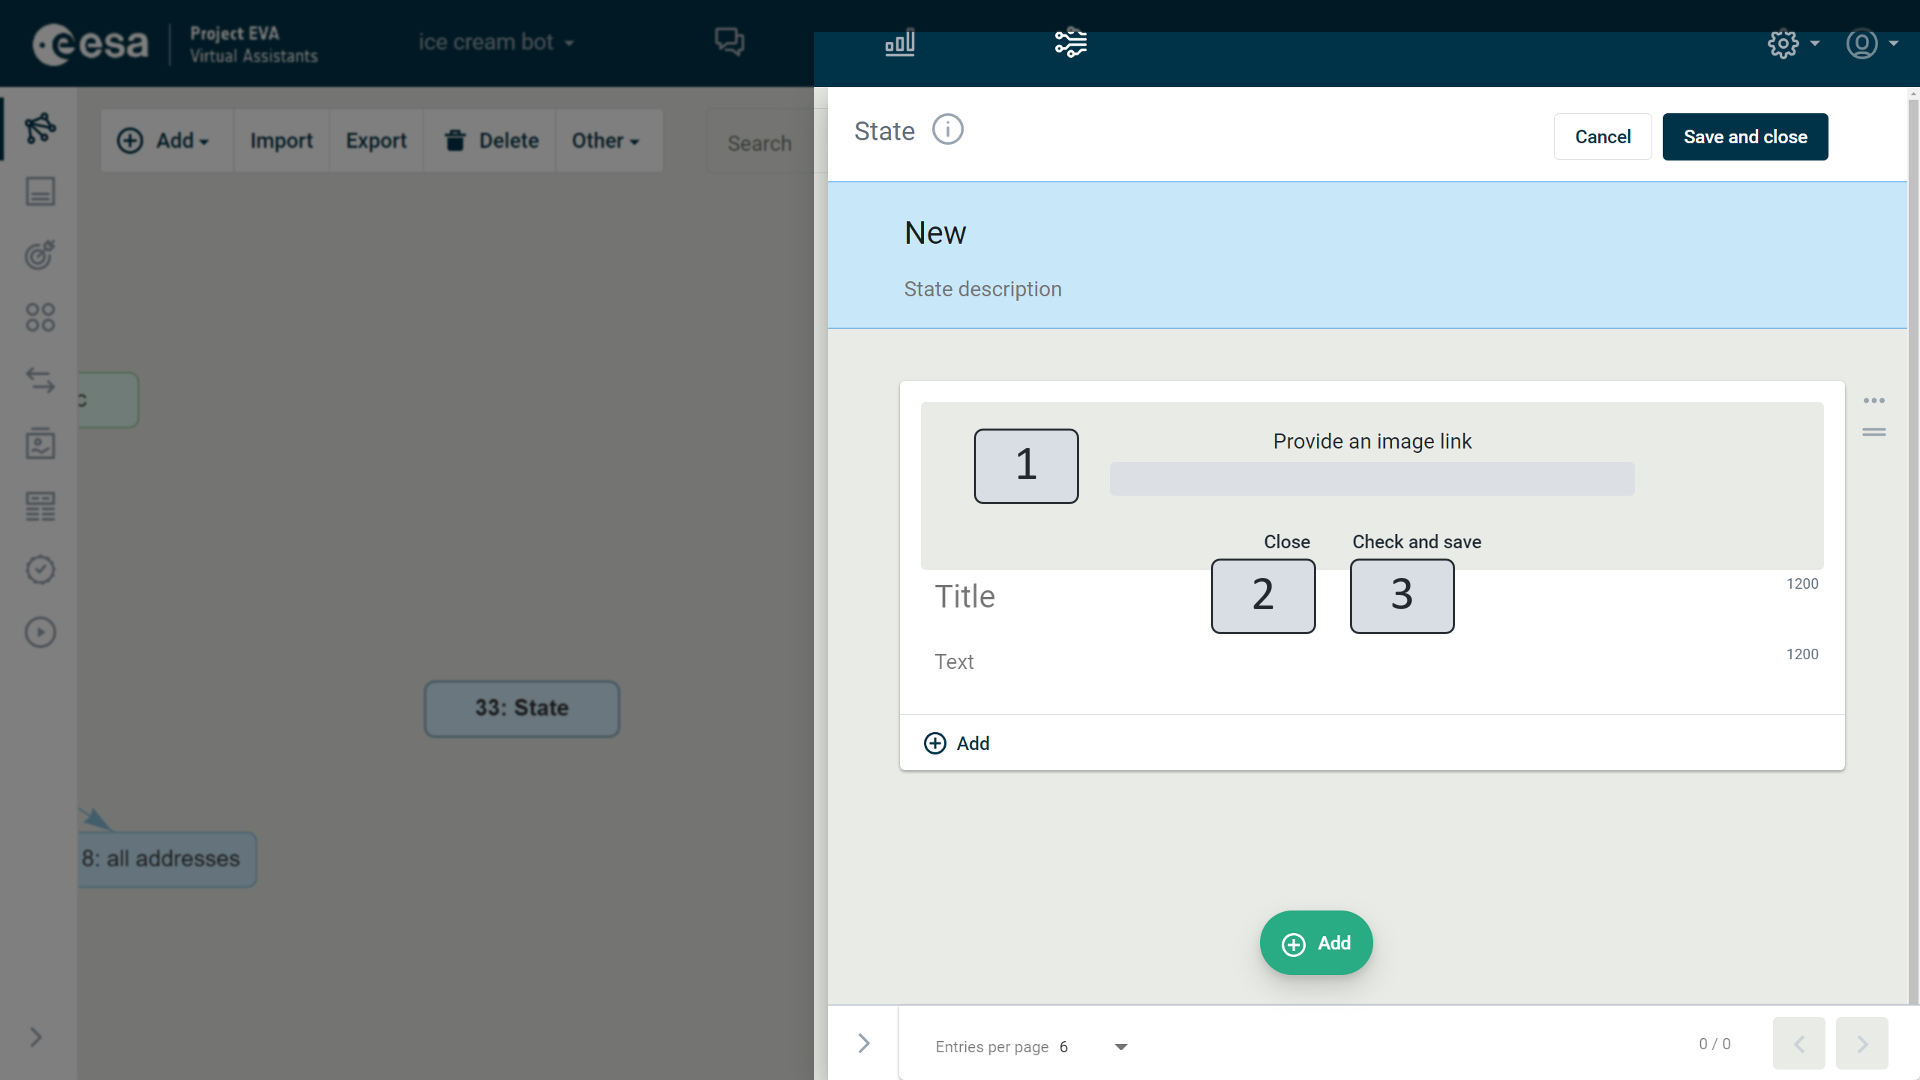
Figure 55. Picture Link Field
To make sure the link works, you must click "Check and save" (Figure 55) (3). When everything is in order, the picture will be displayed on the left hand side of the action field. If the link is incorrect, a message will appear: "Possibly incorrect link". The "Close" button (2) closes the field without saving any changes.
In the "Title" (Figure 53) (2) and "Text" (3) fields, output values can be added in two ways, like all other assistant outputs.
1) To be written in full form at once. (The composed text will also be automatically shown in the "Output" view as a new output with an identifier created from the first words of the text. When publishing a scenario, you should remember to choose "Publish all" so that new outputs also take effect.)
2) Use pre-prepared and published output in the "Output" training view. In this case, you have to start writing an output identifier in the output identifier field or a title from the output. By coincidence, available options will be offered. To choose the right one, click on it.
By clicking the plus sign on the herocard and clicking the title "Add" (Figure 53) (4), you can add three different types of buttons with different actions.
Button. Simple menu button. Use if you want to offer the user a choice. Unlike the buttons on the card, the herocard buttons don't disappear during a conversation with the user. The user sees them and can click on them by looking at the conversation you have already had in the try-out window.
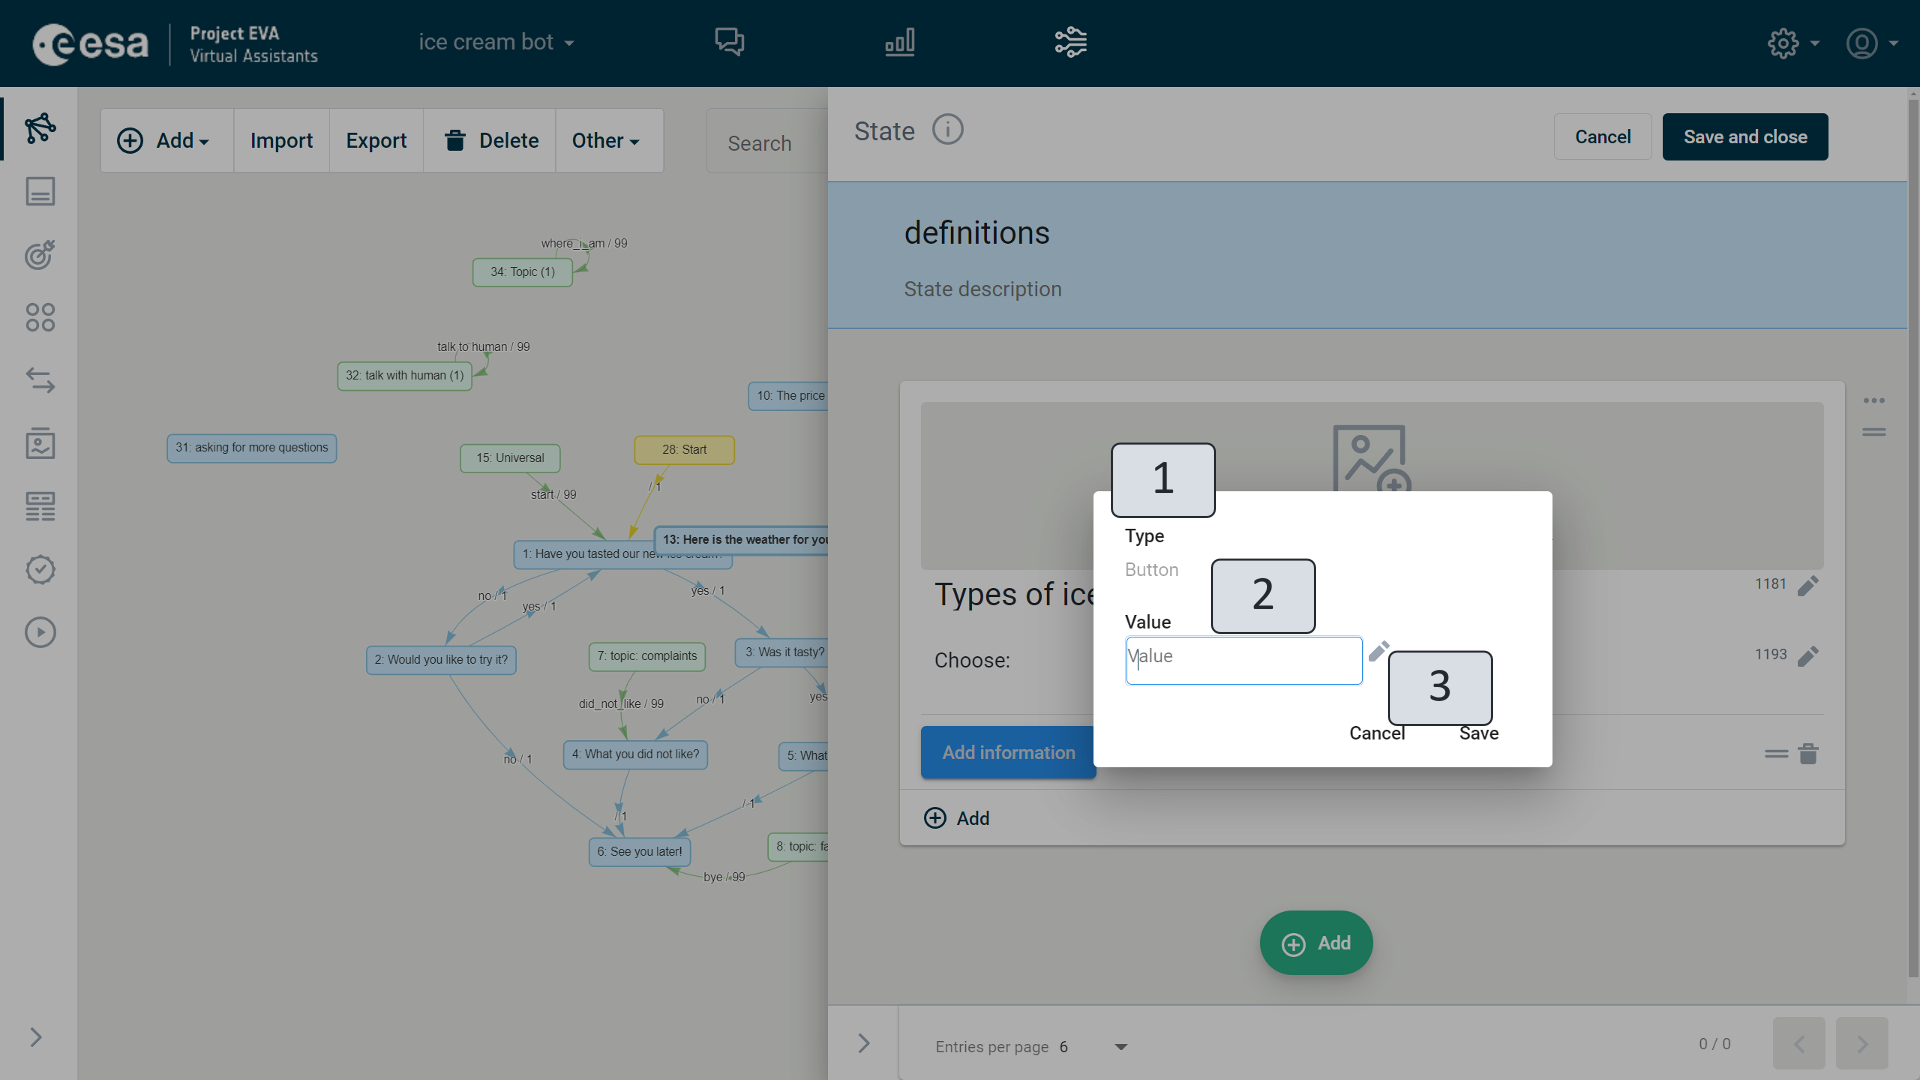
Figure 56. Button
The button window (Figure 56) displays a button type (1). The type field is for information purposes only and cannot be changed. The button's title must be added to the value field (2) just like any VA output. For the corrections to be implemented, you must click "Save", but in order for the changes not to be saved - "Cancel" (3).
Button with link. A button, which when clicked, opens the specified website in a separate tab.
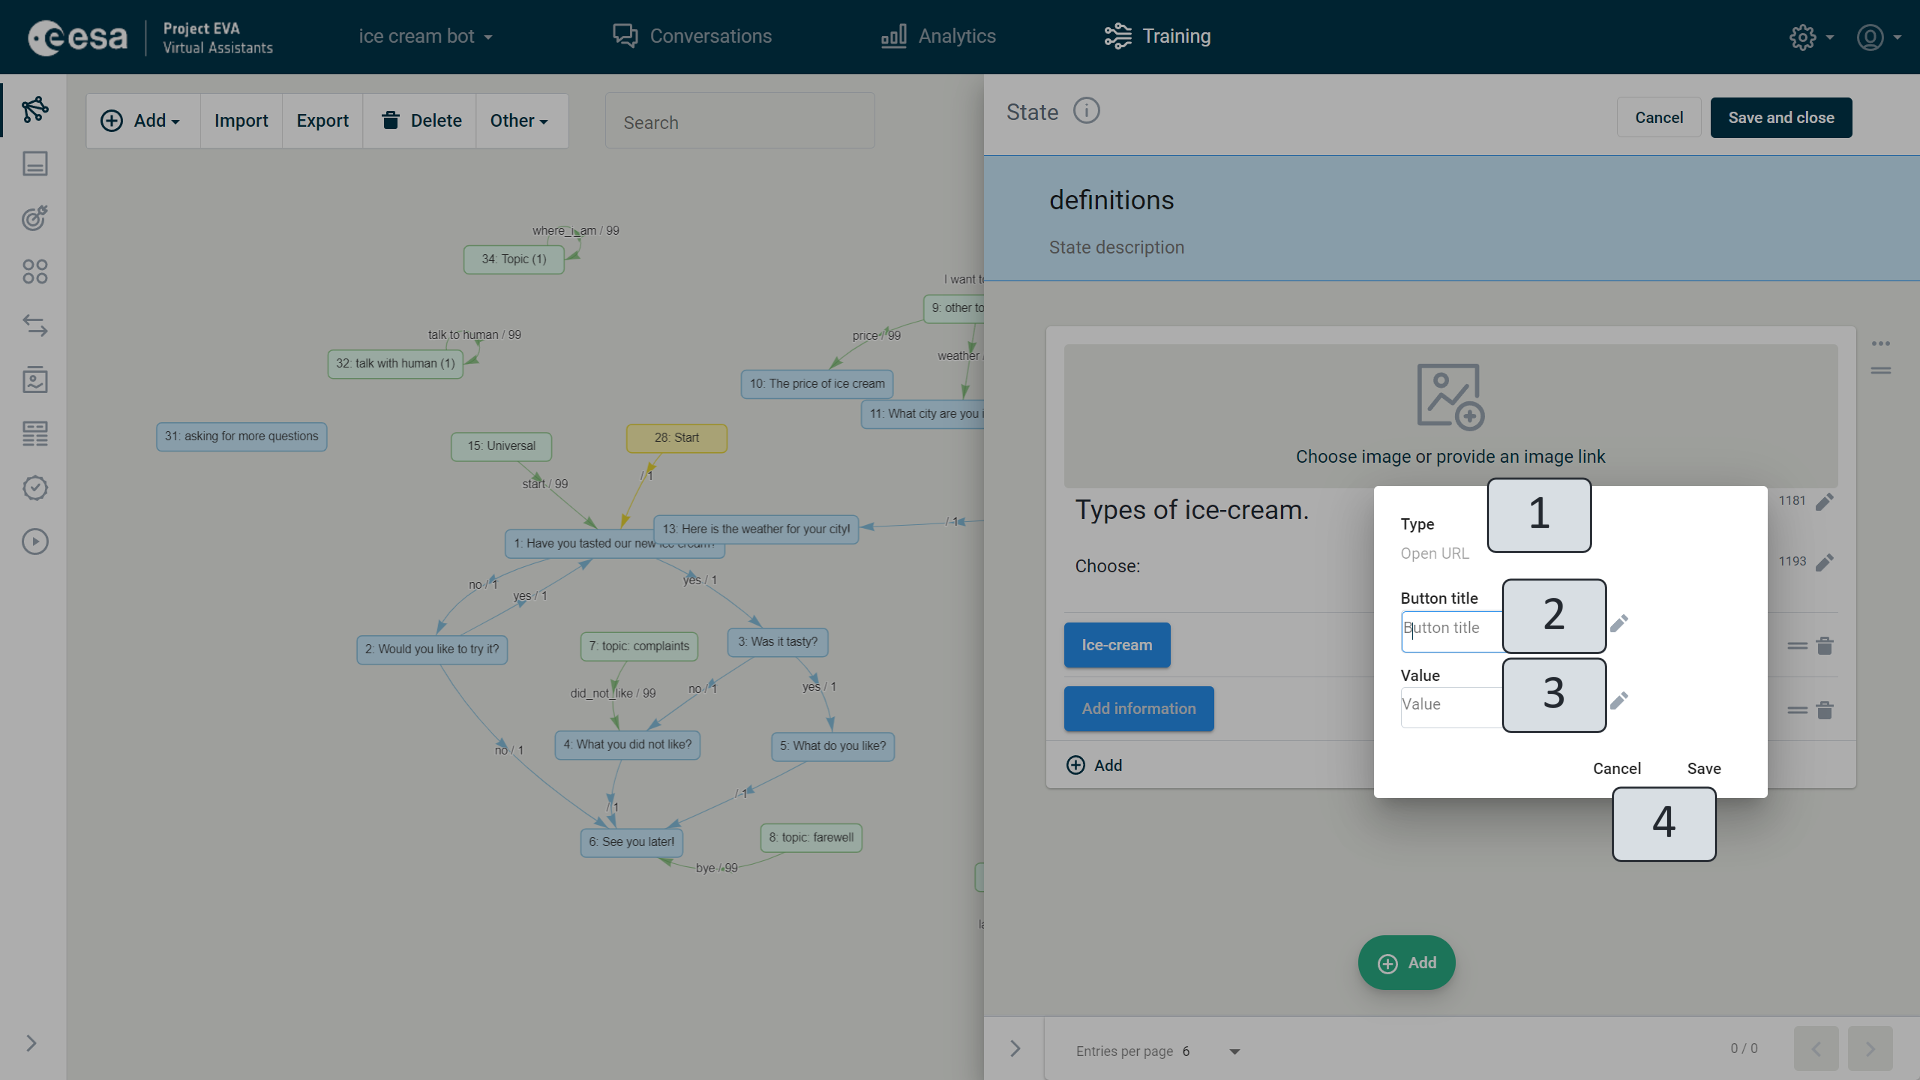
Figure 57. Button with link
To define a button with a link, you must type it in the "Button title" field in the button window (Figure 57) (2). The "Type" field (1) cannot be changed, it serves an informative purpose by indicating that the VA will open the specified website when the user clicks the button. The address or link of the website must be specified in the "Value" field (3). By clicking the titles "Cancel" and "Save" (4), you can either discard or implement the new changes.
Button with command. When you click the button, a message or a command is sent to the assistant about the action to be performed.
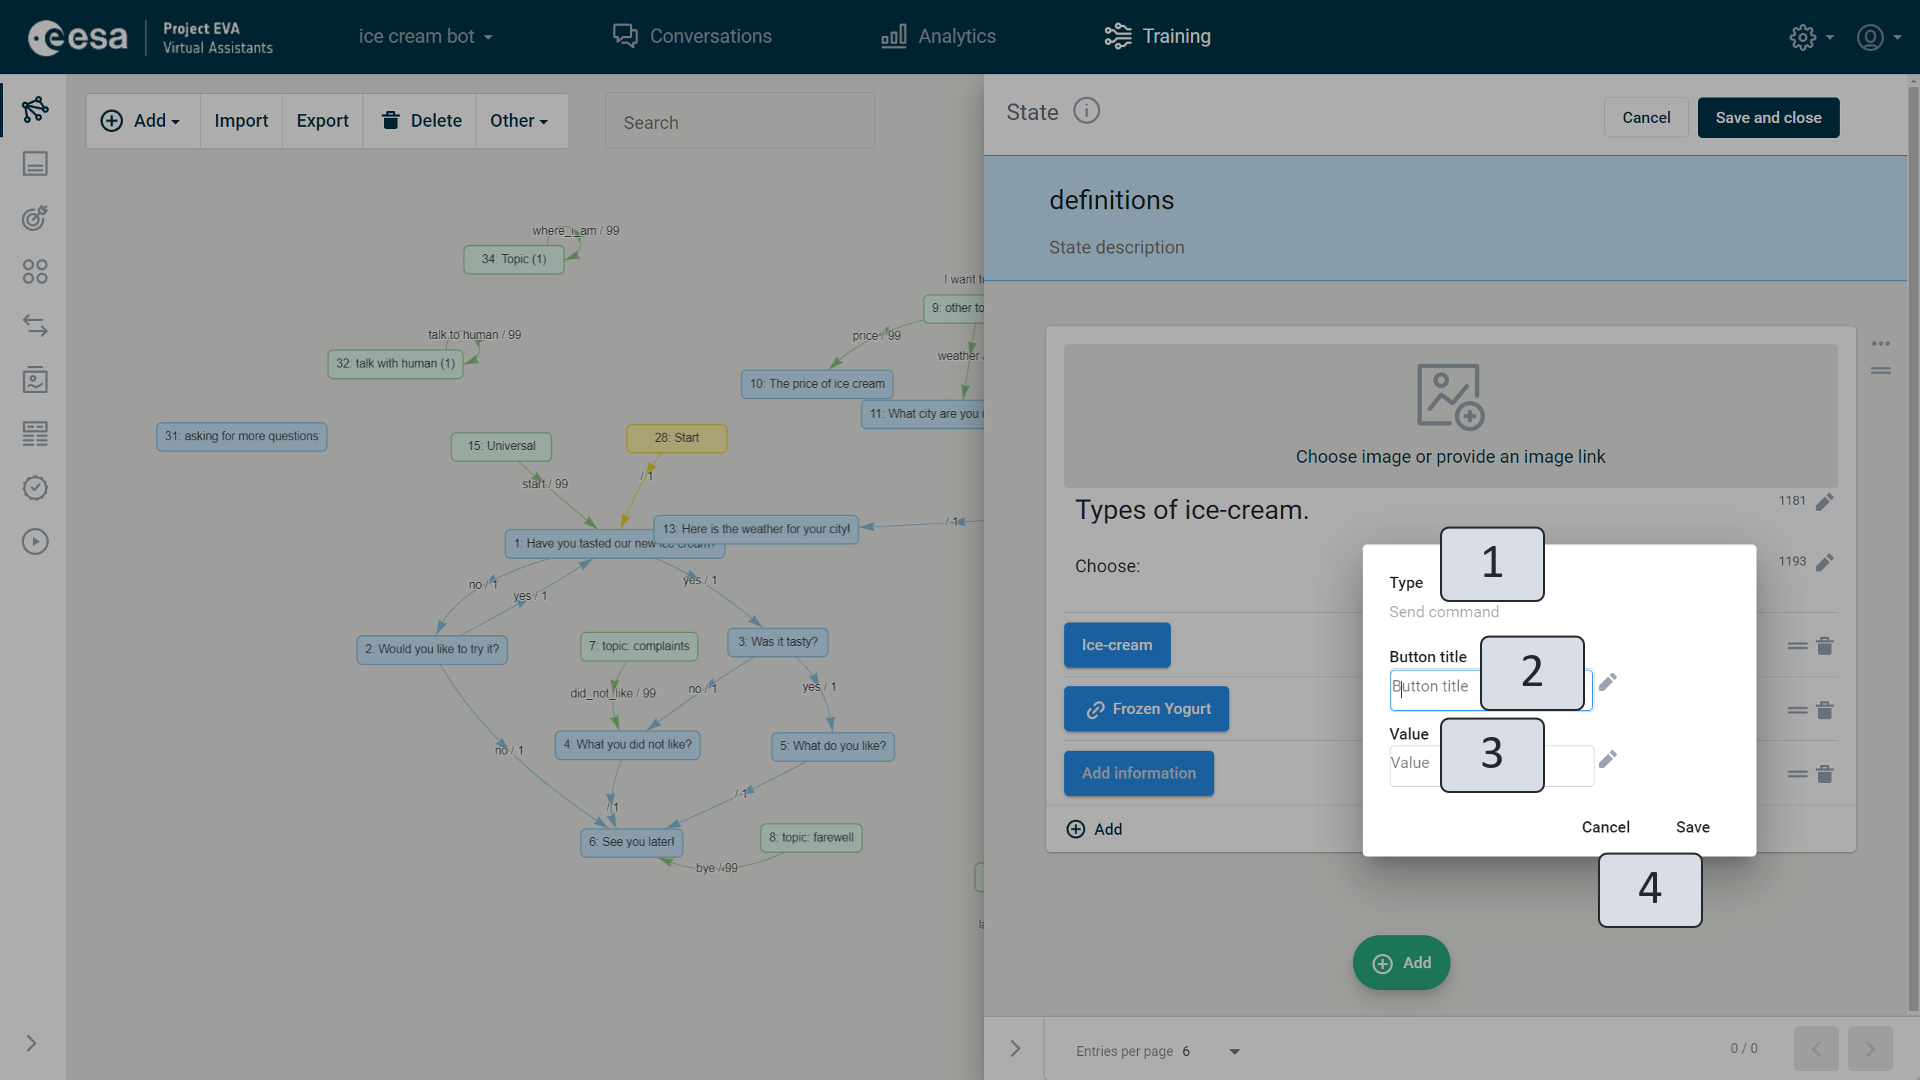
Figure 58. Button with command
When you type a button with a command, you must type the title of the button in the "Button title" window (Figure 58) (2). The "Type" field (1) indicates that the task of the button is to execute a command. This field cannot be changed. In the value field (3), you must specify the command for execution that will be sent to the VA. By clicking the titles "Cancel" and "Save" (4), you can either discard or implement the new changes.
You can move, delete, and add prerequisites and tags (Figure 53) (5) to the entire action of a herocard along with the buttons, just like for other actions. More details are provided in the description of how to delete an action, change the order of action, and the prerequisites in the Sub-chapter "Text".
In an already filled herocard, you can change the place of existing buttons by clicking two parallel lines (Figure 58.1) (1), you can delete already defined buttons (2). You can edit headlines and texts that you have already made: clicking the pencil icon (3) next to the field will open the window "Edit output", where you can make corrections, add other output options (4). For the current fixes to take effect, click "Save" (6). If you want to close the window without saving your changes, click "Cancel" (5).
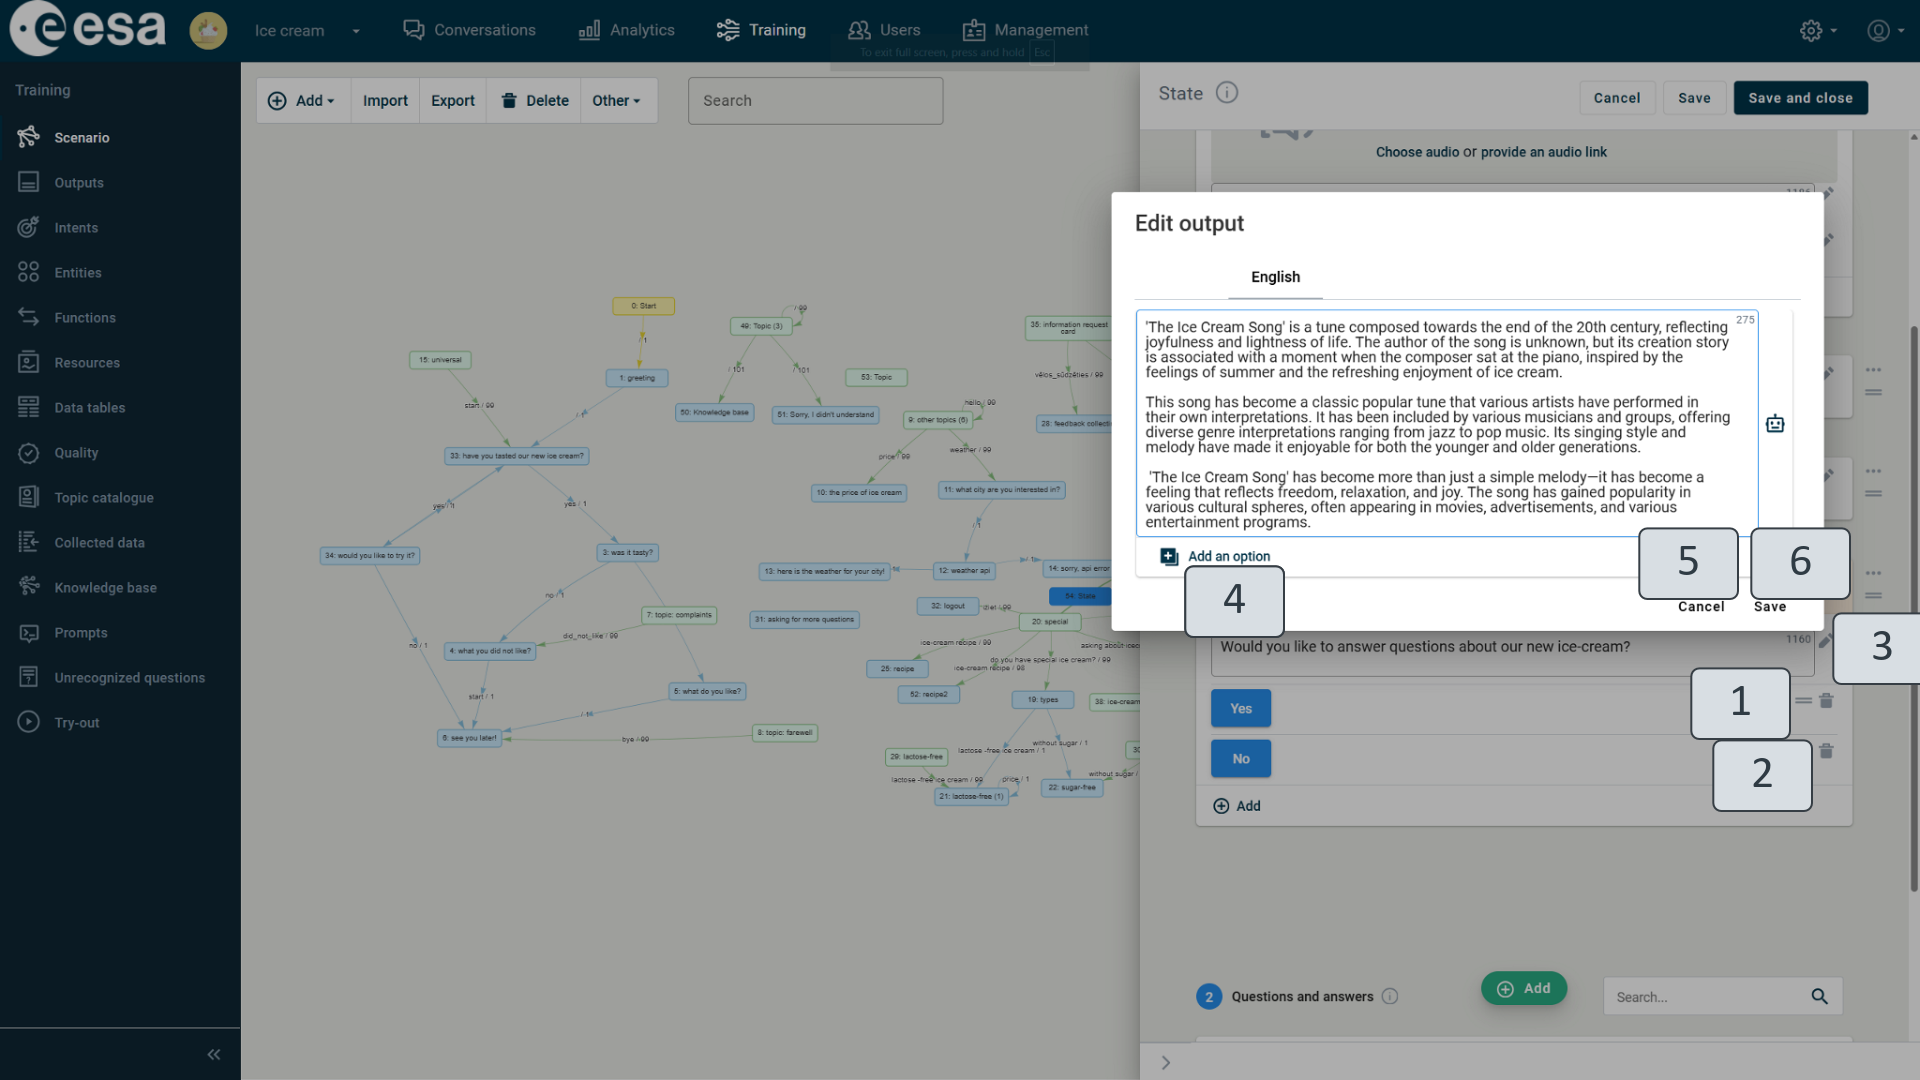
Figure 58.1. Filled in herocard
When you click the card three dots (Figure 53) (5), you will be prompted to add tap action, to the herocard, which the VA must perform if the user clicks on the text or image defined on the relevant herocard during the conversation.
Three types (2) can be specified for tap action (Figure 59) (1).
- Button - when a herocard element (image or inserted text) is clicked during a conversation, the user will be shown a button.
- Open URL - when a herocard element is clicked during a conversation, the link shown in the "Value" field (4) will be displayed to the user.
- Send command - if the user clicks a herocard element during the conversation, the VA will send the command specified in the "Value" field (4).
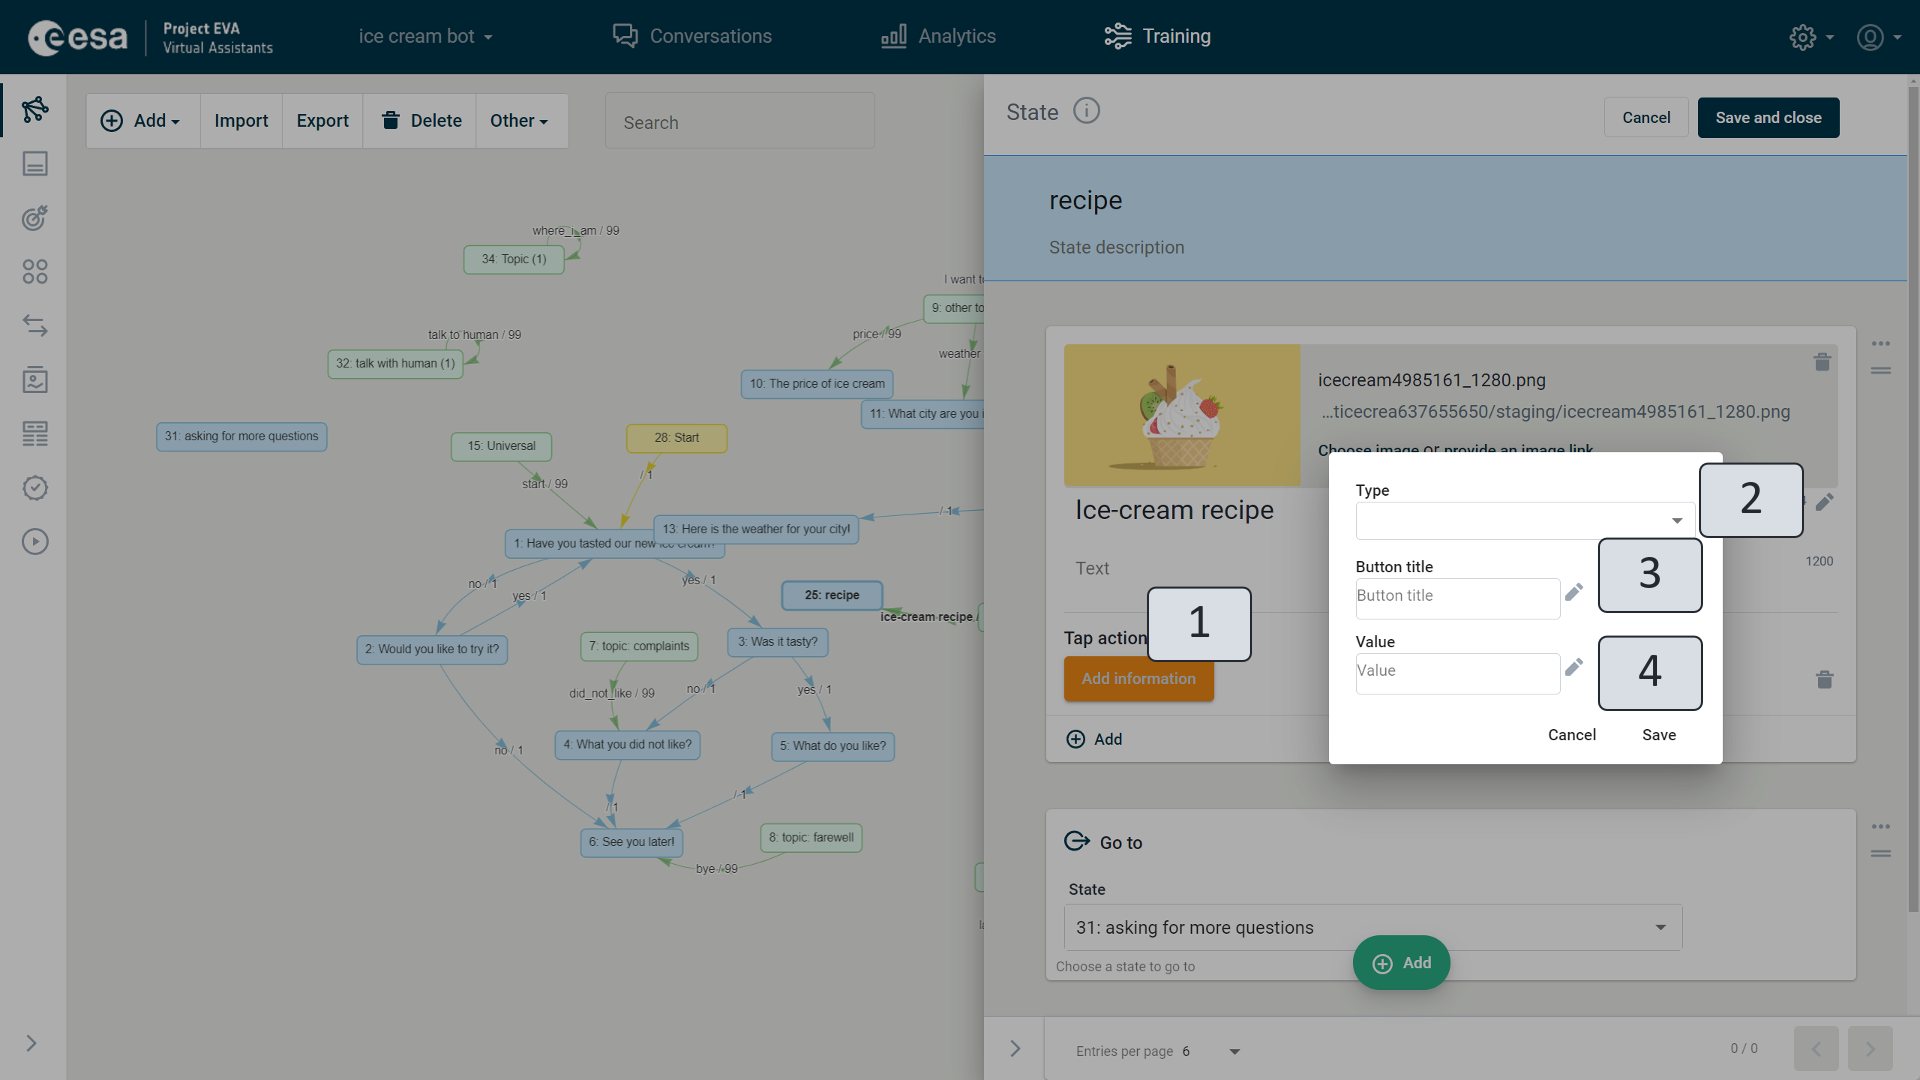
Figure 59. Add a Tap Action to a Herocard
Alongside the tap action, one can also fill in the "Button Title" (3) fields that will only be visible to the user if the "Button" tap action type is selected, and the "Value" field also has to be filled in.
Audio card
The audio card action is designed in the same way as the herocard, only audio recordings (Figure 60) (1) should be included instead of images.
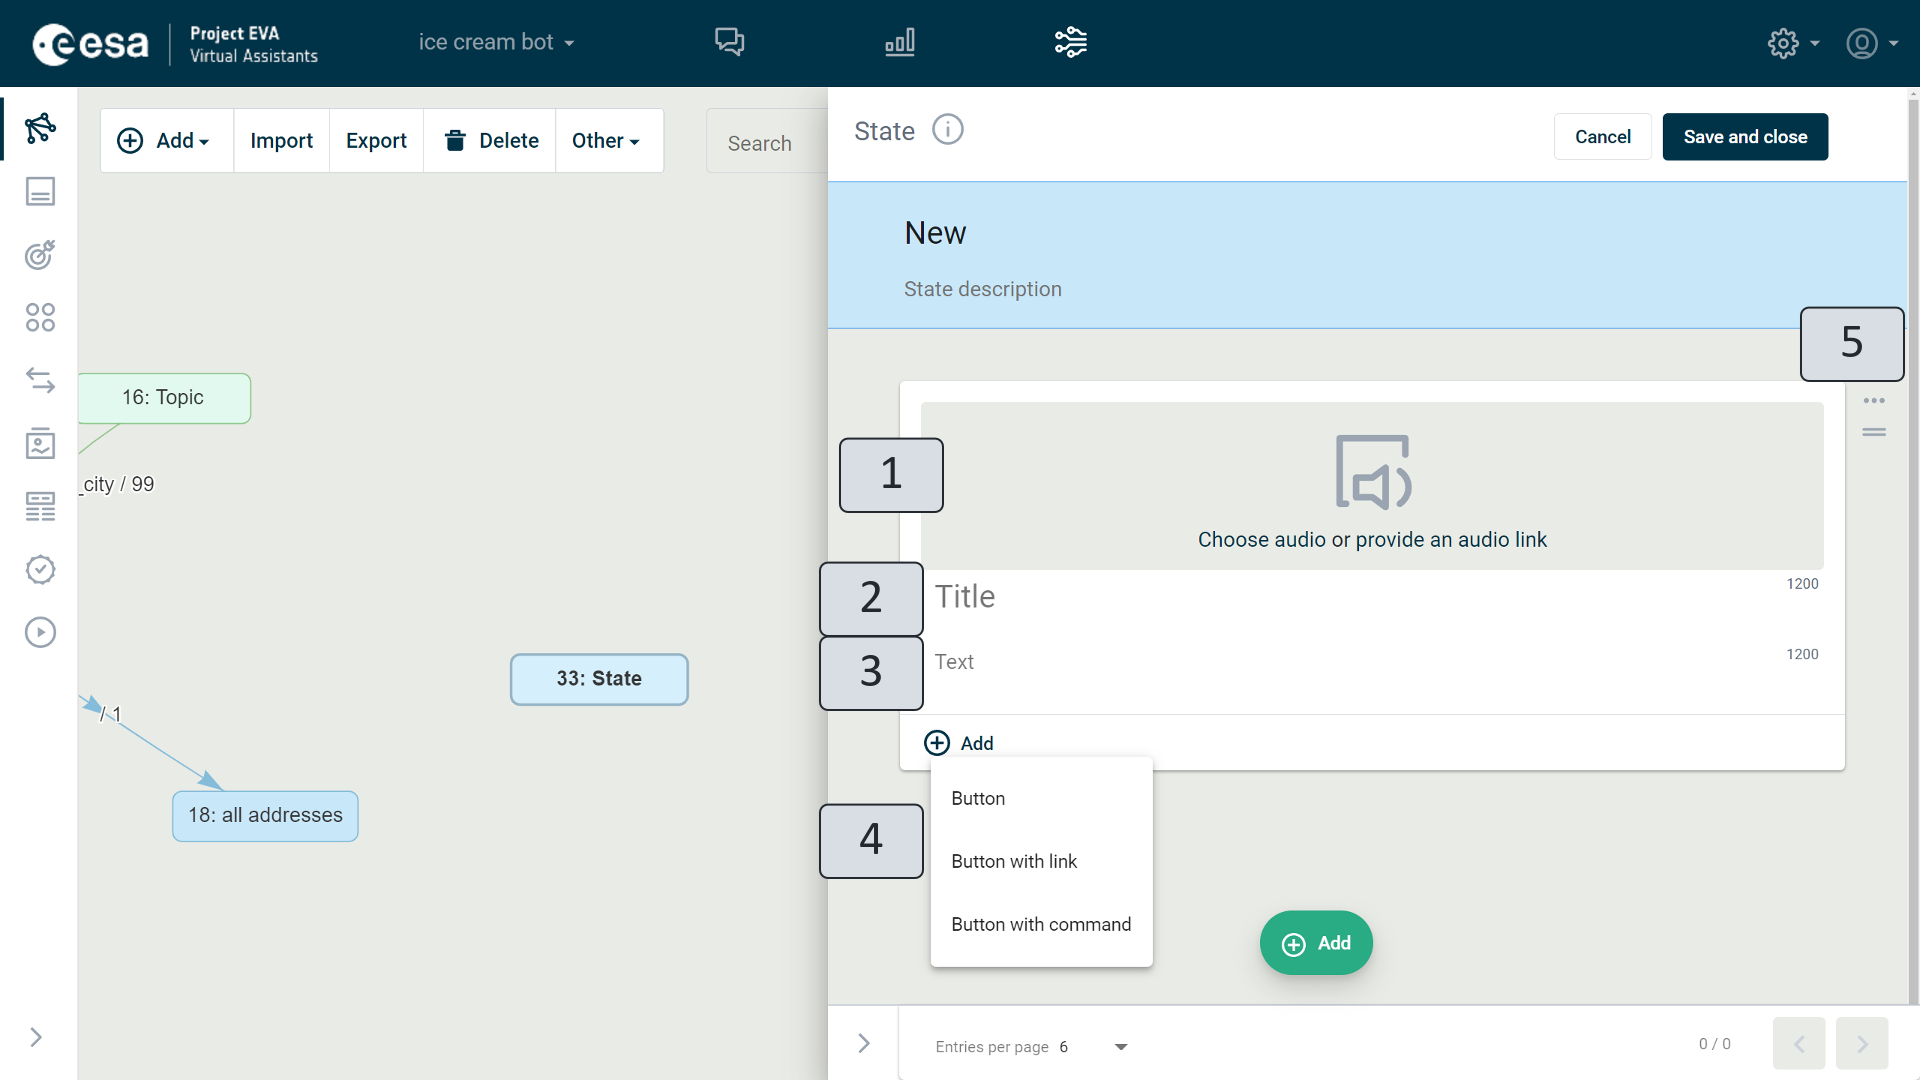
Figure 60. Audio card
You can add an entry to an audio card from both pre-prepared data, information stored on your computer, and a website. The maximum size of the audio file – 30 MB.
Clicking "Choose audio" (Figure 60) (1) will open a list of all audio files (Figure 61) that have already been prepared in the "Resources" training view. You can select the sound recording you want from this list (1), but if it is not there, click on "Upload" (2) in the open window to select the file you want on your computer.
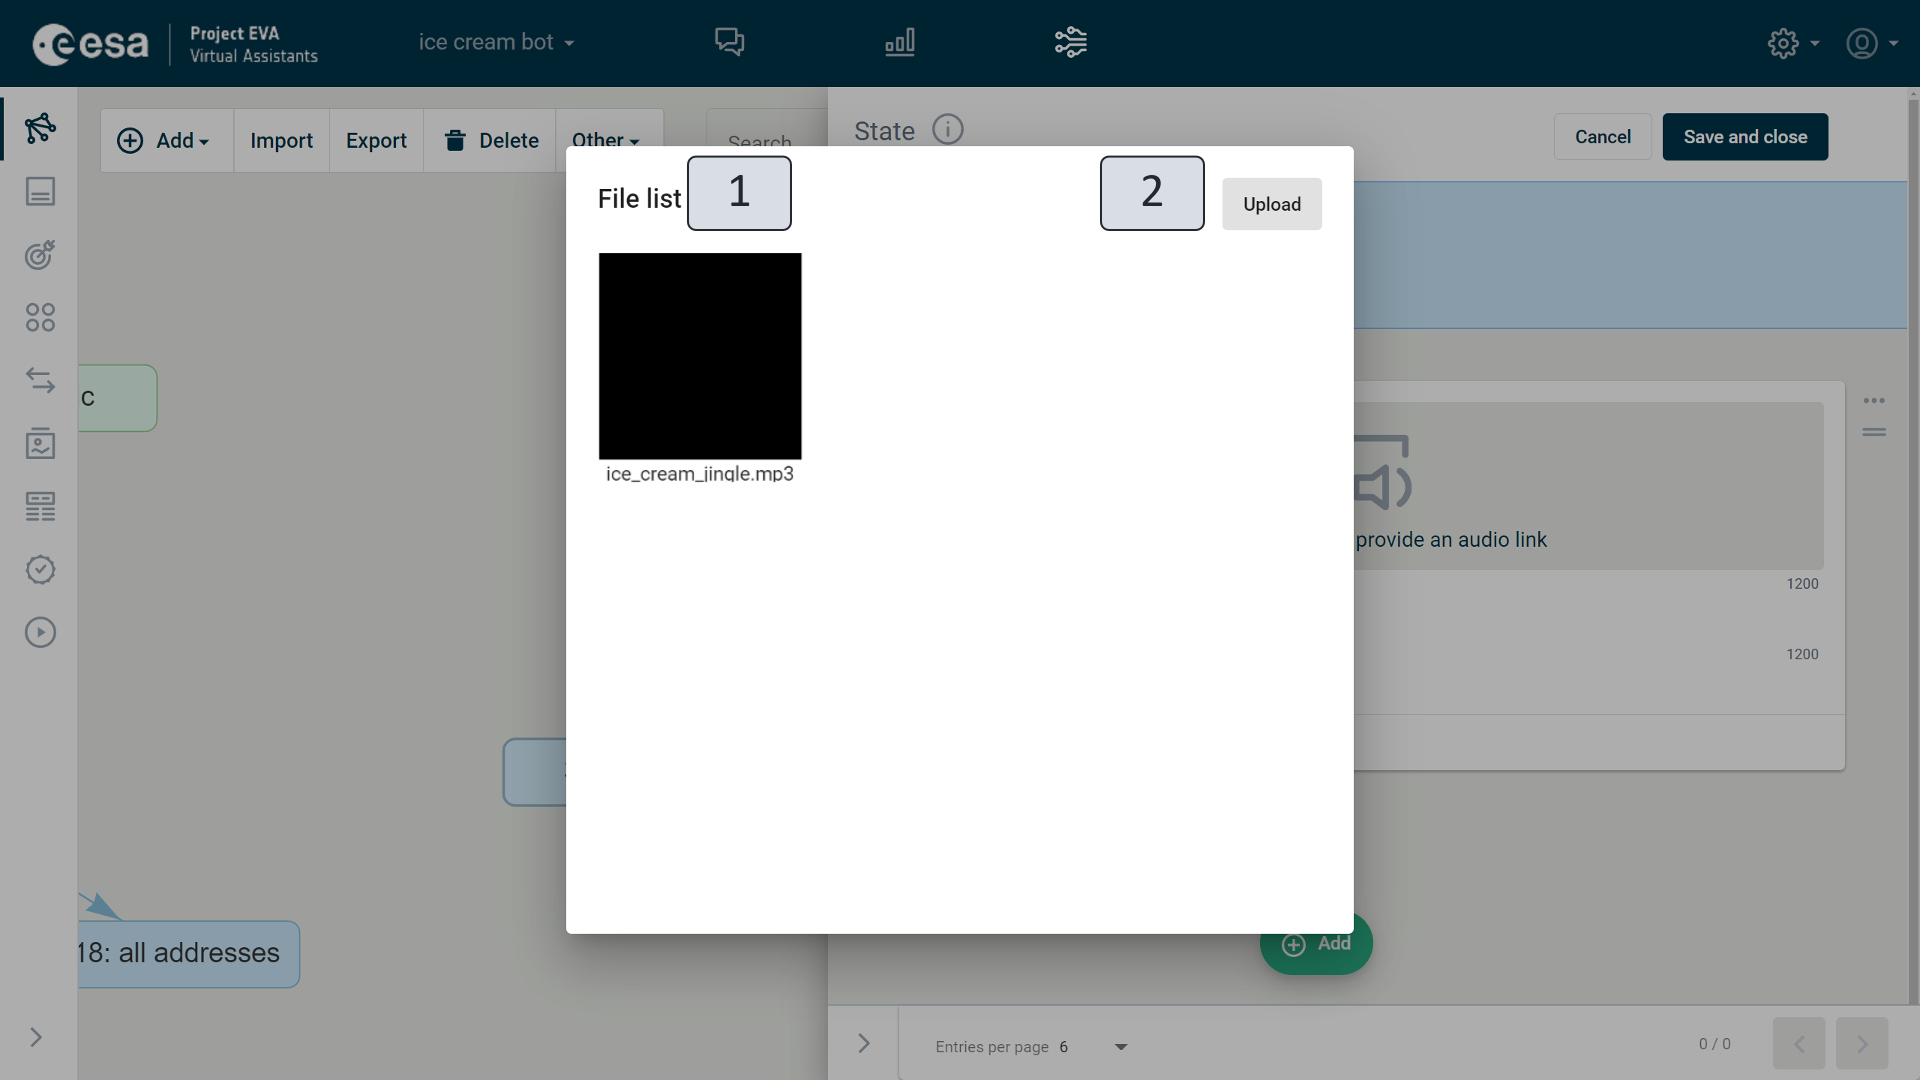
Figure 61. Audio File List
An audio file can also be inserted by specifying its location on the web. Clicking the text "provide an audio link" (Figure 60) (1) will open the field (Figure 62) (1) where you want to type or copy the audio recording address.
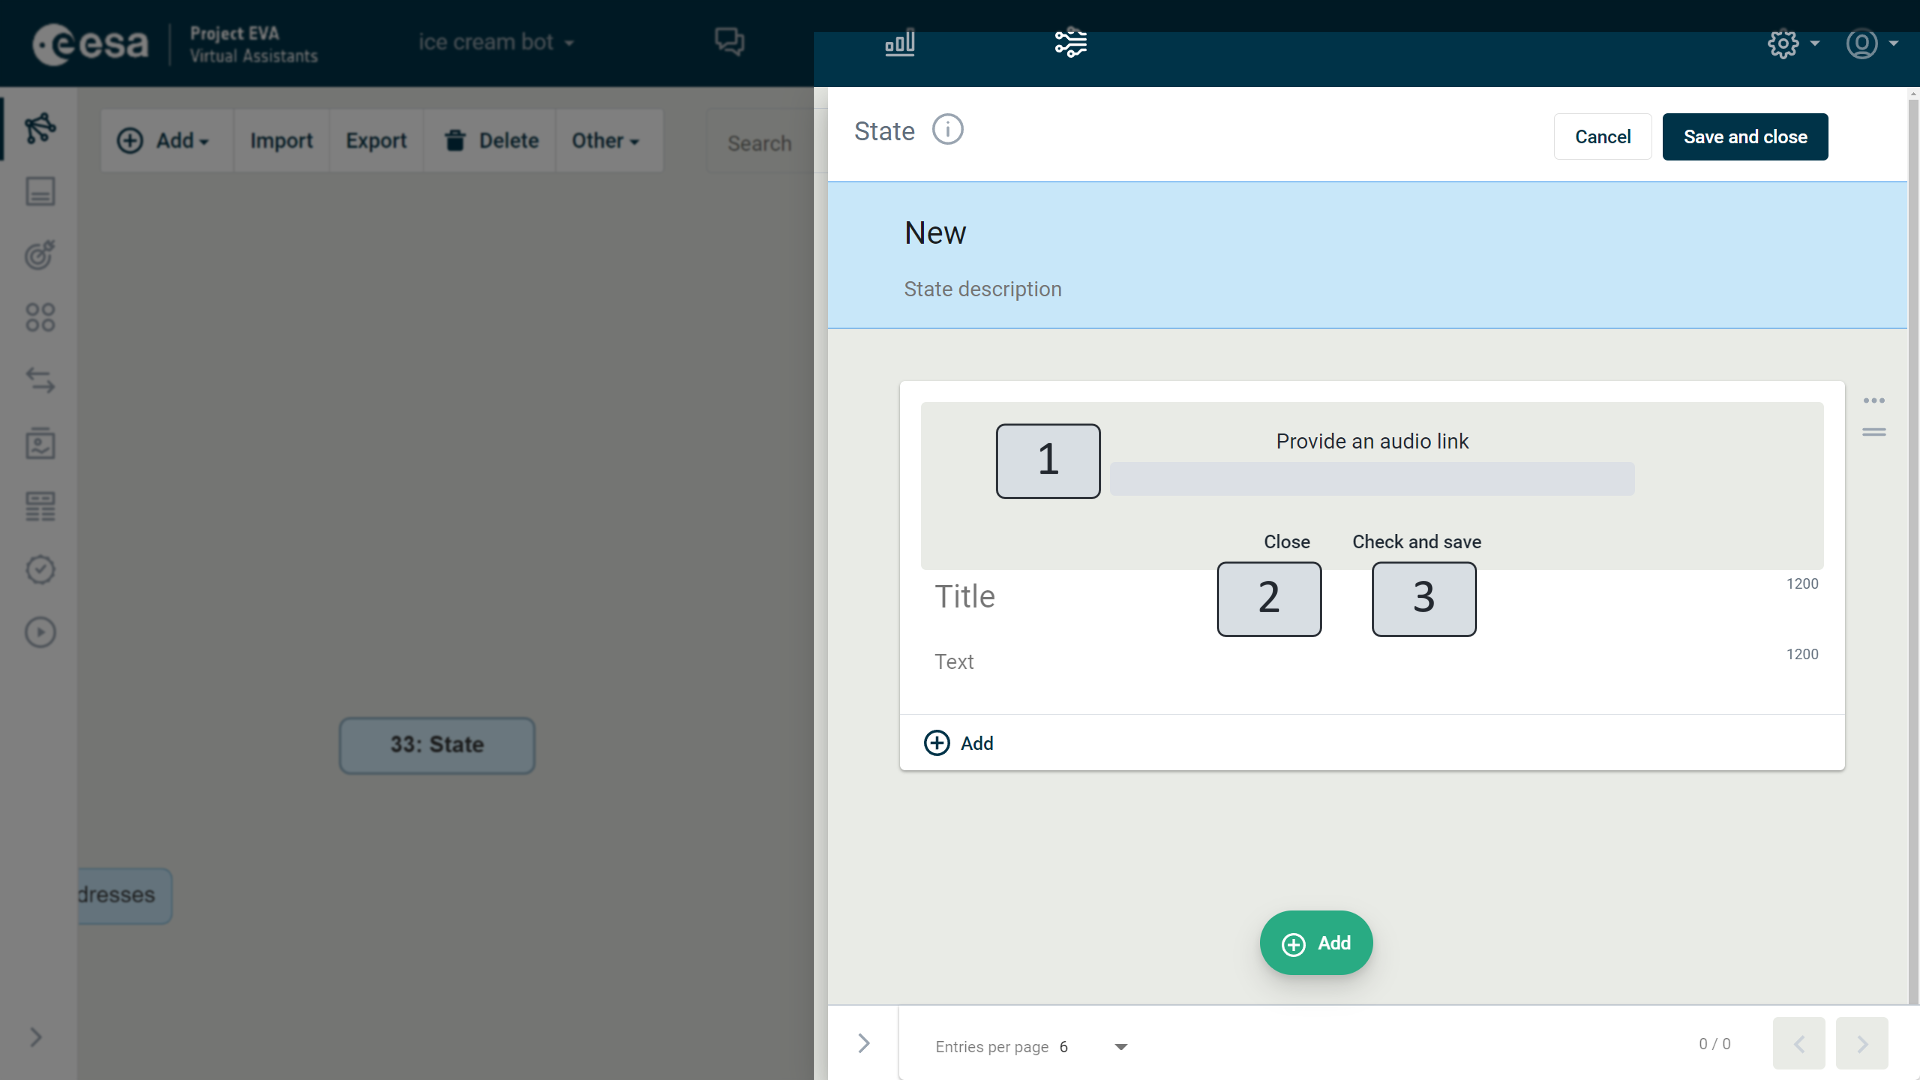
Figure 62. Audio Link Field
To make sure that the link is working, you must click "Check and save" (Figure 62) (3). When everything is in order, the audio object icon will be displayed on the left hand side of the action field. If the link is incorrect, a message will appear: "Possibly incorrect link". If the link is correct, you must click "Use the link". The "Close" button (2) closes the field without saving any changes.
As on the herocard, you can specify different types of text (Figure 60) (2-3) and buttons (4) on the audio card. You can read more about their functionality in "Herocard".
The example with audio card fields already filled in is considered below (Figure 63).
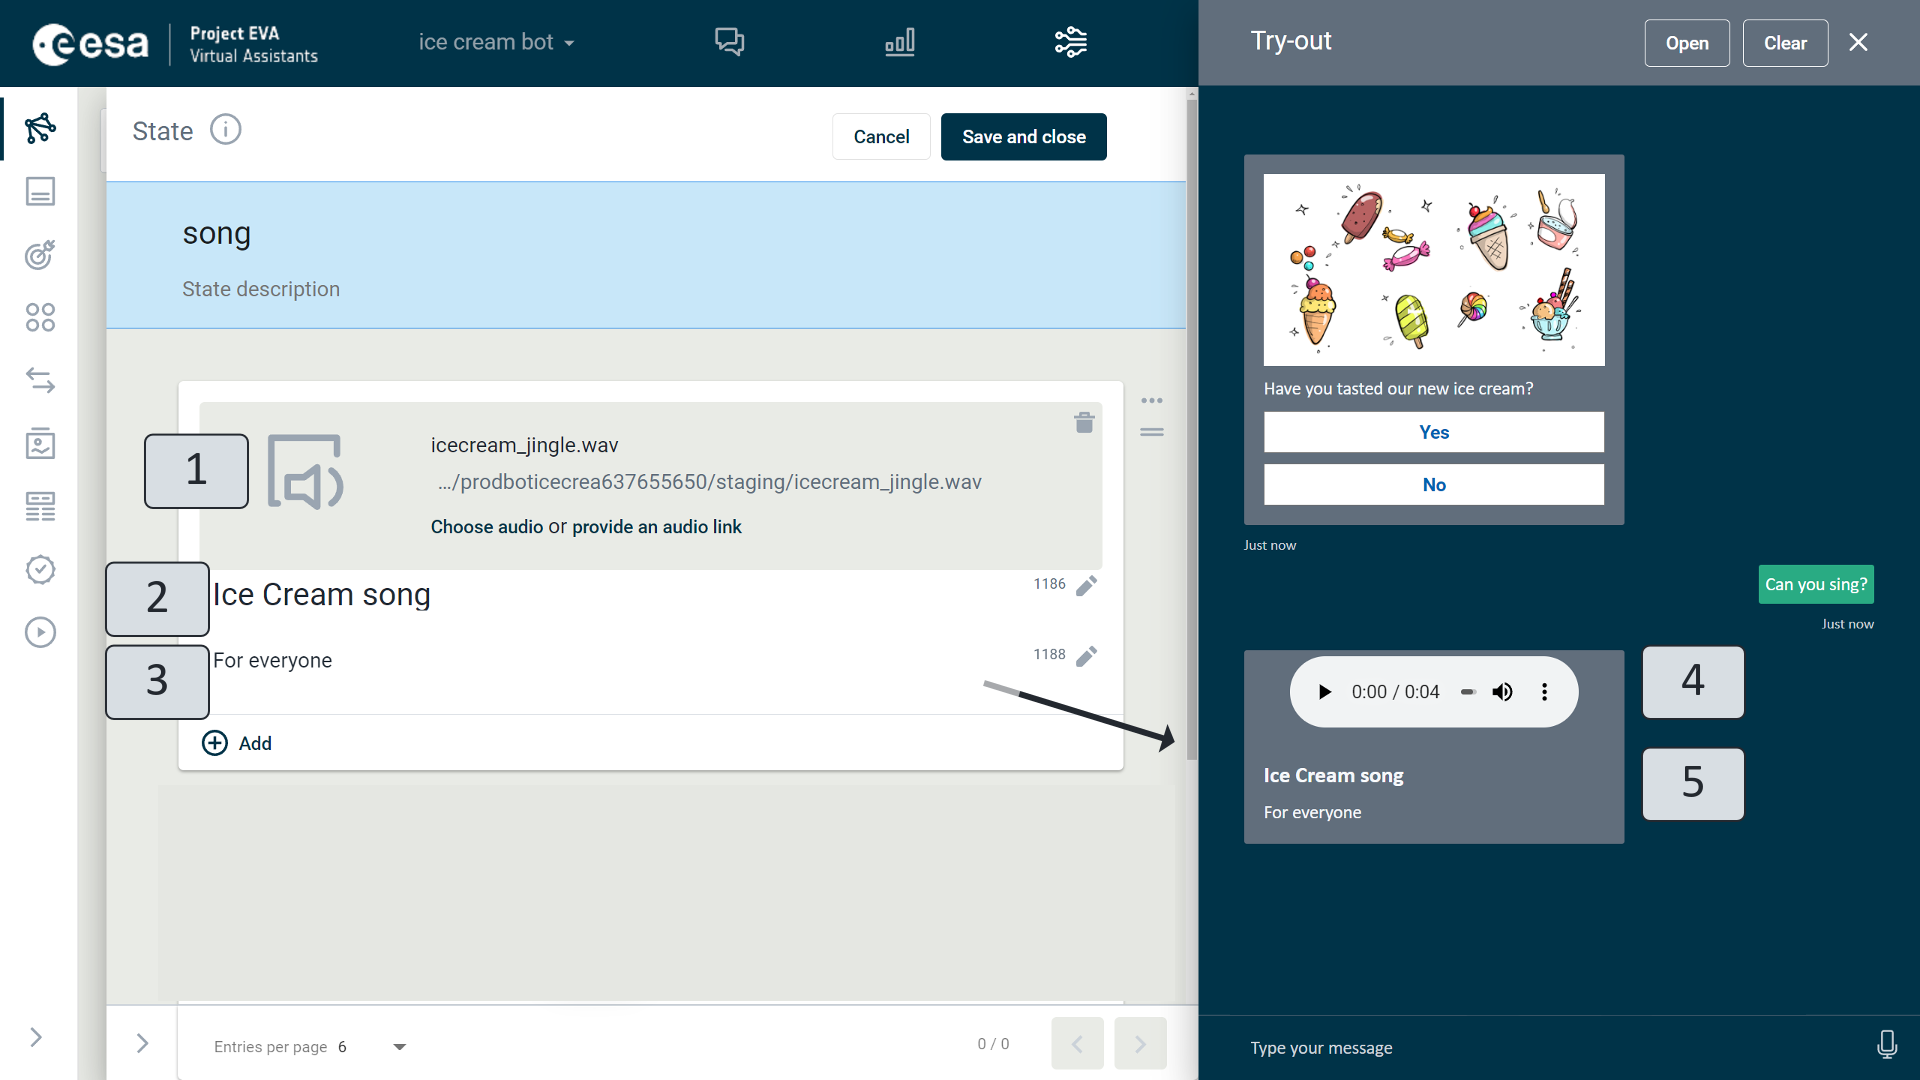
Figure 63. Audio Card Example
In this example, the action indicates the use of an audio object (Figure 63) (1), which is also displayed in the try-out window (4) when the user talks to the VA. In the try-out window, a user with an audio file can take the simplest actions: start and stop playing it, change playing volume, and download the recording to your computer. The title (2) and text fields (3) are also filled in on the audio card, which also appears successively in the dialogue (5).
You can move, delete, and add prerequisites and tags to an audio card action (Figure 60) (5). More details about this are provided in descriptions how to delete an action, change the sequence of an action, and the prerequisites in Sub-chapter "Text".
Video Card
A video card is an action that is designed just like a herocard and audio card, but a video file is included instead of an image or audio file.
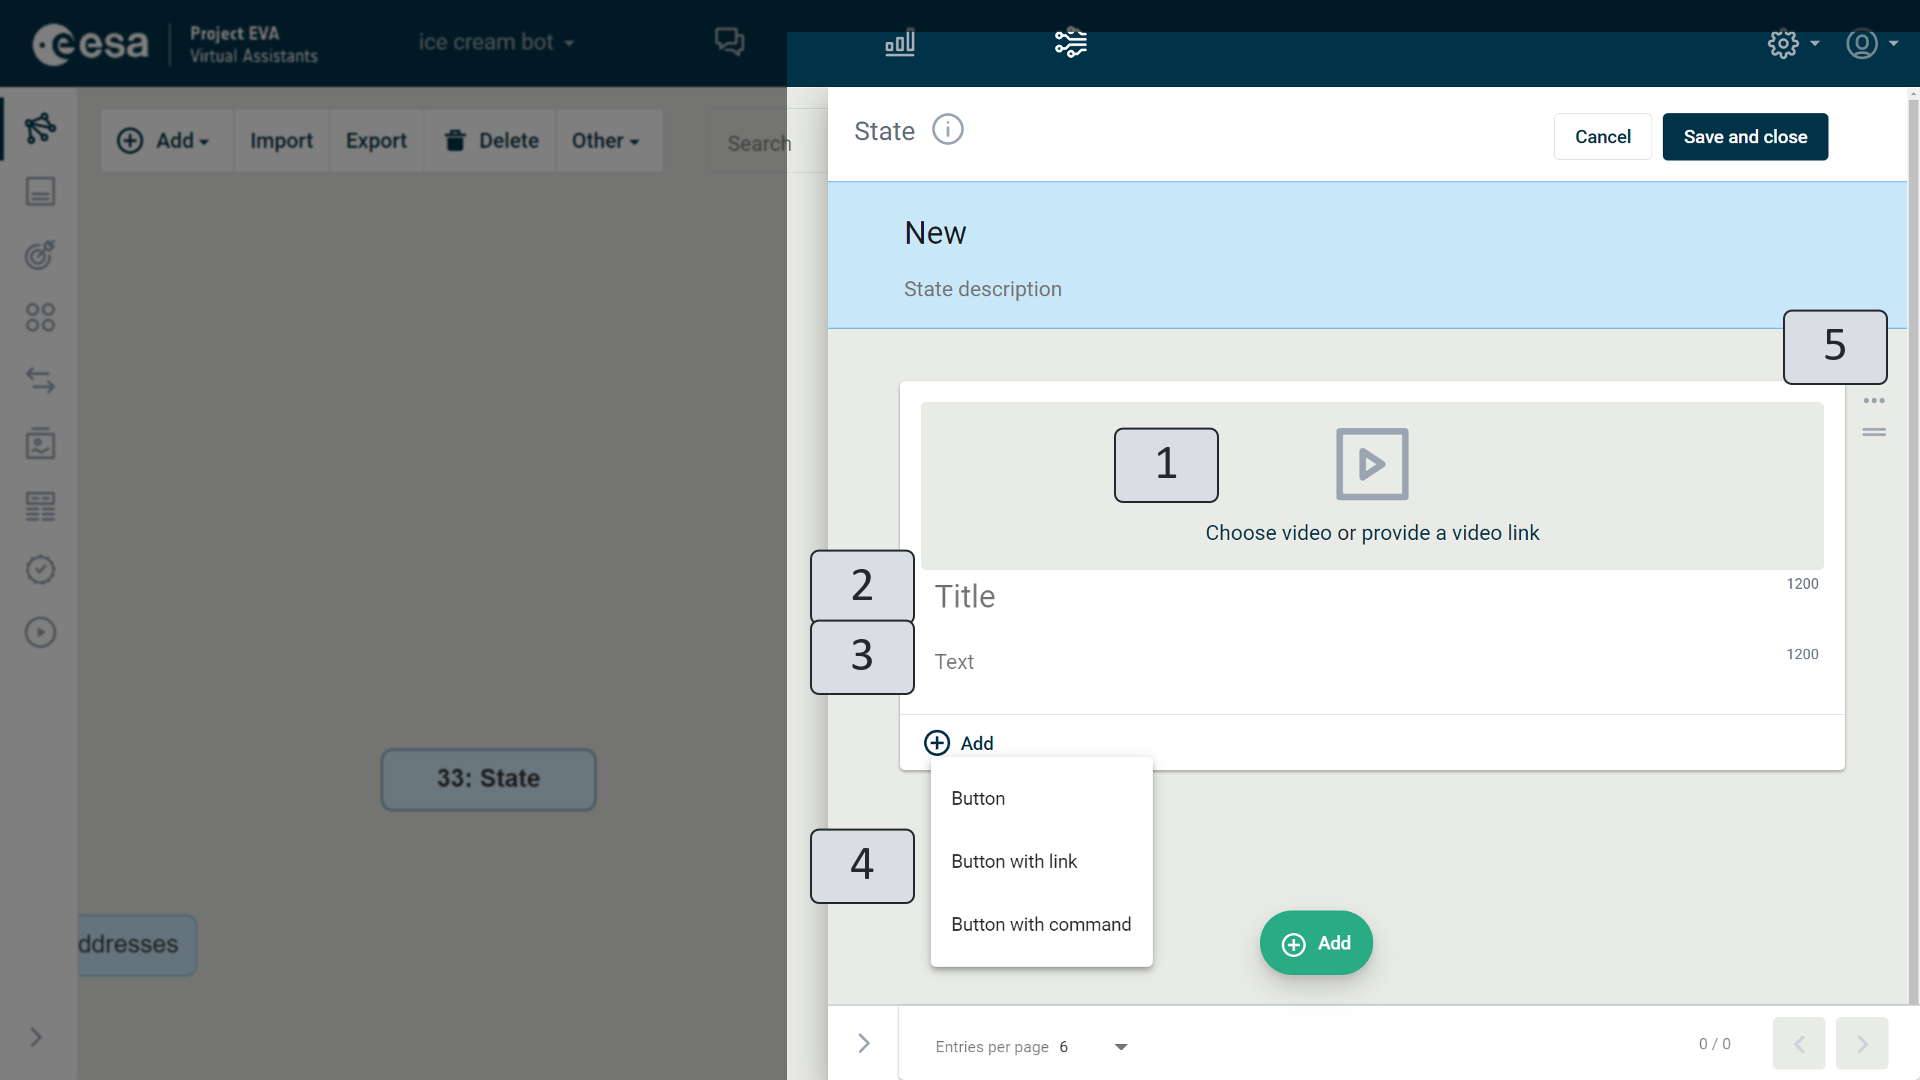
Figure 64. Video Card
You can add a video file to your video card from pre-prepared data, information stored on your computer and your website.
Clicking "Choose video" (Figure 64) (1) will open a list of all video files (Figure 65) already prepared in the "Resources" training view. You can select the video recording you want from this list (1), but if it is not there, you must click "Upload" (2) in the open window to select the file you want on your computer.
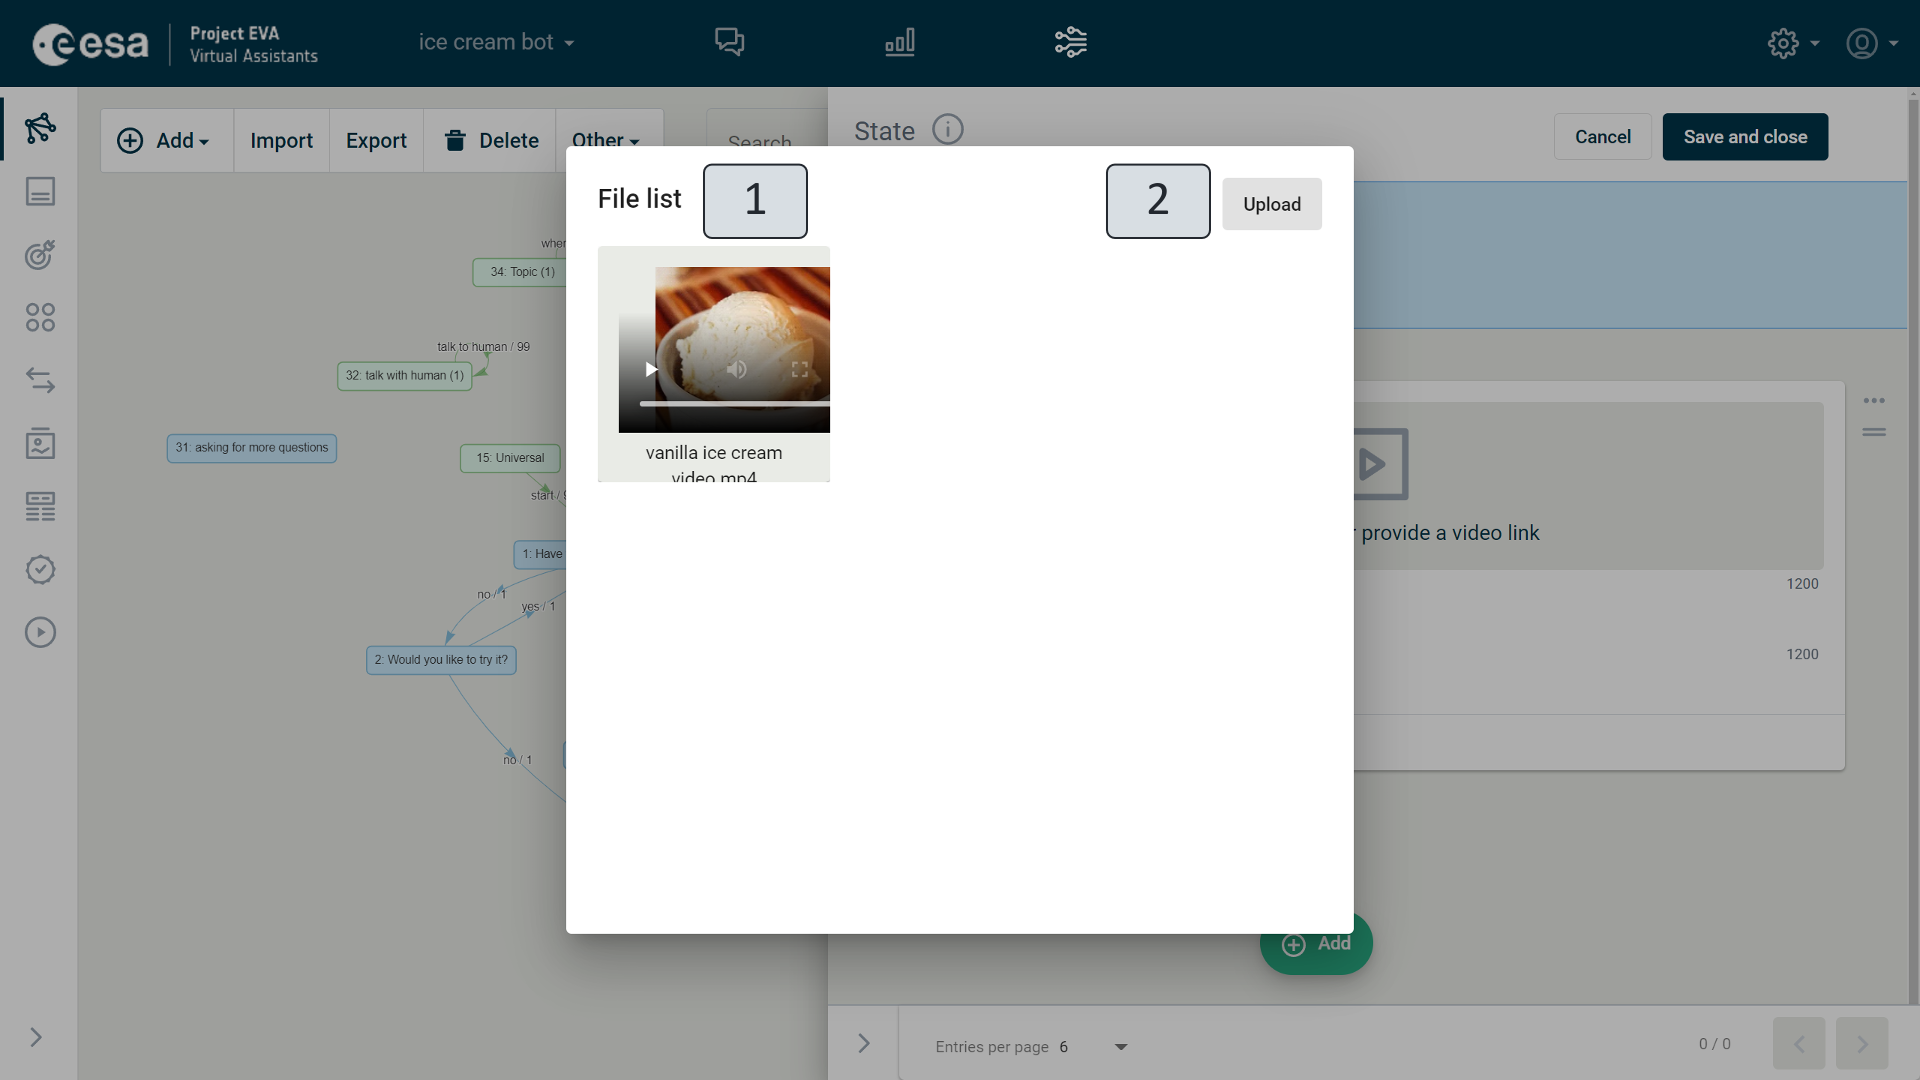
Figure 65. Video File List
You can also insert a video file by specifying its location on the web. Clicking on the text "Provide a video link" (Figure 64) (1) will open the field (Figure 66) (1) where you want to type or copy the address of the video recording.
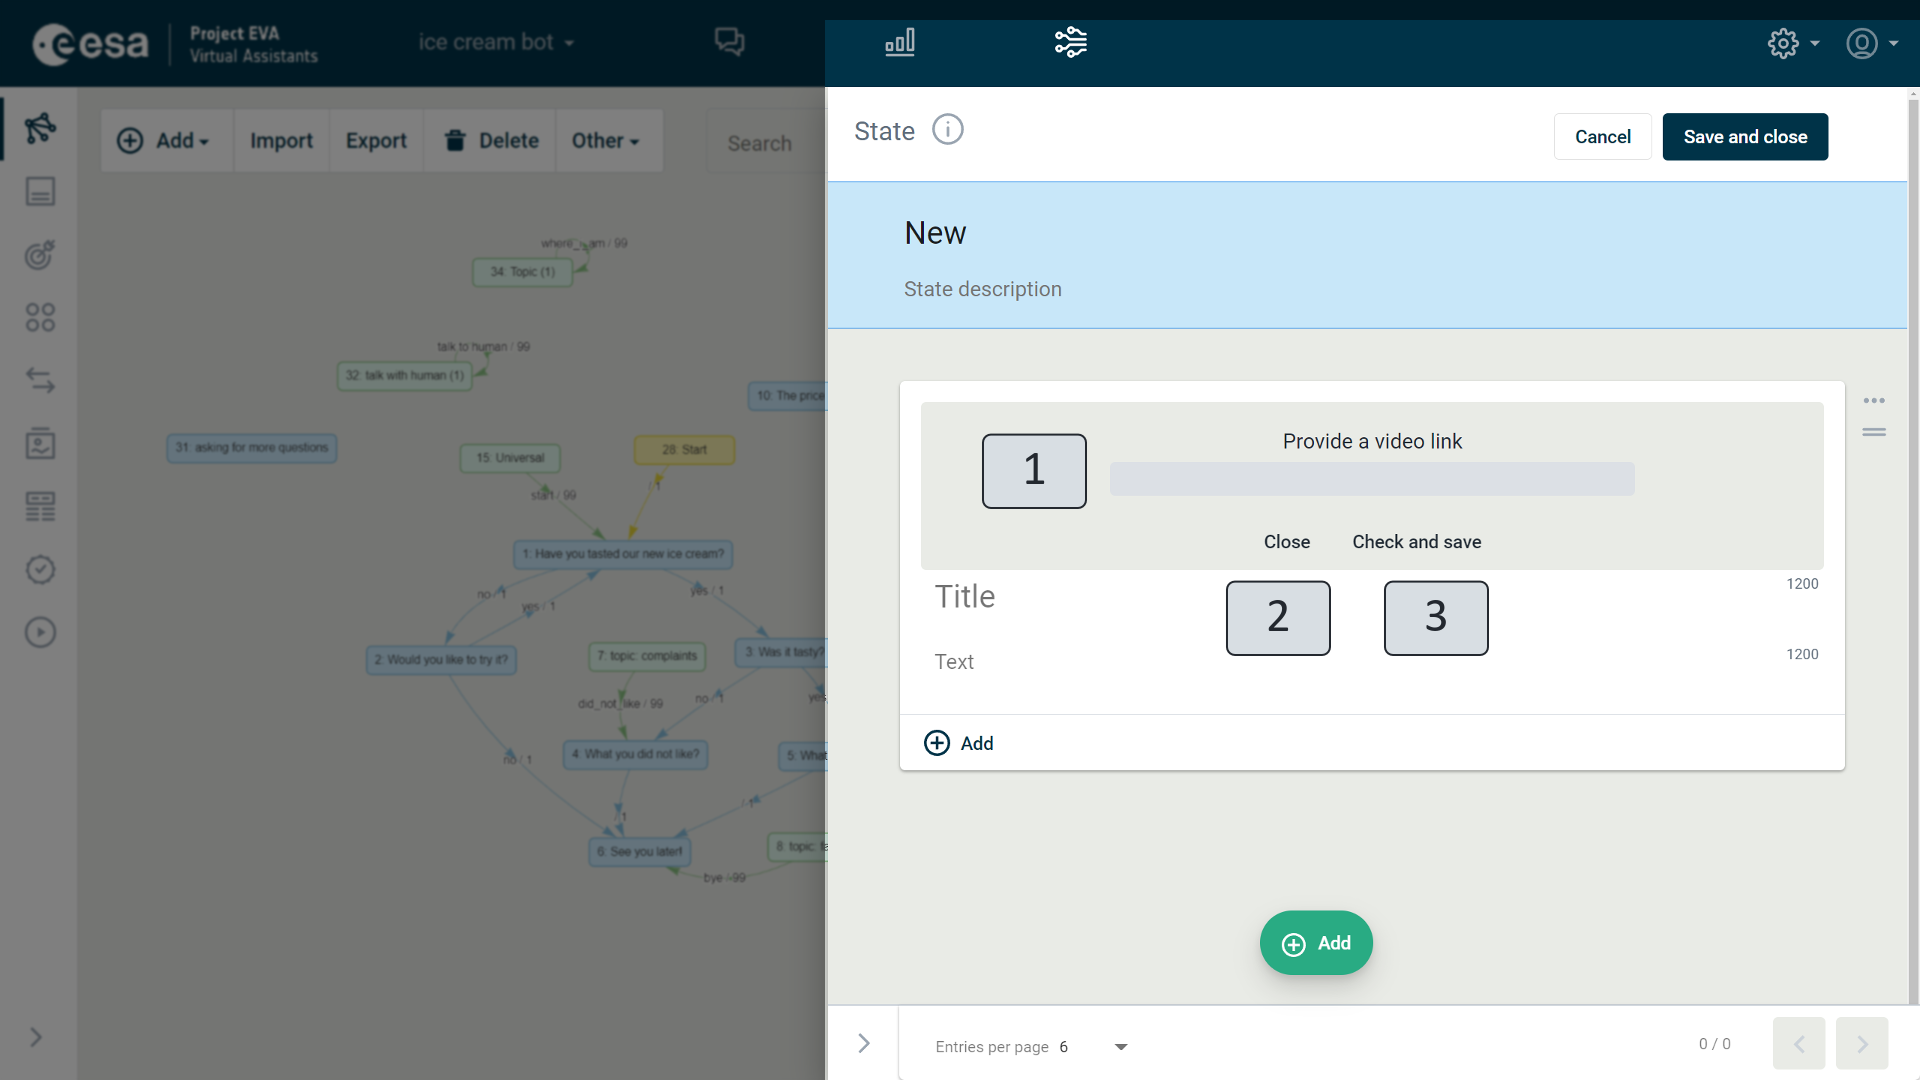
Figure 66. Video Link Field
To make sure that the link is working, you must click "Check and save" (Figure 66) (3). When everything is in order, the video file icon will be displayed on the left hand side of the action field. If the link is incorrect, a message will appear: "Possibly incorrect link". If the link is correct, you must click "Use link". The "Close" button (2) closes the field without saving any changes.
As with the herocard and audio card, you can also include different types of text (Figure 64) (2-3) and buttons (4) on your video card. You can read more about their functionality in "Herocard".
In the example (Figure 67), you can see what the action of the video card looks like with fields that have already been filled in and how this appears in the conversation. The sample shows that a video file (1) is added to the card, which is also viewed in the conversation between the user and the VA (4). When you click on a video object in a conversation (4), playback starts or, if it is already in progress, stops.
In the conversation window, a user with a video file can perform the simplest actions:
- view in full screen mode (click the screen icon in the lower right hand corner of the video file or press F).
- in the video recording time zone, scroll forward or backward by resuming it in the required fragment.
The texts of the action title (2) and sub-title (3) appear successively in the try-out window after the video file (5)
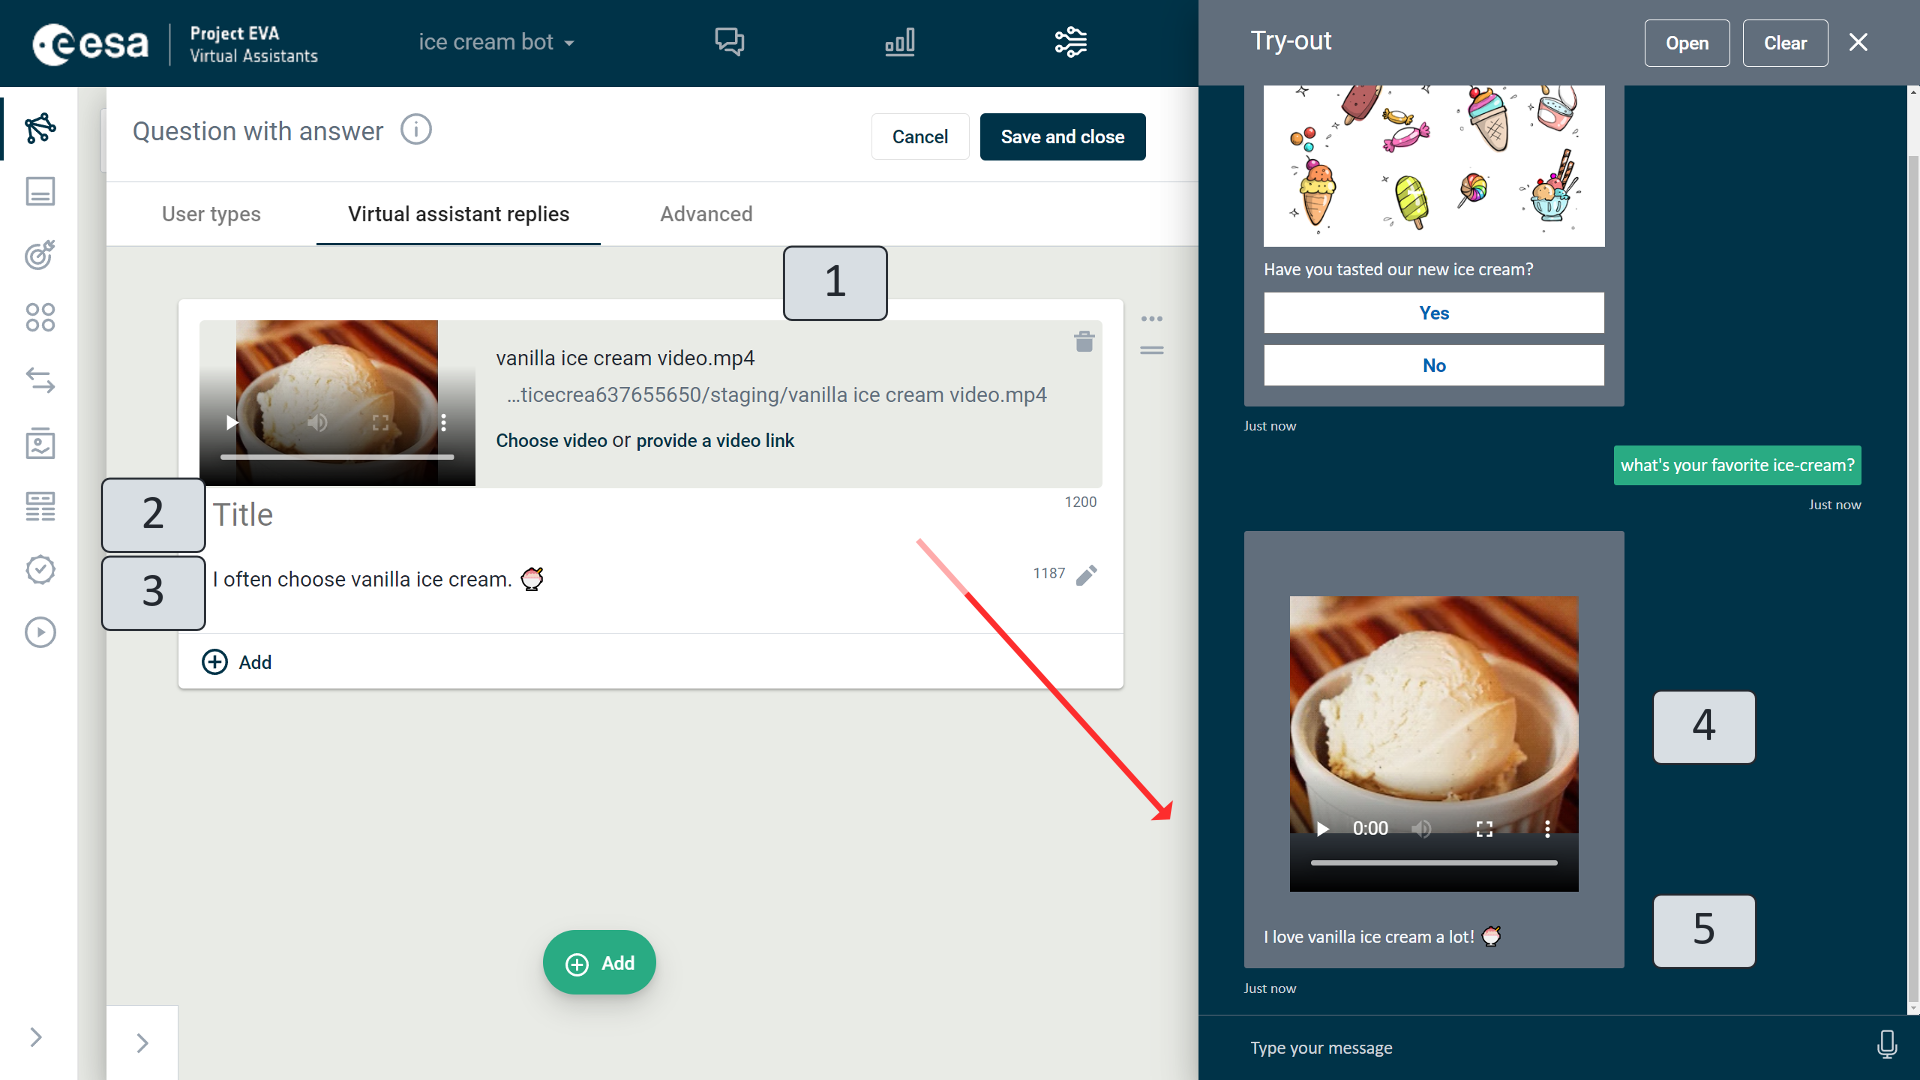
Figure 67. Video Card Example
You can move, delete, and add prerequisites and tags to your video card (Figure 64) (5). More details about this are provided in descriptions how to delete an action, change the sequence of an action, and the prerequisites in Sub-chapter "Text".
Function
The "Function" action in the scenario connects to an external data resource or API. All functions are defined in the "Functions" view (see Chapter "Functions") before they are added. In the function window (Figure 68 ), clicking the down arrow next to the "Choose function" field (1) displays a drop-down list of all functions defined in the "Functions" view. You must select the desired function title from this list. As soon as this is done, other elements of the function (2) are displayed: parameters, result. When you click on them, you can specify the amounts you require. (To understand how to fill out an example of a function window, see Figure 69.)
You can delete or add prerequisites and tags to the function by clicking on the right hand side on the three dots (3) or changing places with other actions by clicking on an icon with two horizontal lines and placing it in the desired location (4).
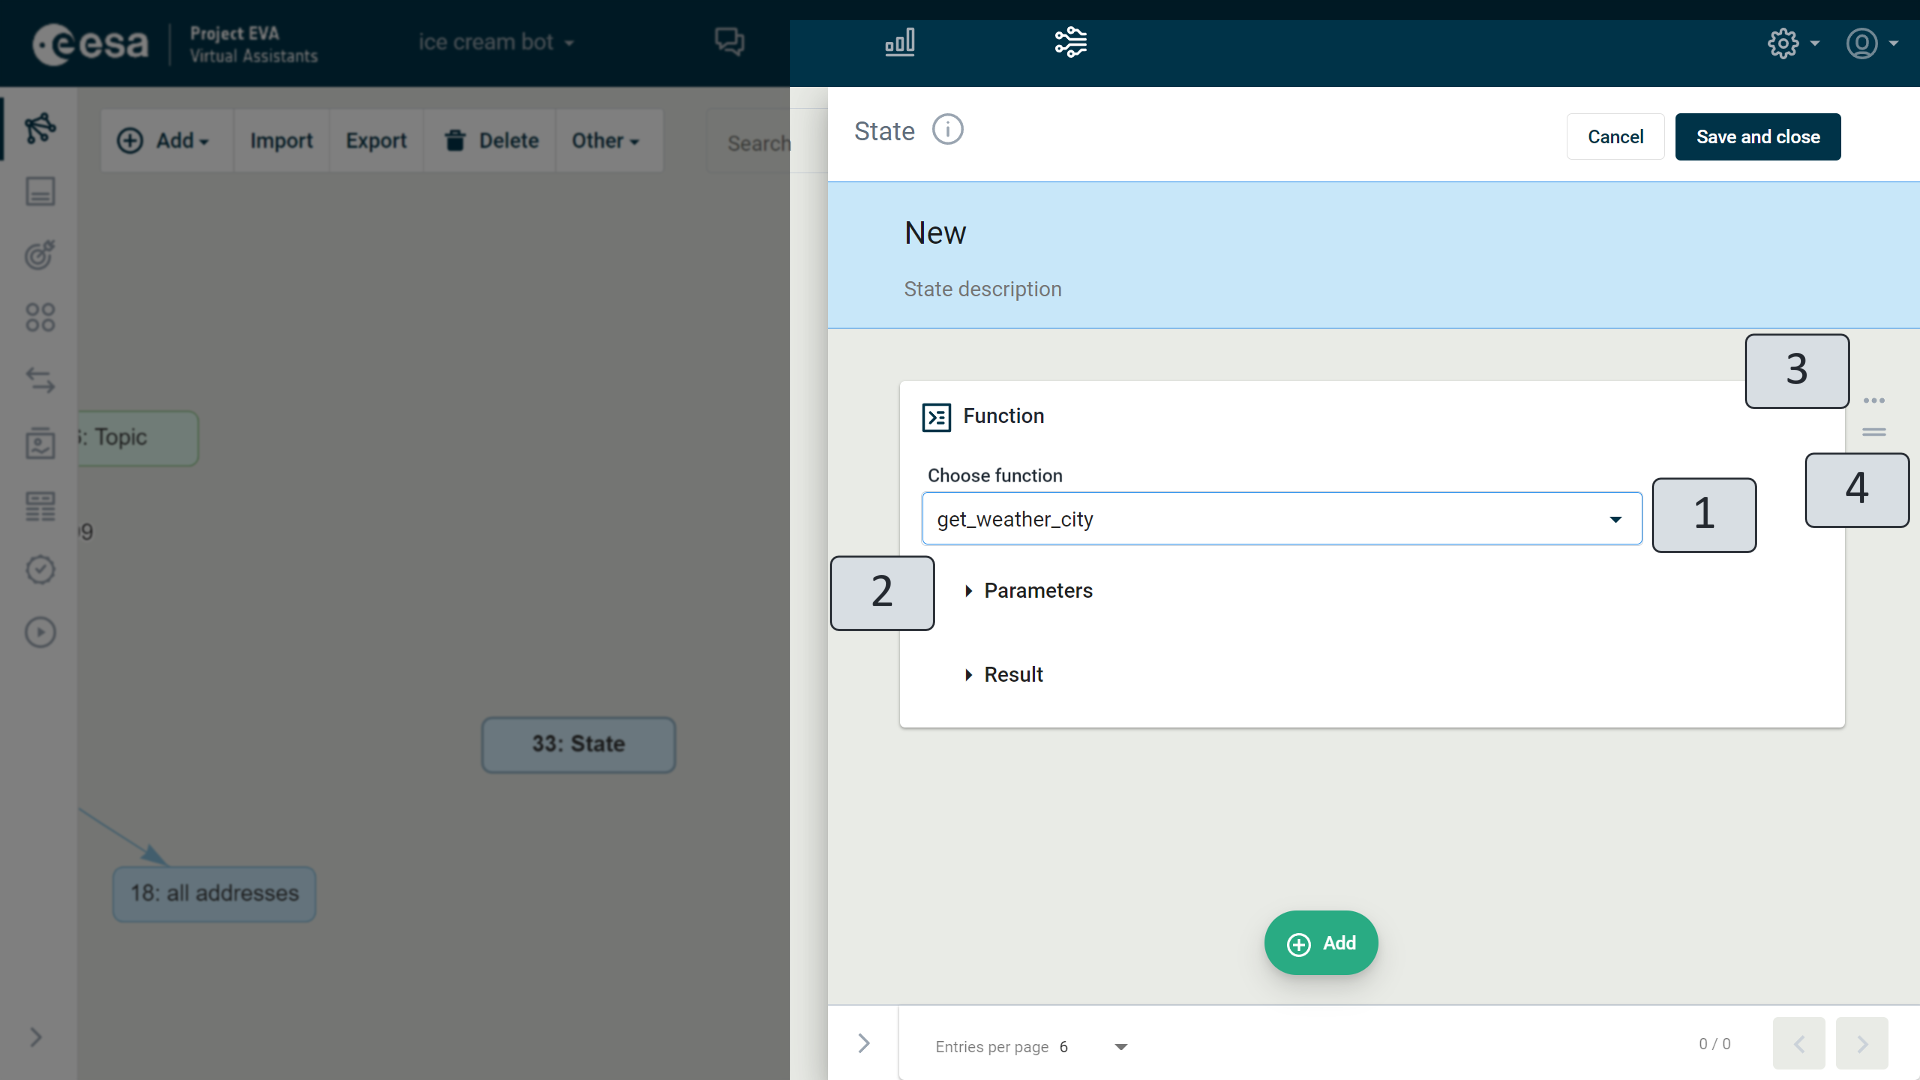
Figure 68. "Function" action
To complete a function action, in order to insert it into a scenario, you can view the example (Figure 69) about calling the weather API.
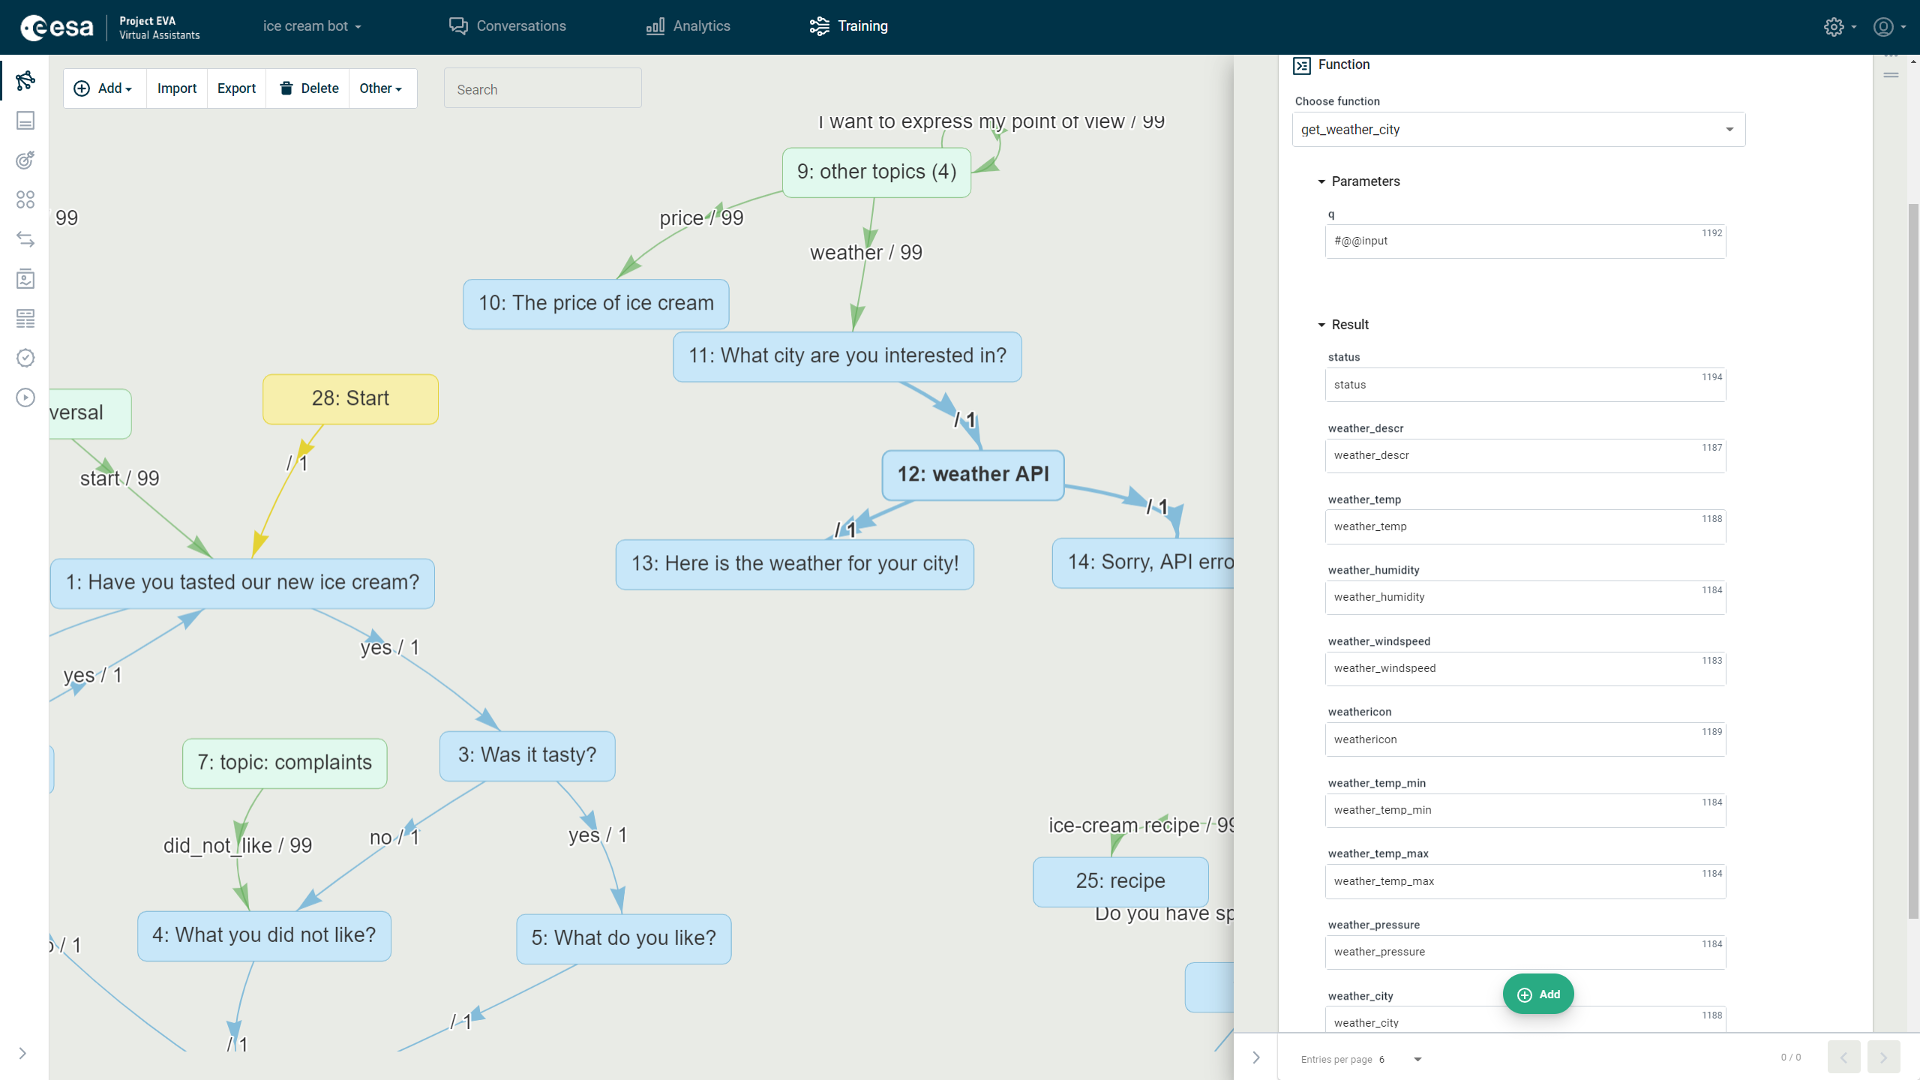
Figure 69. Completed function for calling weather API
Go to
The VA dialogue is progress within the scenario. At any moment of the conversation, the VA is in a certain scenario state. The VA can move from one state to another via transitions. Sometimes, the scenario will specifically show the user information from a particular state e.g. the main menu. In order to save you from having to draw the transition to this state many times in accordance with other VA answer states after which the main menu should be shown, it is convenient to use the "Go to" action.
The "Go to" action indicates the state to which the VA should move from the existing state. Clicking the "State" field (Figure 70) (1) in the action window, a drop-down list opens of all the states in the scenario and their numbers. You must select the required state and click it.
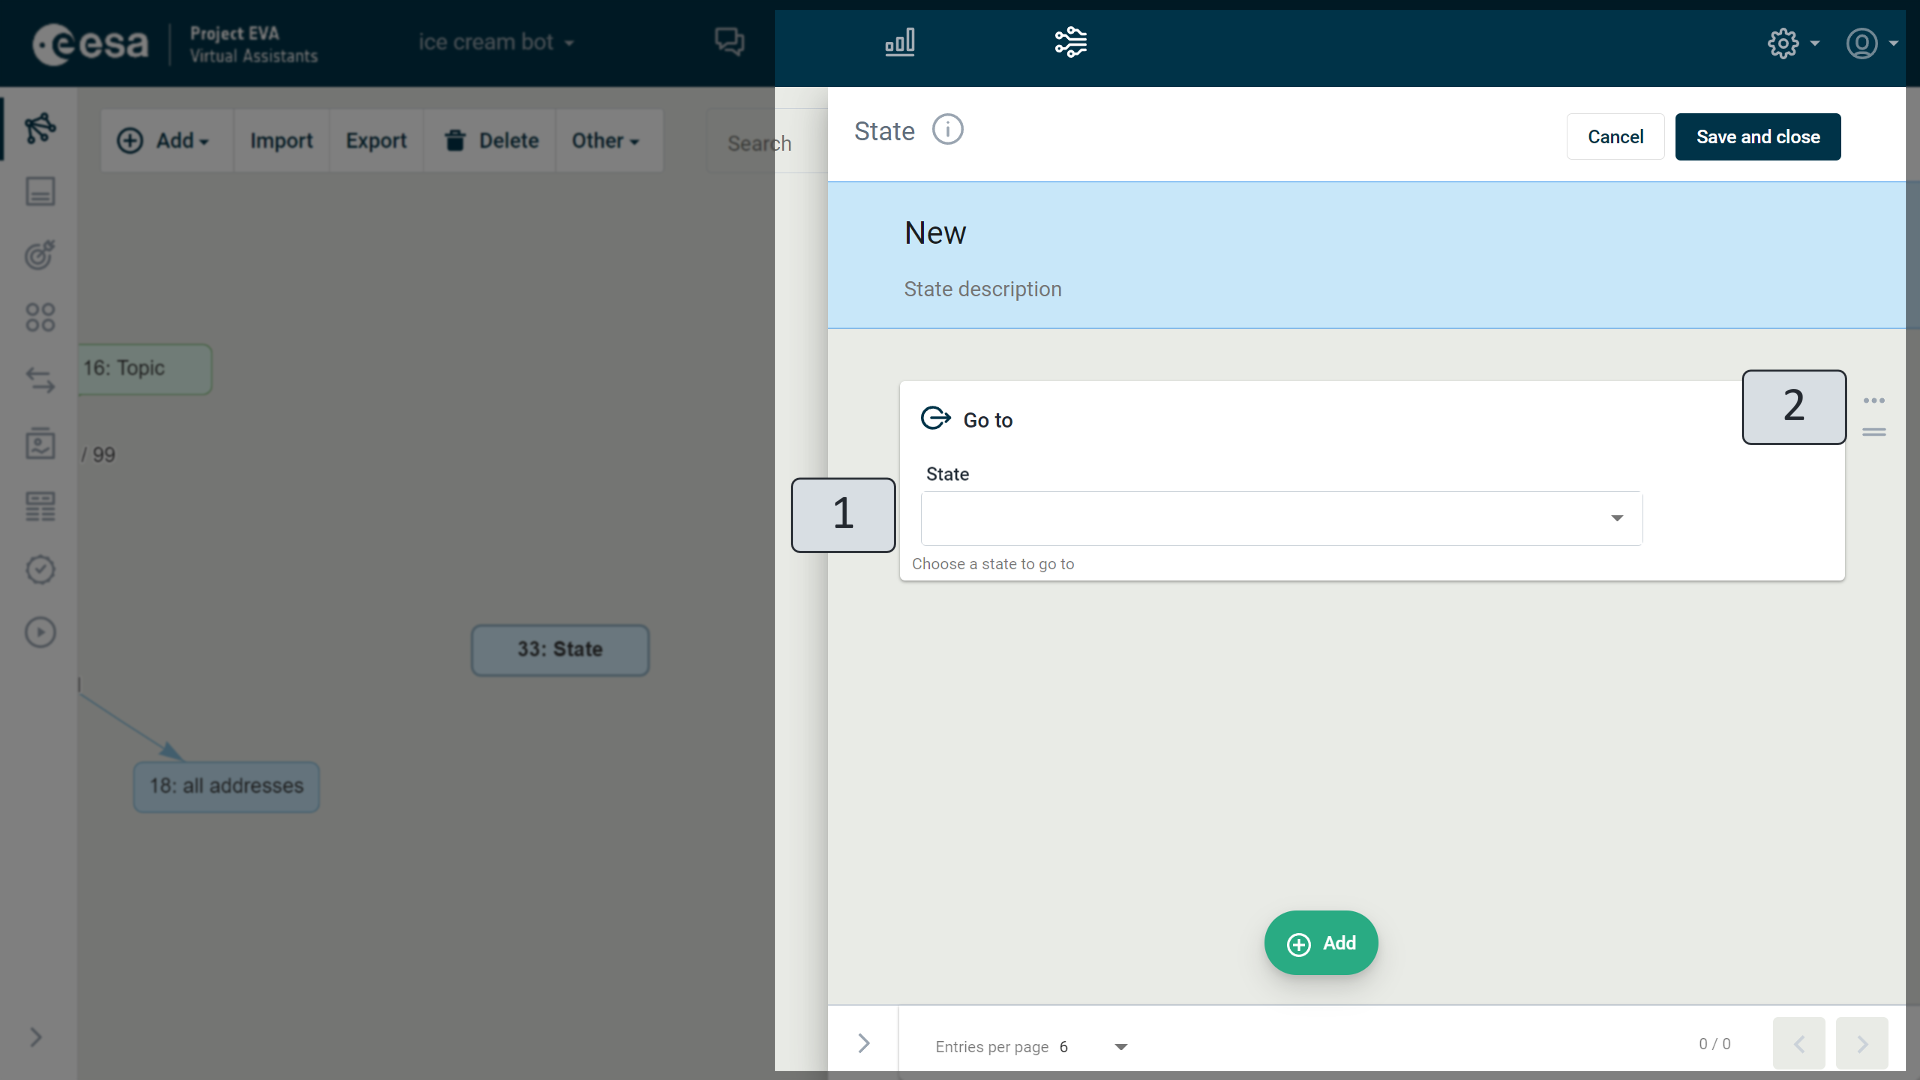
Figure 70. "Go to" action
Other actions such as deletion, changing order, and setting prerequisites (2) are exactly the same as in other cards. More details about this are provided in the descriptions of deleting actions, changing the sequence of actions, and prerequisites in Sub-Chapter "Text".
An example with a completed "Go to" action can be viewed in the example (Figure 71).
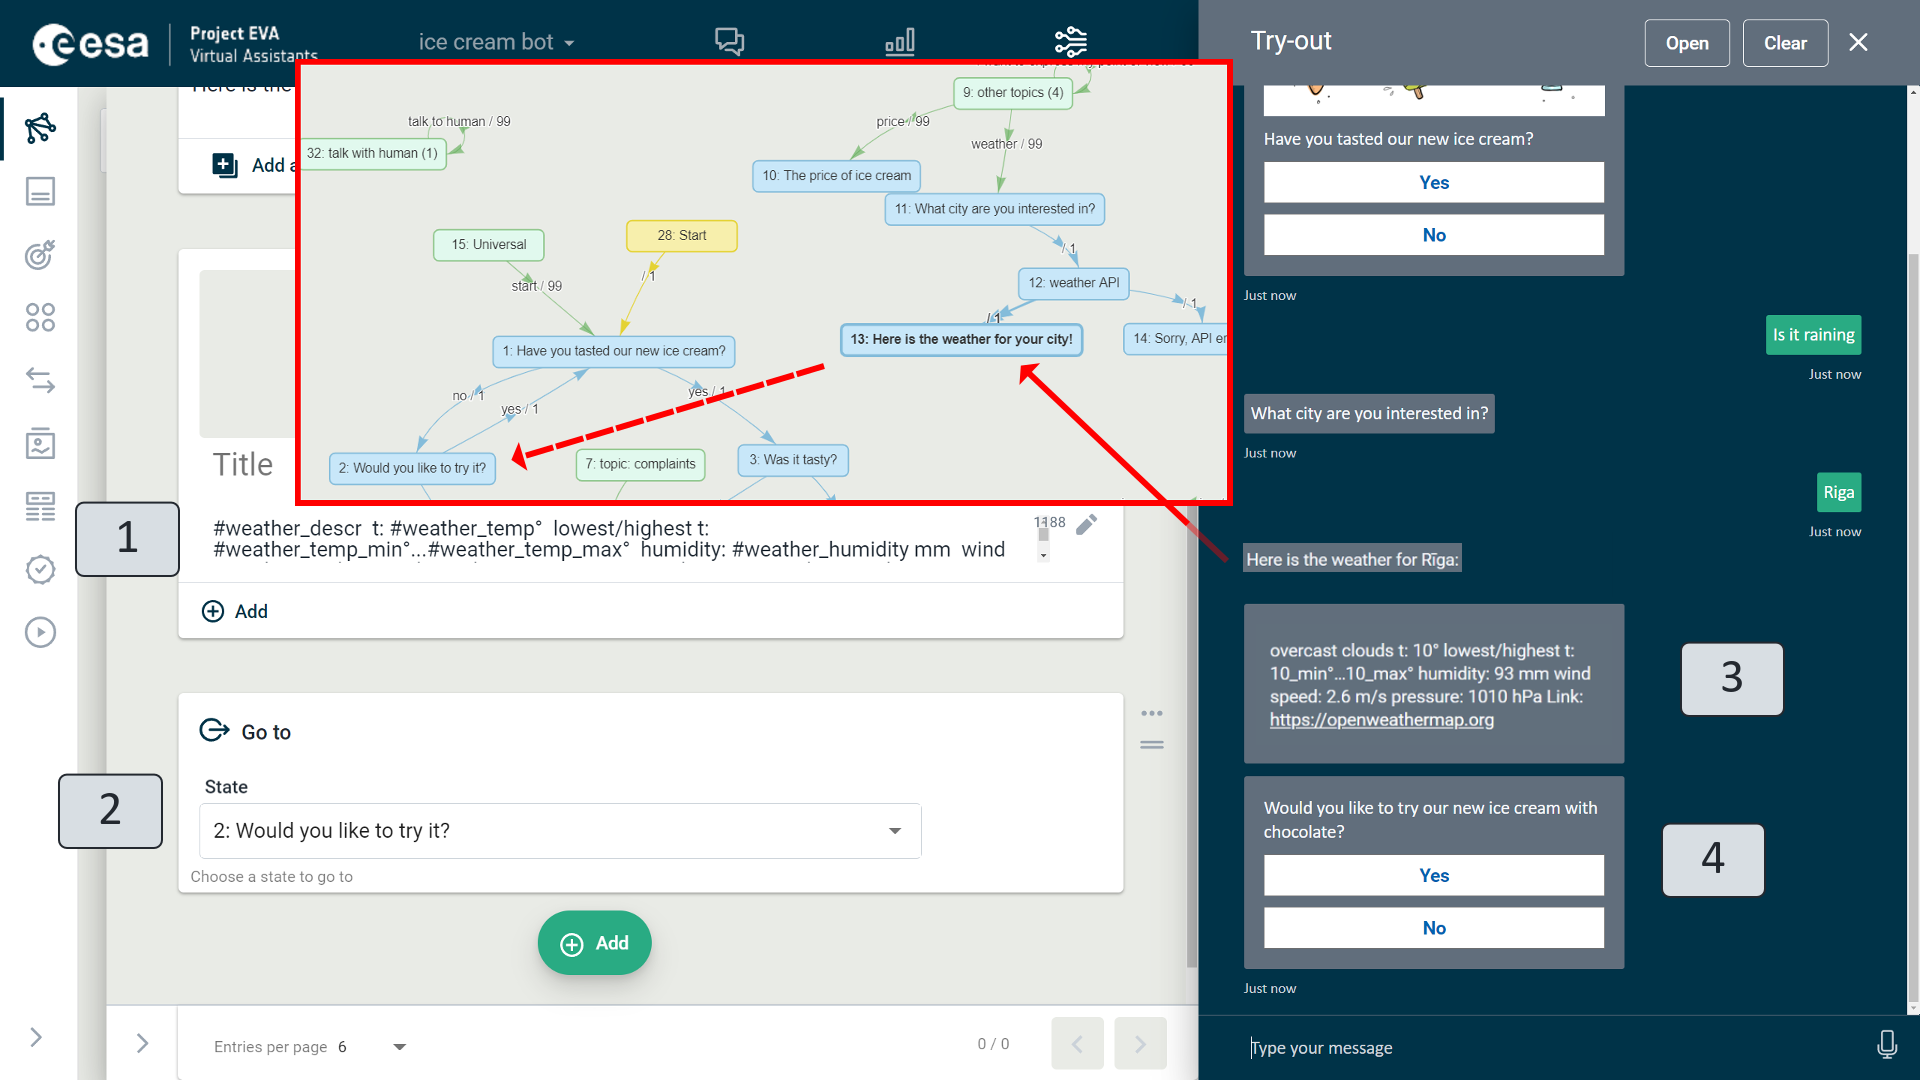
Figure 71. Example of a "Go to" action
This example (Figure 71) shows the state "13: here is the weather for your city" with three actions added. The first two are text actions (1). You can see how they appear in the try-out window during a real conversation (3). The action step defined in this state is "Go to" (2). The state field indicates that the VA should move to "2: would you like to try it?". The try-out window shows how the action is executed - that is, after providing a text response, the VA has moved to the state specified in the action and shows the user the information with the menu (4) defined in it.
Save in context
Context variables are additional information that can be determined from the user input text and kept in the VA's memory for further use in the scenario. In the context, you can save question clarifications, actions, user information and topics covered during the conversation.
Saving a variable value in context usually takes place in a transition between states (see more details in Chapter “Virtual Assistant Replies” Sub-chapter “Advanced”), although context information can also be used in states. In most cases, a value previously set in context that is no longer required in the scenario is deleted in states (Figure 72).
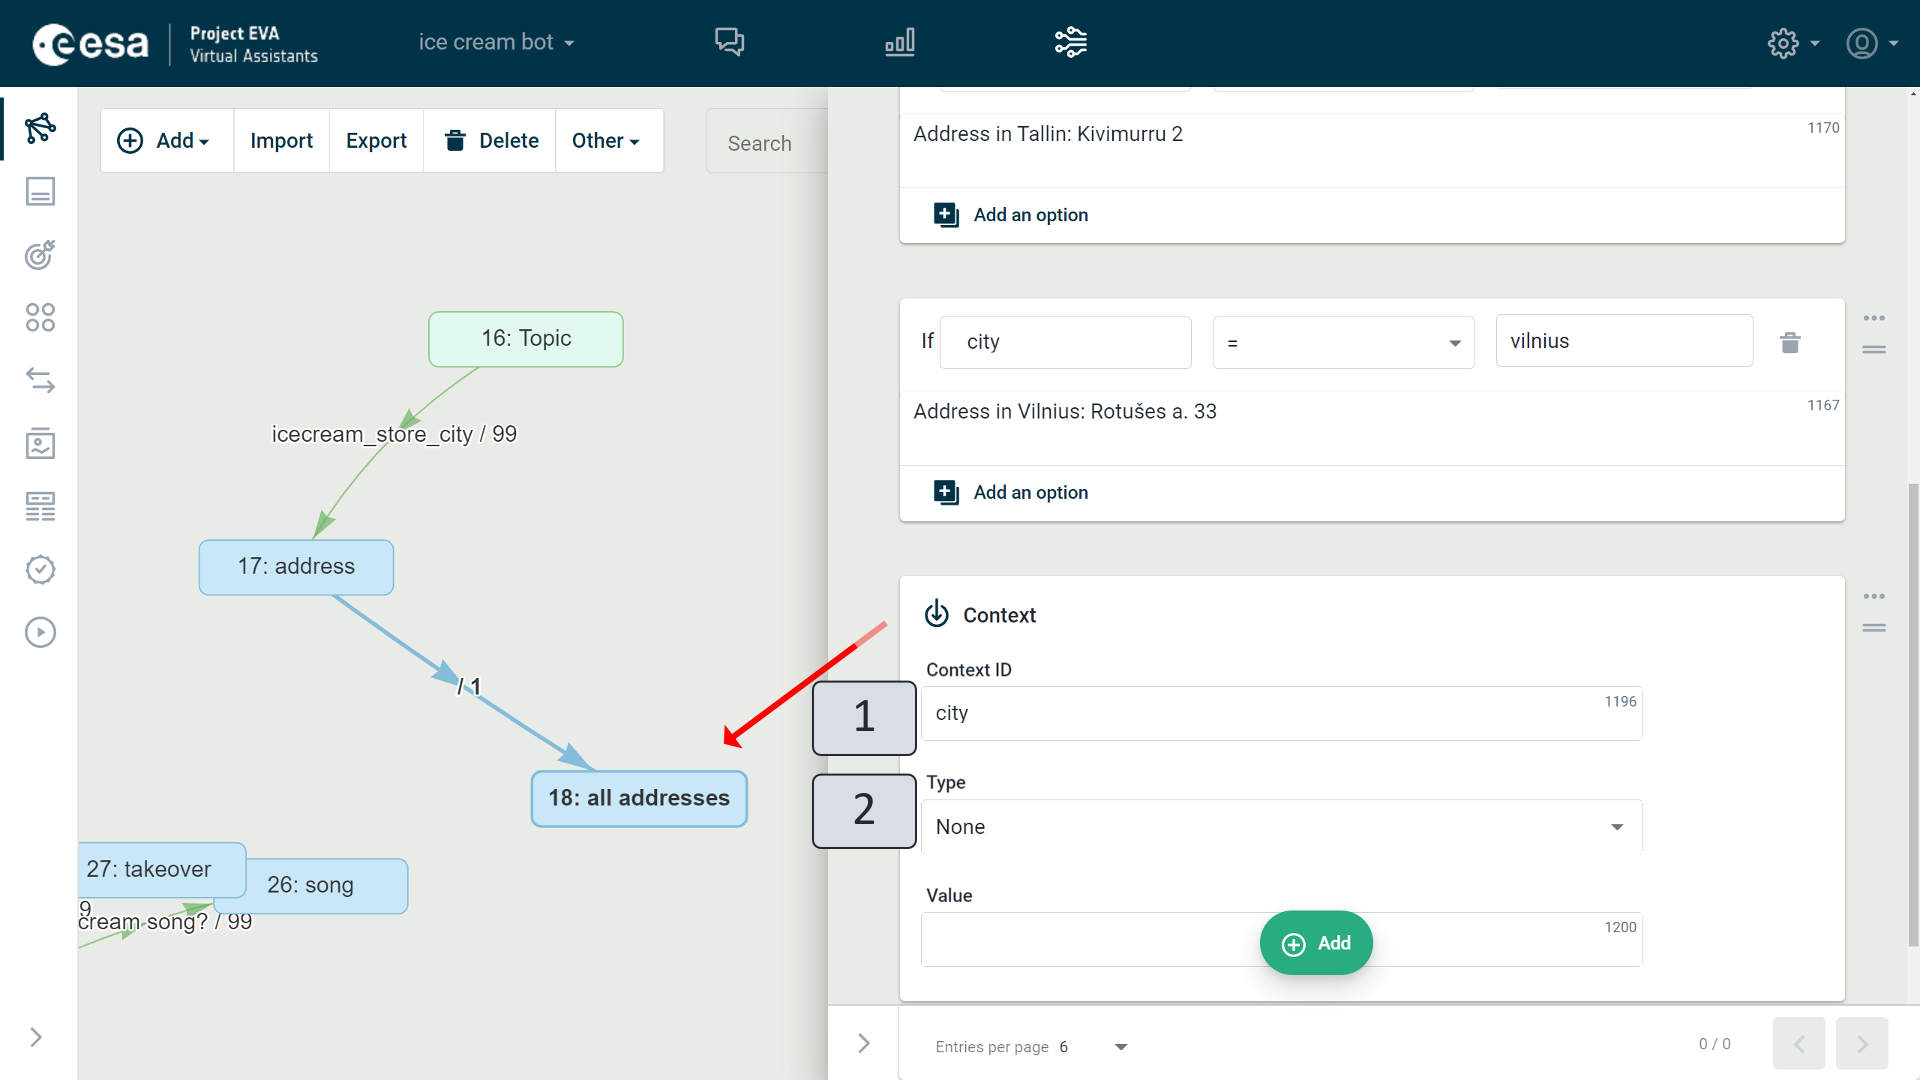
Figure 72. Context deletion
The illustration shows an example from the dialogue box about addresses (see more information and examples in Chapter “Virtual Assistant Replies” Sub-chapter “Advanced”), where when a user asks about a store address, the city name has already been initially saved in the context. It is then used in a scenario under different prerequisites (more details are provided in Chapter "Text"). When the user has obtained the desired answer, the city name originally stored in the context is not needed and is deleted by specifying the previously created identifier in the "Context ID" (1) field and specifying "None" in the "Type" (2) field.
Conversation Evaluation
The "Conversation evaluation" action is used when it is important to obtain feedback from users. Afterwards, conversation evaluations can then easily be selected and browsed in the Conversation Management view (see Chapter "Conversations").
The conversation evaluation action (Figure 73) consists of an evaluation question field (1) where the question the user is to be asked is specified. During the conversation, the user will be shown a question with an evaluation emoticon (2). When a user clicks one of them, the VA will send an answer message that will be previously specified in the "Answer to user" (3) action fields opposite the relevant emoticon.
You can delete or add prerequisites to an action (4), or move it to another location (5) in relation to other actions defined in the state.
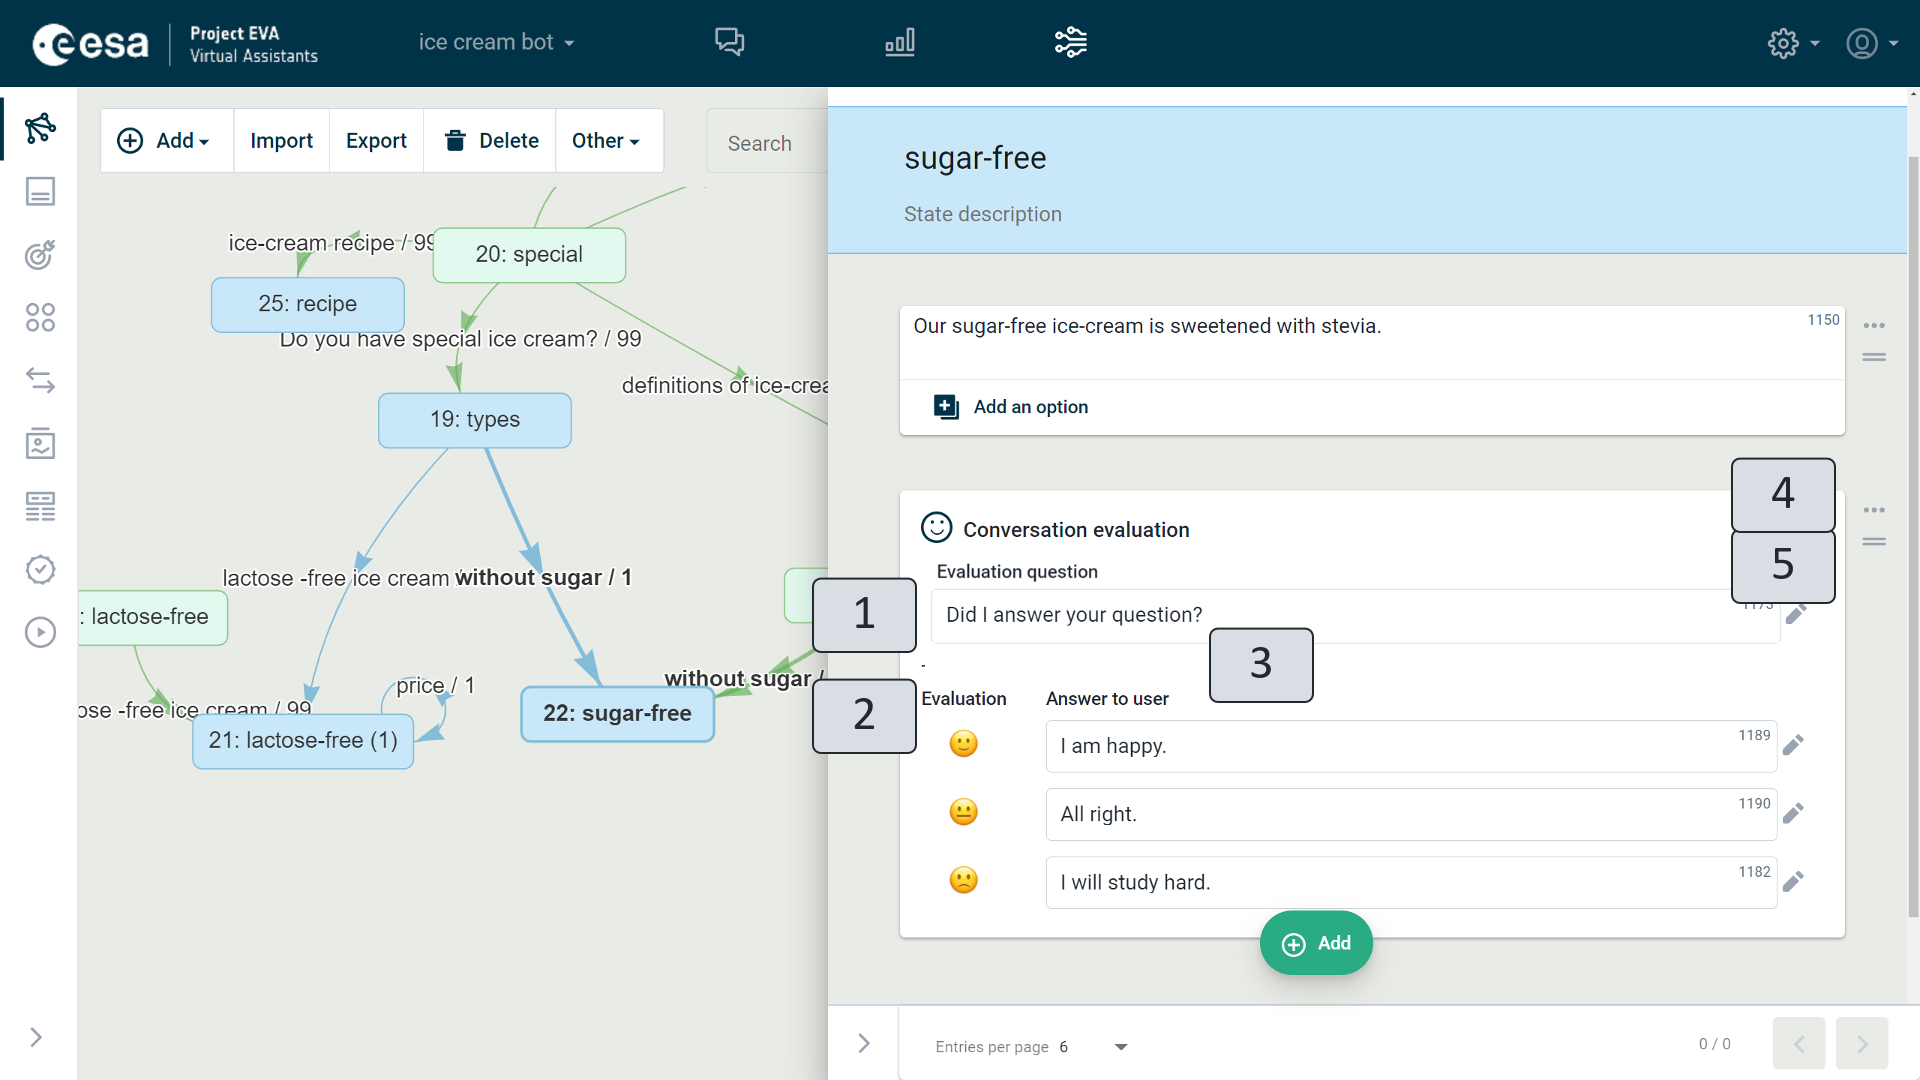
Figure 73. Conversation evaluation
Conversation takeover
A conversation takeover action (Figure 74) (1) is inserted in the state if the scenario requires the VA conversation controller to be shown a statement at the appropriate time in the conversation informing it that the user would like to talk to a specialist or if it is planned to take over the conversation for other reasons. After this action, you can insert another action into the state that explains what is going on to the user. For example, even the text: "Your conversation is being taken over by a specialist."
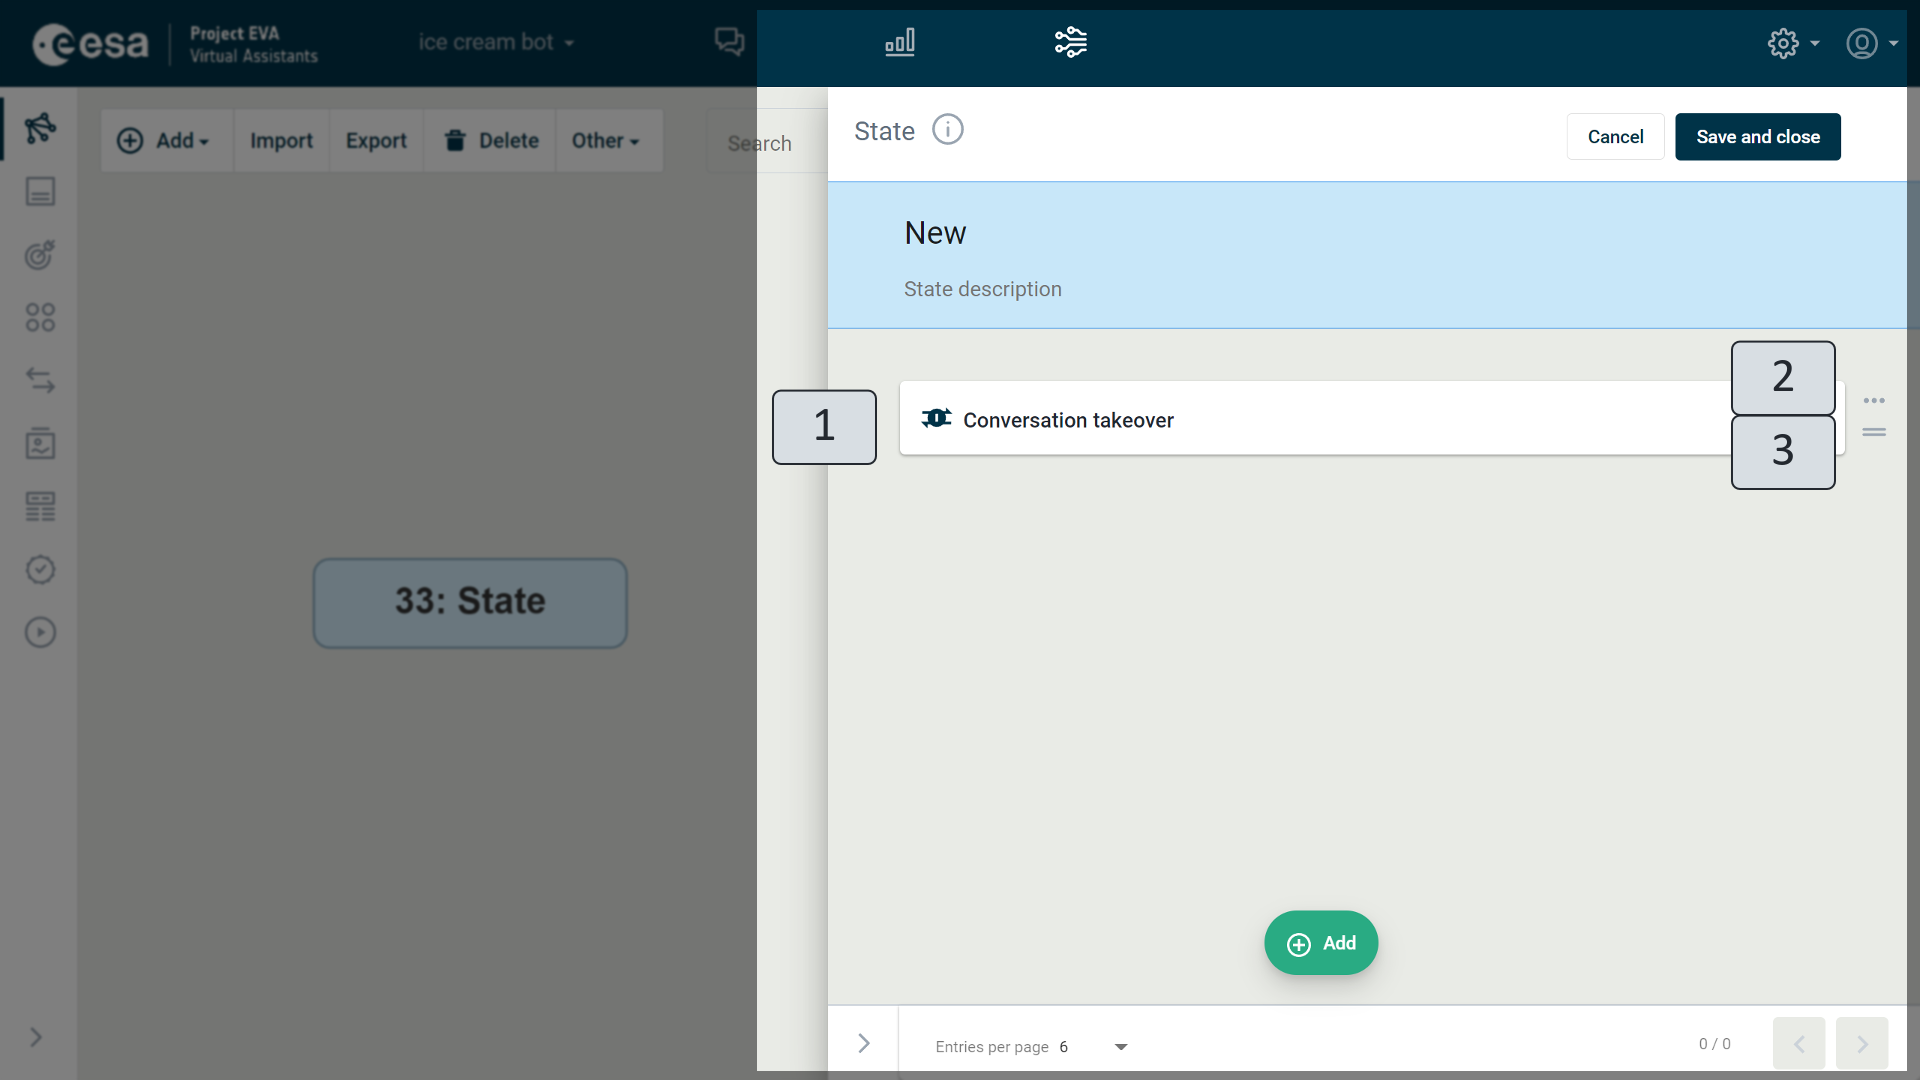
Figure 74. "Conversation takeover" action
When you click on the three dots (2), you can delete the action. When you click on two horizontal lines (3), you can change the state of the action in relation to the other actions inserted into the state.
Authorization
This action is used in scenarios involving authenticated users. It allows the user to be verified as authenticated within the scenario.
Typing
If the scenario includes instances where the user has to wait for an extended period for the next response, you can add a "Typing" action. This represents the process of writing in the chat window, typically shown as a flashing series of dots.
Logout card
The state also includes a logout card (Figure 75) to be used when operating scenarios with authenticated users.
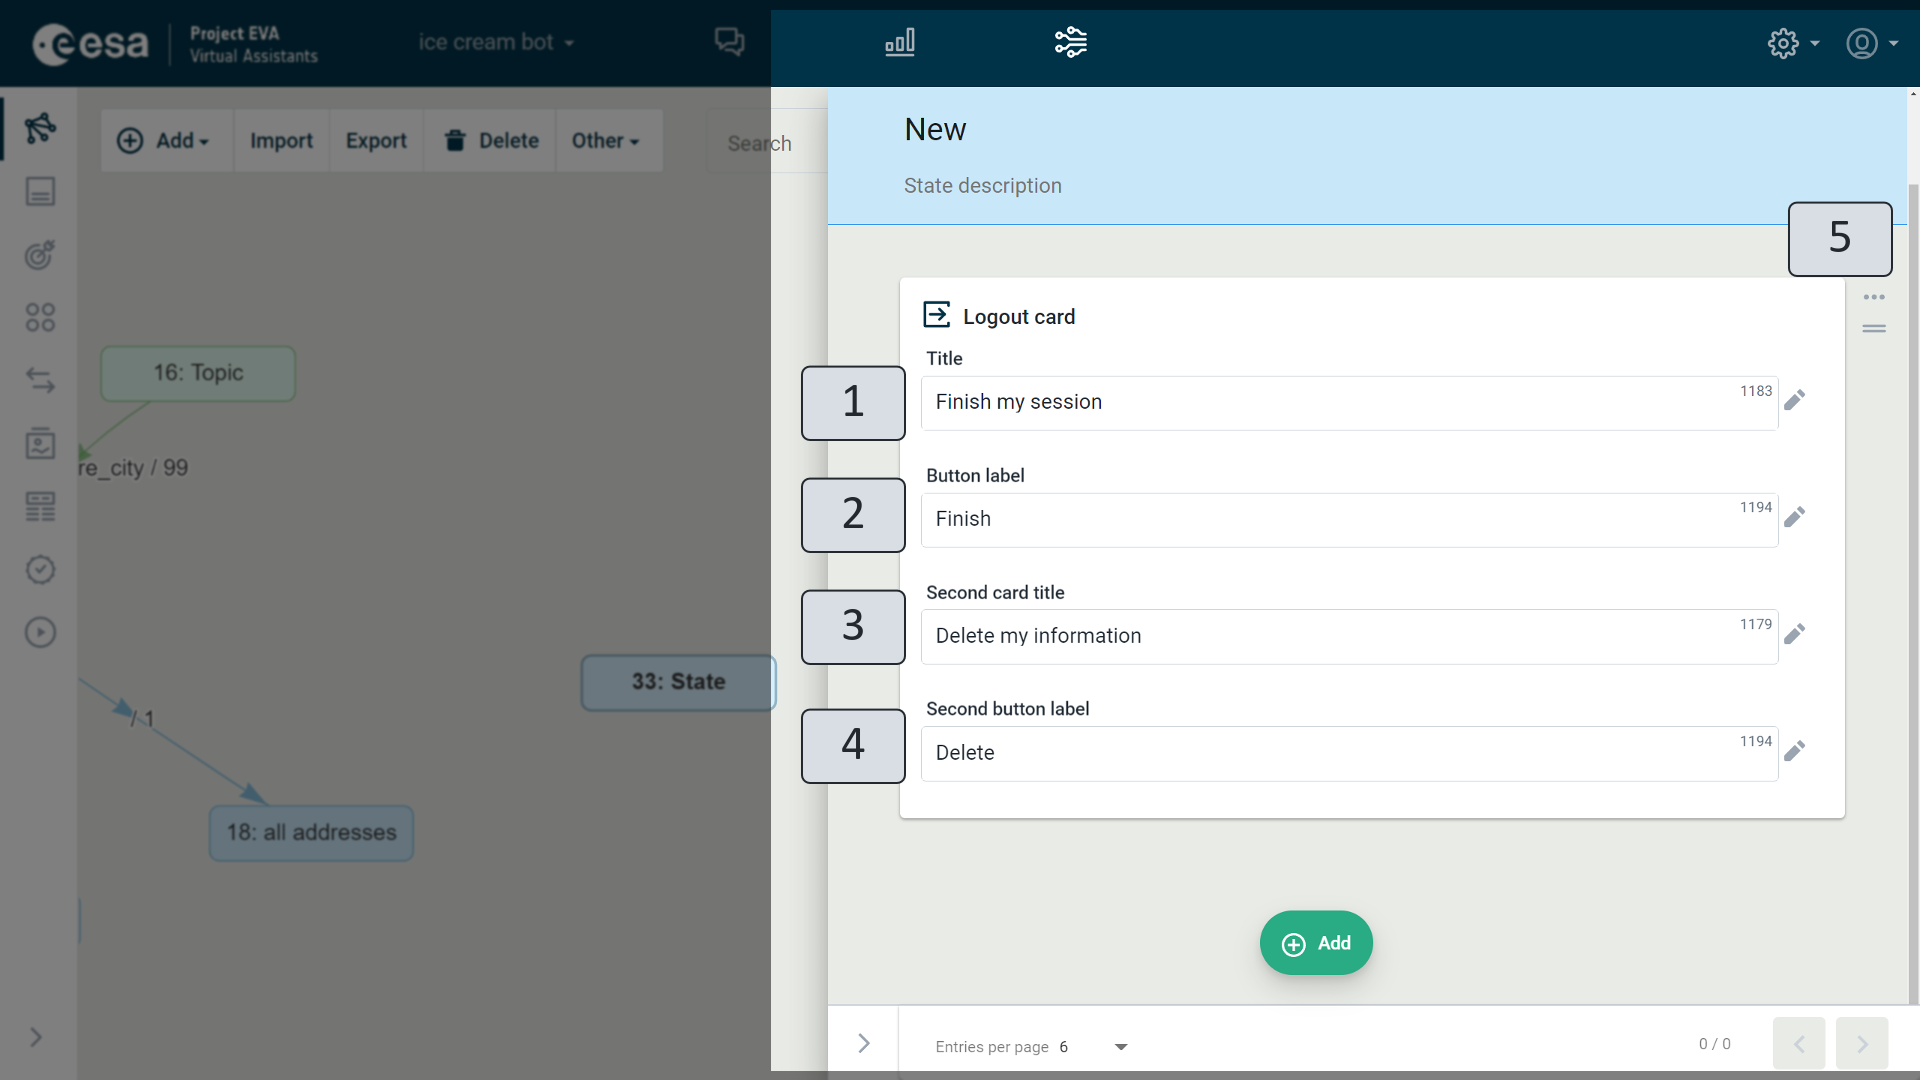
Figure 75. Logout card
The logout card determines the end of the user's session. It consists of two parts. The first part (Figure 75) contains a card that contains its title (1) and a button (2) that allows the user to opt out of the session. The second part deletes information from the VA's registration journal, which is also displayed as a card with a title (3) and a button (4) that deletes all user session information when clicked.
You can delete a card, add prerequisites to it, and change its location (5) in relation to other actions defined in the state.
Information request card
The information request card collects more detailed information from the user for an accurate response. You can also get information by drawing up transitions and states and defining context variable values, though it is more convenient to use this action.
Information request card contains the following fields (see Figure "Information request card" below).
- Virtual assistant asks (1) - virtual assistant output message that asks the user to specify the information. You can edit and add options to the output by clicking the pencil icon.
- Context ID (3) – a field for the identifier; the assistant will save in the context the variable value with such an identifier.
- Entity (4) - field to select an entity identifier that a virtual assistant will detect in the user's text. The entity and its values must be pre-prepared in Entity view.
- Error Message (5) - the text the assistant will display to the user if no entity can be detected from the user's input. You can edit and add options to the output by clicking the pencil icon.
- Repetitions (6) - the number of times the assistant re-asks the question if no entity is detected.
- Required (7) - check box. If marked, the virtual assistant only moves forward with the entity detected.
- On error, go to state (8) - shows the further step in the scenario if the entity is not detected.
- Save input in (9) – write the identifier name; this will save the full user input in the context with this identifier.
When you click the three dots (10), you can add prerequisites or delete the action. You can change the order of action relative to the other actions in the state by clicking on two parallel lines and placing the action in the new location.
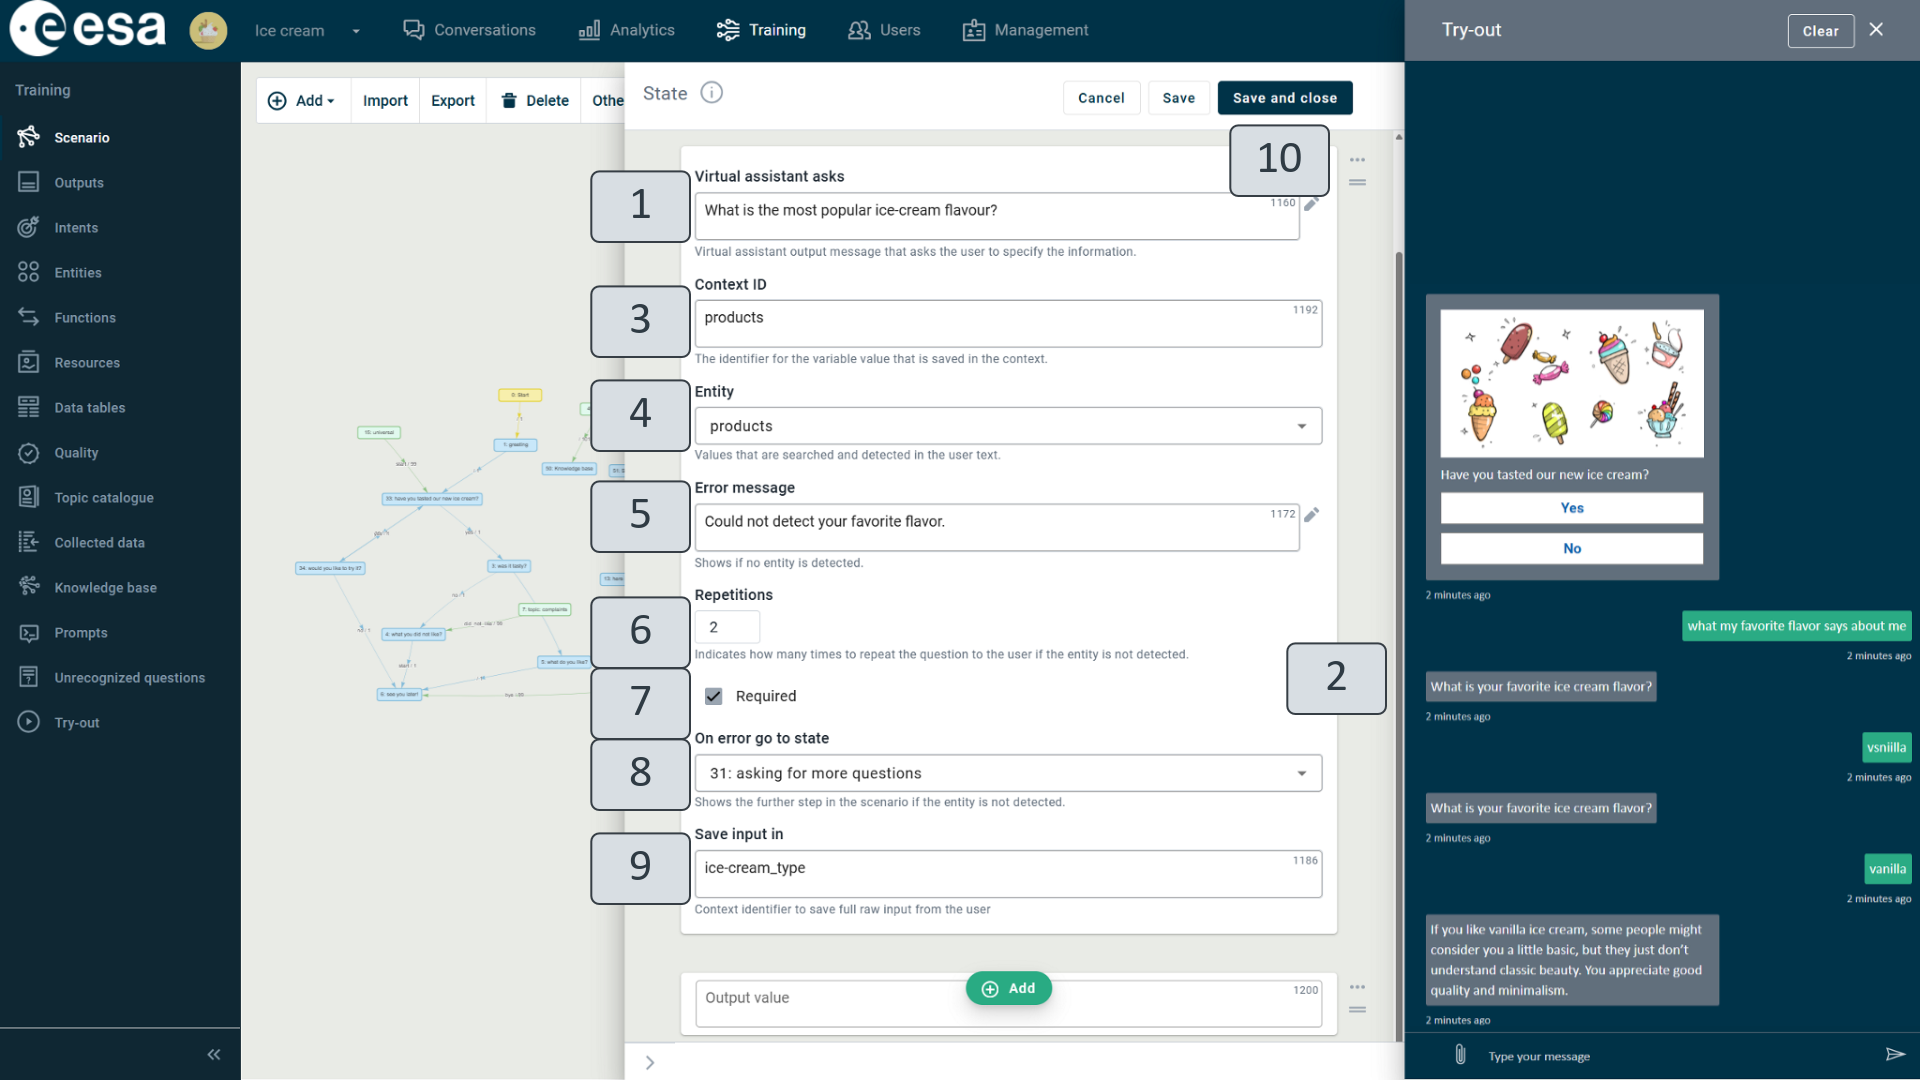
Figure75.1. Information request card
In the try-out window, you can see how the action works in scenario (2). The virtual assistant asks the question and waits for the answer. If the user's response does not contain the entity that the virtual assistant is waiting for, the assistant asks the question again. If the assistant detects the desired entity in the user's response, it saves its value in the context, and the scenario moves further, giving the user an appropriate response.
Add question with answer
You can also immediately add a question with an answer to the state. A question with an answer consists of one intent and simple answer that is ready straight away. Ordinarily, questions with answers in a scenario are used to sort questions and answers on a single topic in a consistent manner that does not complicate the dialogue, drawing individual states and transitions for detailed questions. In the scenario, questions already added with answers can be seen as a self-loop to relevant topics and states.
Adding questions and answers is done in the transition editing window, so you can read more about this in Chapter "Transition Editing Window", and especially in Sub-chapter "Virtual Assistant Replies".
Placeholder
You can add an action to a state using a temporary value that is displayed when a real value is either unknown or unavailable. For example, placeholders are often used in scenarios involving automatic text generation or large language models, which take time to generate a response. To provide feedback to the user while they wait, placeholder text is shown, such as: "Please wait, the answer is being generated." Figure 75.2 (1) When the text generation result (2) is ready, the placeholder text is replaced by the final answer.
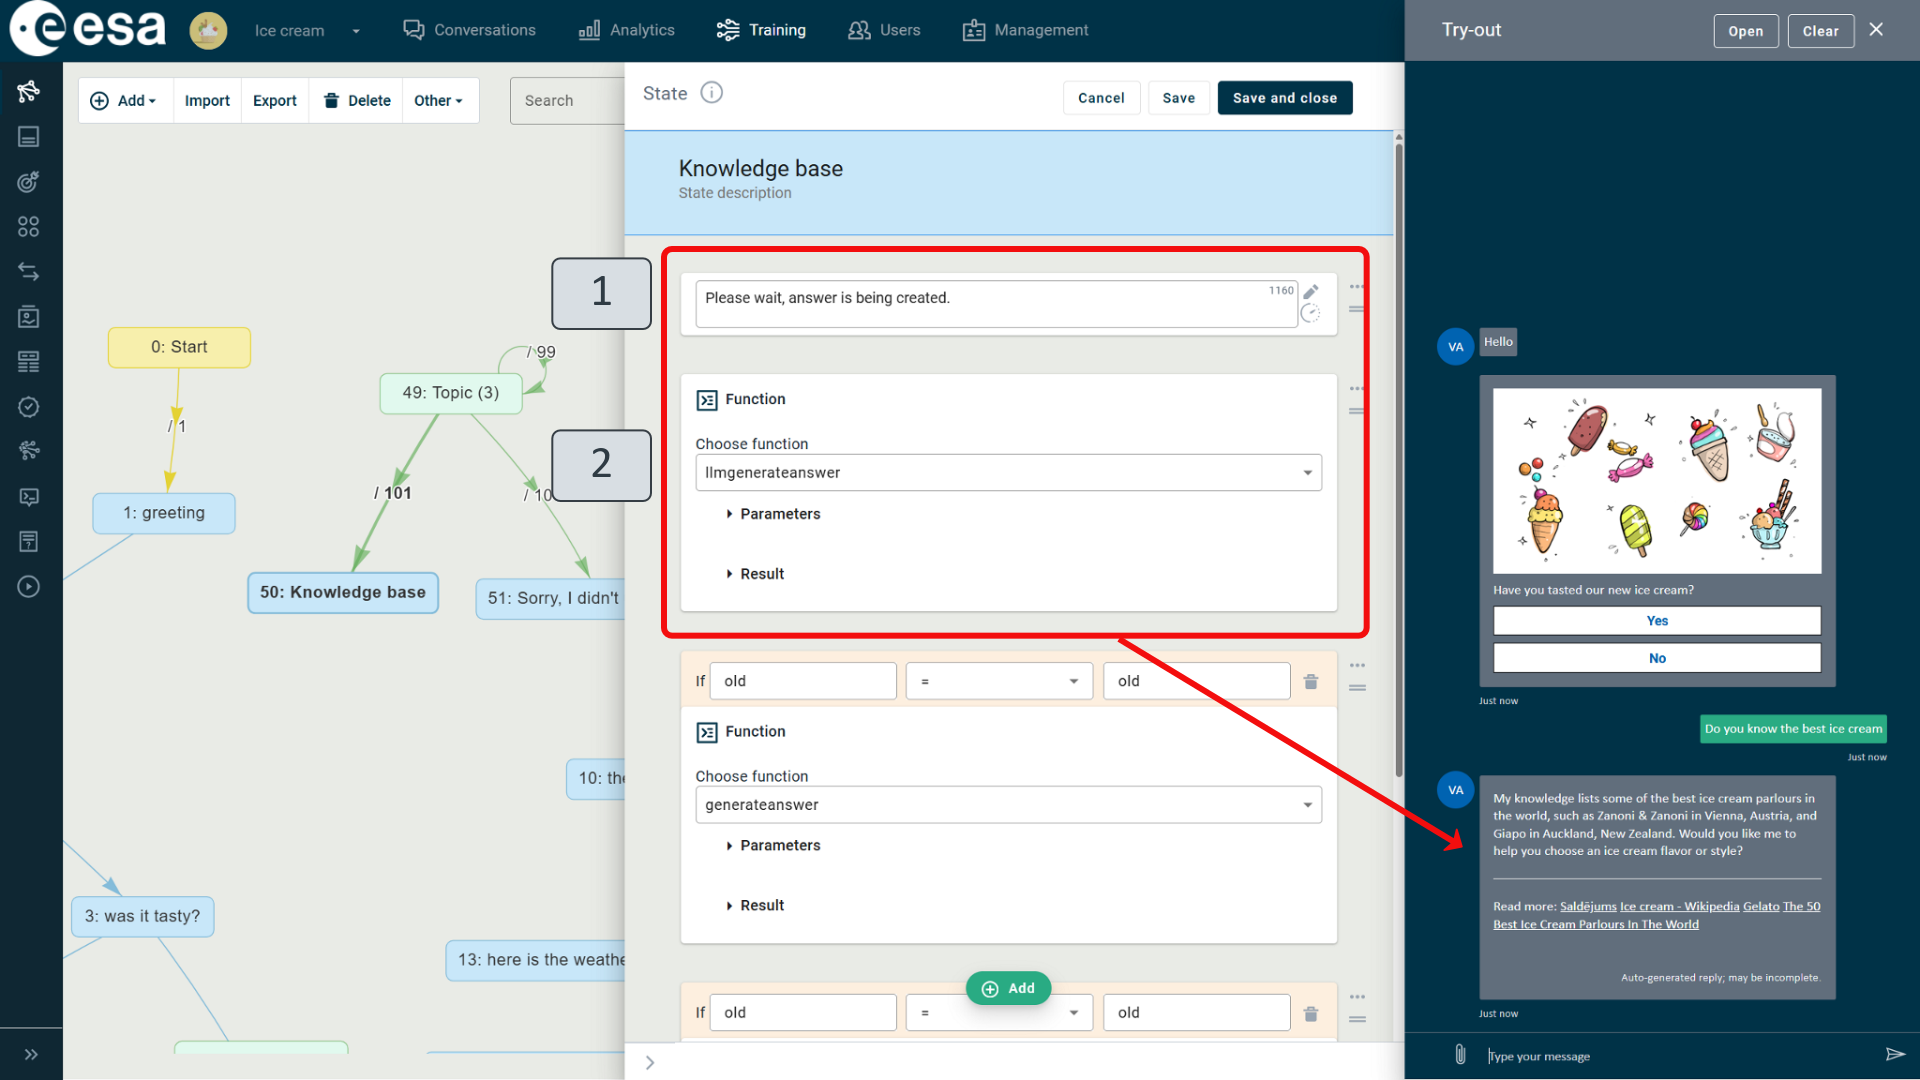
75.2 Figure. Placeholder
Automatically generated answer
See ESA-MLSOVA-OM-0002, section "Automatically generated answer", for detailed instructions.
Topic Editing Window
A topic is usually used to provide access to non-interrelated states within the structure of the dialogue. In addition, simple questions with answers that do not need to be highlighted in detail in a scenario are sorted by subject under the topic. The topic also works if it is not related to other elements of the scenario.
When you add a new topic or click a topic already created in a scenario, a topic editing window (Figure 76) appears on the right hand side of the view, where you can fill in, change, and edit all the information about the topic, and add a question with an answer to the topic. You cannot change the unique number that is automatically allocated to each topic and appears before the topic title. This makes it easy to find a subject in a scenario, even if the topic titles are the same.
If the topic editing window covers the scenario view, you can collapse it by clicking the arrow (5) and then expand it again. Other tools are also available at the bottom of the topic editing window. You can change the number of entries per page and turn the next and previous pages if you have a lot of information. When you specify the required information by clicking on the “Save and close” button (7), it is saved and the editing window is closed. If the changes made do not need to be saved, click on the “Cancel” button (7) - no changes will be made and the editing window will be closed.
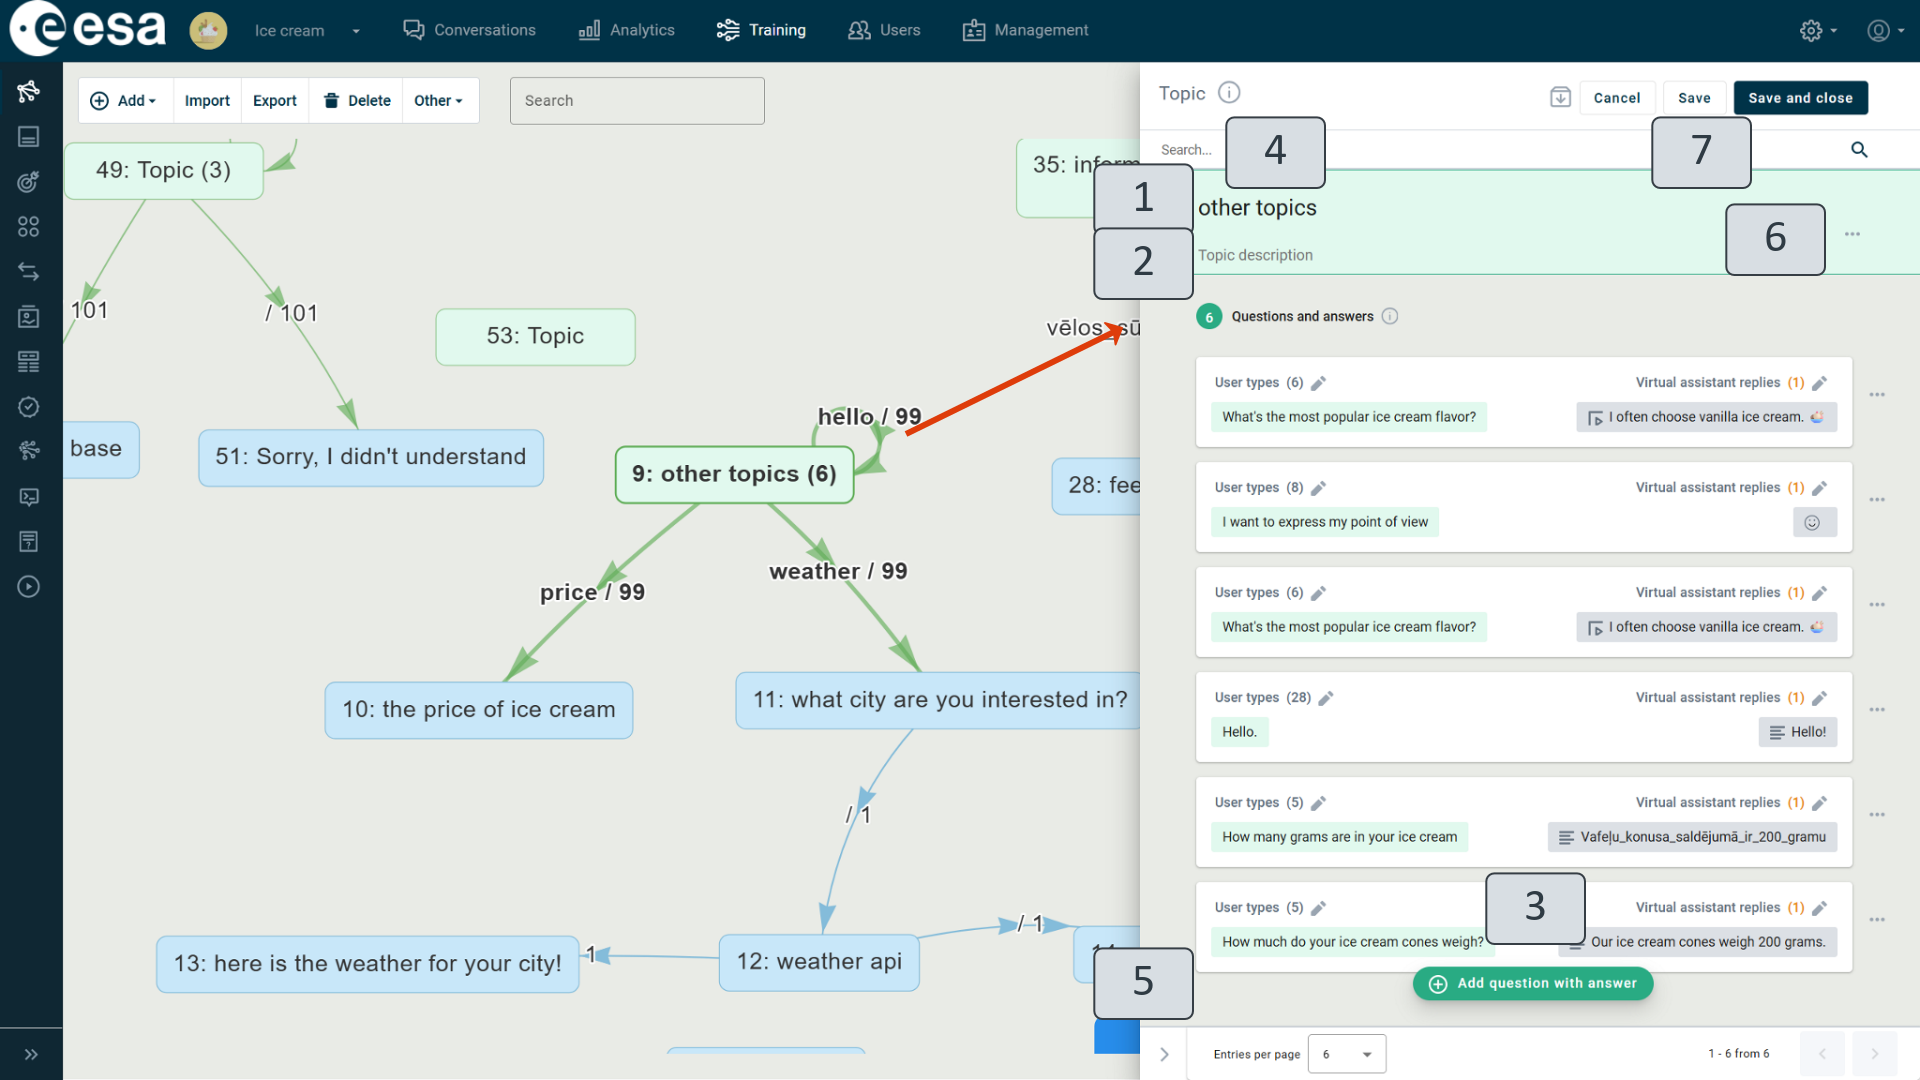
Figure 76. Topic Editing Window
In the topic window, type the title of the topic in the "Topic" (1) field. The title chosen should make it clear what the subject of the topic is, which is useful in order for the VA to become smarter and the scenario to expand. The topic title will also appear on the topic in the display scenario, and you can use it by finding a specific topic in the scenario search field.
To gain an even more insight into the subject, which is collated under the set topic, you can also fill in the description field of the topic (2), specifying the description of the topic. This field is for information requirements only.
No actions are specified in the topic, there is only one option to add a question with an answer (3).
Adding questions and answers involves transition processing, so you can read more about it in Chapter "Transition Editing Window", and especially in Sub-chapter "Virtual Assistant Replies".
If there are many questions and answers in a topic, to find the information you want, you can type the search word or phrase in the search field (4) and review the extracted data.
When you click three dots in the topic editing window (6), there are two options for sharing and including topics in other VA. See the following chapter in detail.
Topic data. Importing and exporting topics
Sometimes assistants of different kinds have information that could work equally well at all VA, such as simple questions and answers about chit-chat topics.
In such cases, it is convenient to use and import an existing topic with all the questions and answers that have already been developed, from another VA.
To export the prepared topic data with questions and answers from the VA, click three dots (Figure 76) in the topic editing window (6).
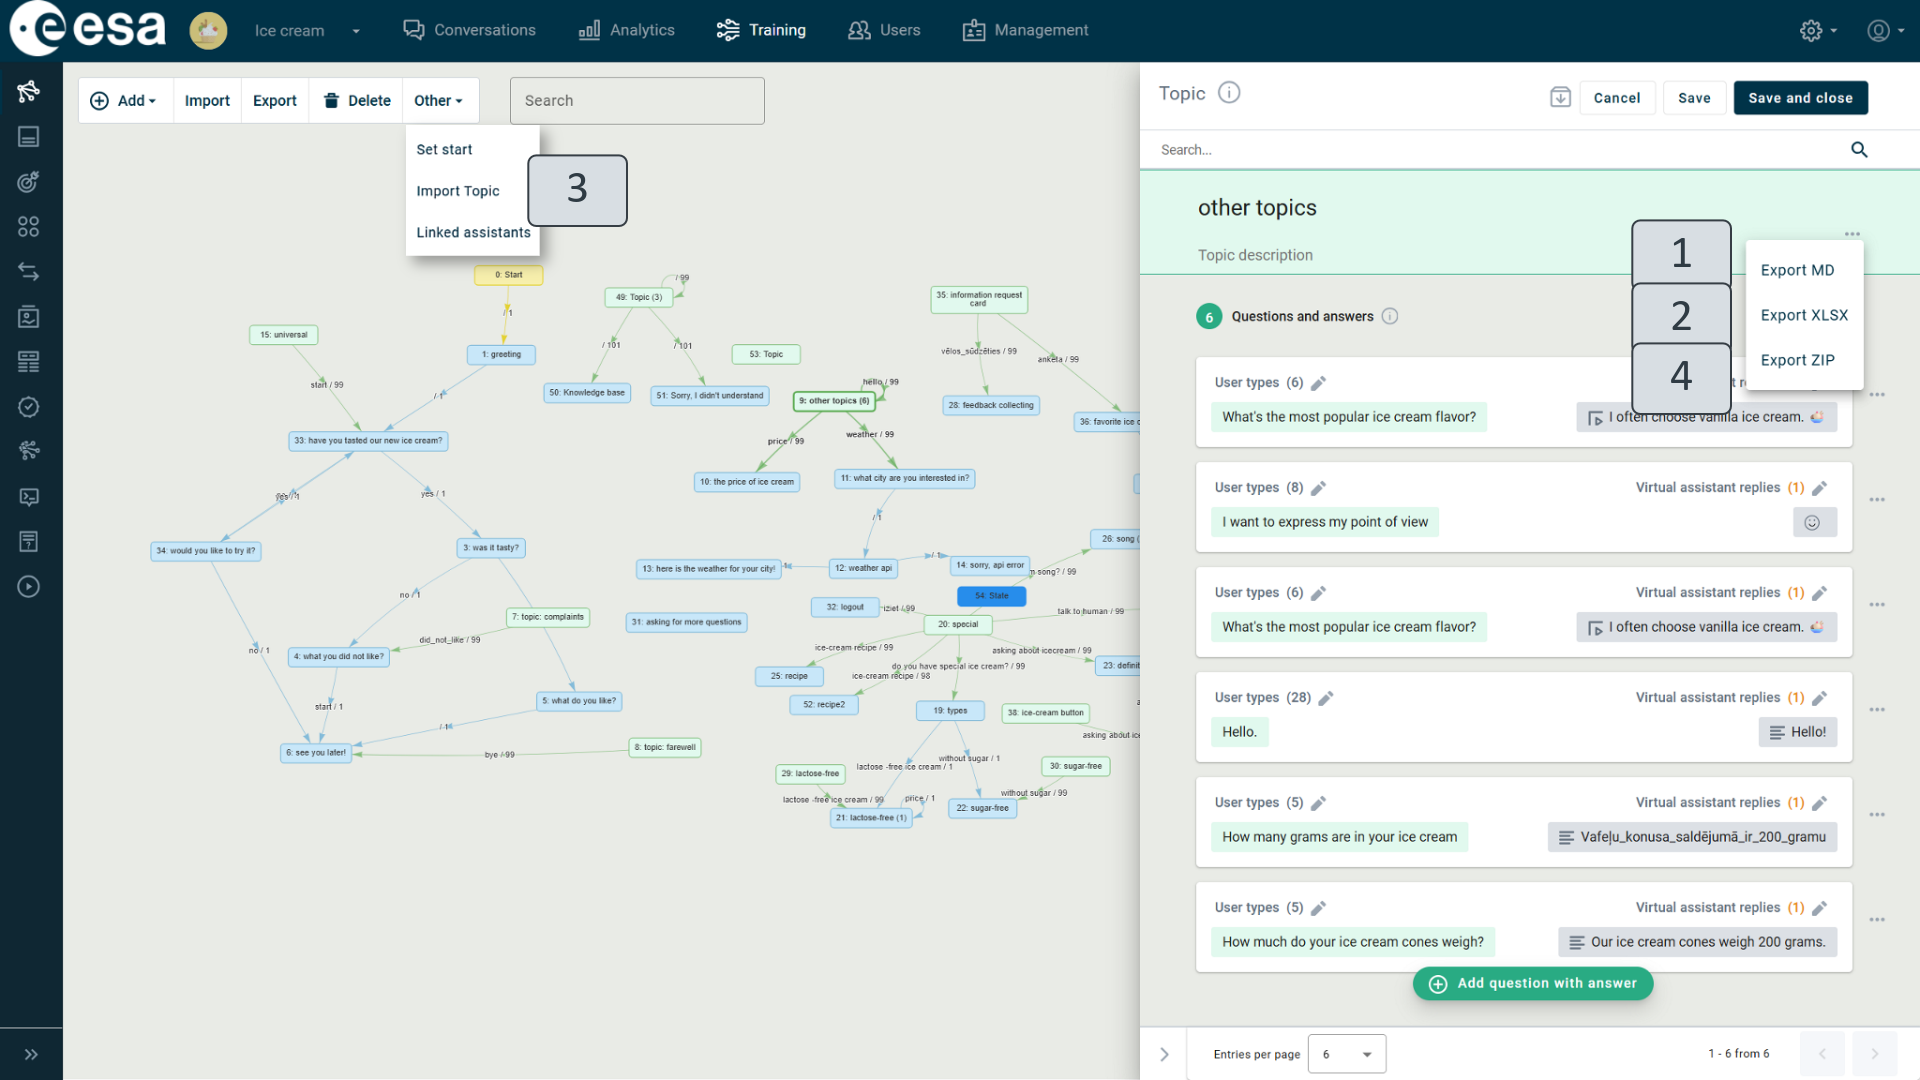
Figure 76.1. Topic import and export
There are three export options available.
- Export MD (Figure 76.1) (1). This export method is used when modernizing legacy VAs and migrating their intent scenarios to automatically generated responses. The topic data (questions and answers) is exported in MD format. The exported content can then be reviewed, unnecessary items deleted, and the number of intent examples reduced. After that, the prepared file can be imported into the VA knowledge base. Once the data has been imported into the knowledge base, the topic can be deleted from the scenario
- Export XLSX (2): exports all topic data (questions and answers) in XLSX format. You can then import them into another VA by clicking on the scenario toolbar “Other” - > “Import topic” (3) and by selecting the previously downloaded XLSX file. After the import, the new imported topic appears in the scenario with intents and outputs in respective views. For them to take effect, the “Publish all” button must be clicked.
- Export ZIP (4). This export function is easy to use if the topic is getting too large and you decide to separate it from the existing VA and make a new VA directly on this subject. All topic data (questions and answers, resources used, data table information, entitles, and other related data) are exported to a zip folder containing JSON files. Afterwards, import this information into another VA by selecting “Other” on the scenario toolbar - > “Import Topic” (3) and selecting the previously acquired downloaded ZIP file. When importing is done, the new imported topic appears in the scenario, while also outputs, intents, entities, resources, and other related data in the respective views. For them to take effect, click “Publish all.”
Transition Editing Window
A set of conditions for switching from one state to another so that the conversation can continue. When states are more closely related to the VA's answer, transitions mostly provide information about user inputs that the VA needs to take into account to reach the next state. Transitions are displayed in two ways: normal transitions connect two different states or a topic and a state (Figure 77) (1); self-loops return to the same state or topic from which they originate (2) and information about them can be found in the editing windows of these states and topics under the title of "Questions and Answers". The options for both transition editing windows are the same.
The transition may be completed if:
- the user has made an input - asked or said something - and the system has understood the user's intent, that is, what he wanted to find out;
- some previously identified information that has been stored in context is known.
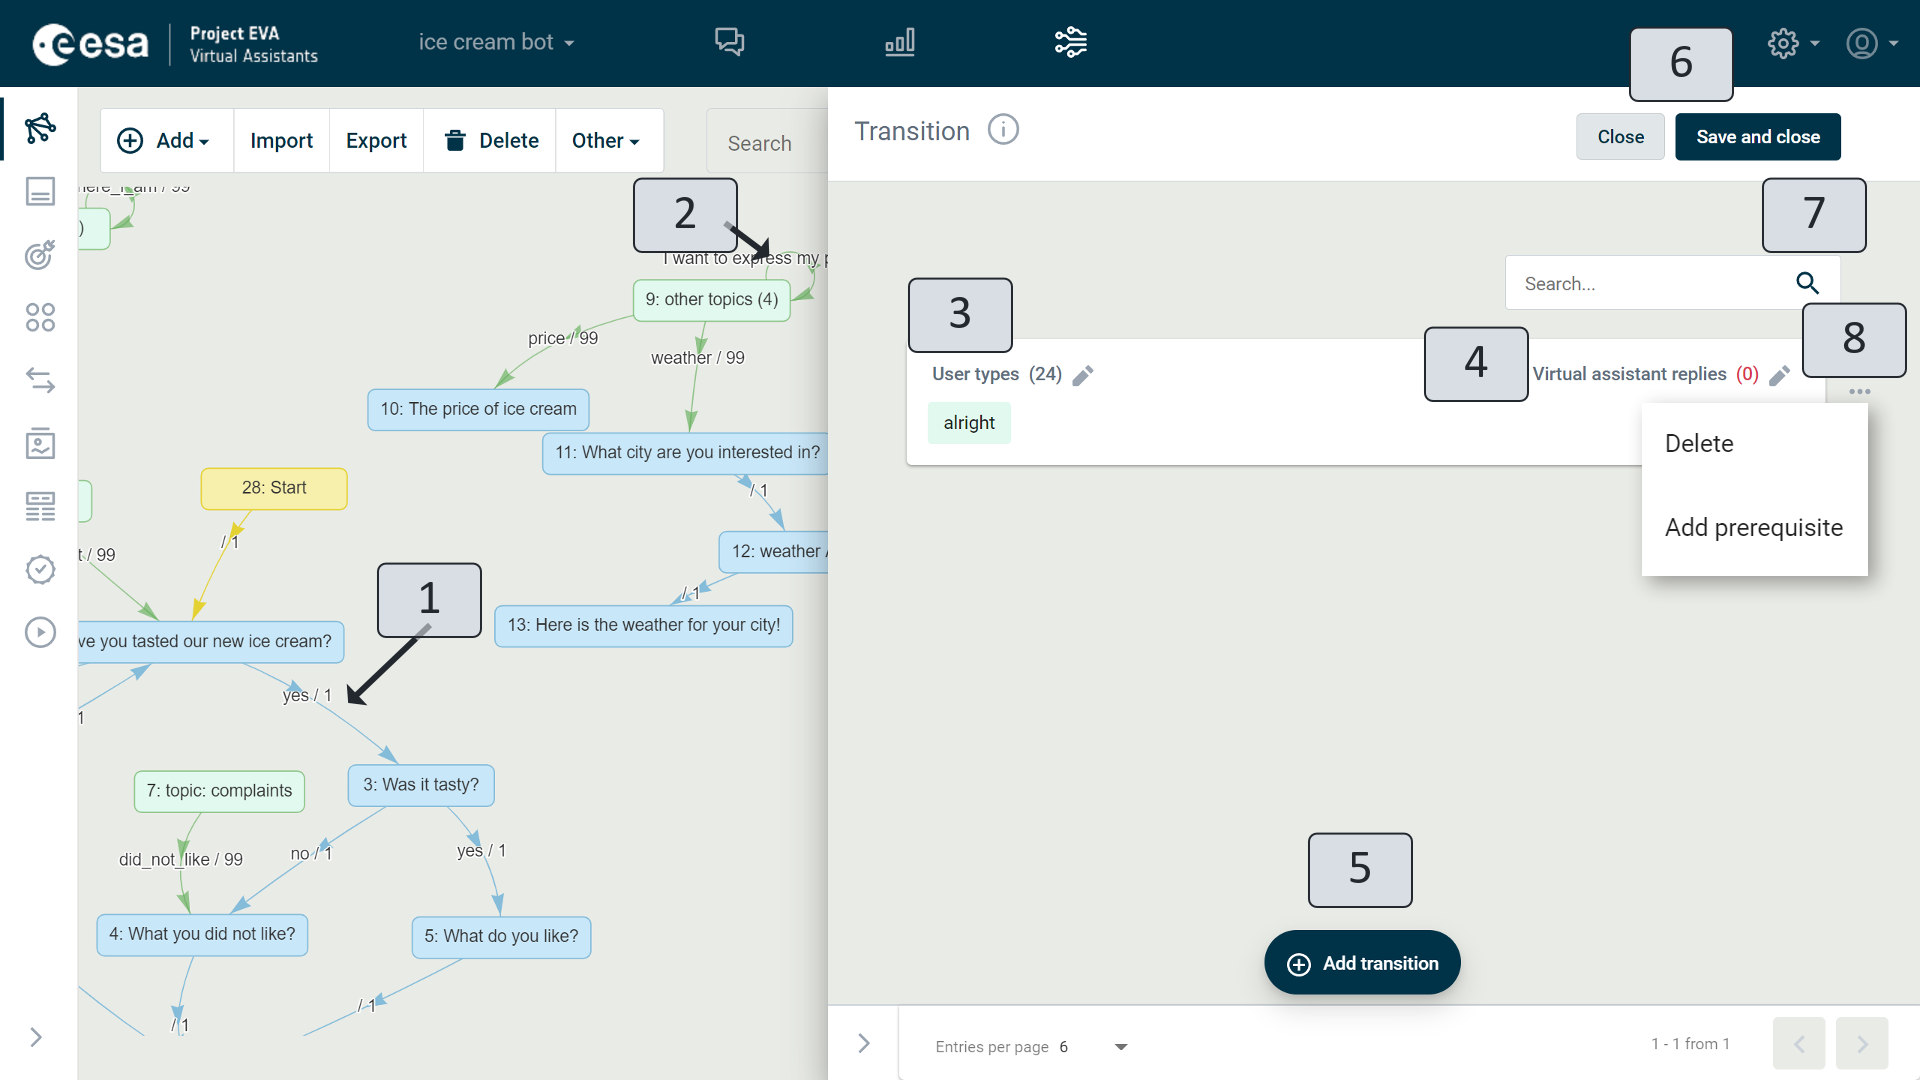
Figure 77. Transition Editing Window
The most commonly used condition allocated to a transition is an intent - in order for a transition to take place - an evaluation is made of whether the user's recorded text corresponds to a specific intent in the VA's knowledge.
In the graphic representation of the scenario, an intent identifier (if defined in the transition) is visible on each transition as a title, as well as the transition priority indicator (Figure 77) (1-2). If several transitions are combined in a single transition, the identifier for the intent of the first transition is shown.
- There are two ways the transition in a scenario is comprised of:
- Holding the Shift key, dragging the state or topic from which the transition should begin with the mouse to the state where it is to be taken, and releasing it. A new transition appears.
- Double-clicking the left mouse button on the state or topic where you want the transition to begin. A red dot appears. With the mouse, drag the red dot to the desired state or topic and release it. A new transition appears.
The self-loop is created by clicking the state or topic where you want the transition to be and choosing "Add question with answer".
If you want to move an existing transition in a scenario and link it to other states, double-click the left mouse button on the transition. Red dots appear at both ends of the transition. With the mouse, drag the red dot to the new desired state or topic and release it.
After creating a new transition or clicking any transition already in a scenario, a transition editing window opens on the right hand side of the screen, where the conditions under which the transition is completed can be described (Figure 77). When the fields you want have been filled in, you must click the "Save and close" button to save the information, and then click "Close" (6) to discard the changes you have made.
You can specify transition information by clicking the pencil icon next to the title "User types" (3). Although the transition is mostly used to indicate different conditions – when the VA should respond and act, which variable to save in context, what values to search for after receiving a certain type of user input, the VA's response or answer to the user may also be defined in the transitions. You can do this by clicking the pencil icon next to the title "Virtual assistant replies" (4). When you click on the pencil icon, one of the three views of the transition editing window opens. You can then simultaneously switch between the two other editing views. You can read more detailed information about working in the transition editing window views in the following Sub-chapters "User types", "Virtual Assistant Replies", and "Advanced".
When you click the title "Add transition" (5), a new transition is attached to the existing one, for which you can specify other performance conditions.
In the search field of the transition editing window (7), you can search for a pre-prepared transition by typing a word from the intent example or output text specified therein. This option is particularly useful when reviewing a large number of questions with answers.
You can delete a separate transition if you click the three dots on the right hand side and choose the "Delete" option (8).
Prerequisites are definable, when you click on the three dots and choose the title "Add prerequisite" (8). They should be indicated in the same way as in the state menu (see Sub-chapter "Text"). Prerequisites stipulate that the transition occurs when there is a specific value in the context.
An example with completed transition prerequisite fields is shown below (Figure 78). In the previous scenario, when a user asks for an address, the context with the identifier "city" contains information about the city in which the ice cream shop is located (see "Advanced". Likewise, if the user has not mentioned the specific city name, in the state "17: address", it is offered a choice of cities with the buttons. The state "18: all addresses" contains answers with named addresses. To reach this position, you must proceed along the transition from the state "17: address" to "18: all addresses". The transition has no intent and the only prerequisite for its execution is that the city name (1-2) must be stored in the context. If the city name is not mentioned anywhere in the user's text used previously, the transition will not take place.
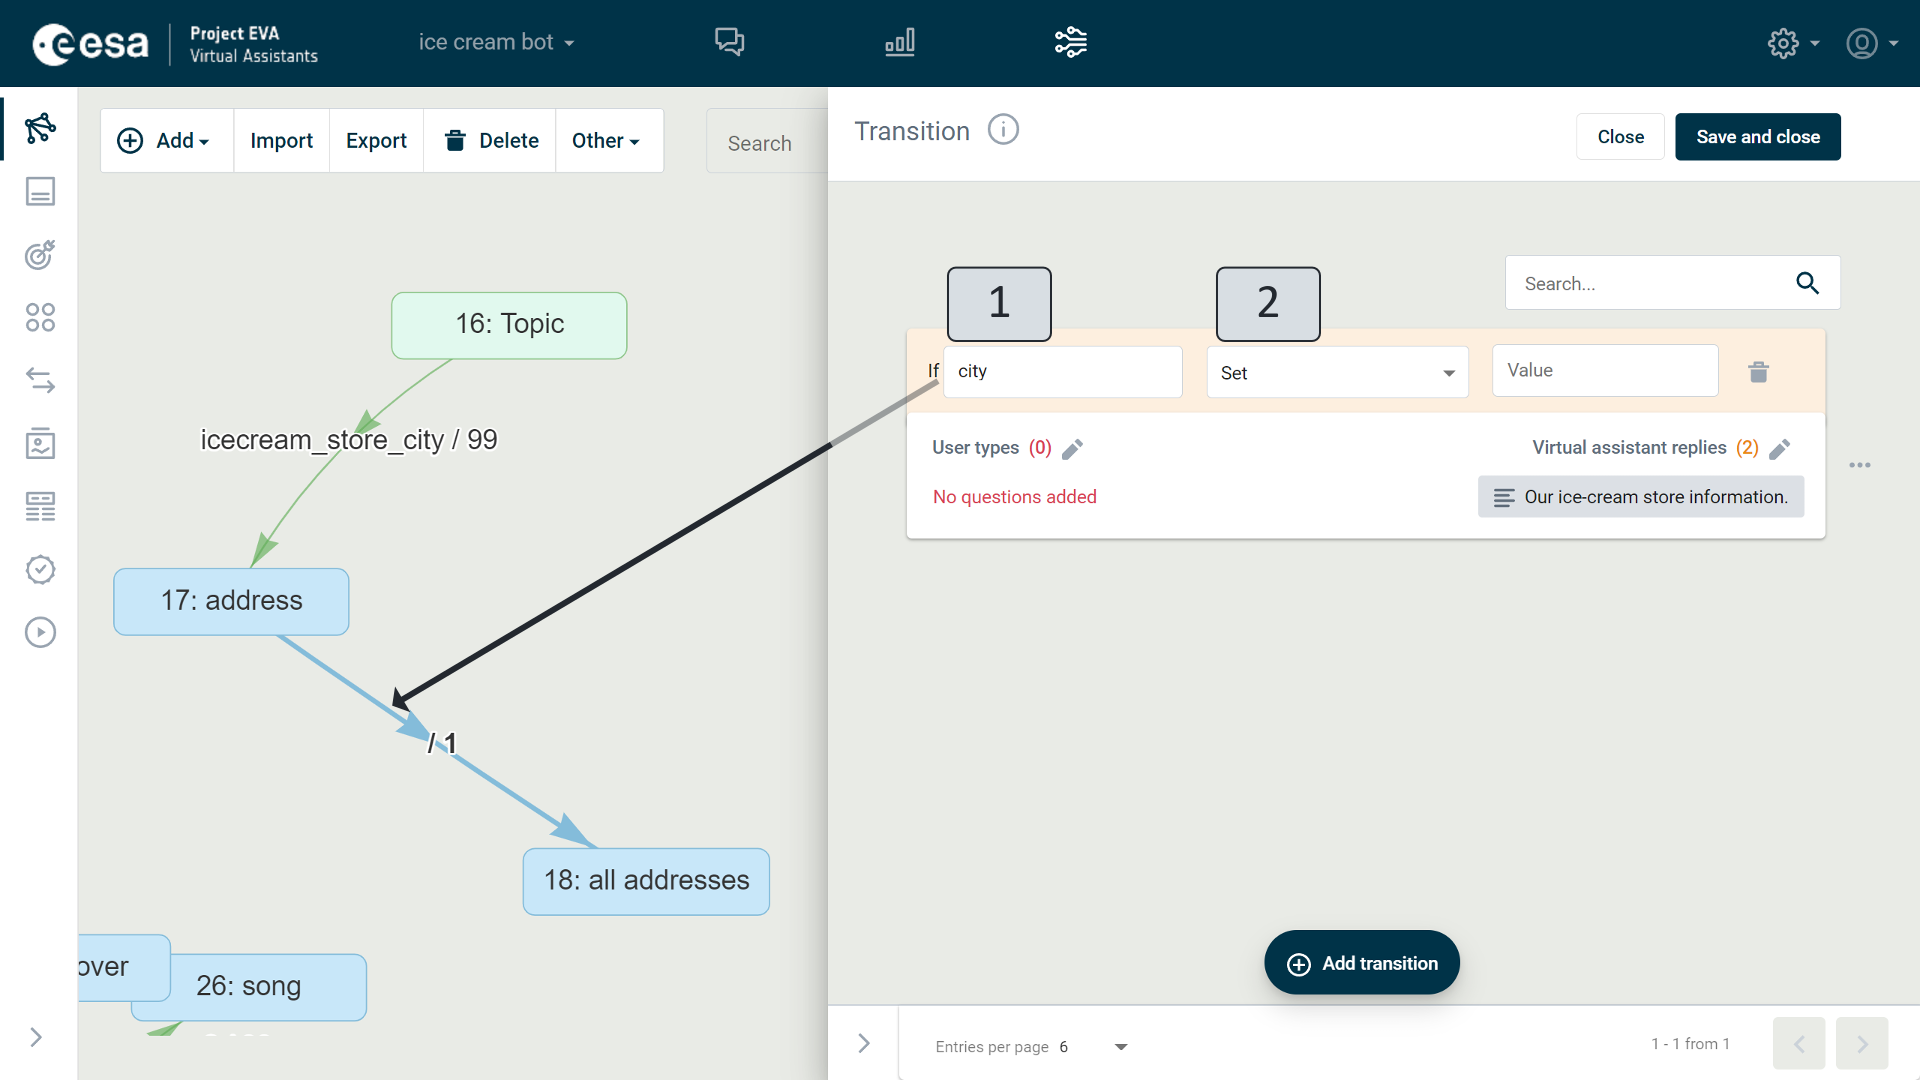
Figure 78. Transition with a Prerequisite
User types
In the transition editing window, information about the transition conditions is recorded in three views that appear when you click the pencil icon (Figure 77) either under the title "User types" or "Virtual assistant replies." You can save all the information that you have changed or added anew by clicking "Save and close" (7). If you click "Cancel" (7), the view closes without saving.
In the "User types" view (Figure 79) (1), information about the user question and its intent can be specified if this is relevant for the execution of the transition.
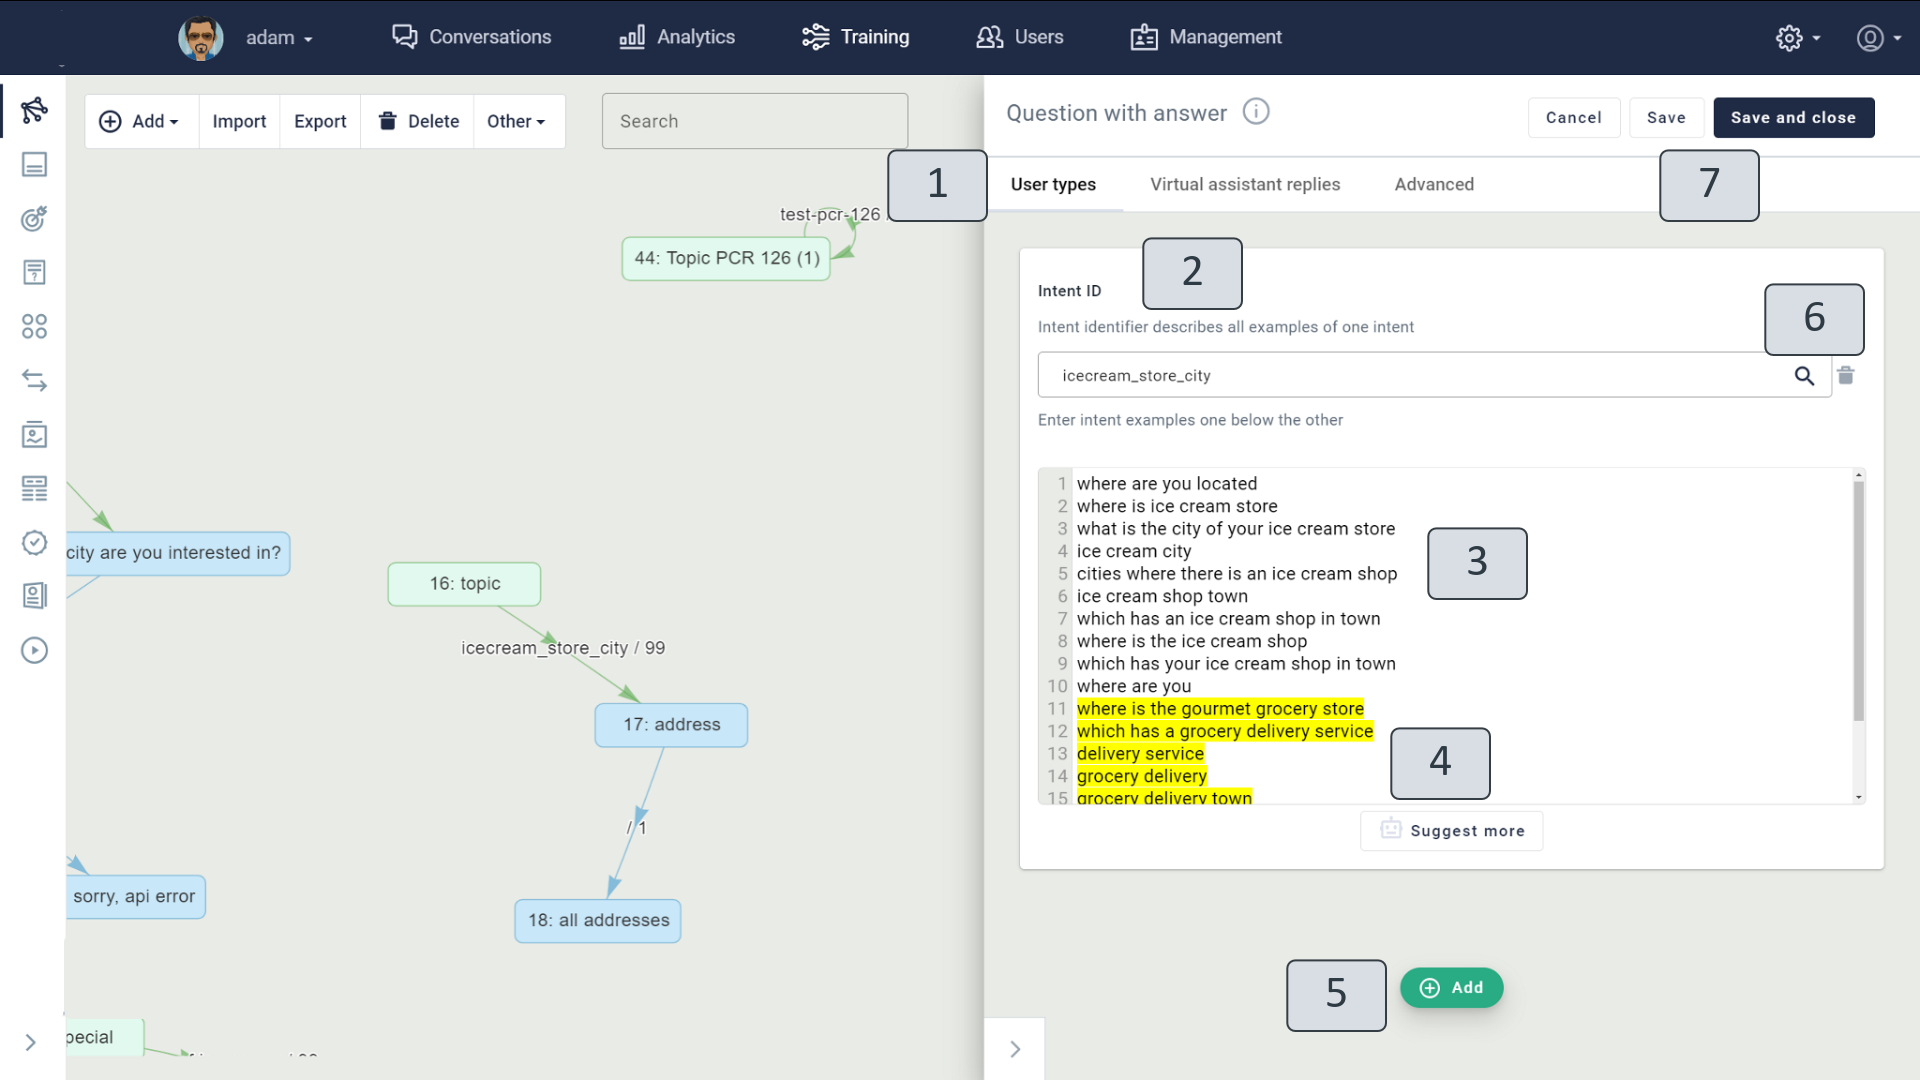
Figure 79. "User types" View
In the "Intent ID" (2) field, you must add a intent identifier that can be done in several ways:
- start writing an identifier or a title from an example already prepared in the "Intent" view, and then choosing the right one from the options offered in the drop-down menu.
- enter a new intent identifier;
- leave the field blank. The intent identifier will be created automatically from the first of the following examples:
The intent example field (3) should contain at least 5 intent examples for the VA to be trained. The field will be filled in automatically if you have selected a intent in the intent identifier field that has already been prepared in the "Intents" view. You can delete the examples you have written by clicking on the Recycle Bin icon (6).
When you click "Suggest more" (4) next to the robot icon, an automatic text generator adds 5 more intent examples (colored yellow) to the existing intent. You can edit these and use them to create the base intent.
When you click "Add" (5) at the bottom of the window, you will be prompted to specify an entity if the transition is only required when a specific keyword is found in the VA user's text. When you click on the title "Entity", you must select the desired entity from the drop-down list, so entitles and their values must be defined in advance in the "Entities" view.
If new information has been recorded that has not previously been prepared in the "Intents" view, the "Publish all" option should be selected when publishing the scenario. It may be necessary to wait a little while for the intent detector to be trained and the changes to take effect.
Virtual Assistant Replies
It is possible not only to indicate VA answers in states but also in transitions. In the transition editing window, this can be done in the "Virtual assistant replies" view (Figure 80) (1). You can also leave this view blank if the answer is given in an associated state.
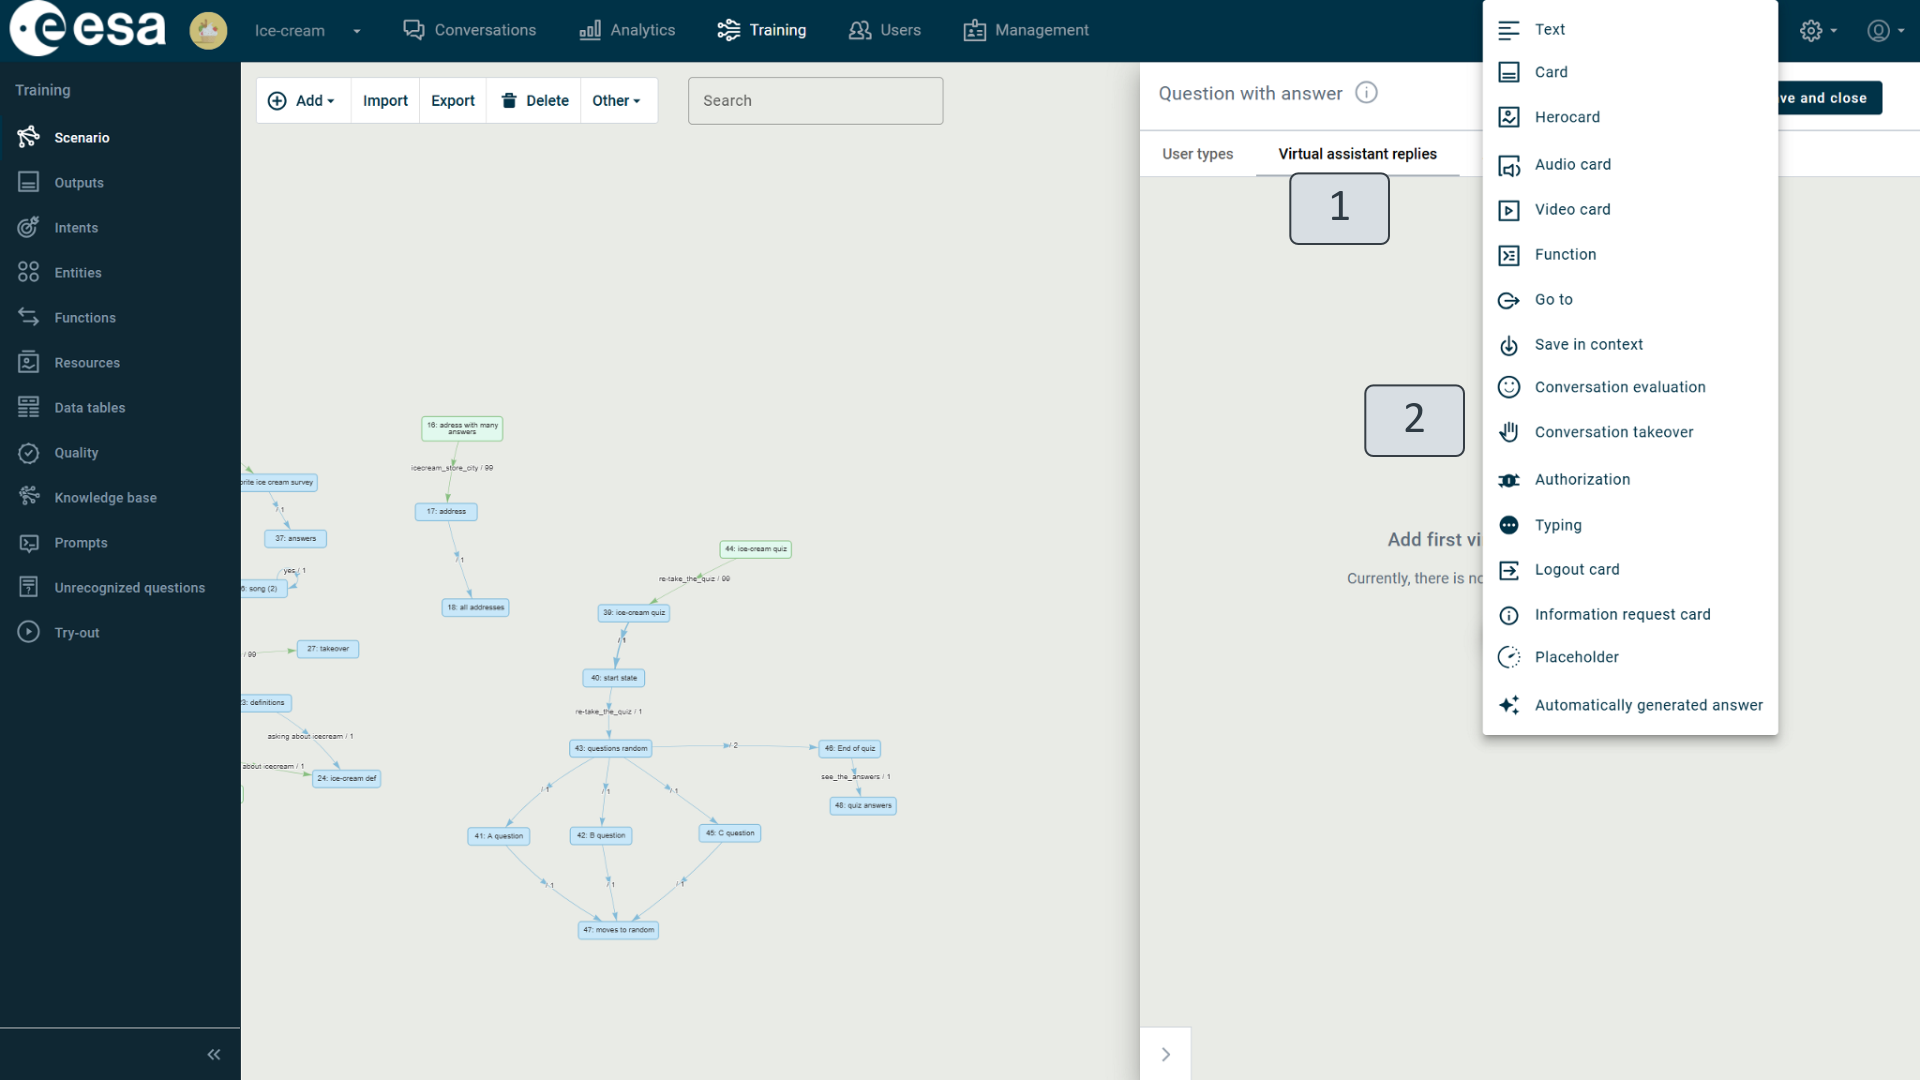
Figure 80. "Virtual assistant replies" View
By clicking on the "Add" green button, you can choose the action (2) that the assistant should perform in response to the user's question.
There are sixteen actions.
- Text
- Card
- Herocard
- Audio card
- Video card
- Function
- Go to
- Save in context
- Function
- Conversation evaluation
- Conversation takeover
- Authorization
- Typing
- Logout card
- Information request card
- Placeholder
- Automatically generated answer
A more detailed description of the actions can be found in the sub-chapters of the corresponding titles that can viewed above in Chapter "State Editing Window".
There are two typical cases where answers are indicated to the user in a transition as opposed to in a state.
- Interim Answer. If any information needs to be clarified, an interim answer can be used before the final answer is given. For example, here we can see an example (Figure 81) when a user asks for an address. There are several ice-cream stores, so for clarification, the VA asks the user to choose which precise address he wants to find out. The "18: all addresses" state defines all addresses, but before that there is important information that the VA has to tell the user, which moreover remains unchanged, whichever location name the user chooses. This information in the example is added to the transition as an answer to the user (1), it appears in the conversation immediately (3) before the normal answer (4). which is defined in the scenario in the relevant state (2).
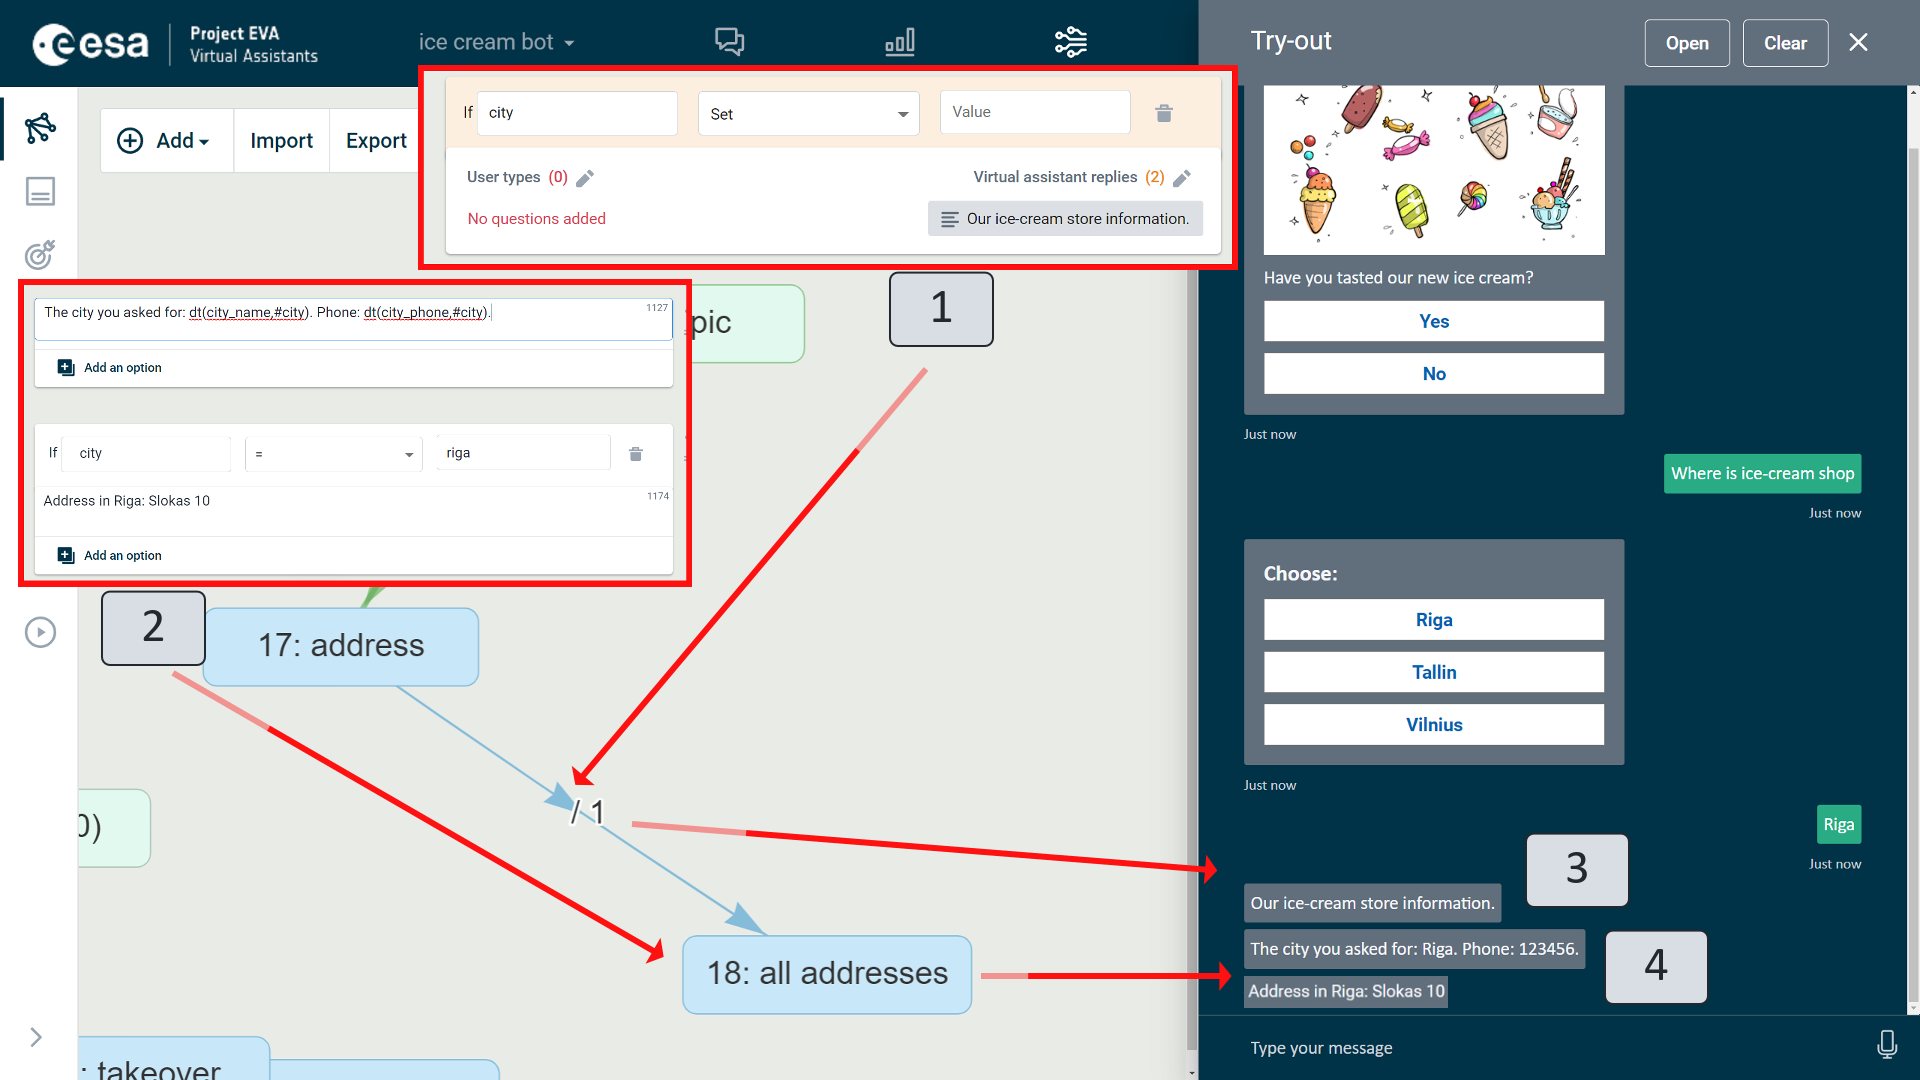
Figure 81. Interim Answer - Question with Answer. More often than not, the VA's answers in transitions are indicated by adding questions with answers. Questions and answers are intents for which simple answers are immediately attached. They are represented in the scenario by a self-loop. Ordinarily, in a scenario they are used to sort questions and answers on a single topic in a consistent manner that does not complicate the dialogue, drawing individual states and transitions for detailed questions. In most cases, questions with answers are added to topics because they can be accessed from anywhere in the scenario. Thus, at any time in the conversation, if the user asks a question, it will be answered, but there are individual cases where a question with an answer can also be added to states. It should be kept in mind that when you add a question with an answer to a state, the assistant will only understand the question asked by the user when the VA has reached the state in which the question with the answer has been defined.
In the scenario, questions already added with answers can be seen as self-loops (Figure 82) (1-2) attached to the relevant topics and states. In parentheses next to the topic and state title, we see a number that indicates the number of questions and answers that are added to the topic or state. Questions with answers encompass both state and transition functionality in one place.
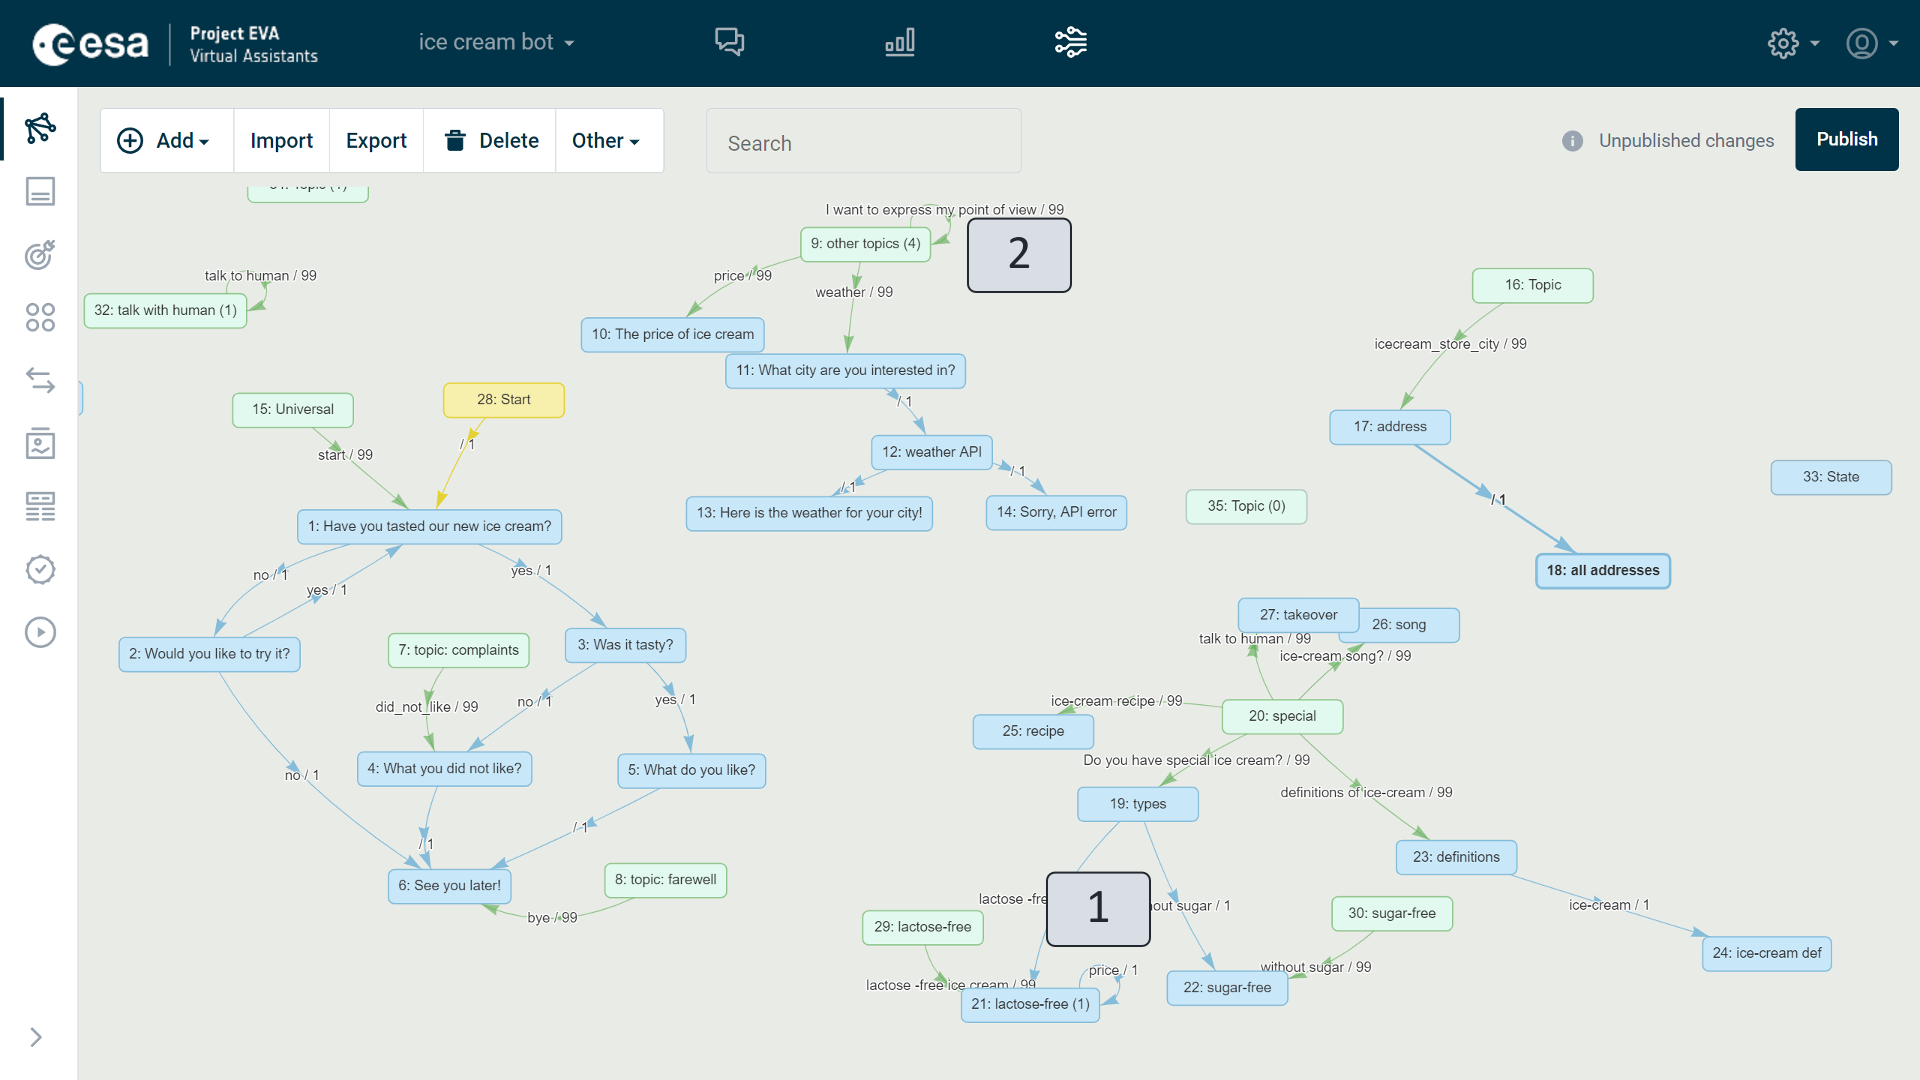
Figure 82. Self-Loops - Questions and Answers
Self-Loop in the State. An example with a self-loop, or a question with an answer added to the state, is shown below (Figure 83).
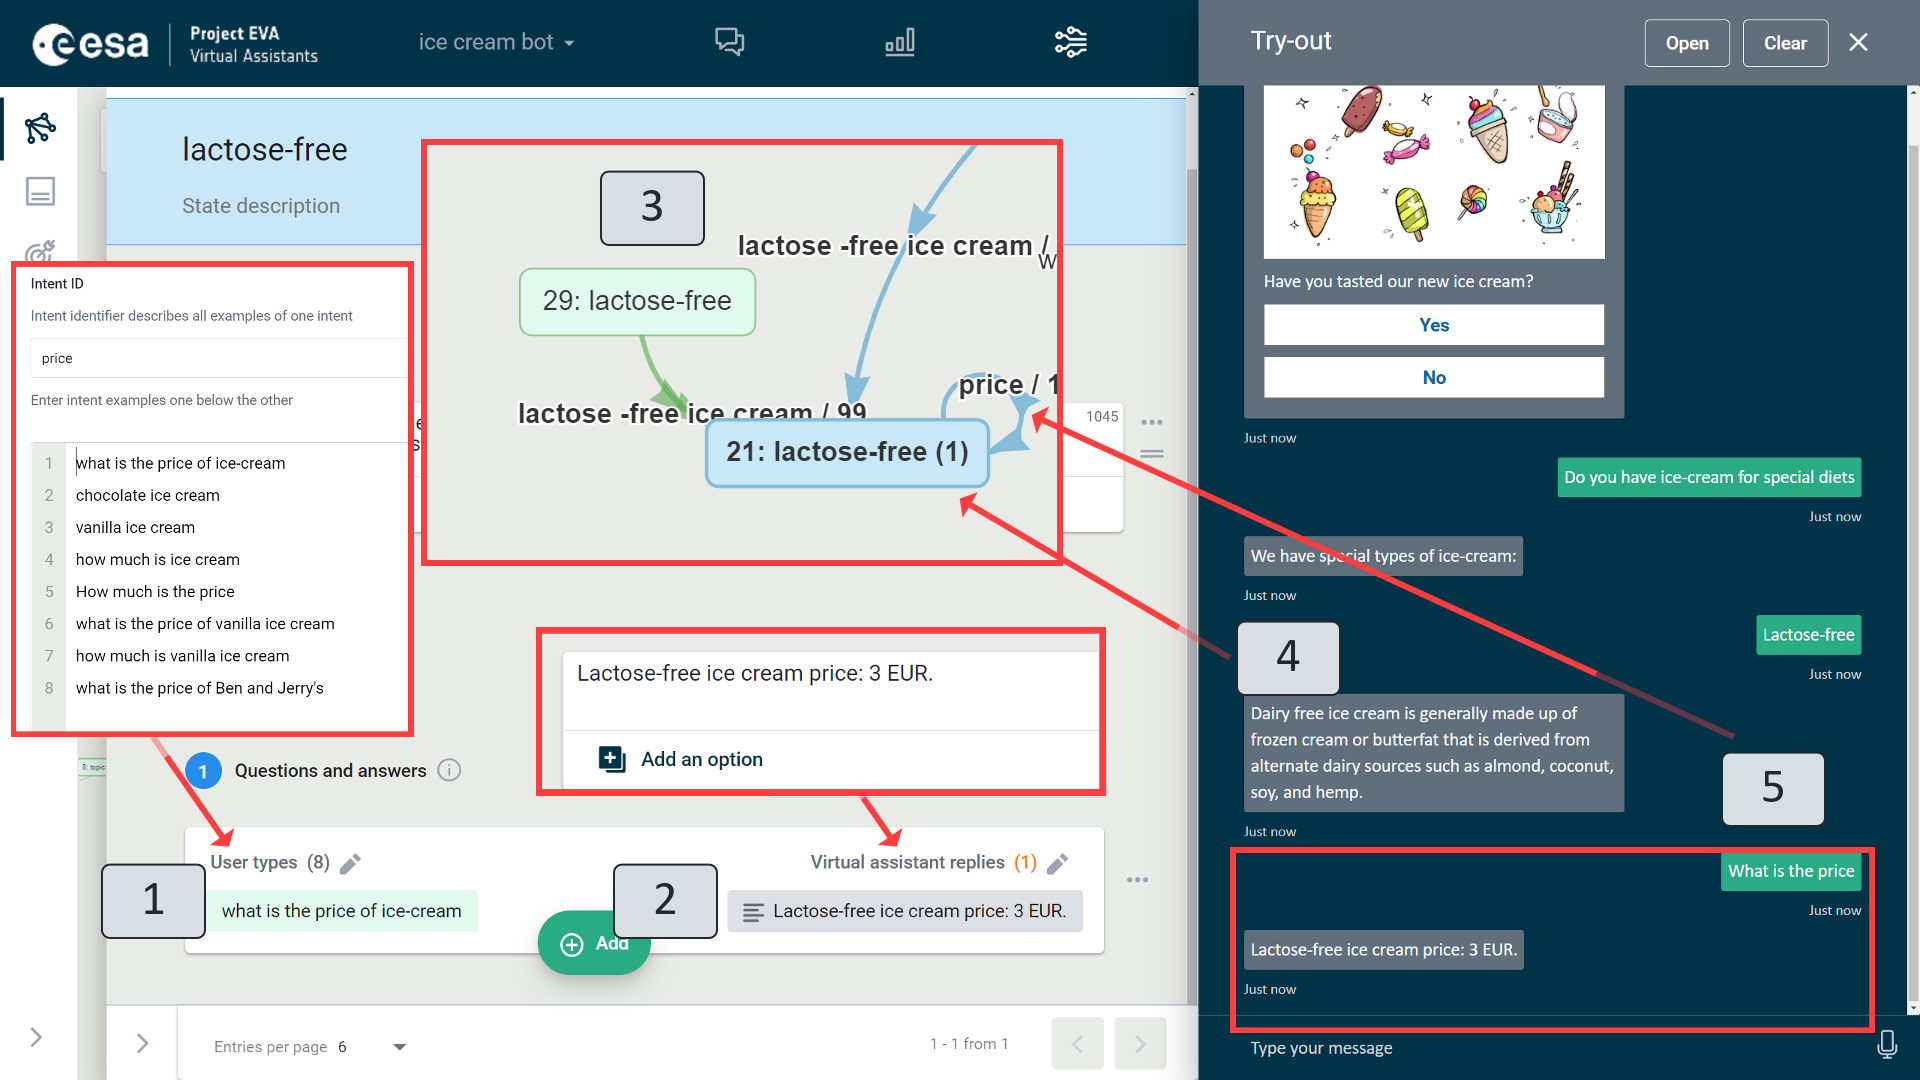
Figure 83. Questions and Answers - Self-Loop in the State
It is evident that the user has reached the position "21: lactose-free" (3) according to the scenario. In the conversation, the VA responds to what is indicated in this state (4) and remains in the scenario, not proceeding and waiting for the next user input. The user asks: "What is the price?" (5). The assistant checks the intent of the input, which matches the intent specified for the questions and answers under this state (1), and provides the required answer (2). In the scenario, one can see that question and answer information is on a self-loop to state 21 and is blue (with first priority), which means that the VA, always in this state, will first check that the user's input does not match that intent. However, if the VA is in a different state in the conversation, asking this same question, the user will not receive an answer, since the VA always only checks blue transitions directly related to the state and then all green transitions. If it is planned that a question with an answer is to be accessed from anywhere in the dialogue, it must be devised in the topic (Figure 84).
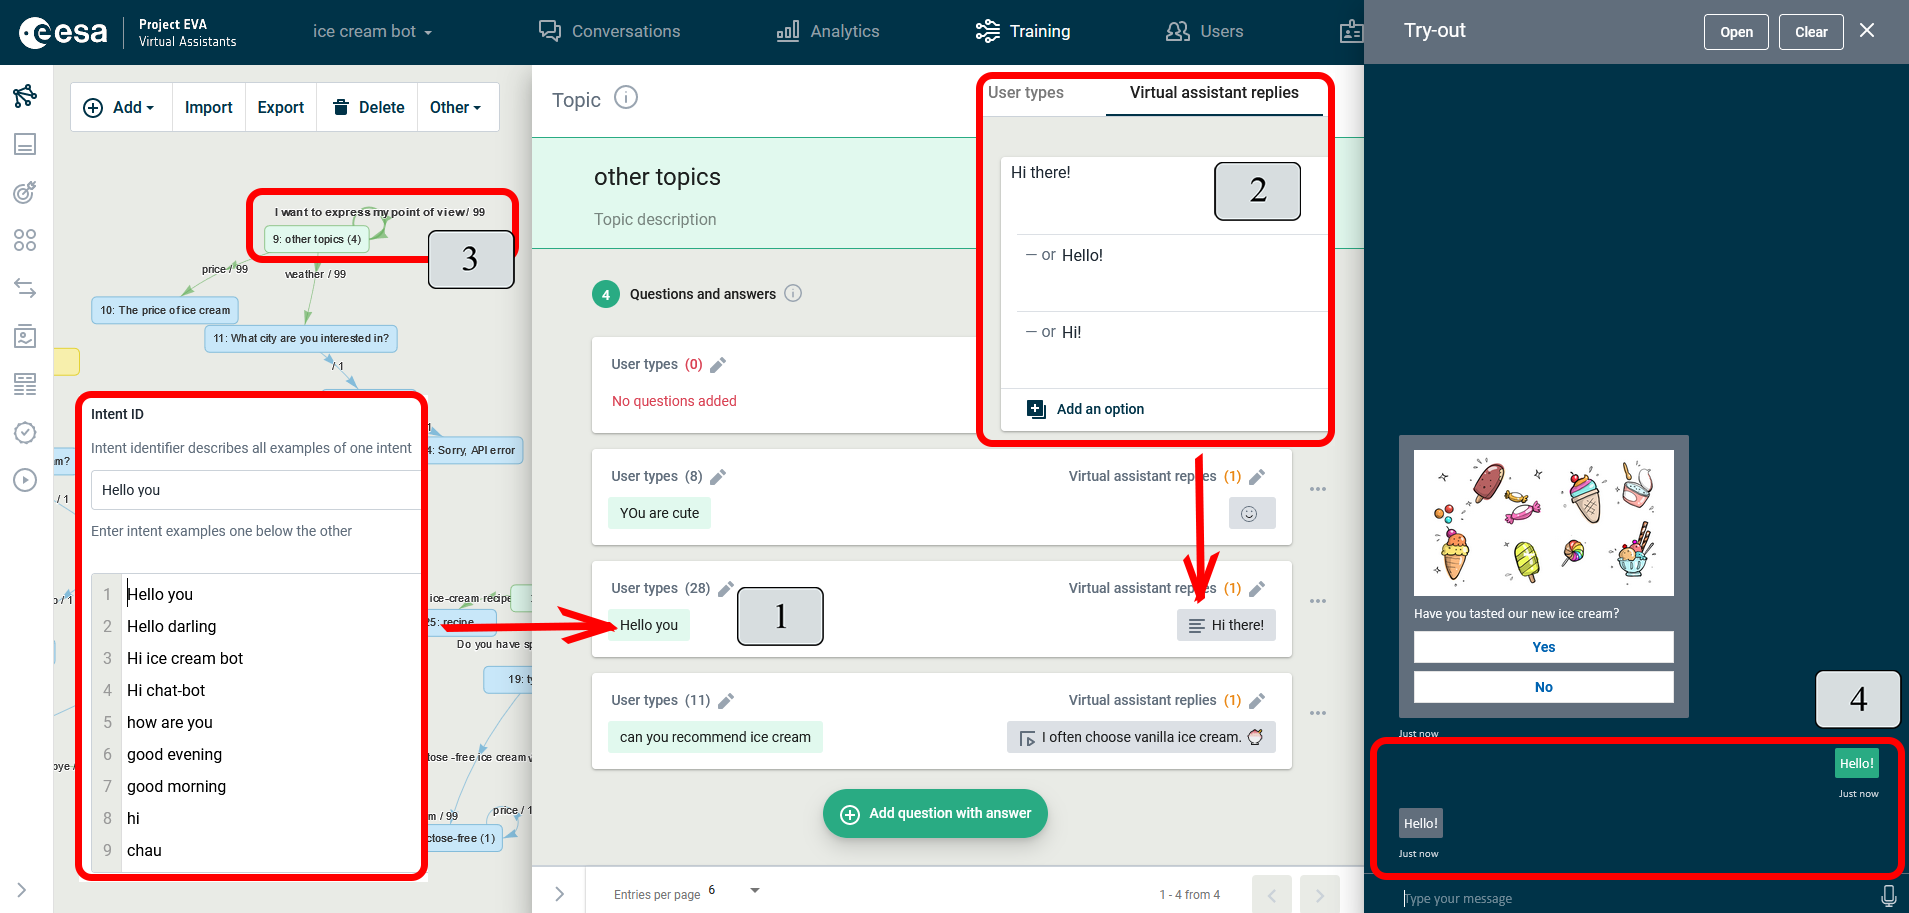
Figure 84. Questions and Answers - Self-loop under the Topic
Self-Loop in the Topic. Figure (Figure 84) shows that the user immediately asks for what it needs and receives an answer without passing through the entire scenario. This question will be answered immediately from any other conversation point because it falls under the topic (3). When addressing the user with: "Good evening!", the VA checks all the blue transitions that are directly related to the state that the conversation has reached at that moment. If none of the blue transition intents corresponds to what the user says, all the green topic changes in the scenario will be checked. Under the topic "9: other topics". a transition is found with the following intent (1) and provides the following answer (2) (4).
Advanced
The transition editing window's third view "Advanced" (Figure 85) (1) allows you to specify transition condition nuances in even more detail.
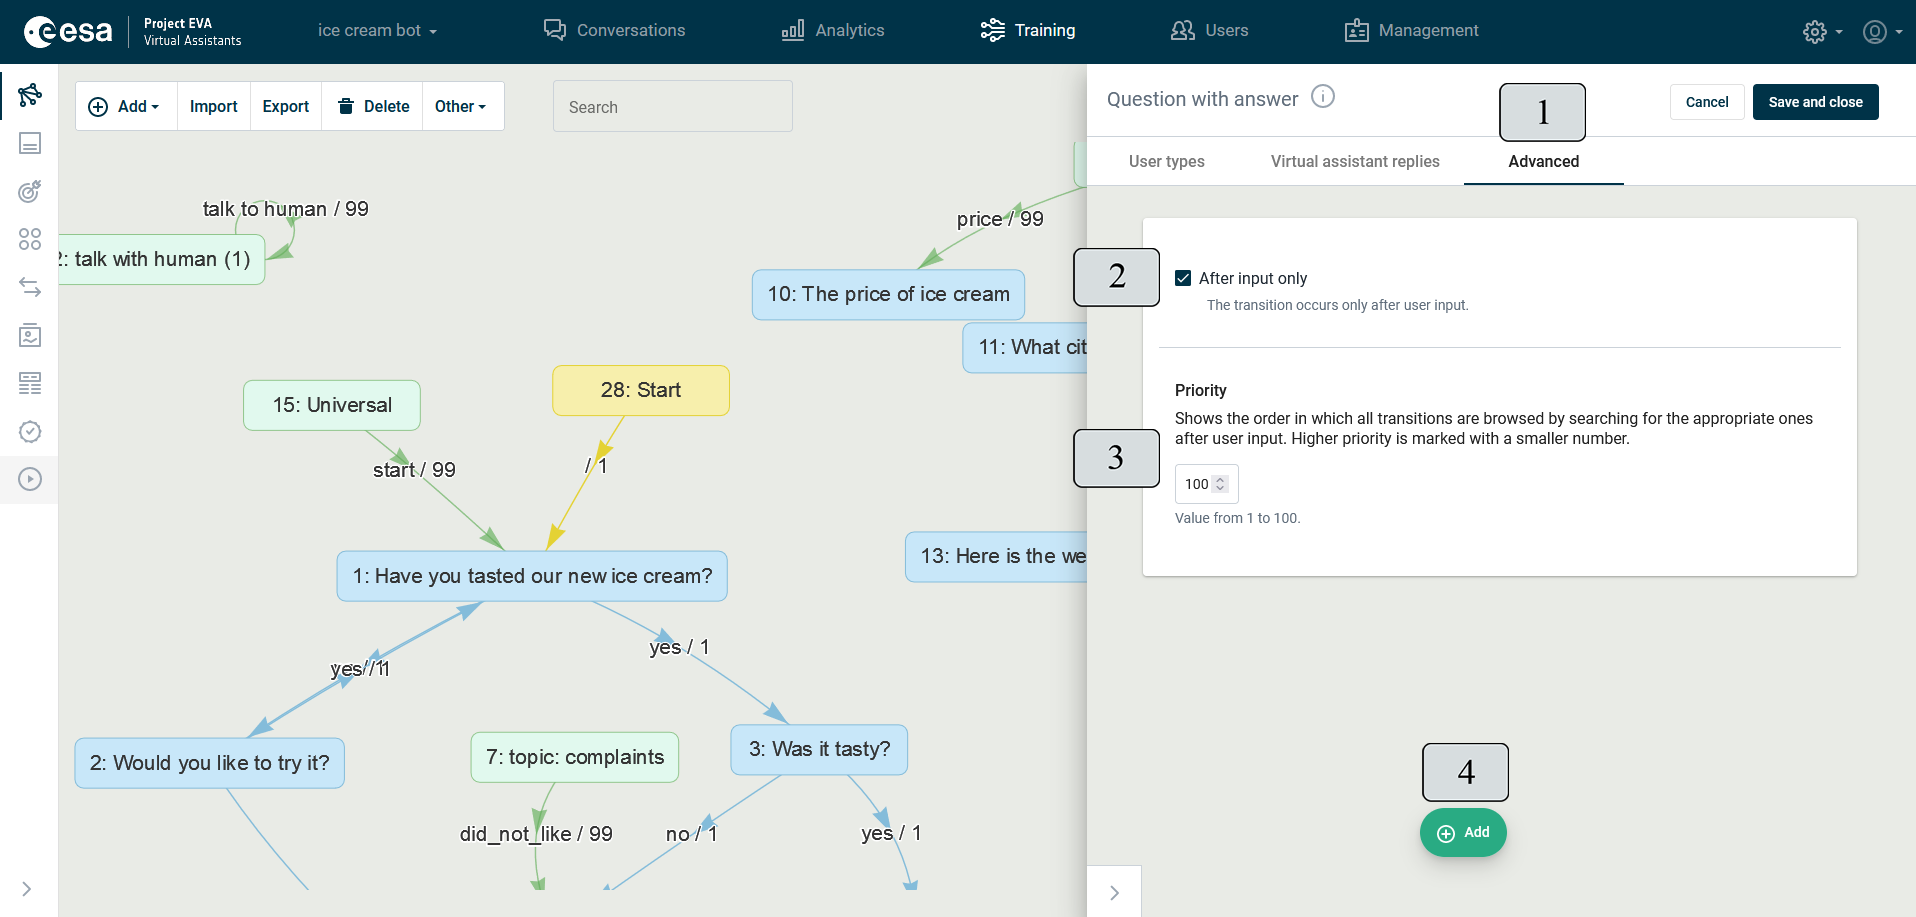
Figure 85. "Advanced" View
After input only.
Each transition has the option "After input only " (2), which must be marked if the transition only occurs after the user has entered something. If the transition is to take place automatically without waiting for user input, the mark does not need to be made.
The check box may also remain unchecked in cases where a intent or another condition has already been specified for the transition, but these will not allow the transition to be completed without user input.
Priority.
Transition priority (3) specifies the order in which all transitions are browsed by searching for those corresponding to the user's input. The priority indicator determines which transition will be used if several transitions meet the prerequisites simultaneously. The highest priority is designated 1.
If the intent is not specified and the transition priority indicator is higher than that given to other transitions, this transition will always be given priority when it comes to execution.
The priority indicator is usually allocated automatically, with 1 for all blue transitions and 99 for greens. The priority indicator is changed in individual cases. For example, if you want to include an answer from the VA to all questions (Figure 86) that have not been understood in the scenario.
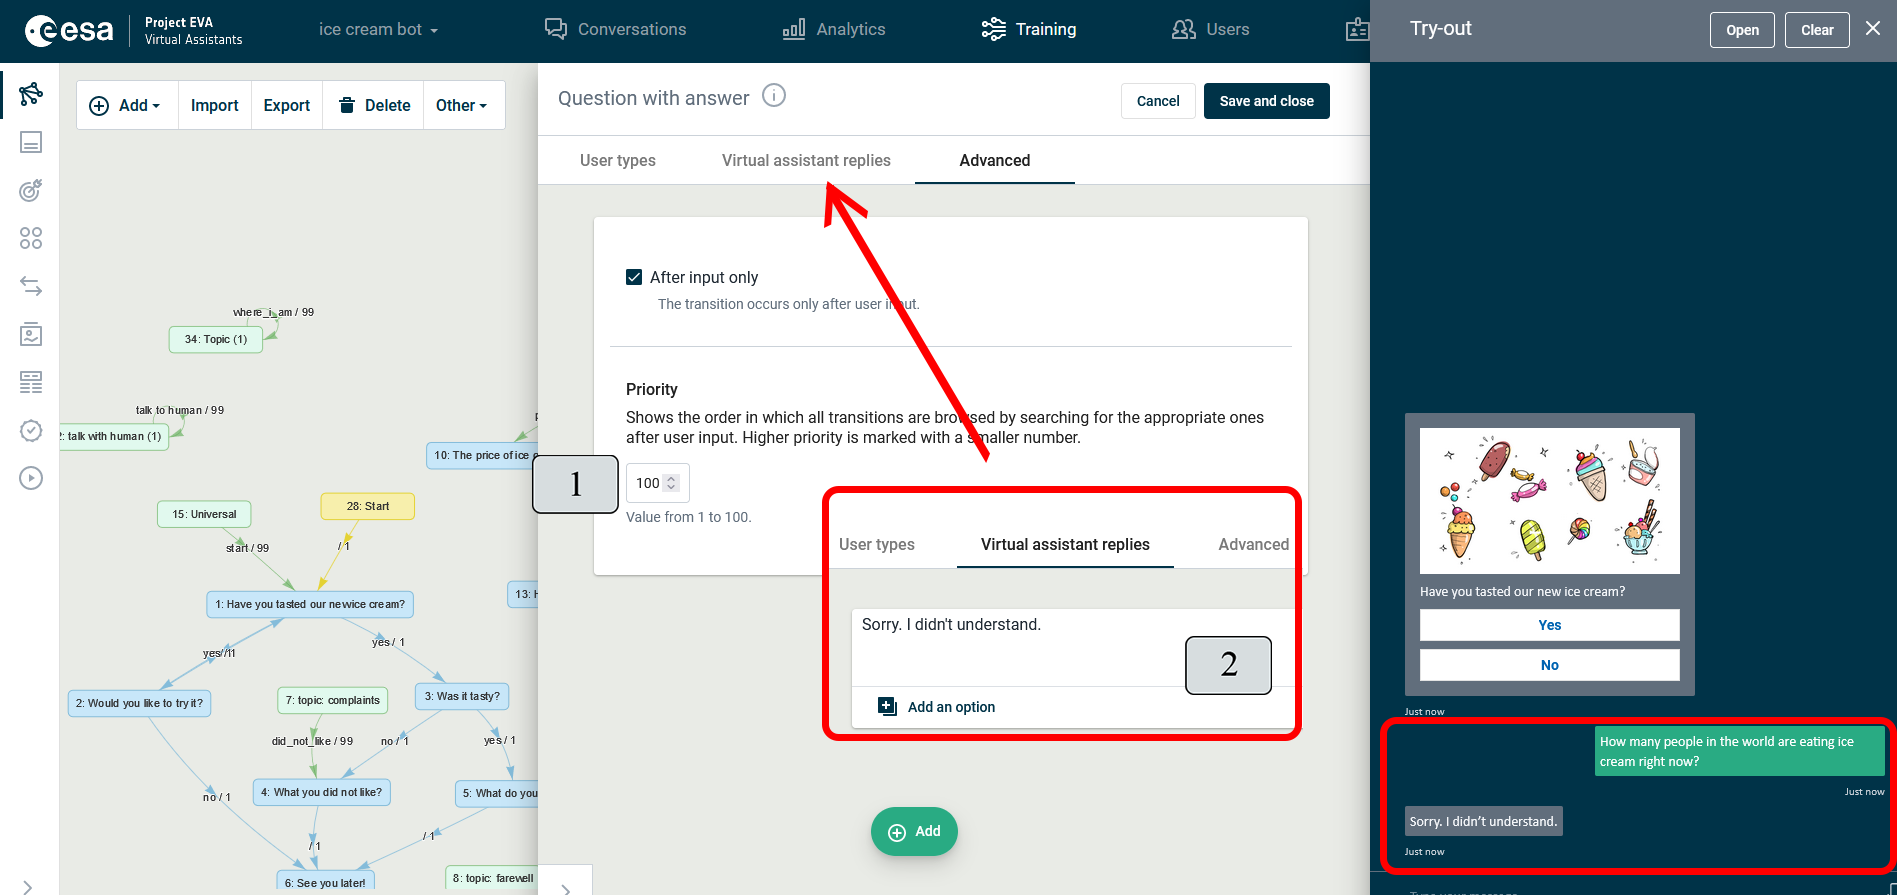
Figure 86. Example of a Priority Change
In the example (Figure 86), the self-loop (a question with an answer) only shows the VA's answer to the user (2), no user intent is specified at all, and the "User types" view is blank, while in the "Advanced" view the transition priority has changed from 99 to 100 (1). This means that the virtual assistant, upon receiving the following user input during a conversation: "How many people are there in the world?" will check all blue transitions with priority 1 to verify if any of them are linked to the state in which the VA is at the time. Not finding any matches, all green transitions with priority 99 will be reviewed, and only then, without any finding any matches in them either, will this transition of 100 be completed. Therefore in cases where no intent can be detected for user input to the VA, the corresponding answer (3) will be provided.
Context.
If you want to save a variable in context, you must click "Add" (Figure 85) (4) in the "Advanced" view – the title "Context" will appear, which, when clicked on, will allow you to fill in the necessary fields (Figure 87).
Context variables are additional information that can be determined from the user input text and kept in the VA's memory for further use in the scenario. In the context, you can save question clarifications, actions, user information and topics covered during the conversation. Saving a variable value in context usually takes place on a transitional basis, between states, although context information can also work in states (most often delete the previously stored when it is no longer needed).
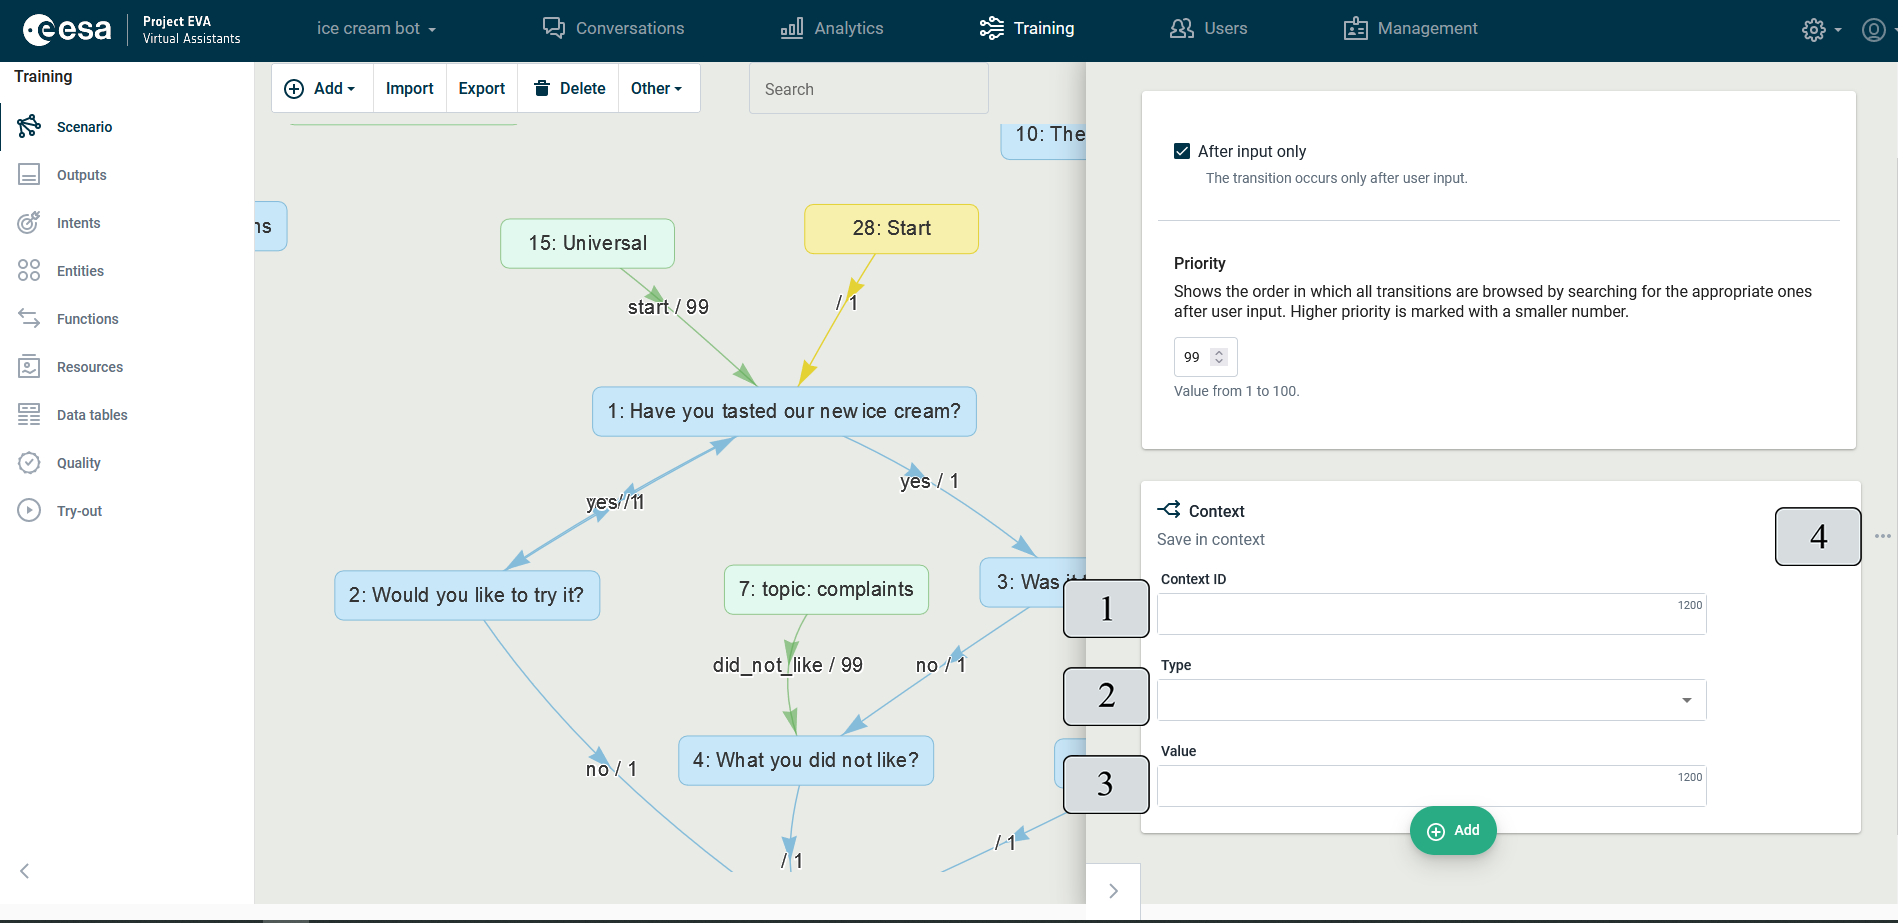
Figure 87. Context
In the "Context ID" (1) field, you must specify an identifier that will describe the variable stored in the specific context. The Type field contains a drop-down menu with multiple types (see Table 7. Context Types), of which you want to select the one you need.
Table 7. Context Types
Type | Explanation |
Text | The context value is text. |
Integer | The context value is an integer. |
Number | The context value is a number. |
Date | The context value is the date. |
Yes/No | The context value is Yes/No (write - true, false) |
Empty | The context key has no value. |
- | Subtracts 1 from the context value. |
+ | Adds 1 to the context value. |
The third field (3) must contain the required value. If the variable value is defined in entities, insert the @ symbol in the field before its value. You can delete context guidelines and fields by clicking the three dots (4) and selecting "Delete".
Filled in fields can be viewed in the example (Figure 88) of how to save the variable value in context. In the transition from topic "16: Topic" to the state "17: address", the user's intent "Where is the ice cream shop?" (1) is indicated. Since the next state shows a menu that offers the user to specify which of the three shops he wants to visit, a case is also envisaged in which the user will immediately include one of the choice titles in the first question, such as "What is the address of an ice cream shop in Tallinn?", and therefore the information given in the state "17: address" will be of no use to him and thus should not be shown to him. In order to be able to continue with city information, it is already initially stored in the context in case the user mentions it.
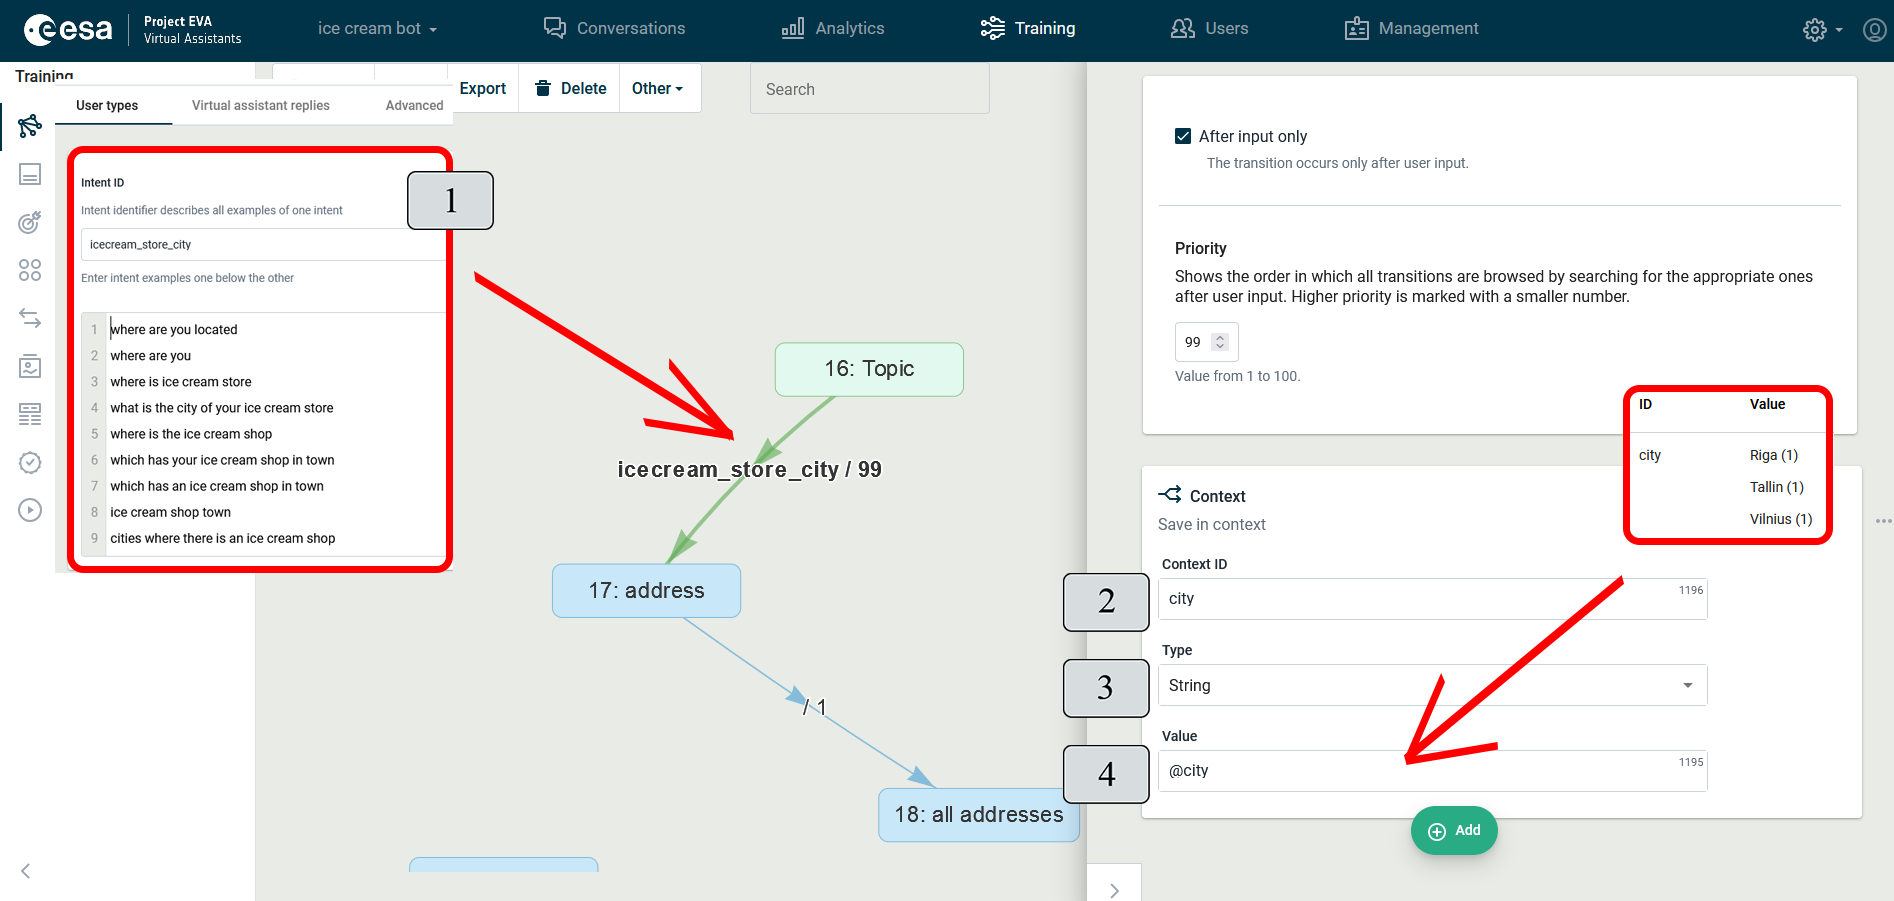
Figure 88. Context Information
The context ID field contains an identifier (2). The context type "String" is selected (3) and in the value field an entity (4) is assigned to the context variable – indicating that the names "Riga", "Tallinn" or "Vilnius" should be stored in the context if the user has mentioned them in his input. The entity "city" has previously been recorded separately with all three values in the view "Entities".
If the transition (in the “Advanced” section) takes any action with context (see Figure 88.1 (2)), you can see it as a visual action icon in the corresponding transition “Virtual assistant replies” section (1).
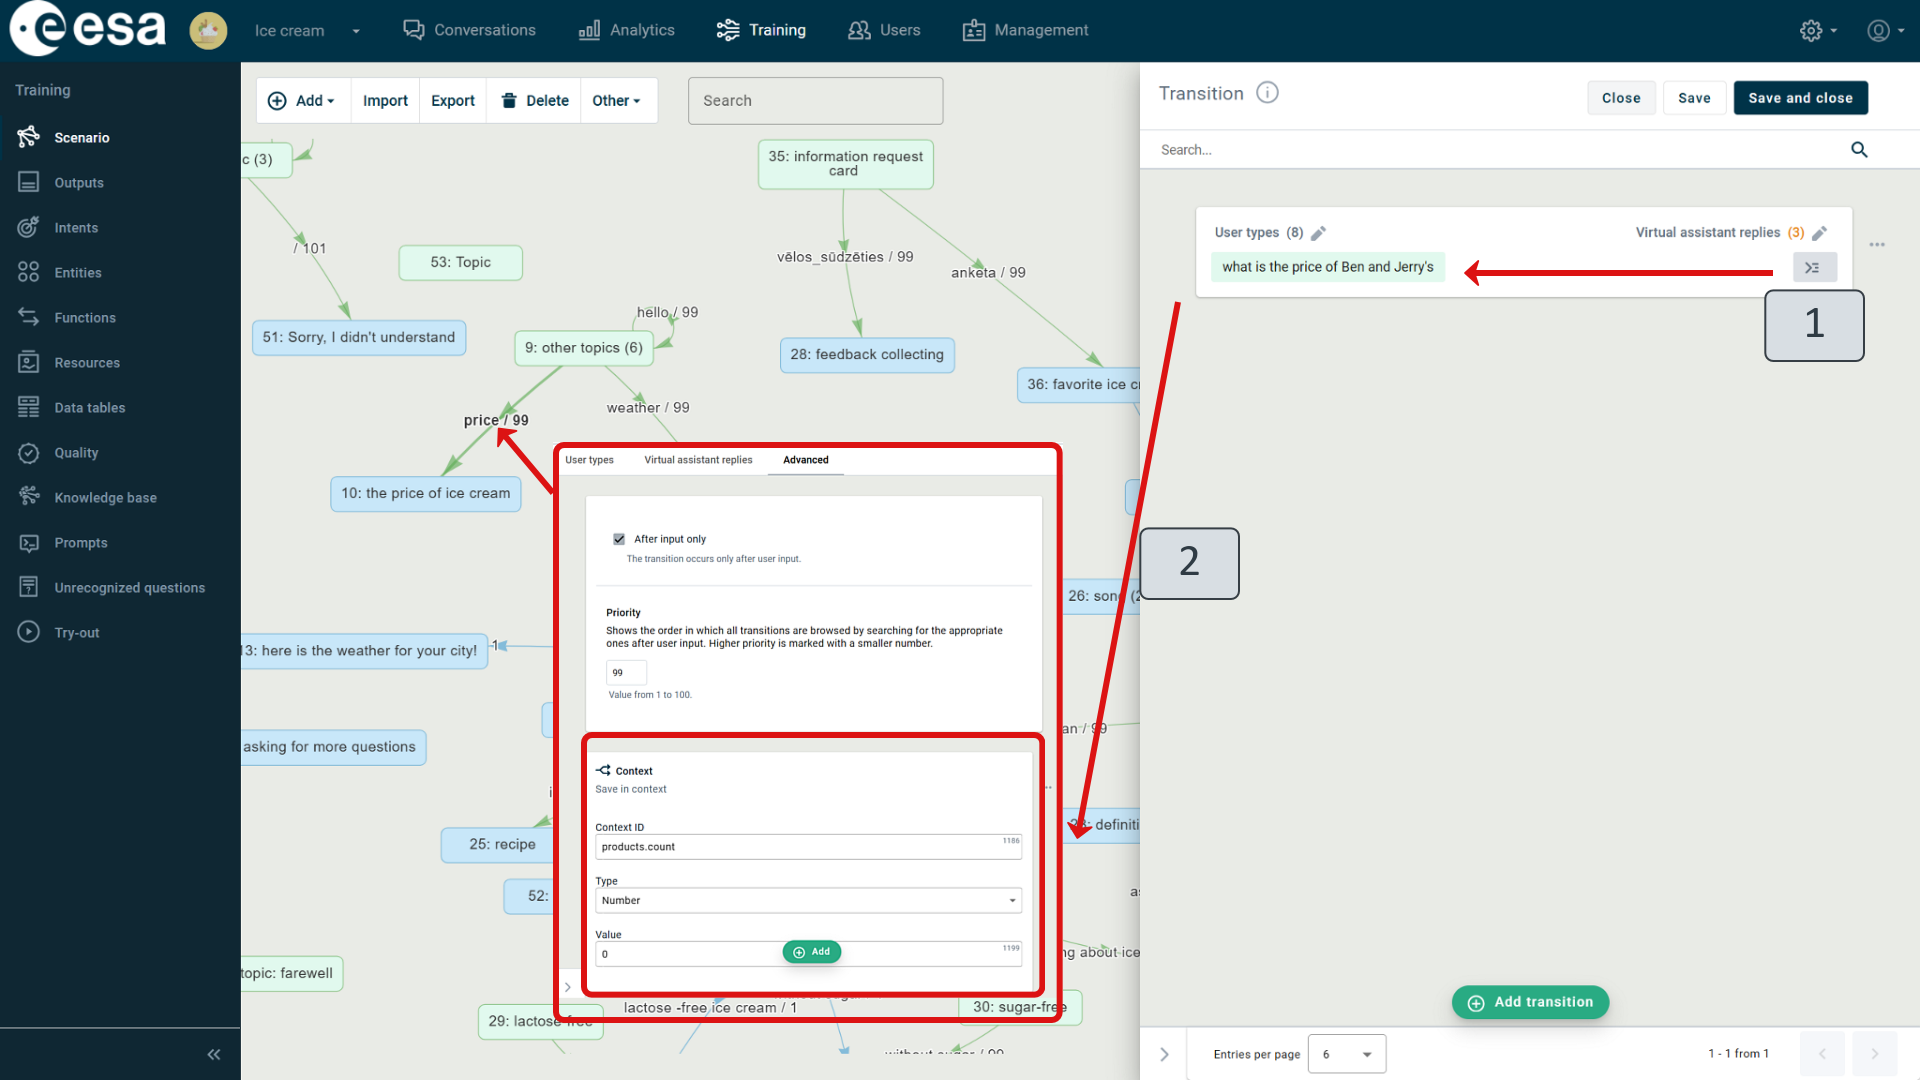
Figure 88.1. Added context icon in transition
In the scenario below, the variable value stored in the context can be used when writing prerequisites (see examples in Chapter "State Editing Window" Sub-chapter "Text") and defining the VA' s answers and other transitions.
When the variable value saved in the context is no longer needed in the outermost scenario, it will be deleted. You can delete a value in both a transition and a state. For information and an example of deleting a variable saved in context in a state, see Chapter "Save in context" Sub-chapter "State Editing Window".
Context variables for handling sensitive information. The VA site includes the ability to define context variables for sensitive information that will only be visible to VA and the user talking to VA. This data will not be visible in the conversation history and will not be available to the bot trainers. The context variable identifier is defined by the prefix "__". A person taking over the conversation can retrieve a pre-defined output (get_client_info_msg) with the desired sensitive information by taking over the conversation and clicking on the "i" icon (Figure 35, 12).
When building a scenario, this output is defined in the Output view by creating a new output with the above identifier and entering the required value. The activity of retrieving sensitive information is logged in the conversation history, so you can see which VA site user requested the data for a particular conversation.
The following example shows that the value of the context variable "__ temp" is not visible in the conversation analysis (Figure 88.2, 1), nor in the output of the particular conversation (2), but when the user himself spoke to the VA, the hidden information - in this case the temperature at the specified location - was visible to him (3). It is also shown that the person who took over the conversation specifically asked to see the user data and received the "get_client_info_msg" output information, which in this case defined the temperature at the specified location, as evidenced by the message "Client info requested" (4).
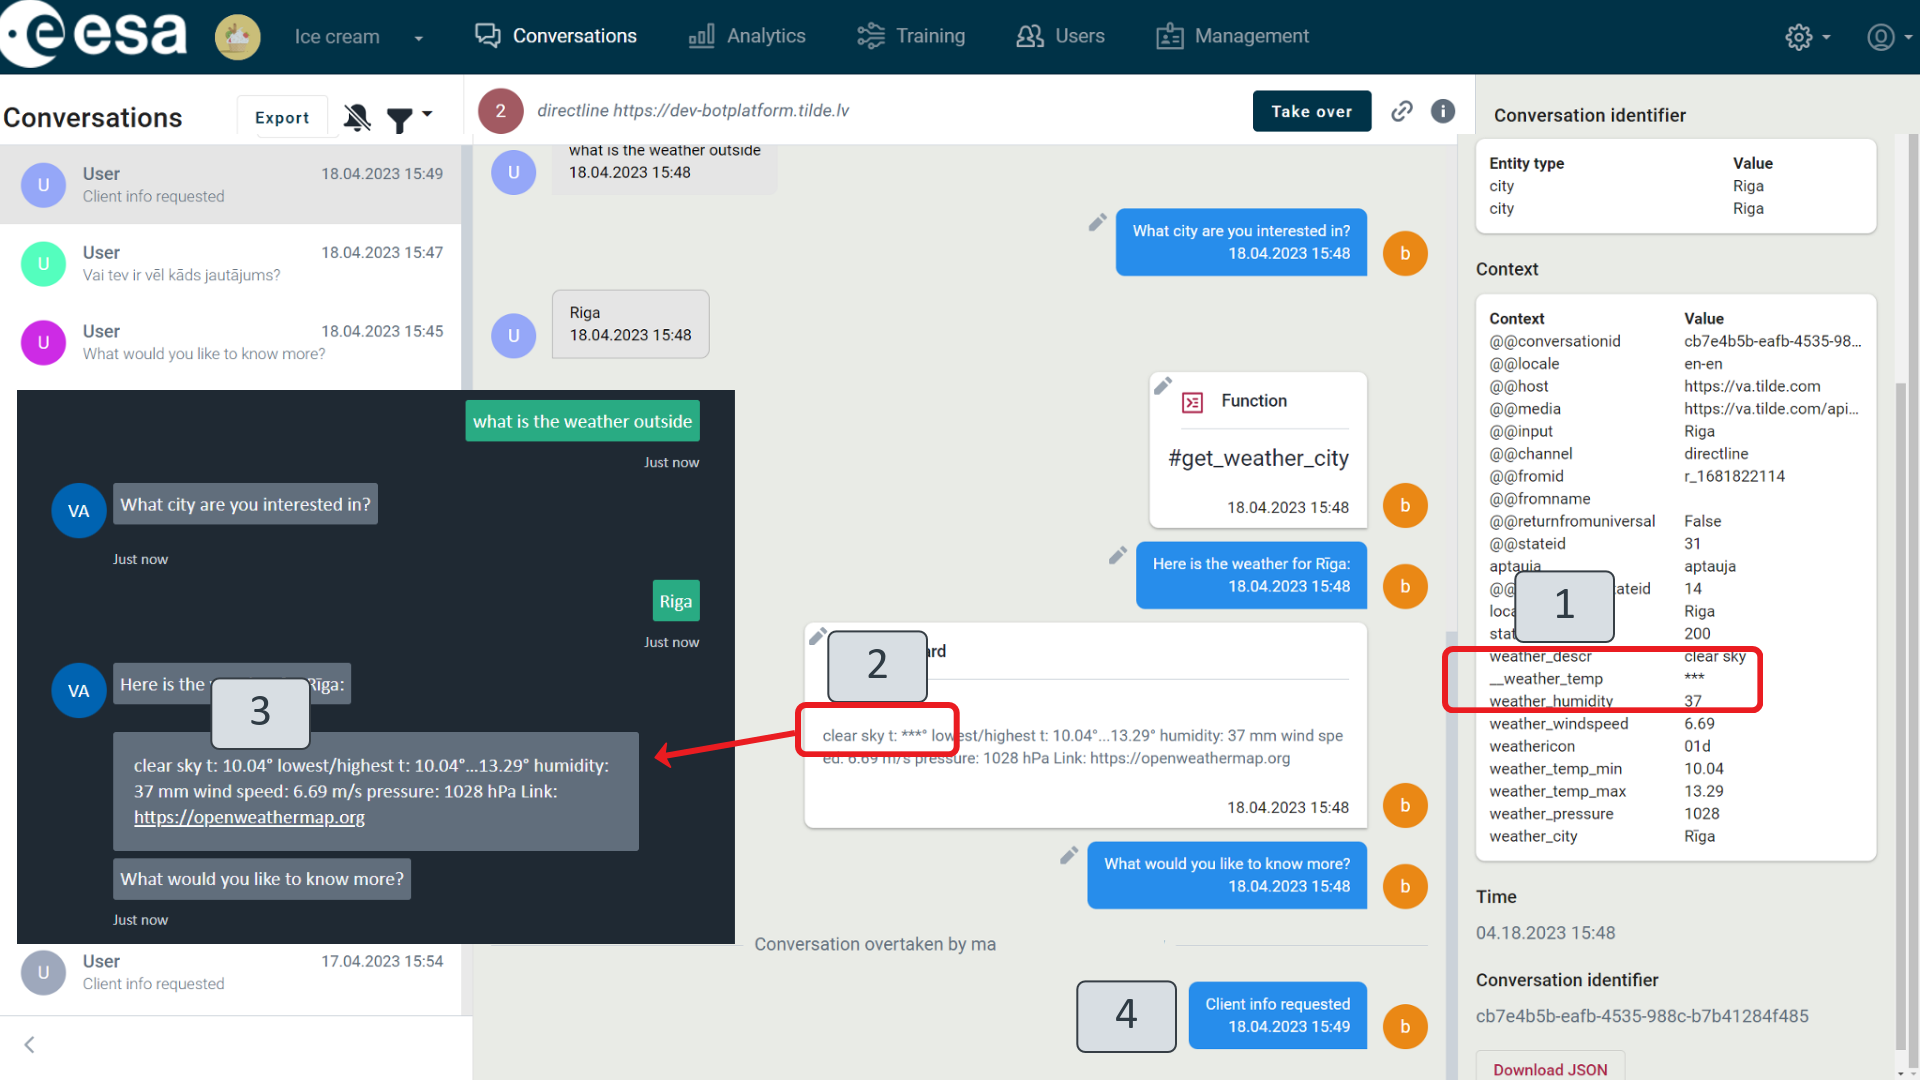
Figure 88.2 Sensitive information in Conversation view
Outputs
The "Outputs" training view (Figure 89) defines all content elements that are used in the virtual assistant's communication with the user: answers, conditions, button titles, and questions for the user. Here you can add new outputs and edit existing ones, as well as review all outputs together in one place, and conveniently translate them into other languages.
If it is planned that the VA will be able to talk to users in several languages, switching language views is at the top of the language view (1), which contains all the available languages. To switch views, you must click on the name of the language you need.
The output view is arranged in four columns: the first contains an output identifier (5), the second indicates the output value (6), the third shows how many times the output is used in scenario (7), while the fourth indicates the state or topic to which the output is added (8). You can easily browse all outputs and find the one you need by typing a word or phrase from the output identifier or value in the search field (4). You can change the number of output entries on the page by clicking the down arrow next to the title “Entries per page” (12). If there are a lot of entries, they are sorted across multiple pages, which can be browsed by clicking the arrow on the right or left next to the number of pages in the bottom right hand corner of the view (13).
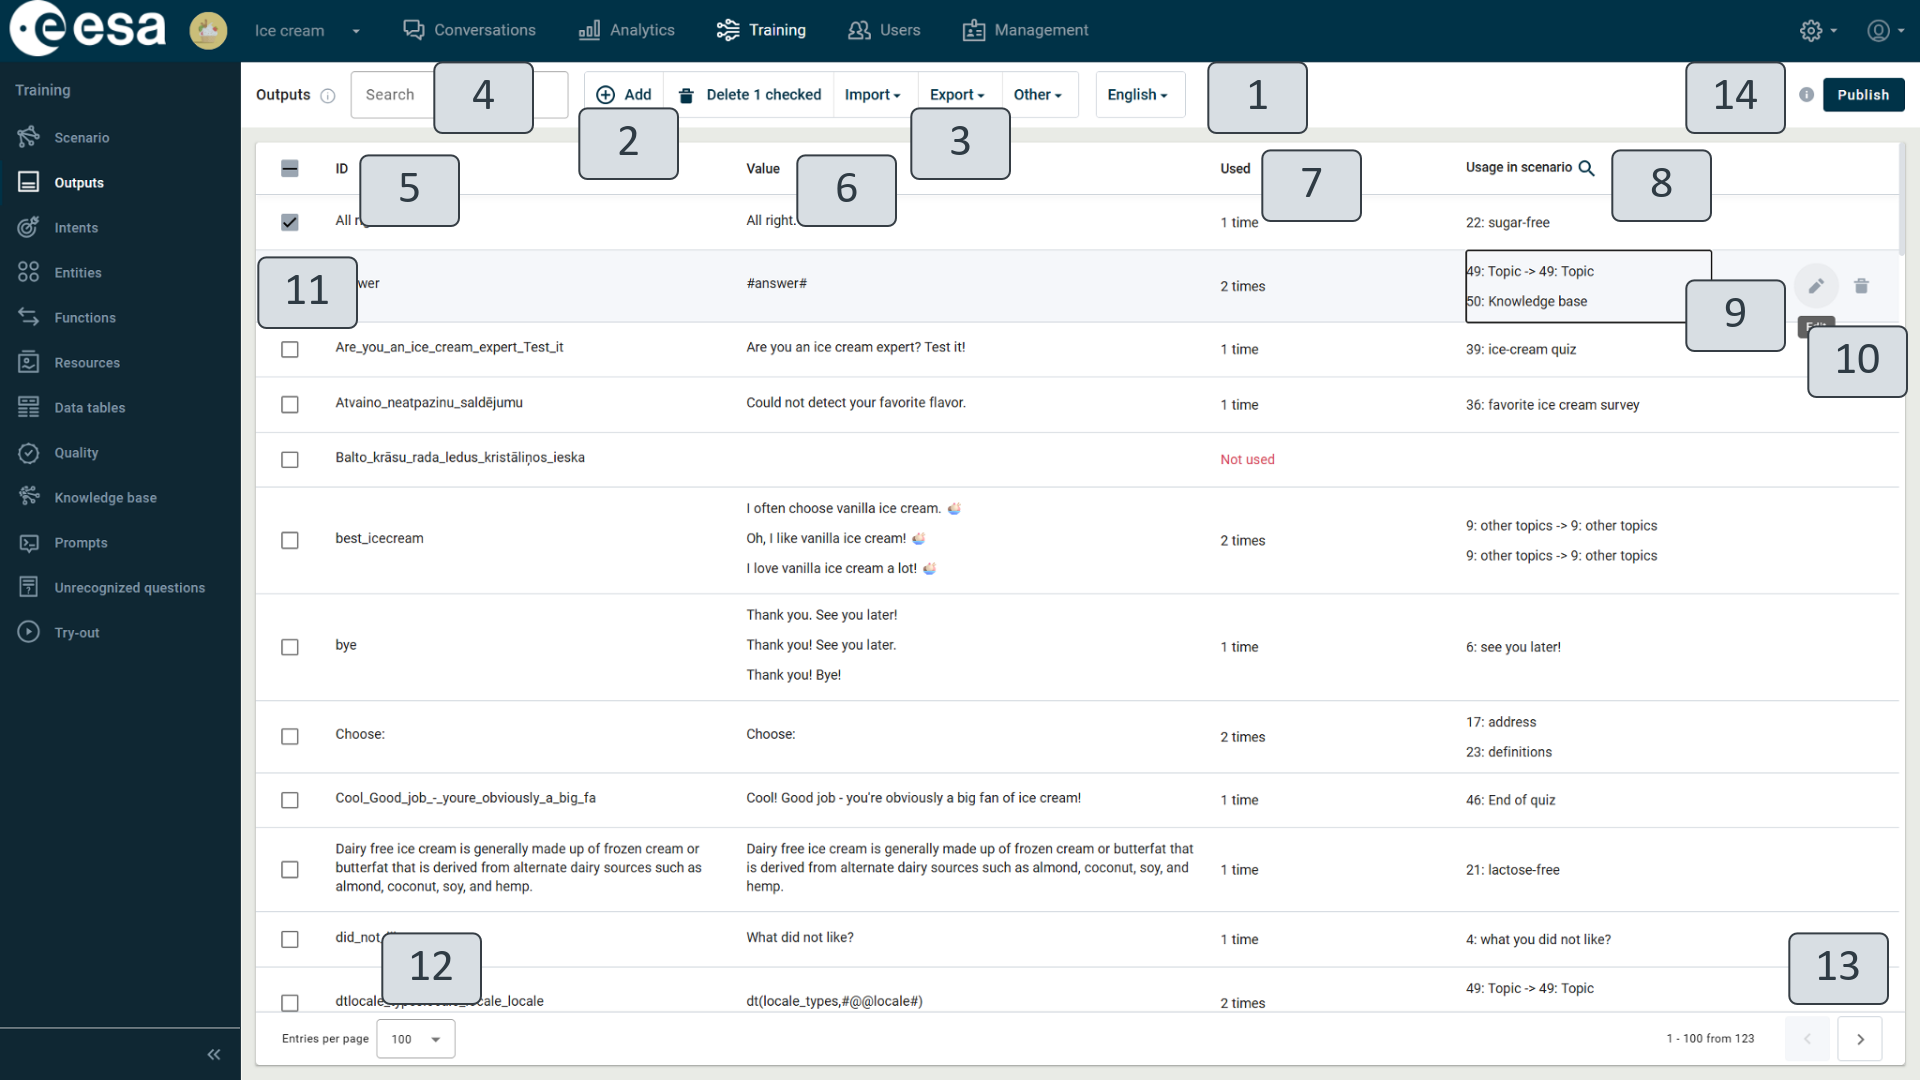
Figure 89. Training View "Outputs"
An existing output can be deleted by clicking the Recycle Bin icon next to the specified output (9), as well as edited by clicking on the pencil icon (10).
Outputs can also be deleted by selecting their checkbox (11) and clicking Delete in the top toolbar.
To insert a new output in the view, click on the "Add" button (2).
In the top right-hand corner of the view (14), a message is displayed to the user informing him that if changes have been made to outputs, which have not yet been published. For them to take effect, the "Publish" button must be clicked.
Output Editing Window
When you click on the "Add" button (Figure 89) (2) or pencil icon (8), the output editing window (Figure 90) appears on the right hand side of the view, in which you can define a new output or correct an existing one.
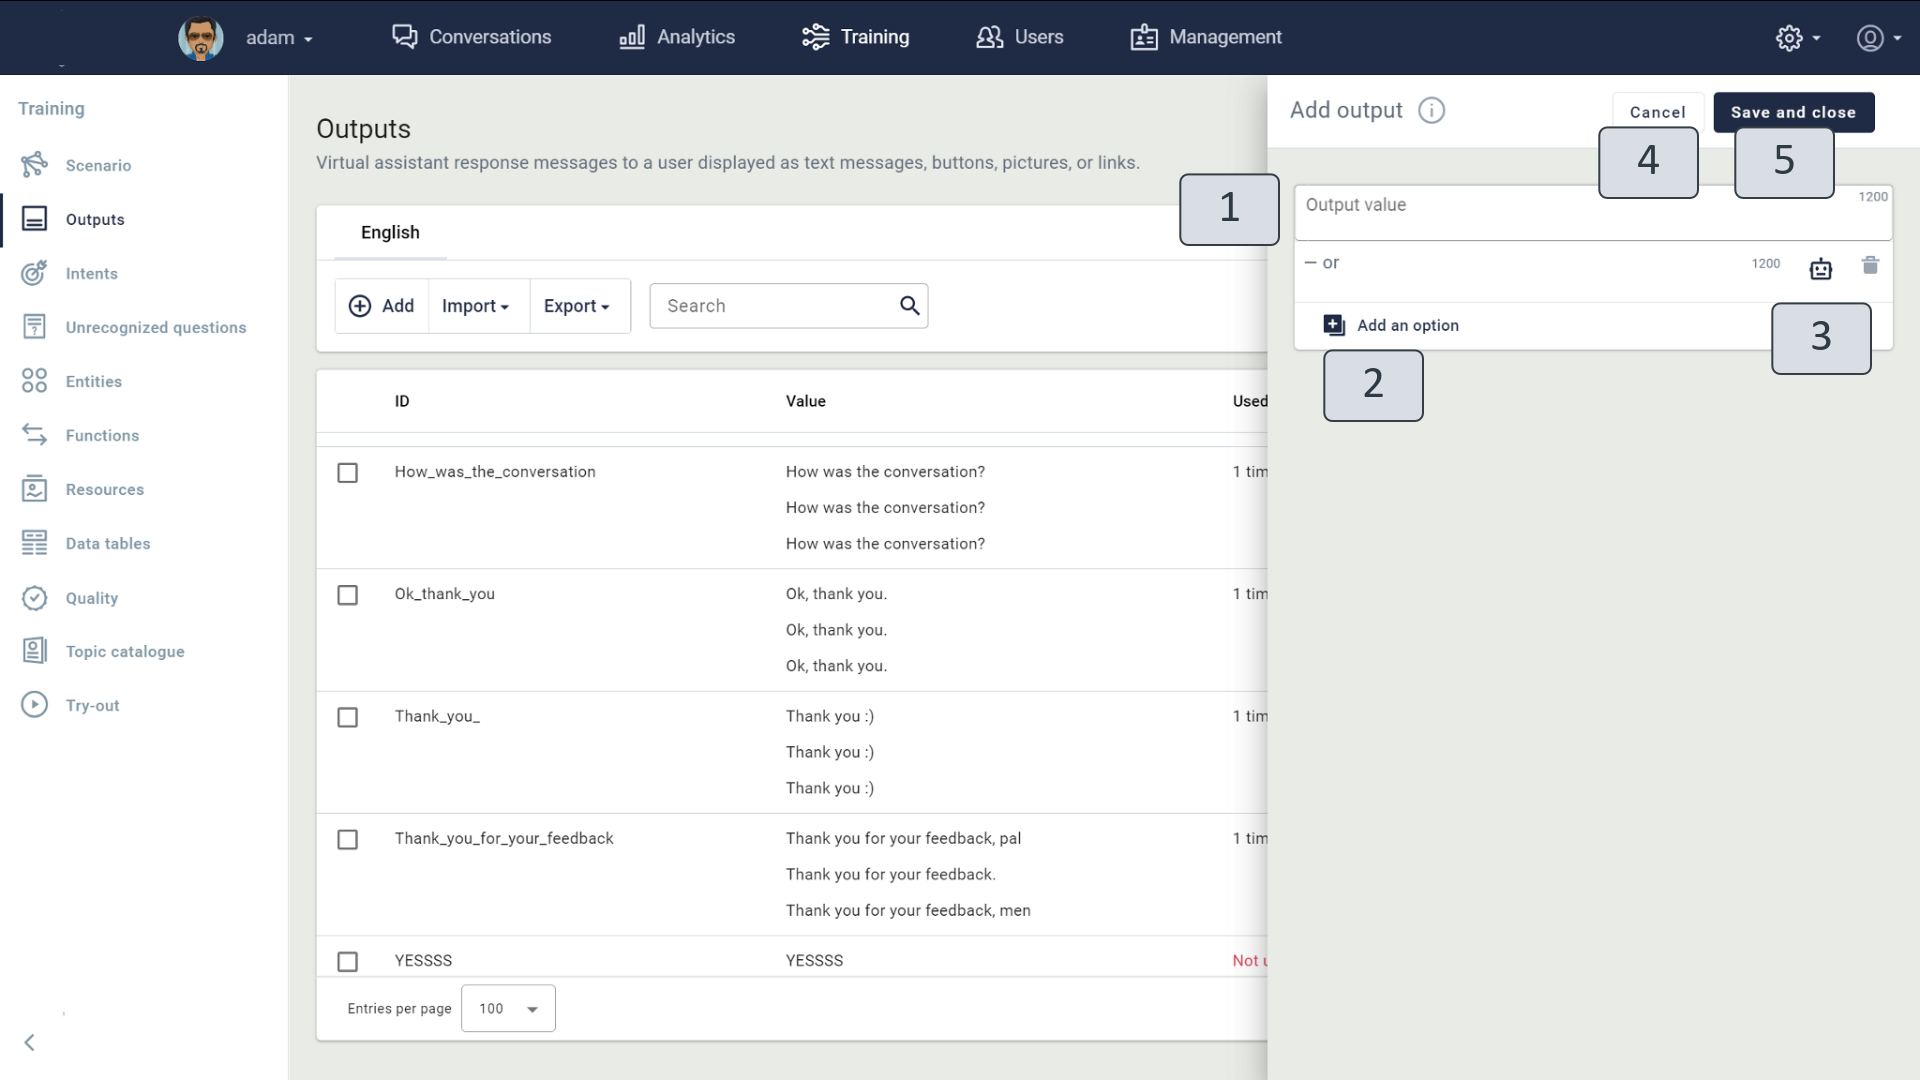
Figure 90. Output Editing Window
In the " Output value" field (1), you must type the VA text for the user. You can also specify options for the output. For example, if the VA assistant is expected to greet the user by saying "Hello!", it will sometimes say "Greetings!", click "Add an option" (2) and specify a second greeting option. If one output has several values or versions, during the conversation the VA will randomly select one of them in answering the user.
It is possible to use the automatic text generation tool to work out the best composition of the output. By clicking on the Rephrase button, you can rephrase the output in 4 different ways - shorter, longer, formal, friendly (3).
When the output is entered, in order to save the changes and close the editing window, click "Save and close" (5). If you click "Cancel" (4), the window will be closed and the changes will not be saved.
Preparing Outputs
In most cases, VA text answers to the user are recorded as normal text.
If the output contains a variable value to be read from the information stored in the context, the #mark shall be inserted in front of it when it is entered.
If the output contains a reference to a data table, it shall be written down as dt(title,parameter), where "title" denotes the title of the data table and "parameter" is the parameter of the data table (see more details in Chapter "Data tables").
Markup is available to indicate a virtual assistant if a specific text or part of it needs to be skipped when replying by voice. If you need a virtual assistant to ignore some part of the text when replying by voice, please enclose this part in braces {}. It will still display a complete text in the try-out window without braces. A virtual assistant will skip this part when using a voice.
In VA output texts, you can highlight individual words or phrases with a special design, e.g. by presenting them in italics or bold. Likewise, you can also neatly design lists, display links and include pictures in the answer text (see Table 8. Text Formatting).
Table 8. Text Formatting
Purpose | Method | Display |
italic | *text* |
|
bold | **text** |
|
bold italic | ***text*** |
|
unsorted list | * text (only in action "Text"; for new line click Shift+Enter) |
|
sorted list | 1. text (only in action "Text"; for new line click Shift+Enter) |
|
stripe | This is the text. |
|
link | [link](http://bing.com) |
|
picture link |  |
|





Importing and Exporting Outputs
The "Outputs" training view also includes an import and export function (Figure 89) (3) that is especially useful when working with a set of texts, reviewing it and preparing it outside the VA management site or with another VA.
Data can be imported and exported in two formats:
- XLSX (for editing and data preparation outside the VA management site);
- JSON (for data transfer to another VA).
When you import data, you are prompted to choose one of two options:
- "Replace" - delete and replace all existing outputs with new, imported ones;
- "Add" - all existing outputs are saved and imported one are added to them.
You can also list all output data from outside the VA management site in the XLSX file, and then import it into the VA output view. When preparing the data, the data must be filled in the first two columns of the table: the first must indicate the output identifier, opposite, in the second, the value should be indicated. See the example below (Figure 91).
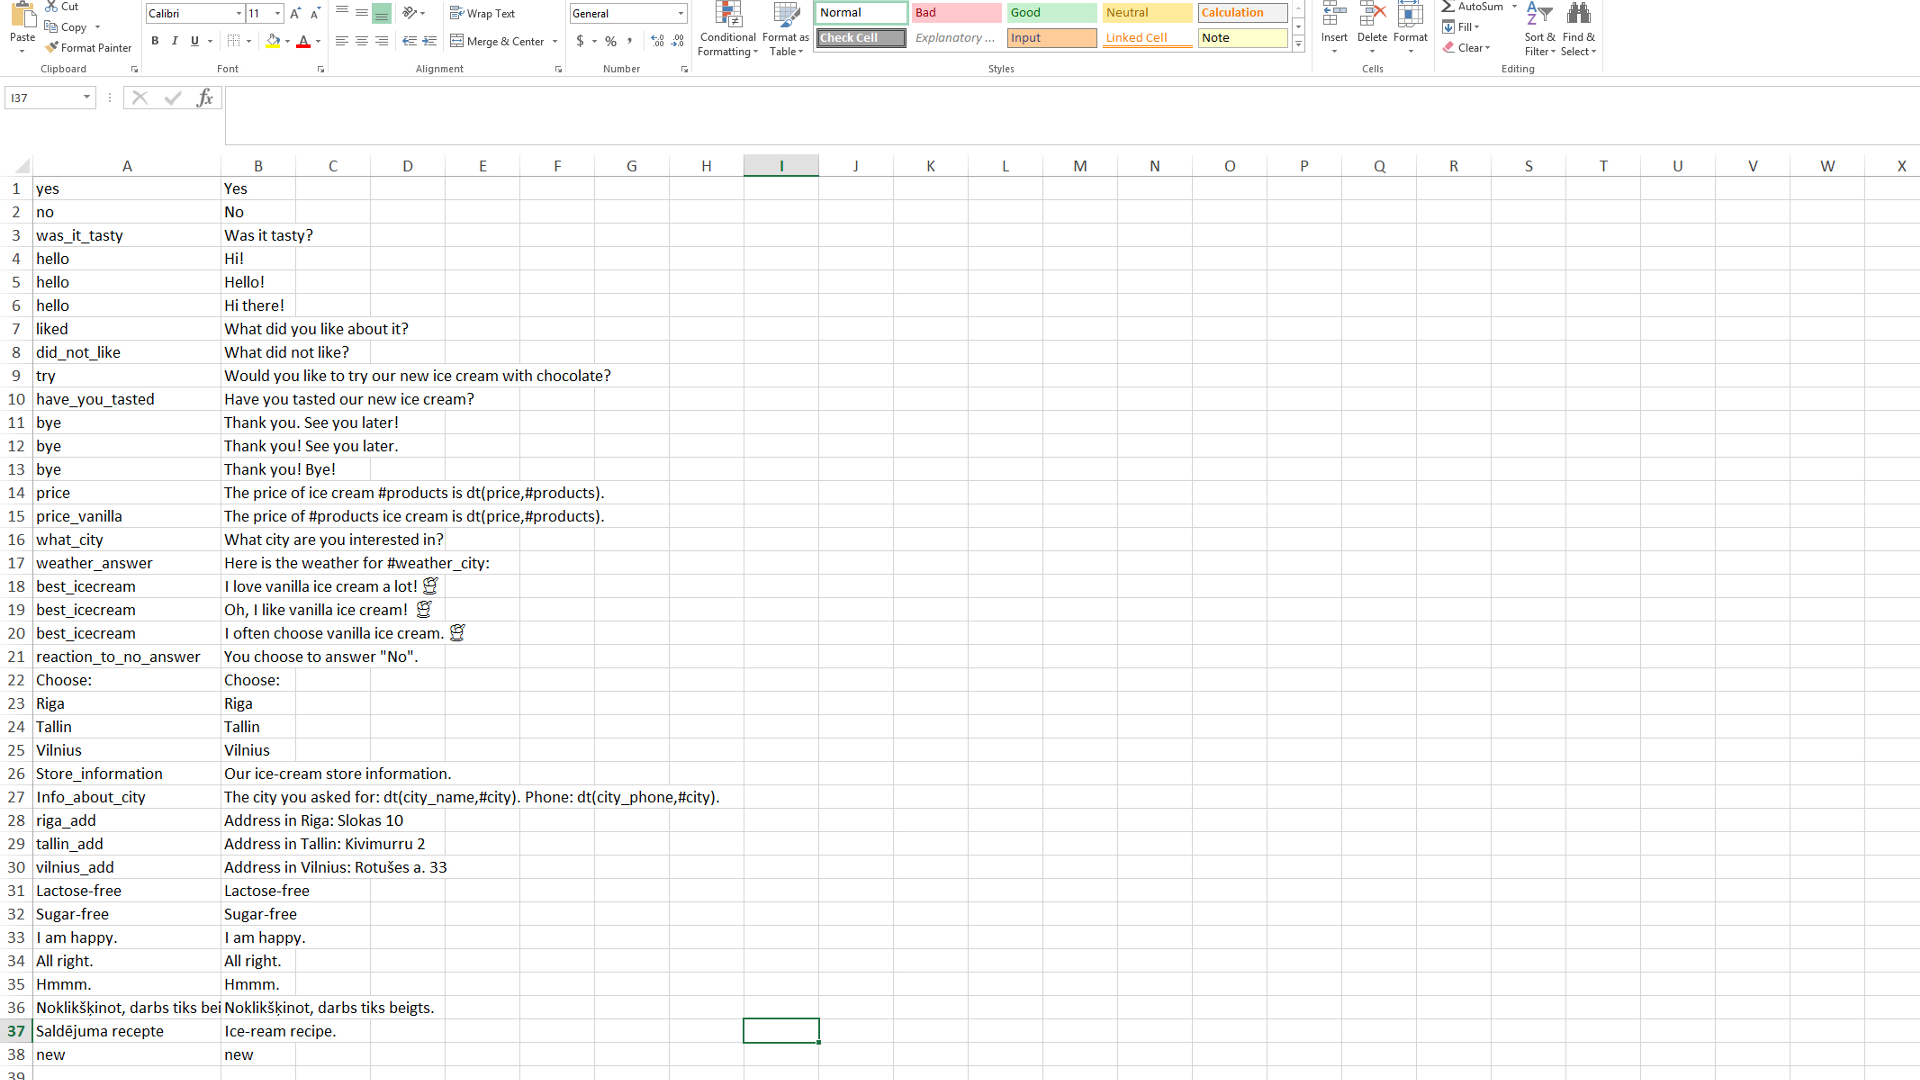
Figure 91. Output Table
Intents
In the "Intents" training view (Figure 92), you can easily browse and edit all the intents of that are used in the training of a natural language understanding model and which a virtual assistant can answer, as well as add new intents.
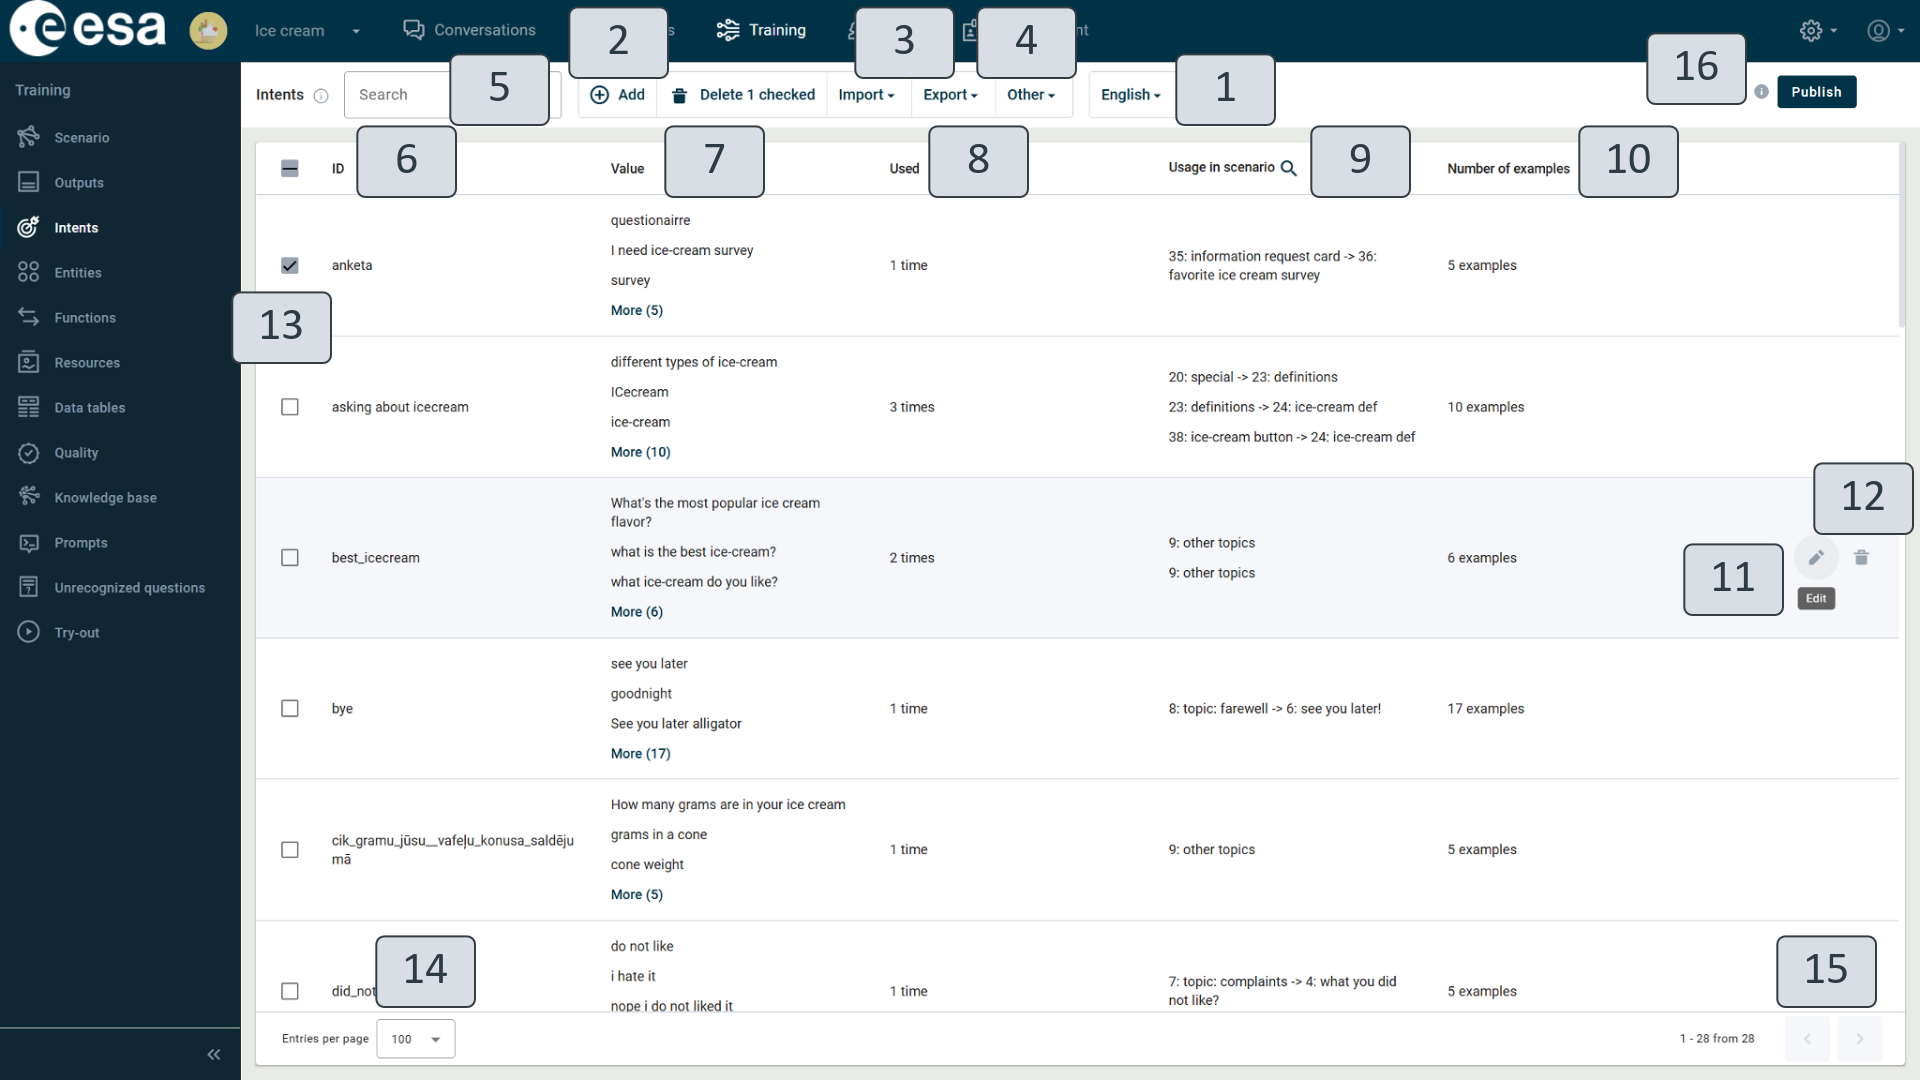
Figure 92. Training View "Intents"
If it is planned that the VA will be able to communicate with users in several languages, switching language views is at the top of the intent view (1), which contains all the available languages. To switch views, you must click on the name of the language you need.
The intents in the view are arranged in five columns: the first with the title "ID" contains an intent identifier (6); the second with the title "Value" is made up of all the intent examples (7); the third with the title "Used" indicates the number of times a scenario uses the intended intent (included in transitions) (8); the fourth with the title "Usage in scenario" indicates the intended transition and connected states (9); while the fourth entitled "Number of examples" shows the number of examples under the intent in question (10).
You can browse and find what you want for all intents by typing a word or phrase in the search field (5) from the intent identifier or example to be found. You can change the number of intent entries on the page by clicking on the downward arrow next to the title "Entries per page" (14). If there are a lot of entries, they are sorted across multiple pages, which can be browsed by clicking the arrow on the right or left next to the number of pages in the bottom right hand corner of the view (15).
An existing intent can be deleted by clicking the Recycle Bin icon next to the specified intent (12), as well as edited by clicking on the pencil icon (11). Intents can also be deleted by selecting their checkbox(13) and clicking Delete in the top toolbar.
To insert a new intent in the view, click on the Add button (2).
In the upper right-hand corner of the view (16), a message is displayed to the user if you have made changes for intents but they have not yet been published. For them to take effect, the "Publish" button must be clicked.
Intent detector test. To test how good the intent detector understands the phrase and recognizes the entities, use intent detector test. When you click "Other" (Figure 92) (4), an intent detector test is available. Type the phrase or word you want in the text field (Figure 93) (1), and click "Test" (2). An intent detector sends the response: what are the most likely intents for the phrase and their confidence (3), or if the phrase contains any entity (4).
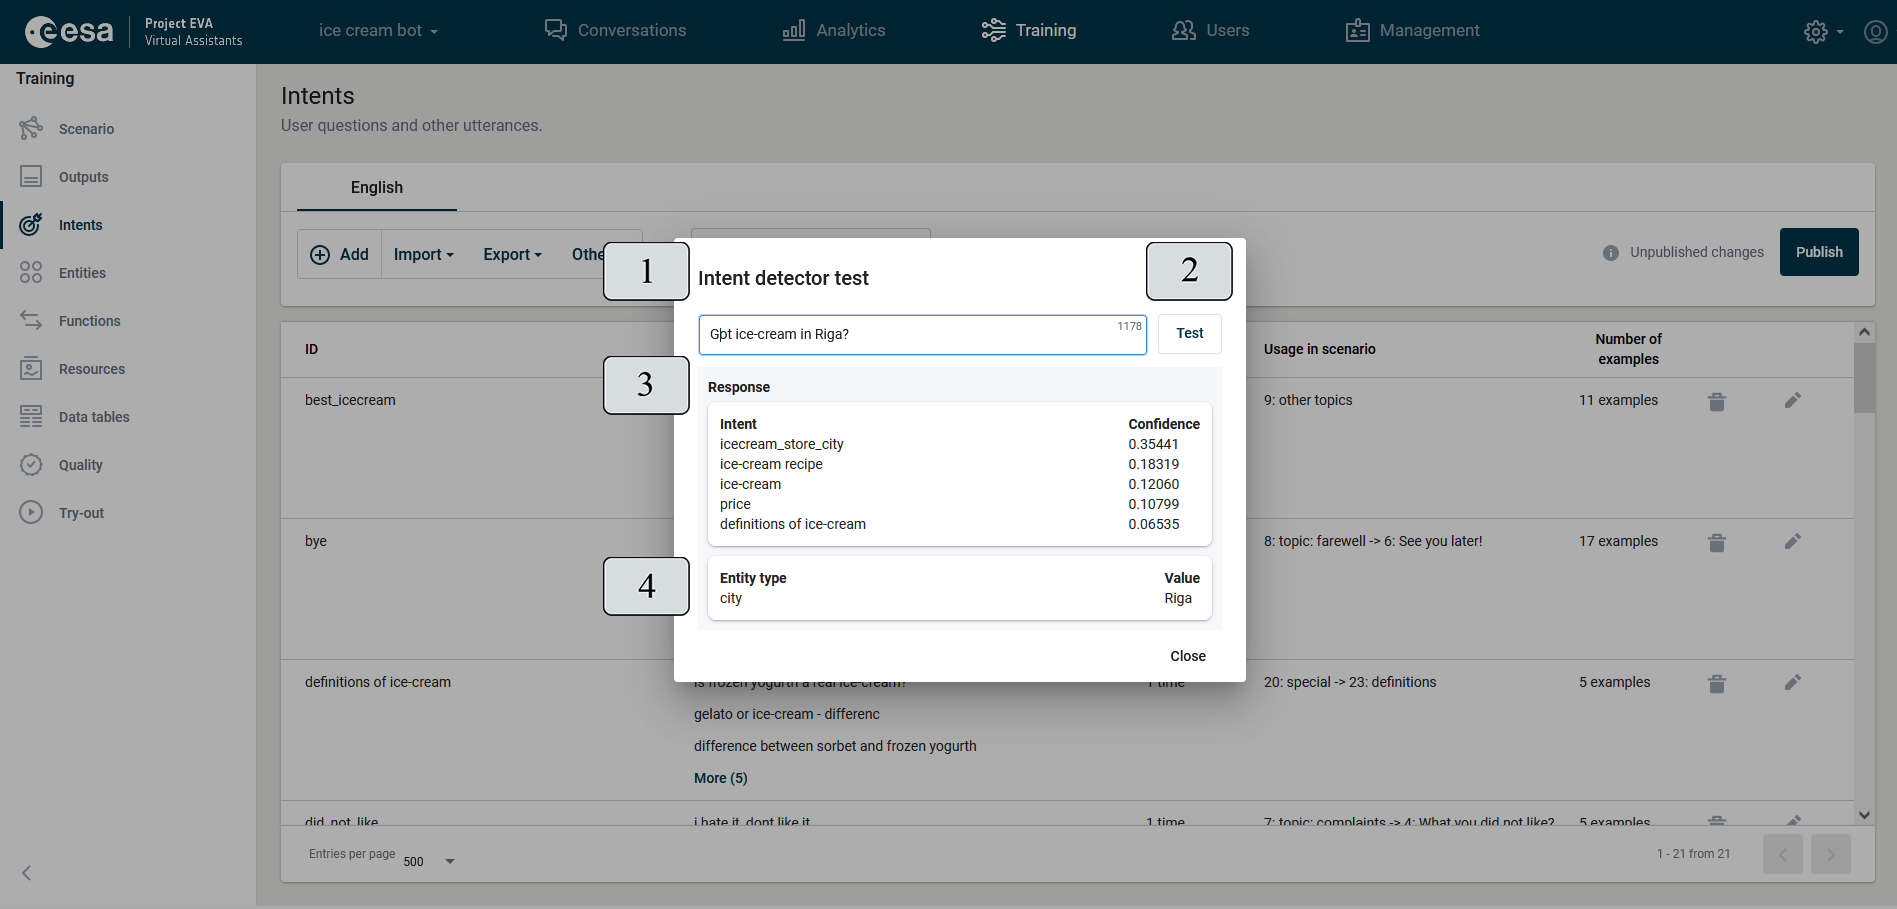
Figure 93. Intent Detector Test
Intent Editing Window
When you click the "Add" button (2) or pencil icons (12) (Figure 92), the intent editing window (Figure 94) appears on the right hand side of the view, in which you can define a new intent or edit an existing one.
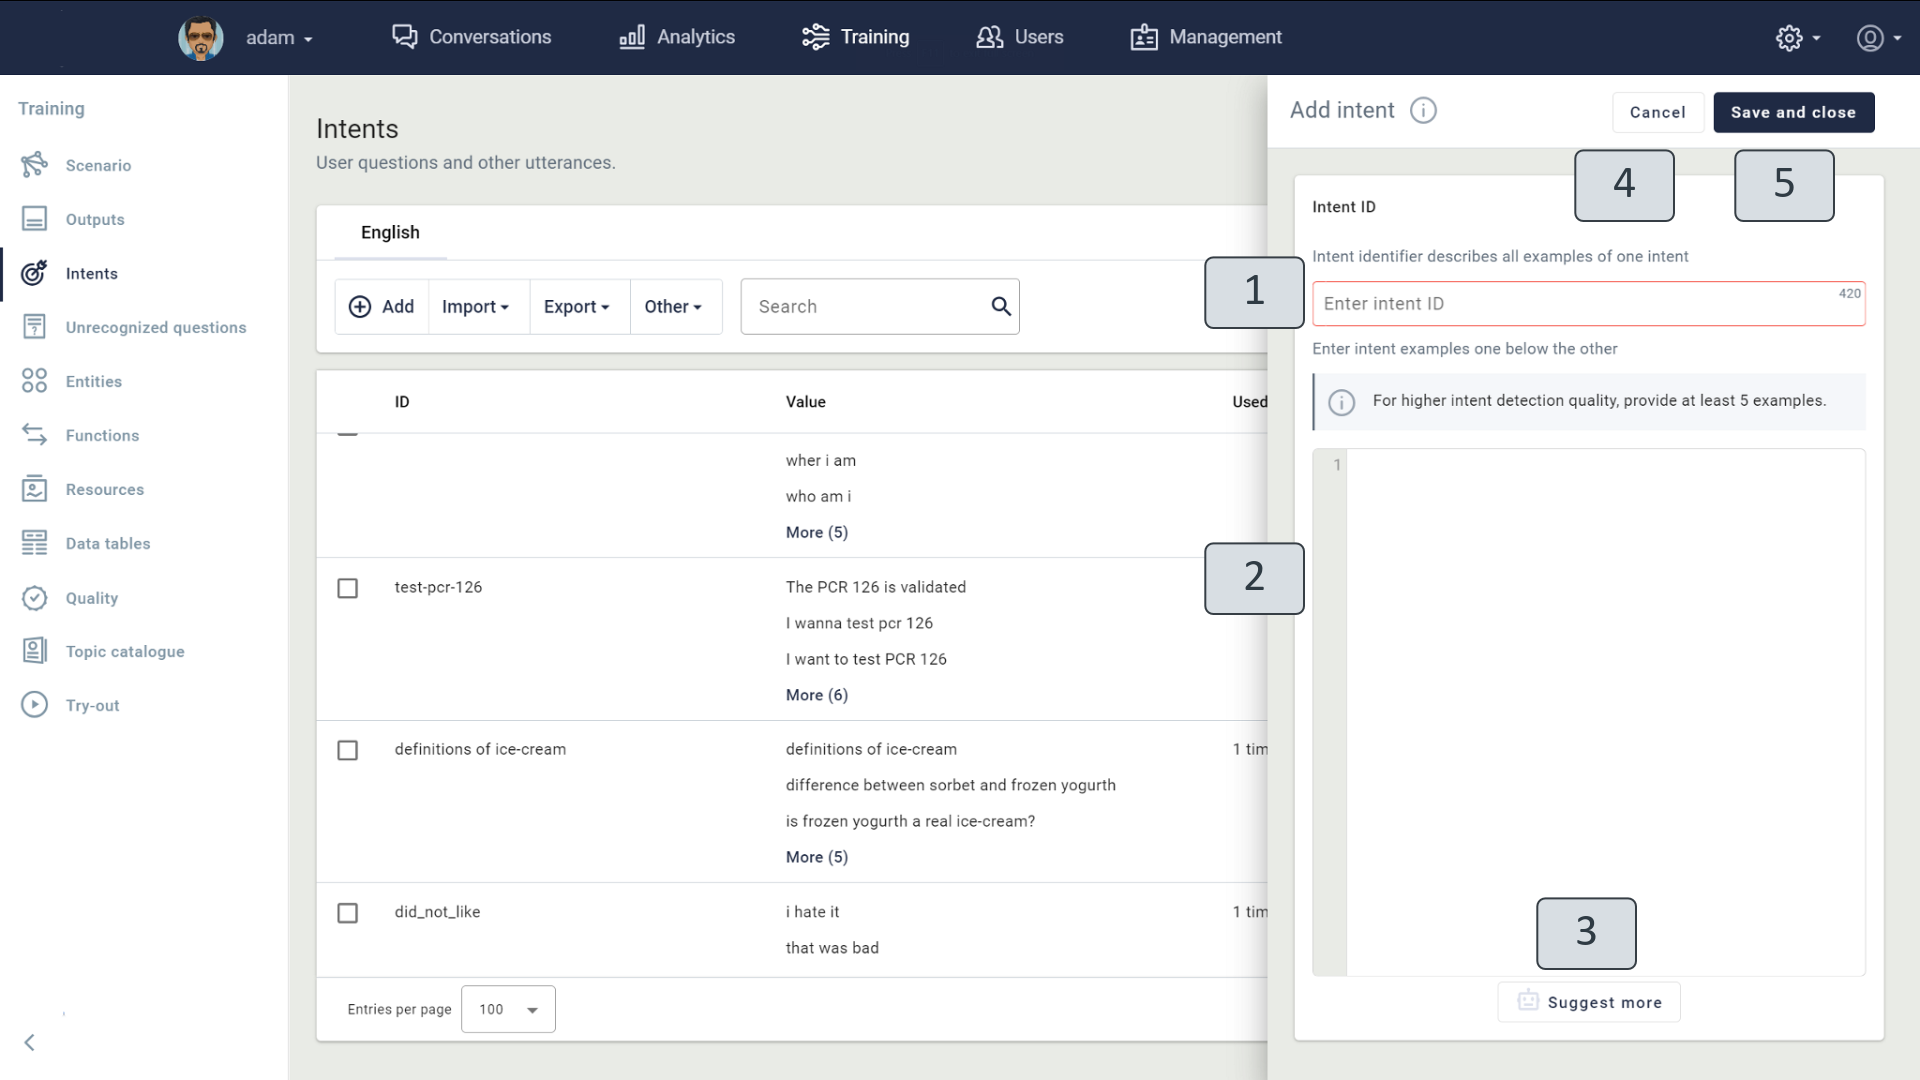
Figure 94. Intent Editing Window
In the "Enter intent ID" (1) field, enter the intent identifier, the name or word connection that describes the whole set of examples referred to hereinafter. All intent examples must be listed in the large field (2). At least five examples should be provided for each intent in which case the training of the natural language understanding model will be successful.
To speed up the process of creating intent examples, you can use the automatic text generator tool. By clicking "Suggest more" (3), the other five intent examples will be created automatically. You can modify them later to suit your needs.
When the intent is recorded with examples, in order to save changes and close the editing window, you must click "Save and close" (5). If you click "Cancel" (4), the window will be closed and the changes will not be saved.
Importing and Exporting Intents
Data used in the training of the understanding of the natural language can be easily imported and exported (Figure 92) (3), allowing the use of pre-prepared data and easily transferring information created elsewhere on the VA management site.
Data can be imported and exported in two formats:
- XLSX (for editing and data preparation outside the VA management site);
- JSON (for data transfer to another VA).
When you import data, you are prompted to choose one of two options:
- "Replace" - all existing intents to be deleted and replaced by new, imported ones;
- "Add" - all existing intents are saved and imported ones are added to them.
You can also list all intent data from outside the VA management site in the XLSX file, and then import it into the VA intent view. When preparing the data, they must be filled in the first two columns of the table: the first must indicate the intent identifier, while opposite, in the second, the intent example should be specified. See the example below (Figure 95).
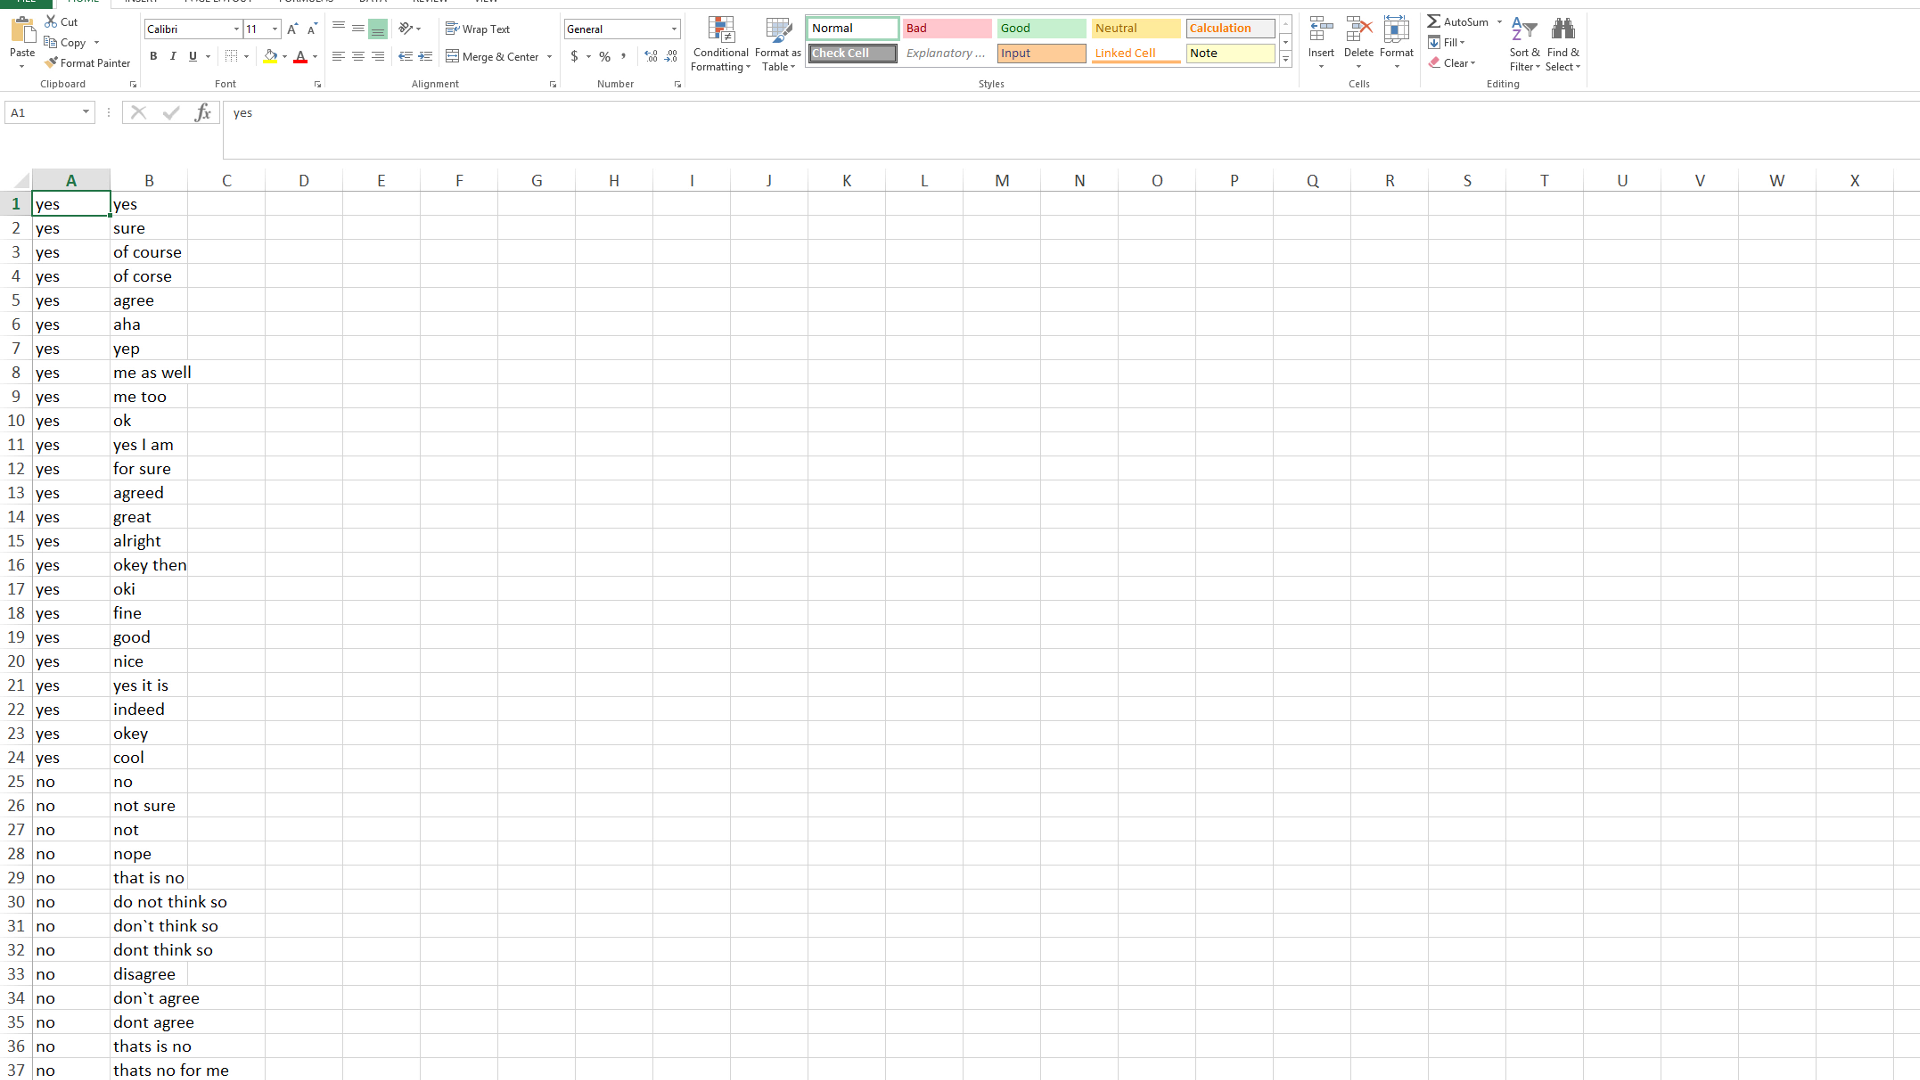
Figure 95. Intent Table
Entities
The training view "Entities" (Figure 96) contains all specific text values that are recognizable from the user input and should be worked on in a scenario.
These consist of names, addresses, numbers, phone numbers, e-mail addresses, dates, times, cities, postal indices, codes and web addresses, etc.
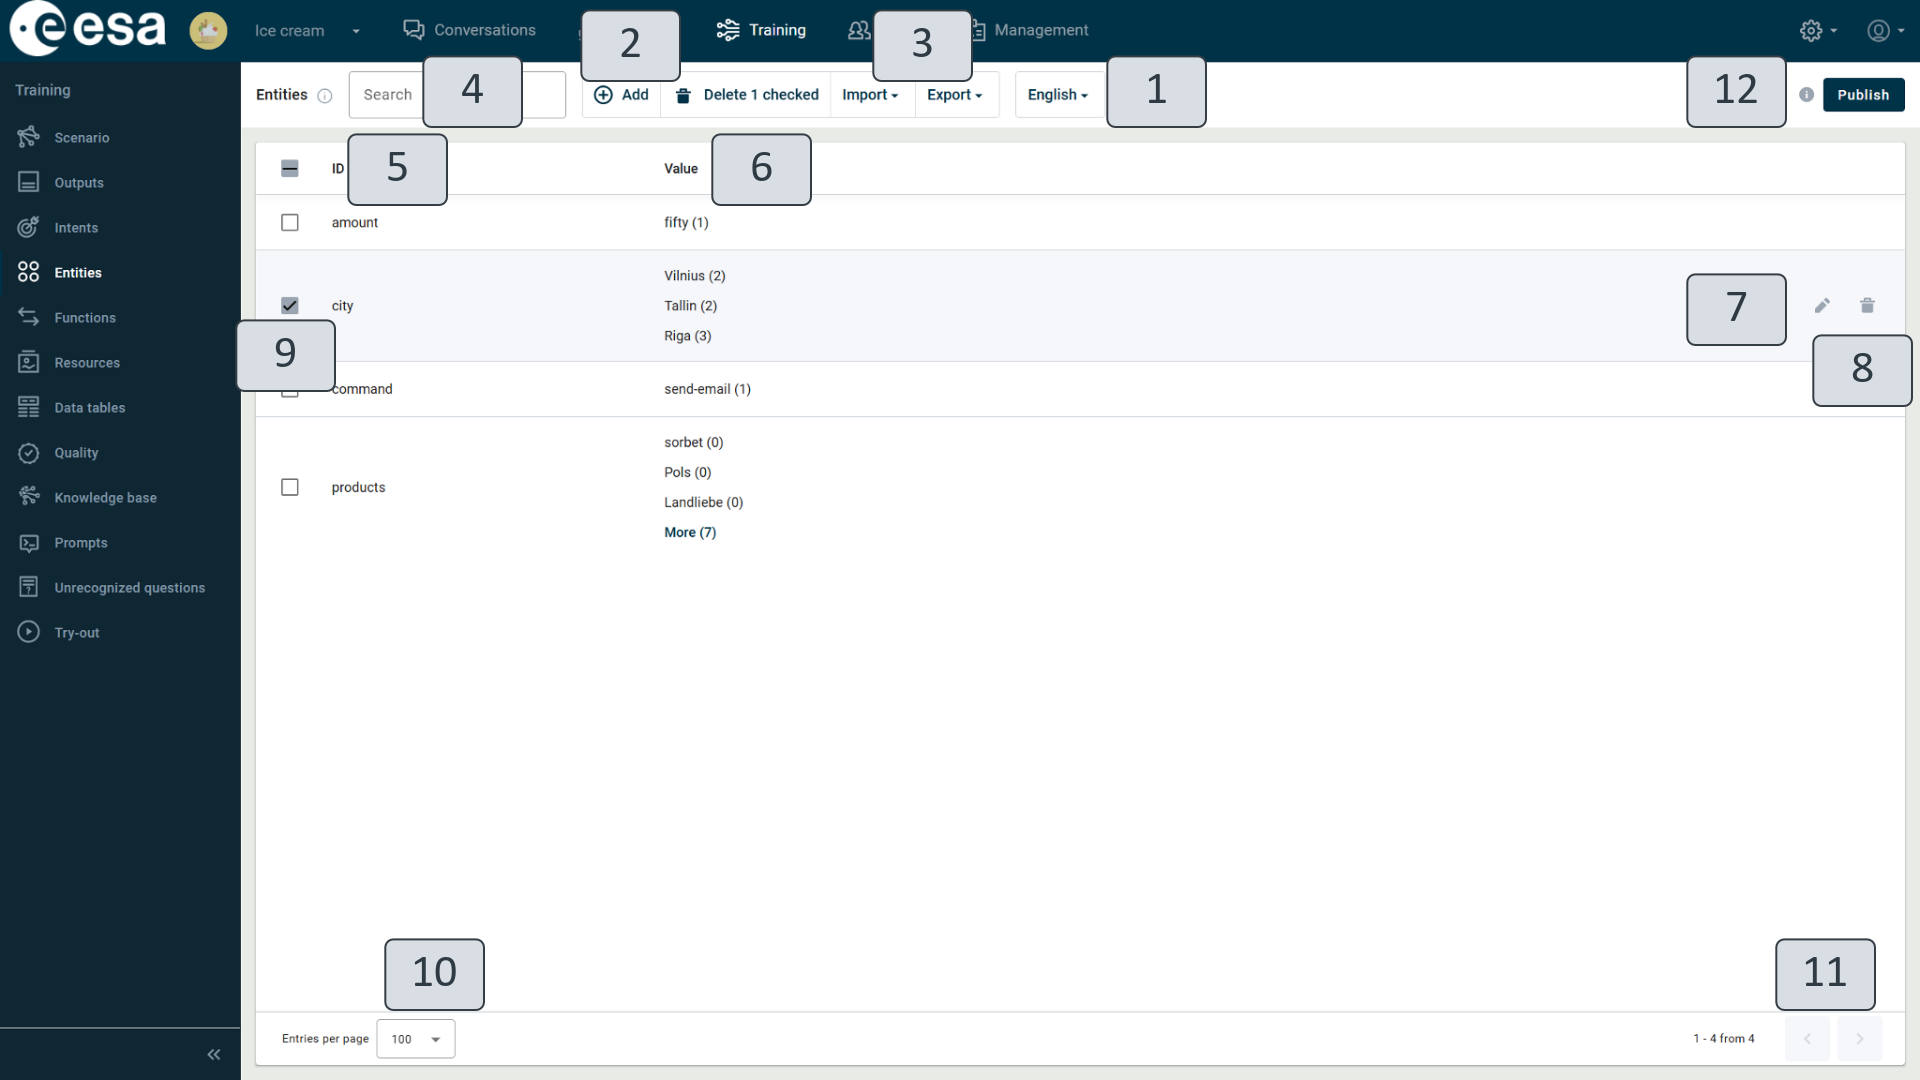
Figure 96. Training View "Entities"
If it is planned that the VA will be able to communicate with users in several languages, switching language views is at the top of the intent view (1), which contains all the available languages. To switch views, you must click on the name of the language you need.
In the entity view, two columns are arranged: the first with the name "ID" contains an entity identifier (5); the second named "Value" contains all relevant entities and their values (6). You can browse and find what you want for all entities by typing a word or phrase in the search field (4) from the entity identifier or example to be found. You can change the number of entity entries on the page by clicking on the downward arrow next to the title "Entries per page" (10). If there are a lot of entries, they are sorted across multiple pages, which can be browsed by clicking the arrow on the right or left next to the number of pages in the bottom right hand corner of the view (11).
An existing identity can be deleted by clicking the Recycle Bin icon next to the specified entity (7), as well as edited by clicking on the pencil icon (8). Entities can also be deleted by selecting their checkbox (9) and clicking Delete in the top toolbar.
To insert a new entity in the view, you must click on the "Add" button (2).
All entity data can be exported and imported (3) in JSON format. When you import entities, you are prompted to choose one of two options:
- "Add" - all existing entities are saved and imported ones are added to them;
- "Replace" - delete and replace all existing entities with new, imported ones.
In the top right-hand corner of the view (12), a message is displayed to the user informing him that if changes have been made to entities, but these have not yet been published. For them to take effect, the "Publish" button must be clicked.
Entity Editing Window
When you click on the "Add" button (2) or pencil icons (8) (Figure 96), the entity editing window (Figure 97) appears on the right-hand side of the view in which you can specify a new entity or correct an existing one.
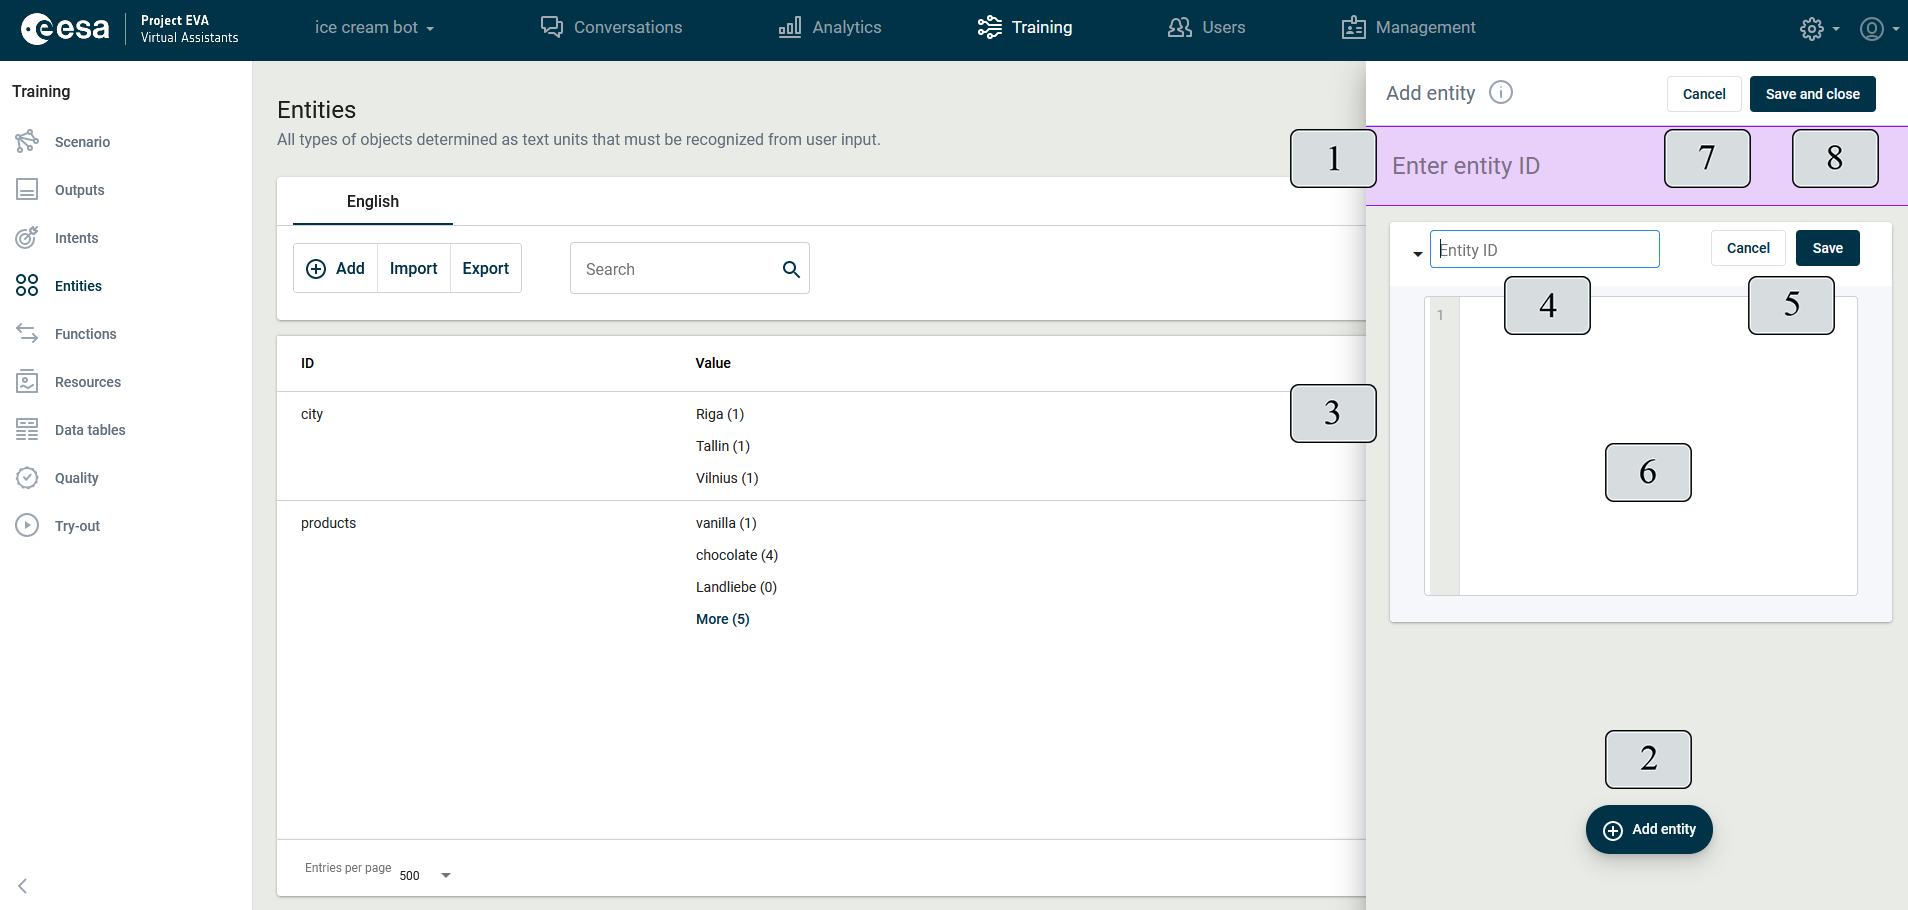
Figure 97. Entity Editing Window
In the "Enter entity ID" (1) field, you must type an entity identifier, a title that describes all of the entities referred thereafter and their text values.
In order to link specific entities to a certain identifier, you must click on the red "Add entity" button (2). Clicking opens the edit window for the individual entity (3). In the "Entity ID" field (4), type the title of the individual value of the entity. In the large field (6), you must type the values of the text that characterizes the entity, how this entity will be searched for in the user's text (for example, "Tallinn", "Estonian capital"). When you analyze user input, you see the precise matching of text, so when you type "Tallinn", you will find all the names "Tallinn", "Tallinn's", etc. In the entry describing the text value of the entity, regular expressions may also be used. When you click "Cancel" or "Save" (5), your changes will be cancelled or saved accordingly, and the individual entity window closed.
You can add as many entities as required to the specified group of entities, which is designated with the same identifier. When the entity identifier has been defined with all values, in order to save changes and close the editing window, you must click "Save and close" (8). If you click "Cancel" (8), the window will be closed and the changes will not be saved.
You can see an example (Figure 98) of entities already recorded in the form of an expanded text value window for one entity. The entity identifier is "city" (1), which combines three entities: Riga, Tallinn, Vilnius. Each of the entities is visible in its field (2). Clicking the arrow to the right next to the name of the entity opens the separate entity window, where you can view the specific values of the entity text (3).
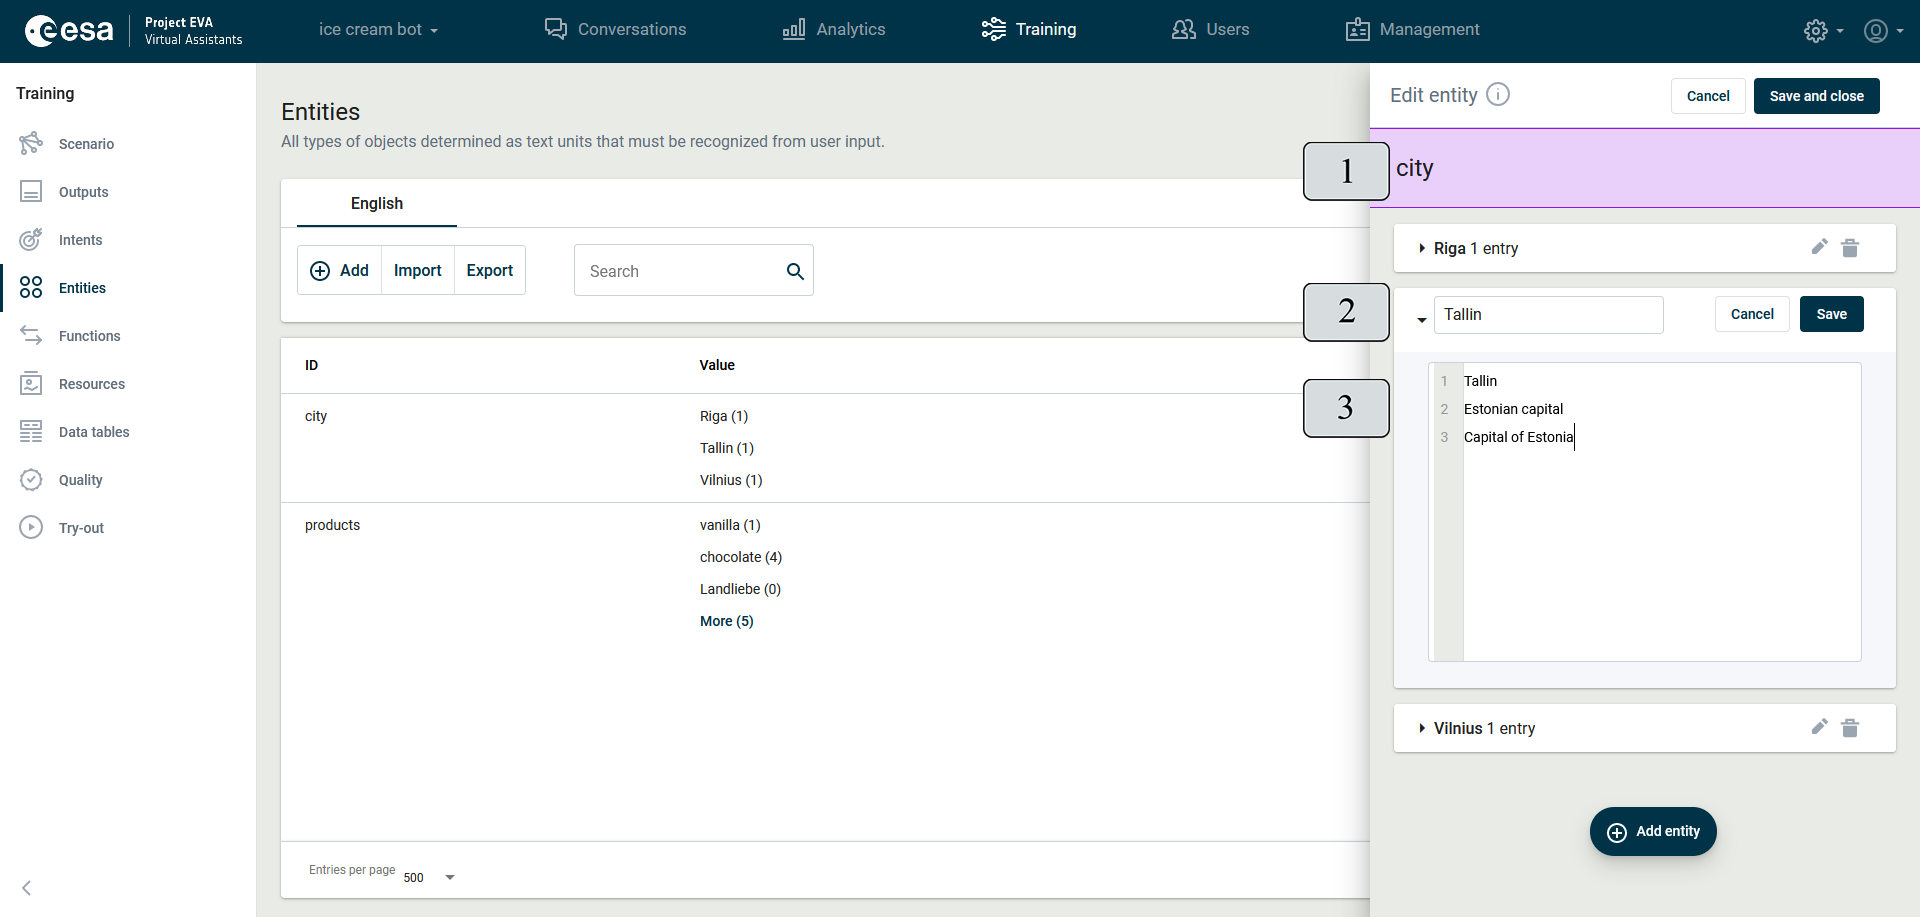
Figure 98. Example of "city" entity
Entity array
In some scenarios, it is necessary to detect not only one but more entities of the same type in single user input. For example, if a user mentions several codes at once for further clarification of information or asks about the location of multiple objects in one question.
Multiple entities of the same type are processed and saved in context as an array. The variable values saved in the context are countable. It is possible to refer to them by adding the number sign # in the output before the context identifier. This retrieves the first value saved. You can also refer to the first value by mentioning a zero: #context ID[0], where “context ID” is the specific context variable identifier. To refer to the other values the following numbers are successively written - “context ID[1]”, “context ID[2]”, and so on. In output with the wording #context ID.count, you can show the count of variables saved.
For more details, see the next picture with the example of the entity array. The user wants to find out the price for several types of ice cream in one question (1): The virtual assistant must save all names in context and respond to the user.
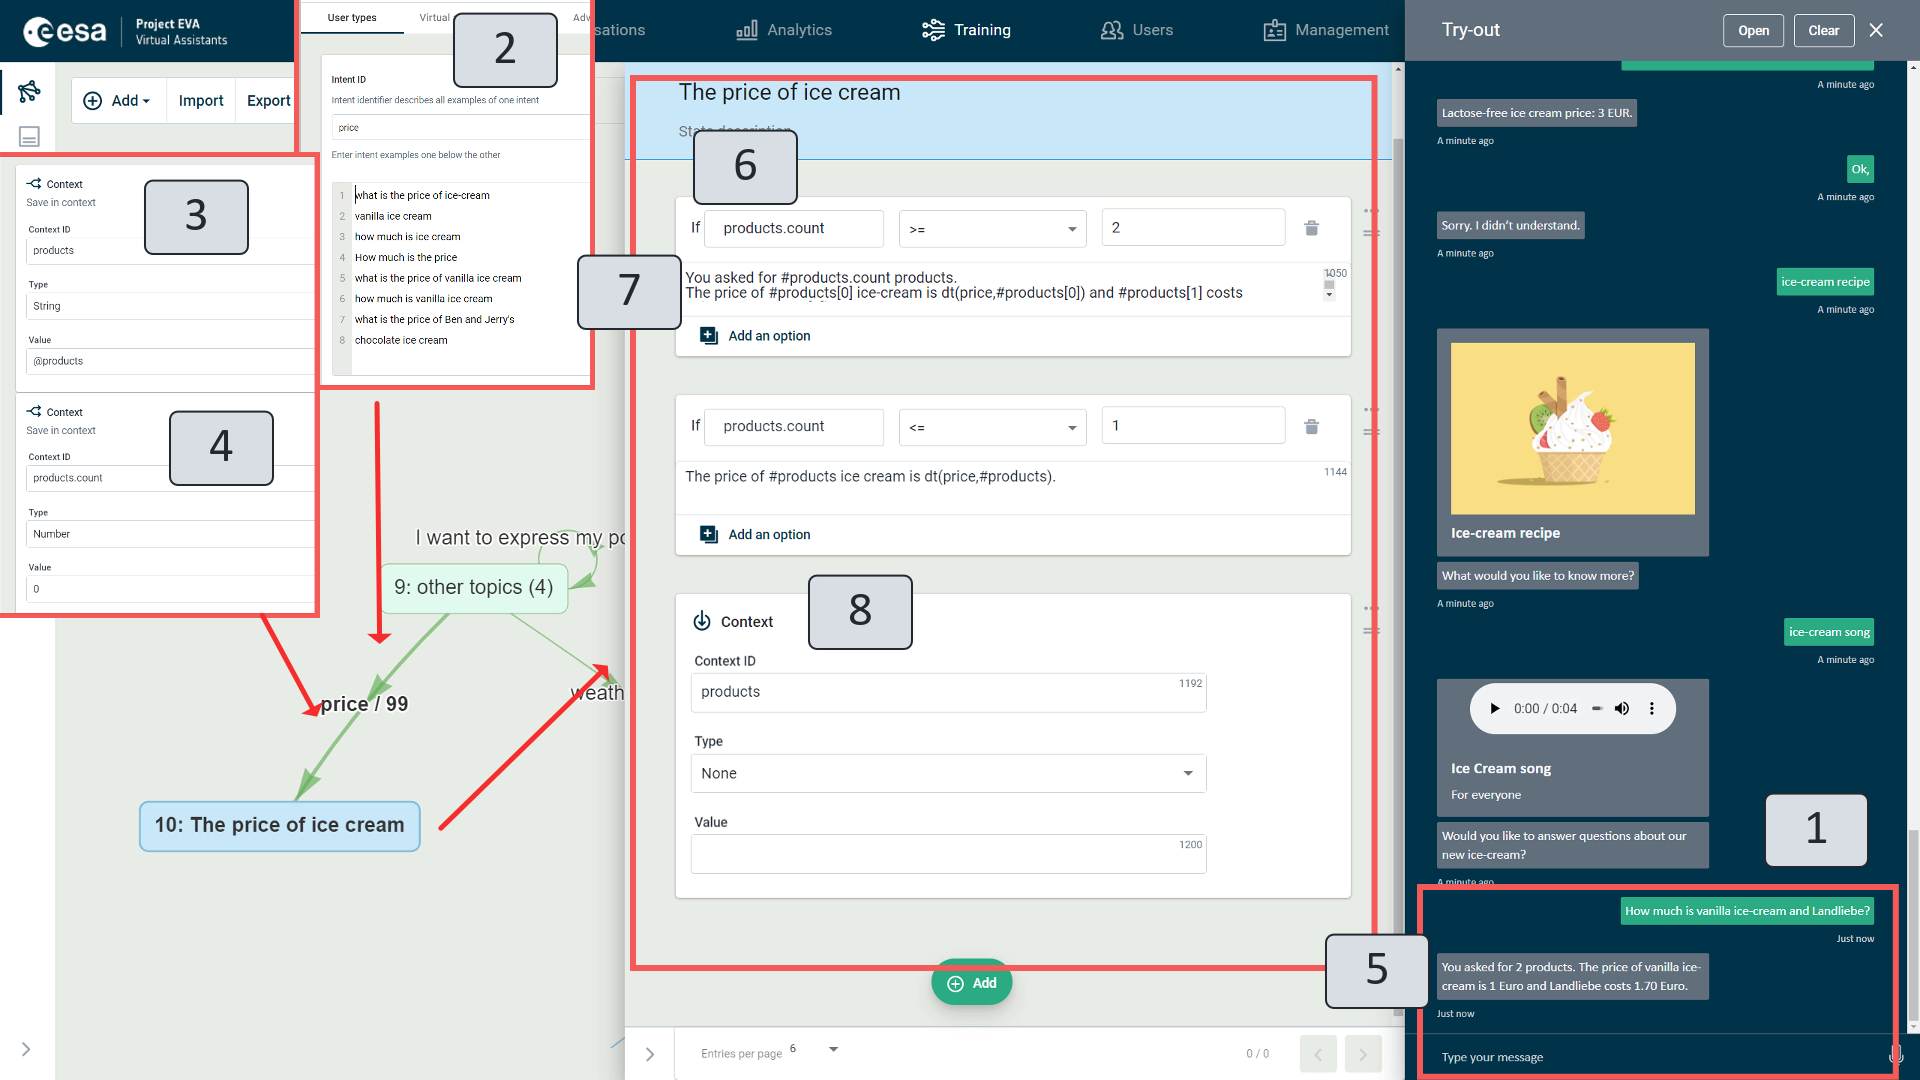
Figure. Entity array
The scenario transition indicates the desired intent (2) about the price. The section "Advanced" of the same transition saves the variable value with the identifier “products” (3) in context, which is the ice-cream names mentioned by the user. Here you can also use a 'count' parameter to define the specific answers later, so the variable identifier “products.count” (4) is also mentioned in the context.
The state shows the answers: the first prerequisite defines that if the user has mentioned more than two variable values in the conversation (6), it will display this answer; the second prerequisite shows the second answer when the user asks the price for one ice cream.
Special syntax is used for extracting ice cream names saved in the context:
#products.count - 2 (the count of ice cream names in user input)
#products[0] - vanilla (the first ice cream name saved in the context)
#products[1] - Landliebe (the second ice cream name saved in the context)
When a virtual assistant responds to the user, you can delete the information saved in the context (8).
Functions
The "Functions" training view (Figure 99) defines VA actions by connecting external processes, such as software interfaces (APIs) that are not in the VA's knowledge information. This entails reading different information from an external resource: weather conditions, exchange rates, distances between cities, translation, etc.
Websites provide both free-access APIs (https://public-apis.xyz/, https://openweathermap.org/current, etc.) and paid ones.
External functions also include the ability to call scripts. It is usually used for processing of various context variables: if two context variables should be interchanged, information in the context replaced with new information or if the context variable should be processed in any other way to use it later during a conversation.
In function view, you can add new functions (1), import and export (2) them in JSON format. When you import functions, you are prompted to choose one of two options:
- "Add" - all existing functions are saved and imported ones are added to them;
- "Replace" - delete and replace all existing functions with new, imported ones.
If there are several functions, use the search field (3) to find what you need.
The functions are arranged in two columns: the first contains the function identifier (4), while the second specifies the value (5). You can delete a function that has already been defined by clicking on the Recycle Bin icon (6), or correct it by clicking on the pencil icon (7). Functions can also be deleted by selecting their checkbox (8) and clicking Delete in the top toolbar.
You can change the number of function entries per page by clicking on the downward arrow in the lower left-hand corner of the window (9), and flipping the page if there are several of them in the bottom right-hand corner (10).
In the top right-hand corner of the view (11), a message is displayed to the user if changes have been made to functions, which have not yet been published. For them to take effect, the "Publish" button must be clicked.
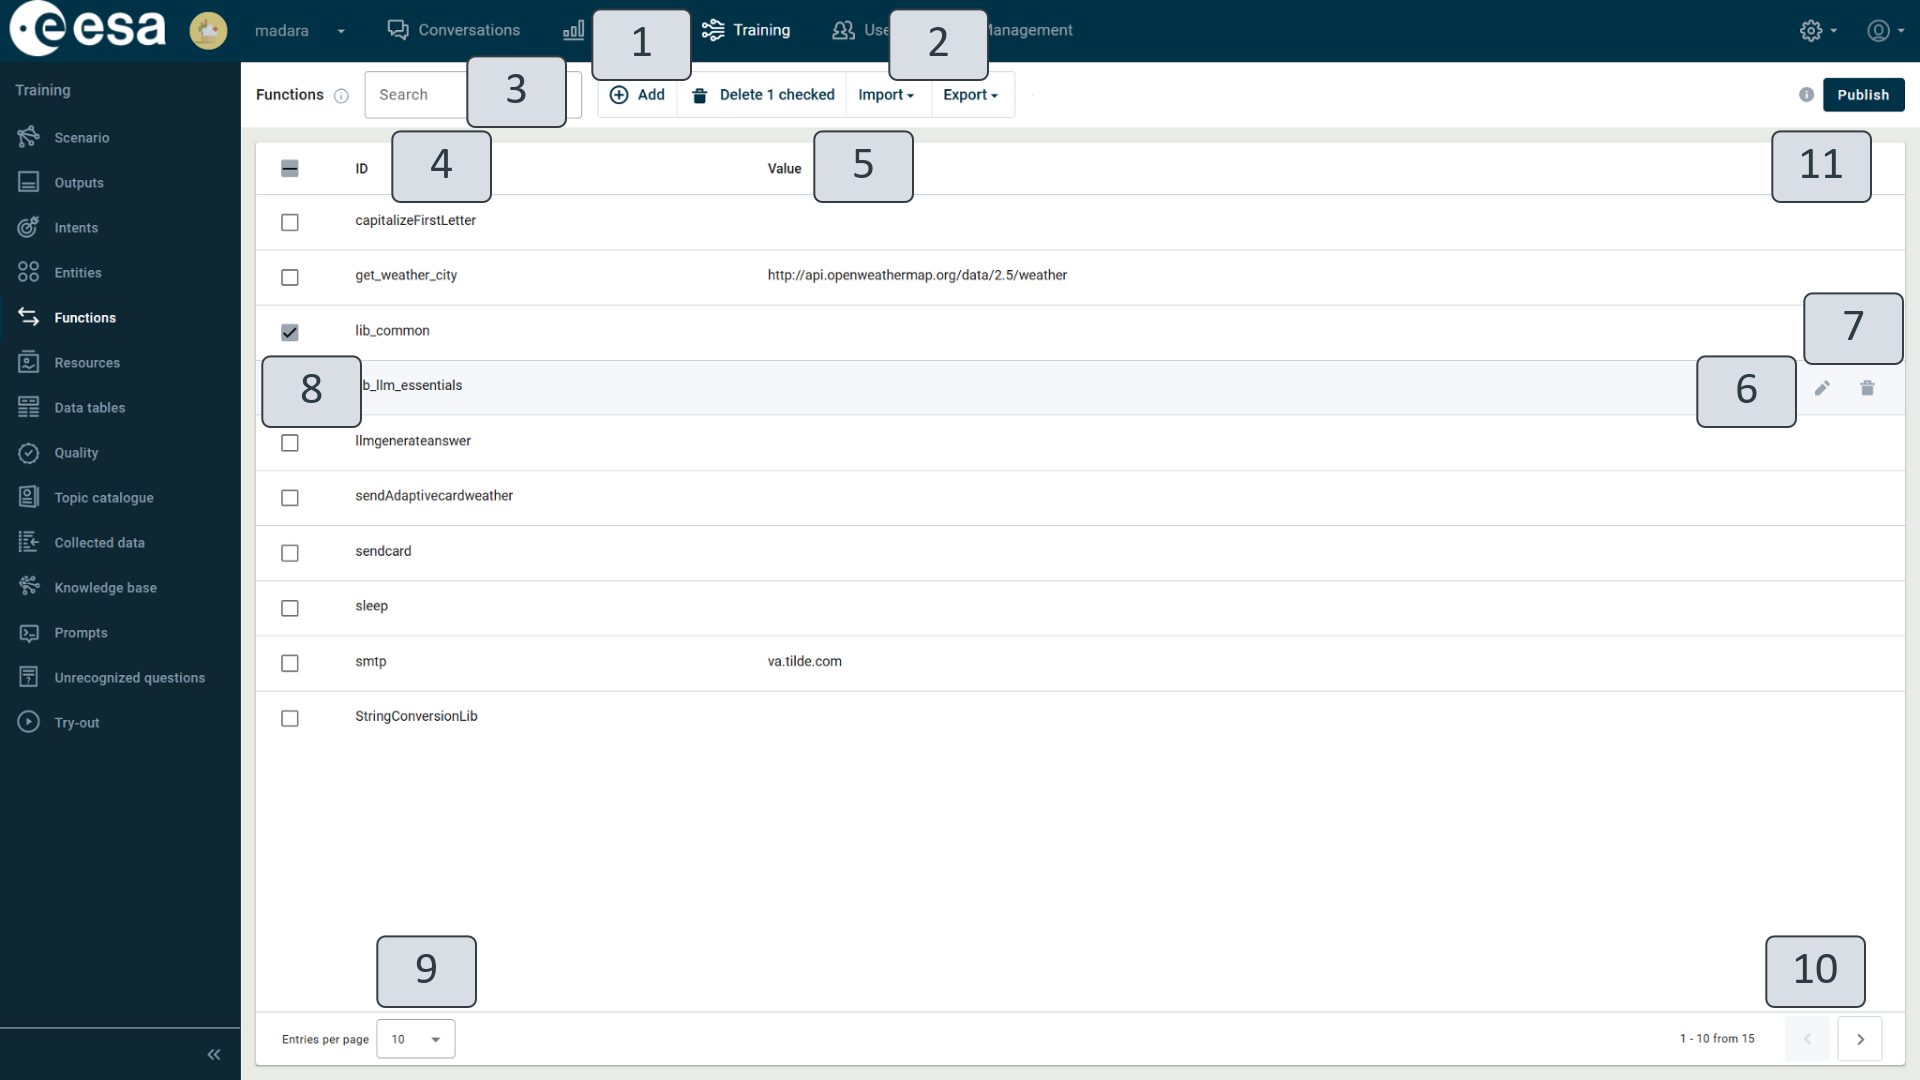
Figure 99. Training View "Functions"
Calling an API
API in Function Editing Window
When you click "Add function" (1) or the pencil icons (Figure 99) (6), the function editing window (Figure 100) opens on the right-hand side of the view.
Before defining the specific function, it is first necessary to find out the API link, key, or identifier, and the required parameters. The following examples will show you how to define a function to obtain data regarding weather conditions. The API has been taken from the site https://openweathermap.org/api.
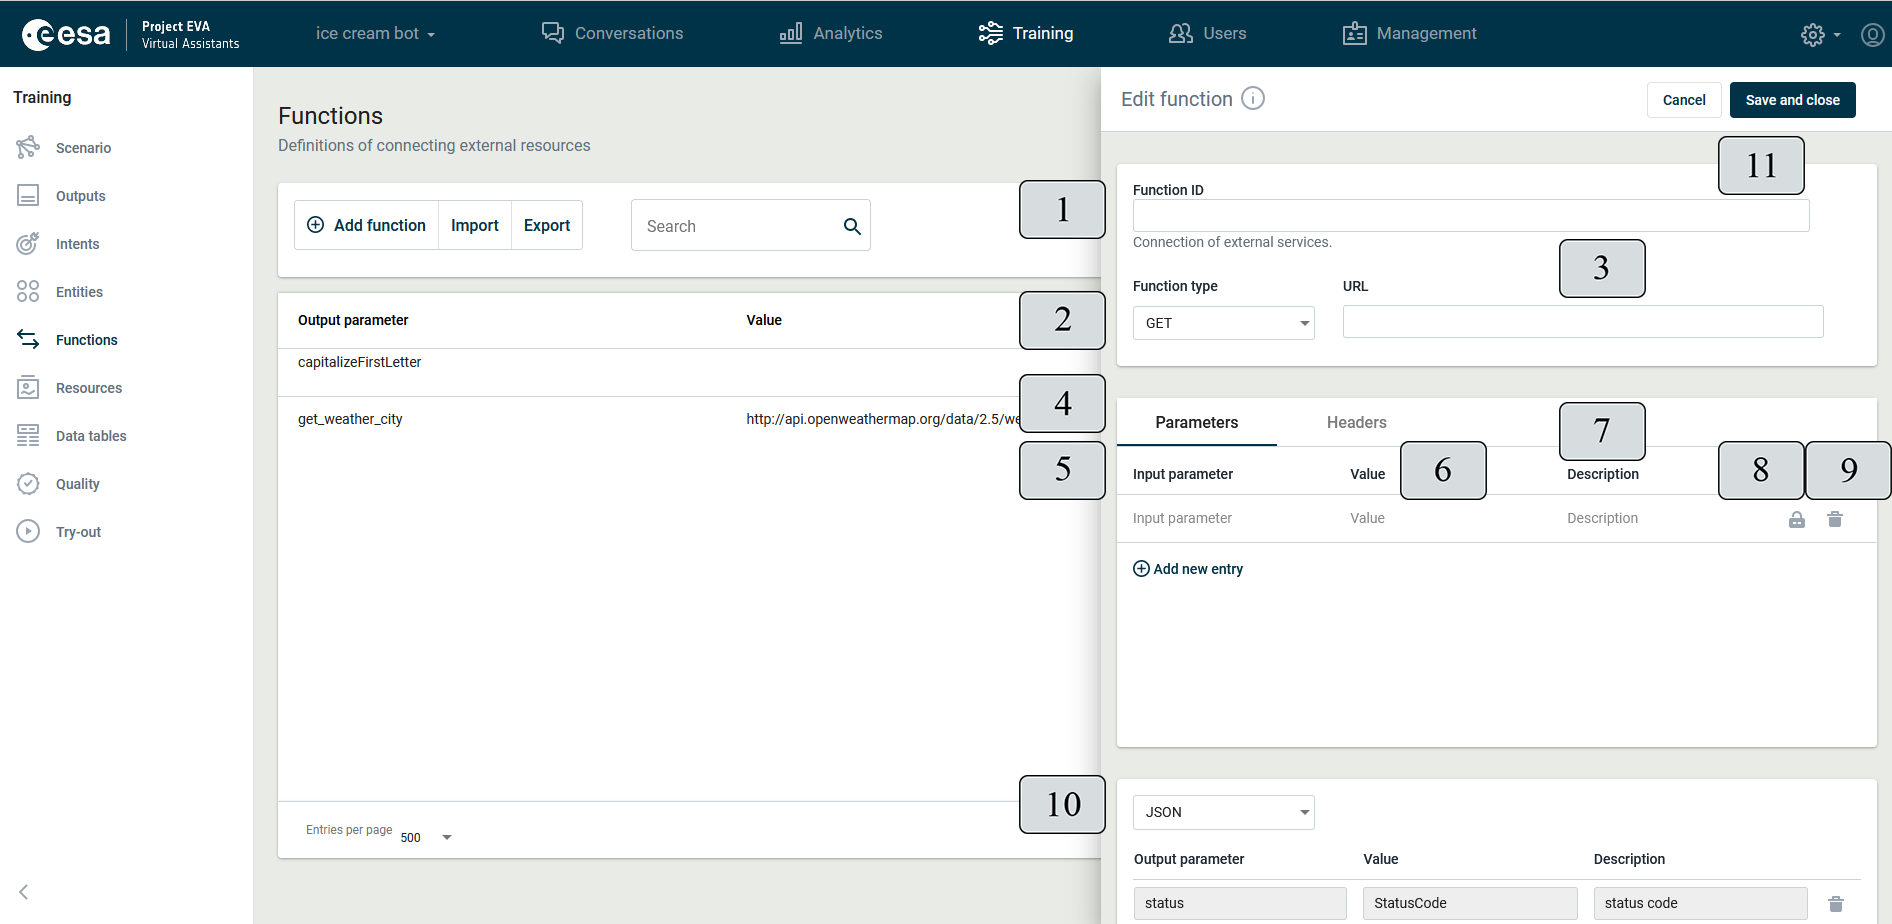
Figure 100. Function Editing Window
In the function editing window (Figure 100), you must come up with and type an action identifier in the "Function ID" (1) field.
In the "Function type" (2) field, select the required type of action POST or GET (usually specified in the API description; usually POST when information is being sent, and GET where the information is retrieved, as well as if the API request can be copied into the Chrome browser and an answer can be obtained).
The API link must be copied next to the specified size in the "URL" (3) field. (Only the part up to the question mark without parameters needs to be copied - http://api.openweathermap.org/data/2.5/weather?q=London) (filled in sections - Figure 101).
The Parameters section (4) must be filled in with parameter identifiers and required values specified in the API description.
- In the "Input parameter" (5) field, you must enter a parameter identifier.
- In the "Value" field (6) - the value of the required identifier.
- The "Description" (7) field can be filled in freely as you wish by entering your own notes or indications.
You must click on the lock icon  (8) to block the parameters. A blocked parameter appears with the black lock icon
  . Blocking is used to enter constant values that do not change during execution and do not need to be filled in in the scenario view (e.g. the identifier key in the following example as "appid") (see Figure 101 (4), which is a specially generated letter/number string for a specific type of connection). For values which are not blocked, in the dialogue, in creating the scenario, you will have to enter the desired values. See example with "Parameters" section filled in in Figure (Figure 101).
To read and display the parameters required for users, you must type them in the corresponding fields in the "Header" section that you want to switch next to the "Parameters" section (Figure 100) (4).
- In the "ID" field, you must come up with and enter an identifier for the answer parameter.
- In the "Value" field, enter the parameter to reach the required display value. (For the correct syntax of the value note, see Sub-chapter "Record of Parameters".)
- The "Description" field can be filled in freely as you wish by entering your own notes or indications.
For example, under “Headers”, see picture (Figure 102).
The following section (10) automatically already contains the format JSON.
After you have filled out all sections and required fields, to close the window and save the changes, you must click “Save and close”. If you do not need to save your changes, click “Cancel” (Figure 100) (11).
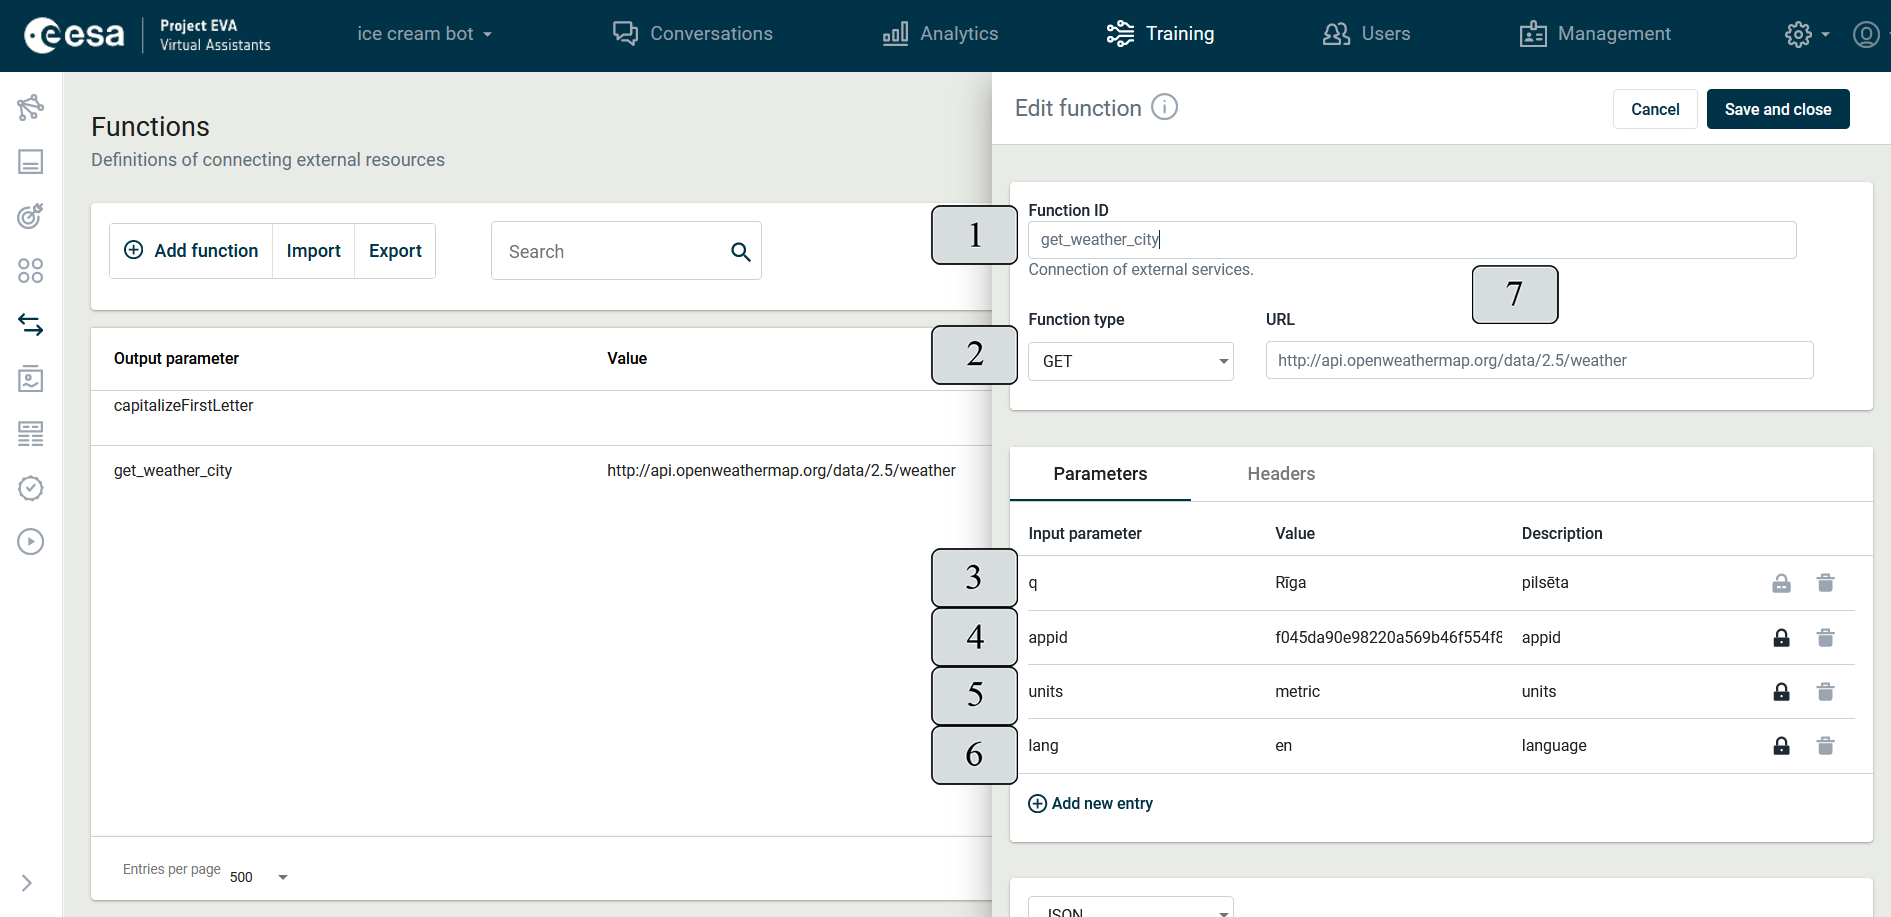
Figure 101. Defined parameters
In example (Figure 101), the function ID field (1) is filled in, its type is shown (2) as well as its web address (7), and the following parameters are defined:
- q: Riga (3) (this parameter is not blocked; the scenario will indicate that the values entered by the user are taken into account);
- appid: API identifier or key (4) (instructions for obtaining your identifier: https://openweathermap.org/guide);
- units: metric (5) (measuring units must be indicated in the metric system);
- lang: en (6) (language - English; this language is indicated for obtained output to be in English).
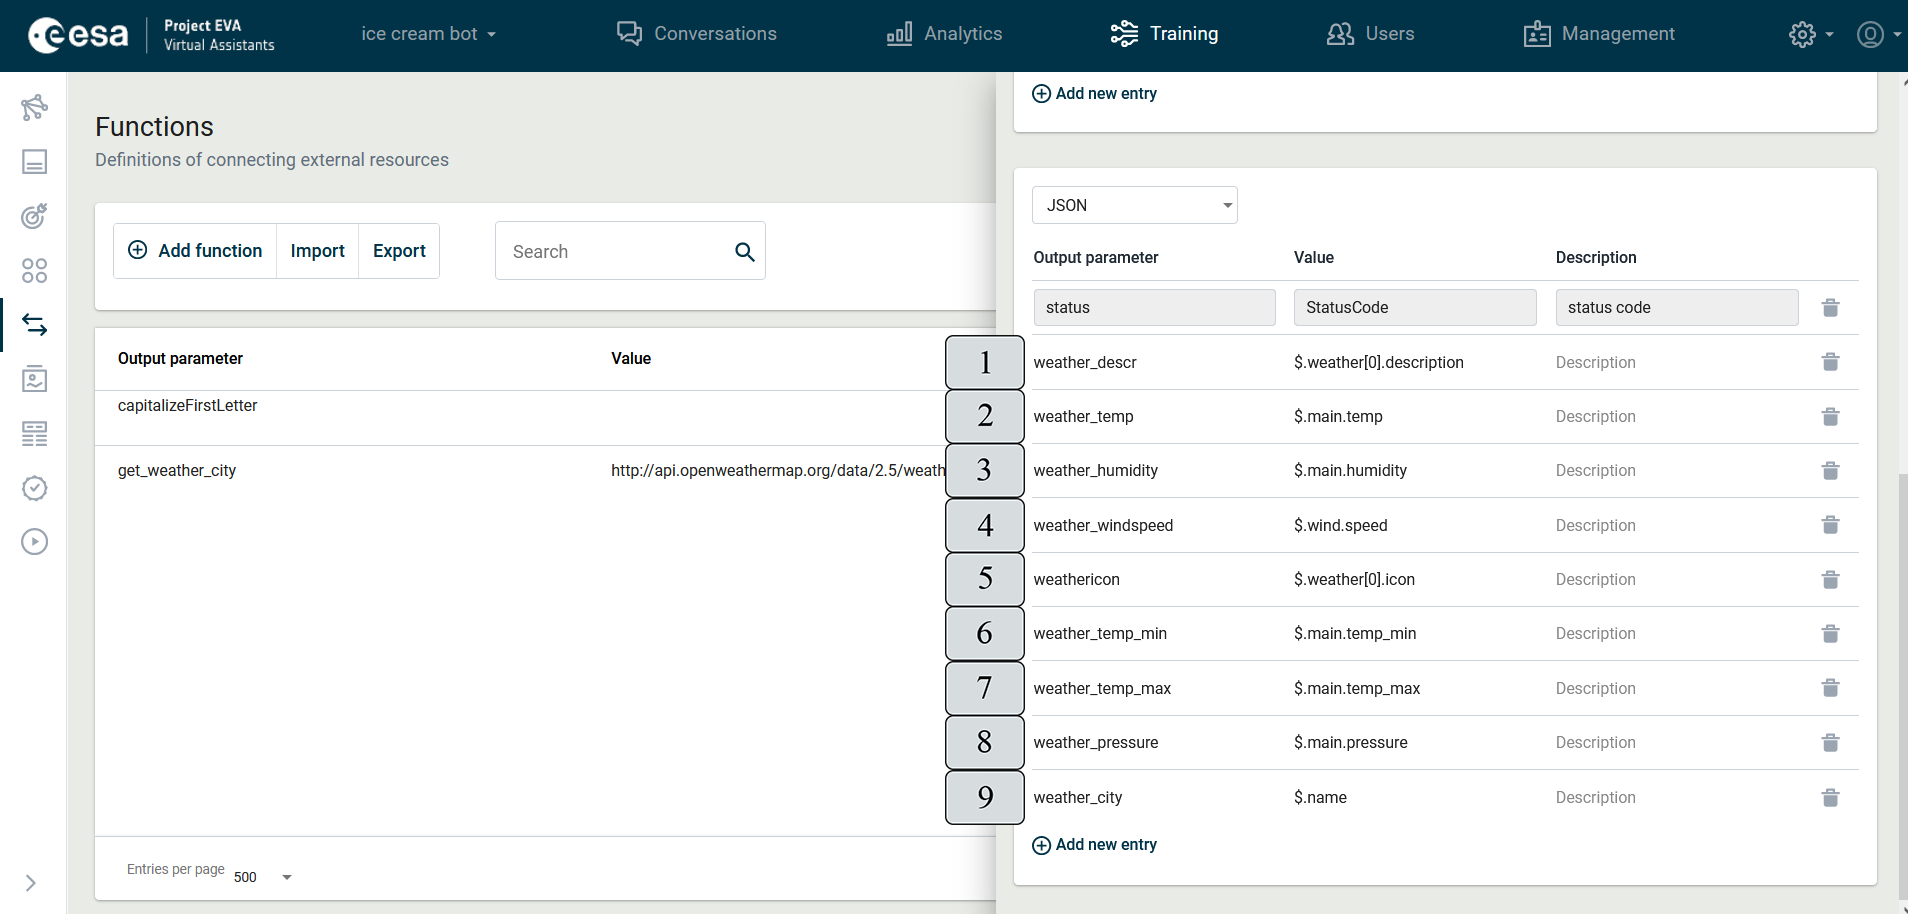
Figure 102. Defined parameters (header)
In the example (Figure 102), identifiers have been thought up for the following parameters and their values have been recorded:
- weather description (1) - weather_descr: $. weather [0]. description
- temperature (2) - temp: $. main.temp
- humidity (3) - humidity: $. main.humidity
- wind speed (4) - windspeed: $. wind.speed
- time legend icon (5) - weathericon: $. weather [0]. icon
- minimum temperature (6) - temp_min: $. main.temp _ min
- maximum temperature (7) - temp_max: $. main.temp _ max
- air pressure (8) - pressure: $. main.pressure
- city name (9) - city: $. name
Record of Parameters
To explain the parameter entry, the following example of the weather condition APIs already considered in the previous chapter will be used.
To know how to correctly write down the parameters to be given in the action answer, you must start with the full record of the link.
https://samples.openweathermap.org/data/2.5/weather?q=London&appid=b6907d289e10d714a6e88b30761fae22When you open a link in a new Web tab, you display its expression with all parameters. (If an expression is not visible transparently, but as a long string, it is recommended that you use a JSON application formatting tool (e.g., https://jsoneditoronline.org/) to arrange it).
{
"cod": 200
"coord": {
"lon": -0.13,
"lat": 51.51
},
"weather": [
{
"id": 300,
"main": "Drizzle",
"description": "light intensity drizzle",
"icon": "09d"
}
],
"base": "stations",
"main": {
"temp": 280.32,
"pressure": 1012,
"humidity": 81,
"temp_min": 279.15,
"temp_max": 281.15
},
"wind": {
"speed": 4.1,
"deg": 80
},
"clouds": {
"all": 90
},
"dt": 1485789600,
"sys": {
"message": 0.0103,
"country": "GB",
"sunrise": 1485762037,
"sunset": 1485794875,
"type": 1,
"id": 5091
},
"id": 2643743,
"name": "London",
"visibility": 10000
}- To understand how to refer to these parameters and check the correctness of the recording, you must open the online verification tool https://jsonpath.com/? and copy this text into the left-hand black window (Figure 103) (1).

Figure 103. Record of Parameters - You must type a parameter in the "JSONPath Syntax" field (Figure 103) (2). The correct parameter syntax is as follows:
- Parameter starts with $ and dot
- Parameter levels are separated by points
- The recording must take into account the order of levels, firstly specifying the highest level title and moving step by step towards the required title at the deepest level.
When you type a parameter correctly, its result will appear on the right (3):
The following example (Figure 103) records how to reach the temperature indicator. To get the record $.main.temp, the path leads in depth to two levels:
{
"cod": 200
"coord": {
"lon": -0.13,
"lat": 51.51
},
"weather": [
{
"id": 300,
"main": "Drizzle",
"description": "light intensity drizzle",
"icon": "09d"
}
],
"base": "stations",
"main": {
"temp": 280.32,
"pressure": 1012,
"humidity": 81,
"temp_min": 279.15,
"temp_max": 281.15
},
"wind": {
"speed": 4.1,
"deg": 80
},
"clouds": {
"all": 90
},
"dt": 1485789600,
"sys": {
"message": 0.0103,
"country": "GB",
"sunrise": 1485762037,
"sunset": 1485794875,
"type": 1,
"id": 5091
},
"id": 2643743,
"name": "London",
"visibility": 10000
}
- The recording should start with $. and then indicate main.
- The record below should indicate the next level that will return the answer regarding temperature: temp.
Specify an API function in a scenario
To indicate a function in a scenario, the corresponding intents and outputs that will need to be involved in the function scenario should be prepared first. In the example, you can see how the weather condition API call (Figure 104) is involved in the scenario.
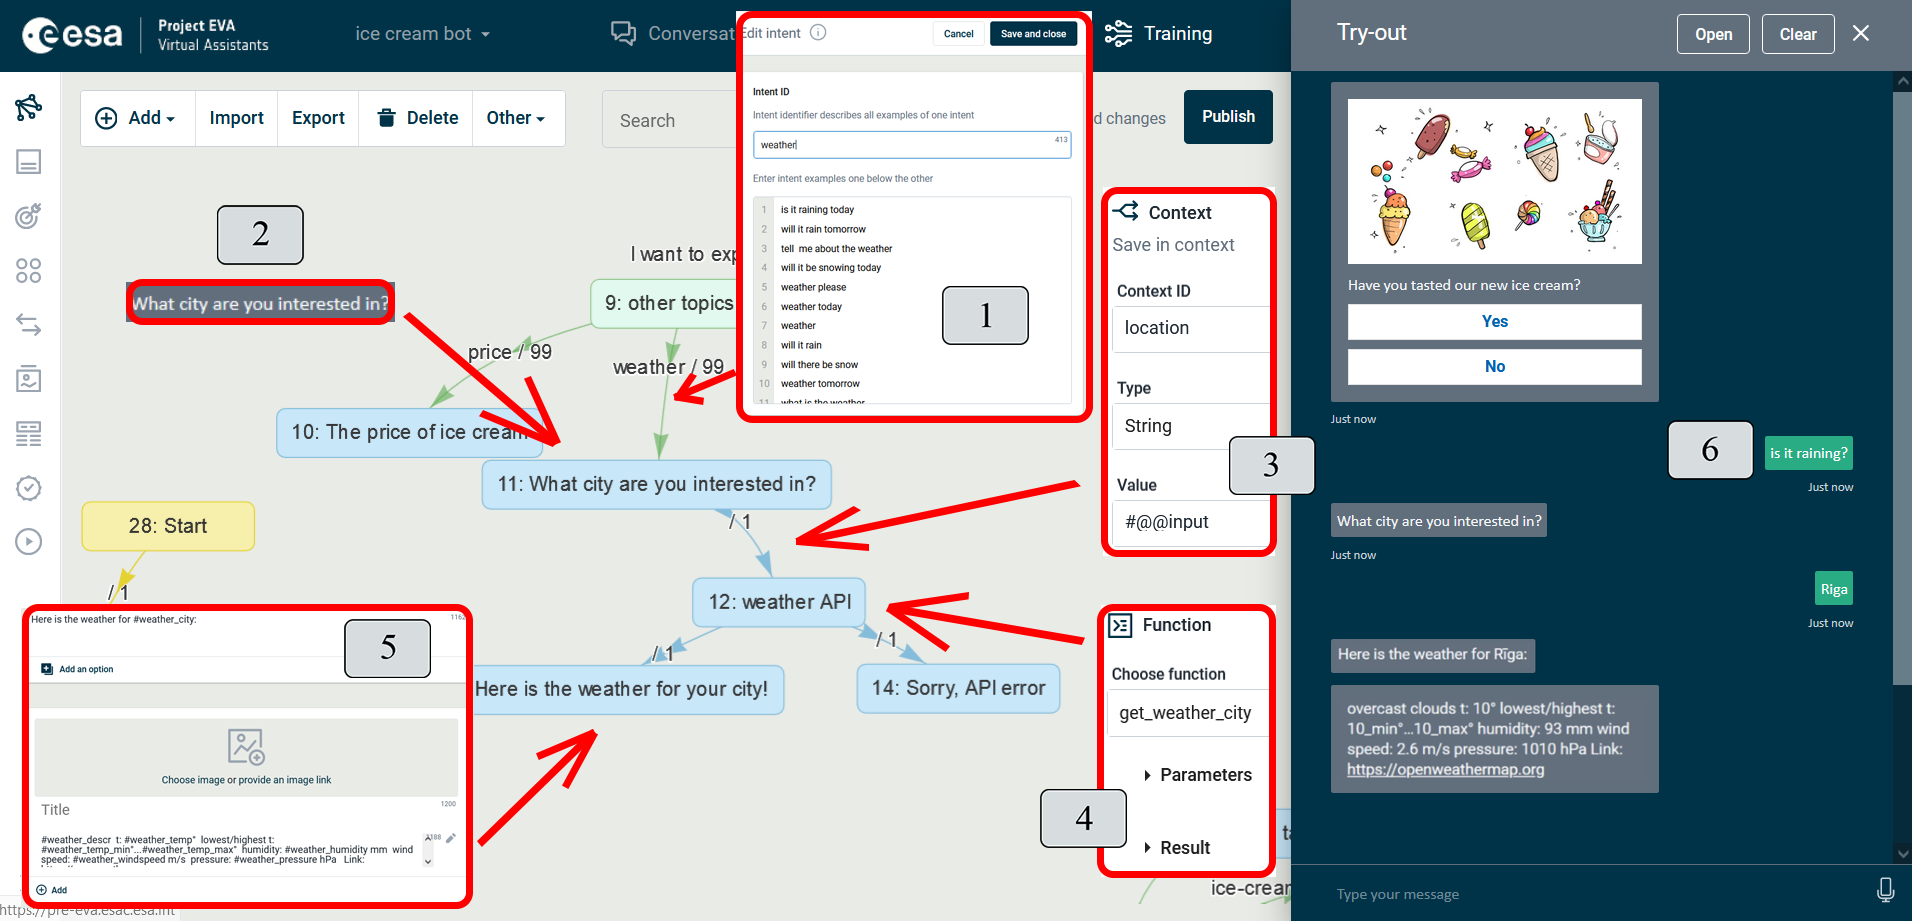
Figure 104. Specify a function in a scenario
The transition from the topic "9: other topics" to the state "11: what city are you interested in" indicates the intent of weather conditions (1). In the state "11:what city you interested in", the VA asks which city is it necessary to find out the weather conditions for (2). In the transition from the state "11: what city you are interested in" to "12: weather api", an instruction is issued to save the name of the city mentioned by the user (3). In state "12: weather api", a function is defined that provides connection to API (4) (to understand how to complete the function in detail, see Figure 69). The answers show two answer options: the first in state "13: here is the weather for your city!". If the external resource is running (5), a second in state "14: sorry, api error", in case it is not working. In try-out view (6), you can see how the conversation is proceeding.
Calling a script
Script in Function Editing Window
By clicking on Add (1) or the pencil icon (Figure 101) (6), the Function editing window (Fig. 105) is opened on the right side of the view.
The following examples demonstrate how to define the script that changes the first letter of a context-saved variable to a capital letter for this value to be capitalized whenever it is used during a conversation or in a text. I.e. if the user asks about vanilla ice-cream, according to the scenario the entity ‘vanilla’ is identified and context-saved with the small first letter. To use this value later during a conversation and directly include in answers, it has to be capitalized like all other product names. Thus, the below script can provide assistance.
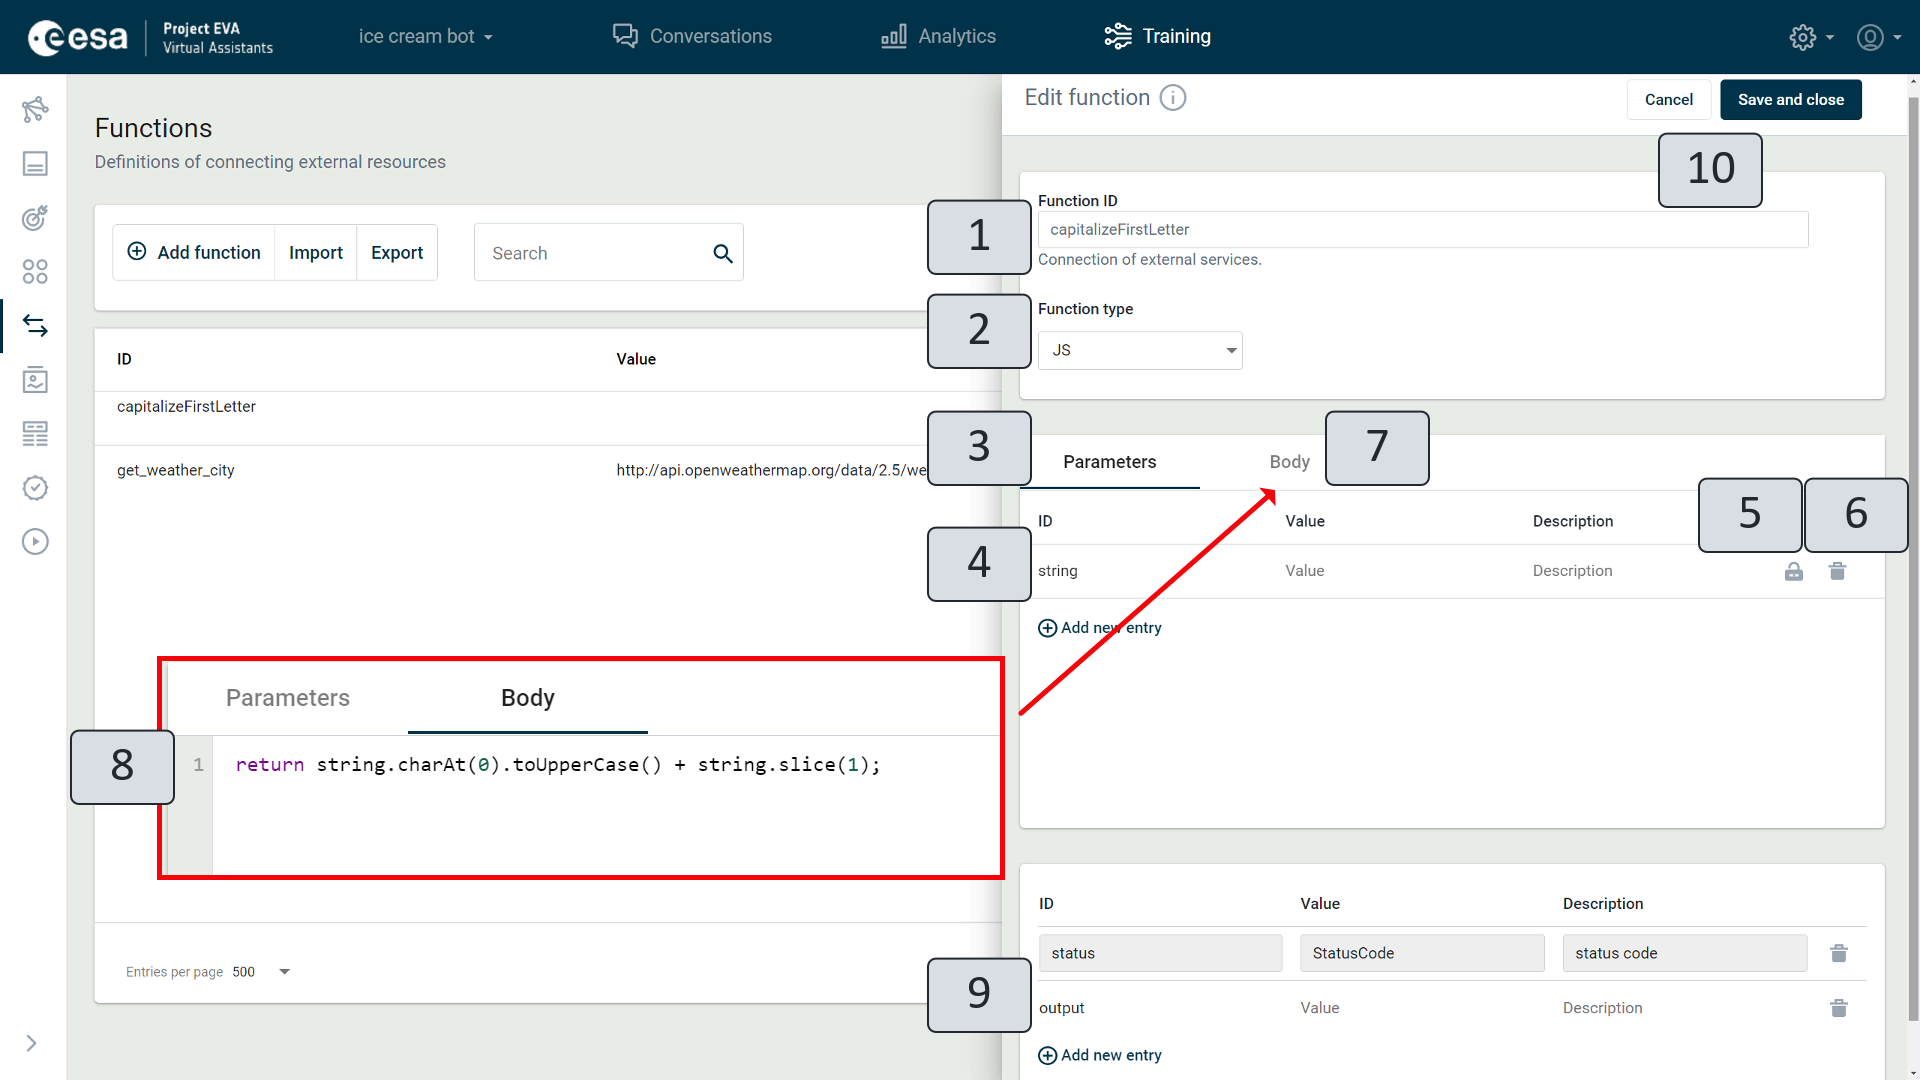
Figure 105. Defining the script
In the Function editing window (Figure 105), Function ID (1) field, a function identifier must be entered.
In the Function type (2) field, the required type of action should be selected: in this case, in defining the script, it should be JS (JavaScript).
If JS is selected as the function type, Body (7) appears next to Parameters in the Edit function window; information should be entered by relying on the JS script. In the below example (8), you can see a script that requests to substitute the first character with a capital character.
return string.charAt(0).toUpperCase() + string.slice(1);
In the Parameters section (3), you should enter parameter identifiers and the required values.
- In the ID field, type the parameter identifier (in this case, “string” (4)).
- In the Value field, the required identifier value.
- The Description field can be freely completed at your discretion: you can enter notes or directions.
To lock the parameters, click on the lock icon  (5). A locked parameter will have a black lock icon
  . Locking is used to enter constant values that do not change during execution and should not be executed in the scenario view. For unlocked values, you will have to enter the preferred values in the dialog when you create the scenario. In this particular case, in defining the script one parameter with unlocked value was used (4). If you need to delete the defined parameter, click on the Recycle Bin icon (6).
In the next section (9), one output parameter should be indicated: output (9).
When all sections and fields are completed, to close the window and save changes click on Save and close. If no changes need to be saved click on Cancel (10).
To call a script, the function should be included in the scenario, see the next chapter.
There is another function type – JavaScriptLib. By choosing this type (see Figure below 'JavaScriptLib Function') (1) you can define a library of functions that can be called from the other scrips defined in the project. For example, you can define two functions – one is turning the first letter of the input string to uppercase (2), other – to the lower case (3).
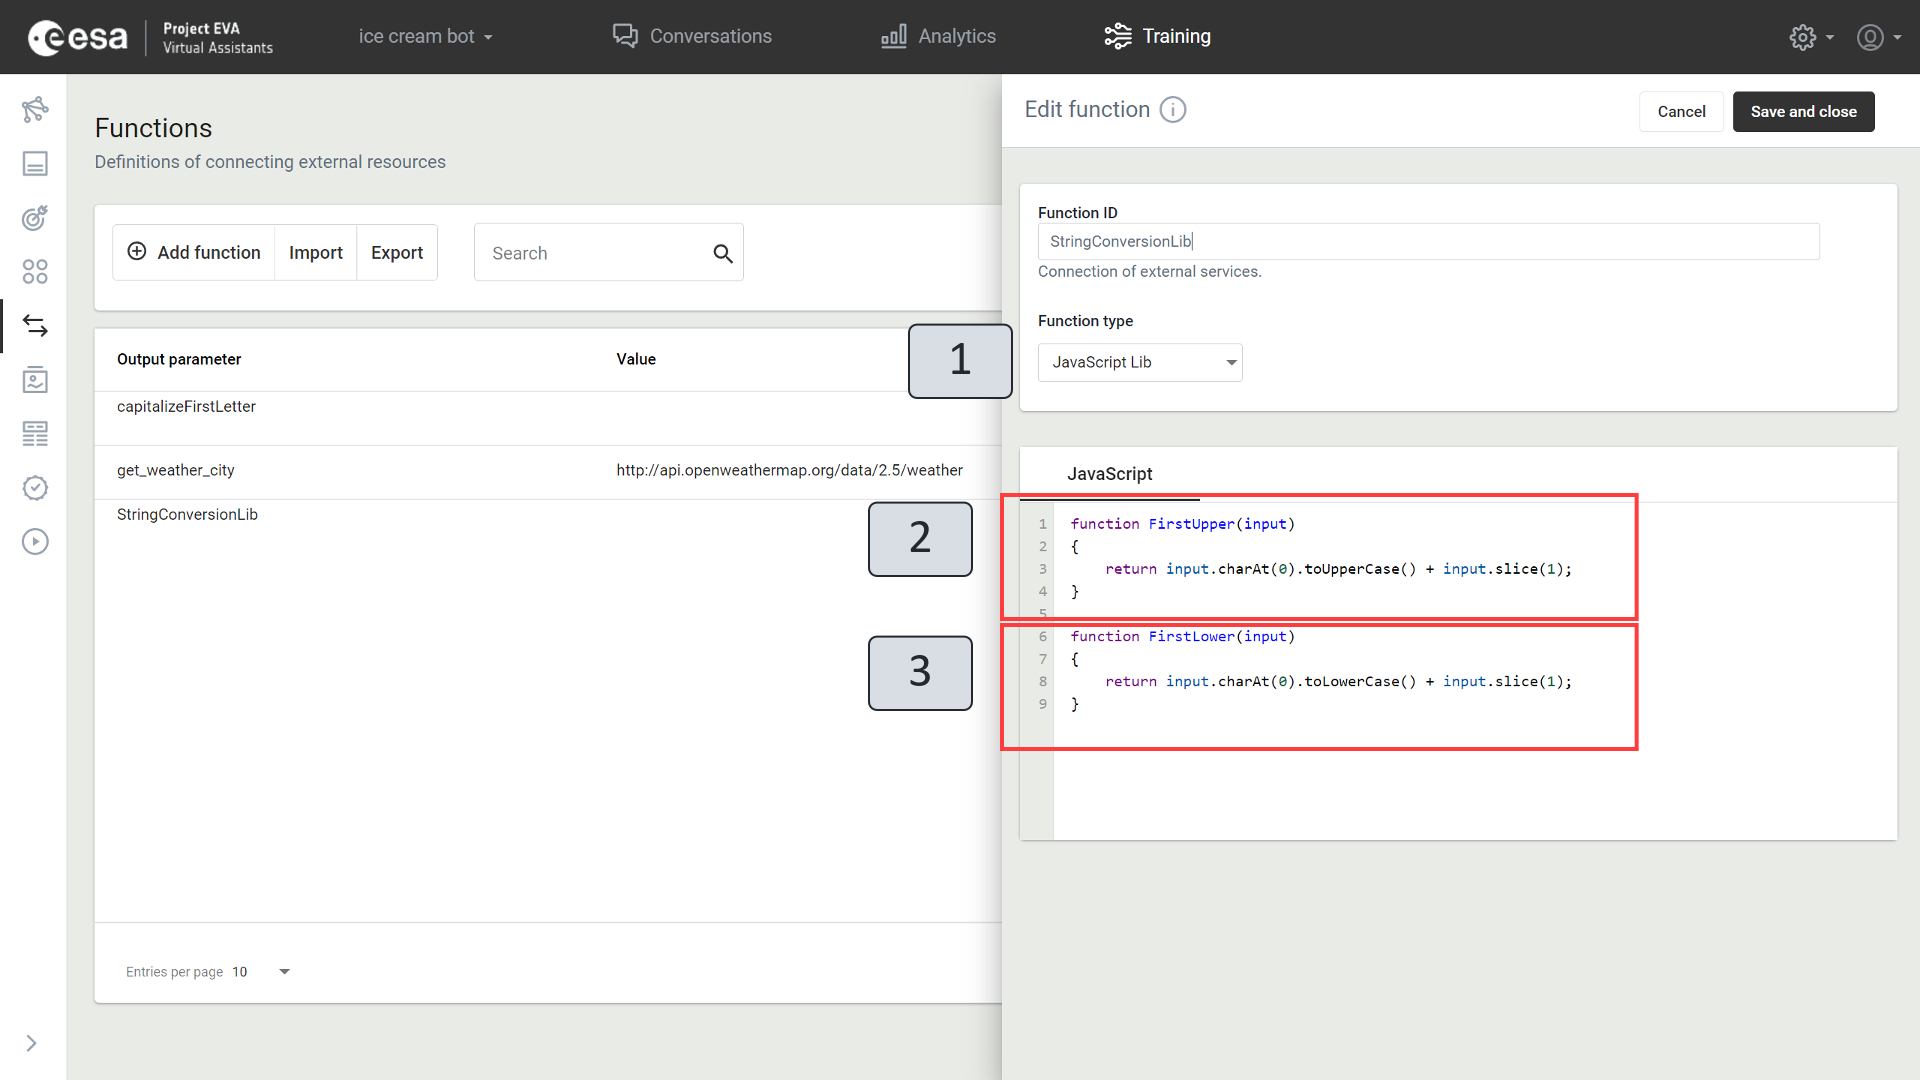
Figure. JavaScriptLib Function
Including the script function in the scenario
To understand how to include a function with a script calling in a scenario, see the next Figure on the price of ice cream. In the VA knowledge (entities and also the data table), you can see various ice cream names that the user can mention during a conversation. For example, the user may ask: “What is the price of vanilla ice-cream? (1)” In the context, the variable ‘products’ with the specific value ‘vanilla’ is stored, and then the respective information and the price are found in the data table and shown to the user in the reply. The answer to the user is generally worded in a way so that the requested name of the specific ice cream is shown automatically from the pre-saved information. But, as the value is saved uncapitalized, for the name to be correctly capitalized in the answer to the user, an external function is included in the scenario that calls a capitalization script and helps to capitalize the first letter of the word.
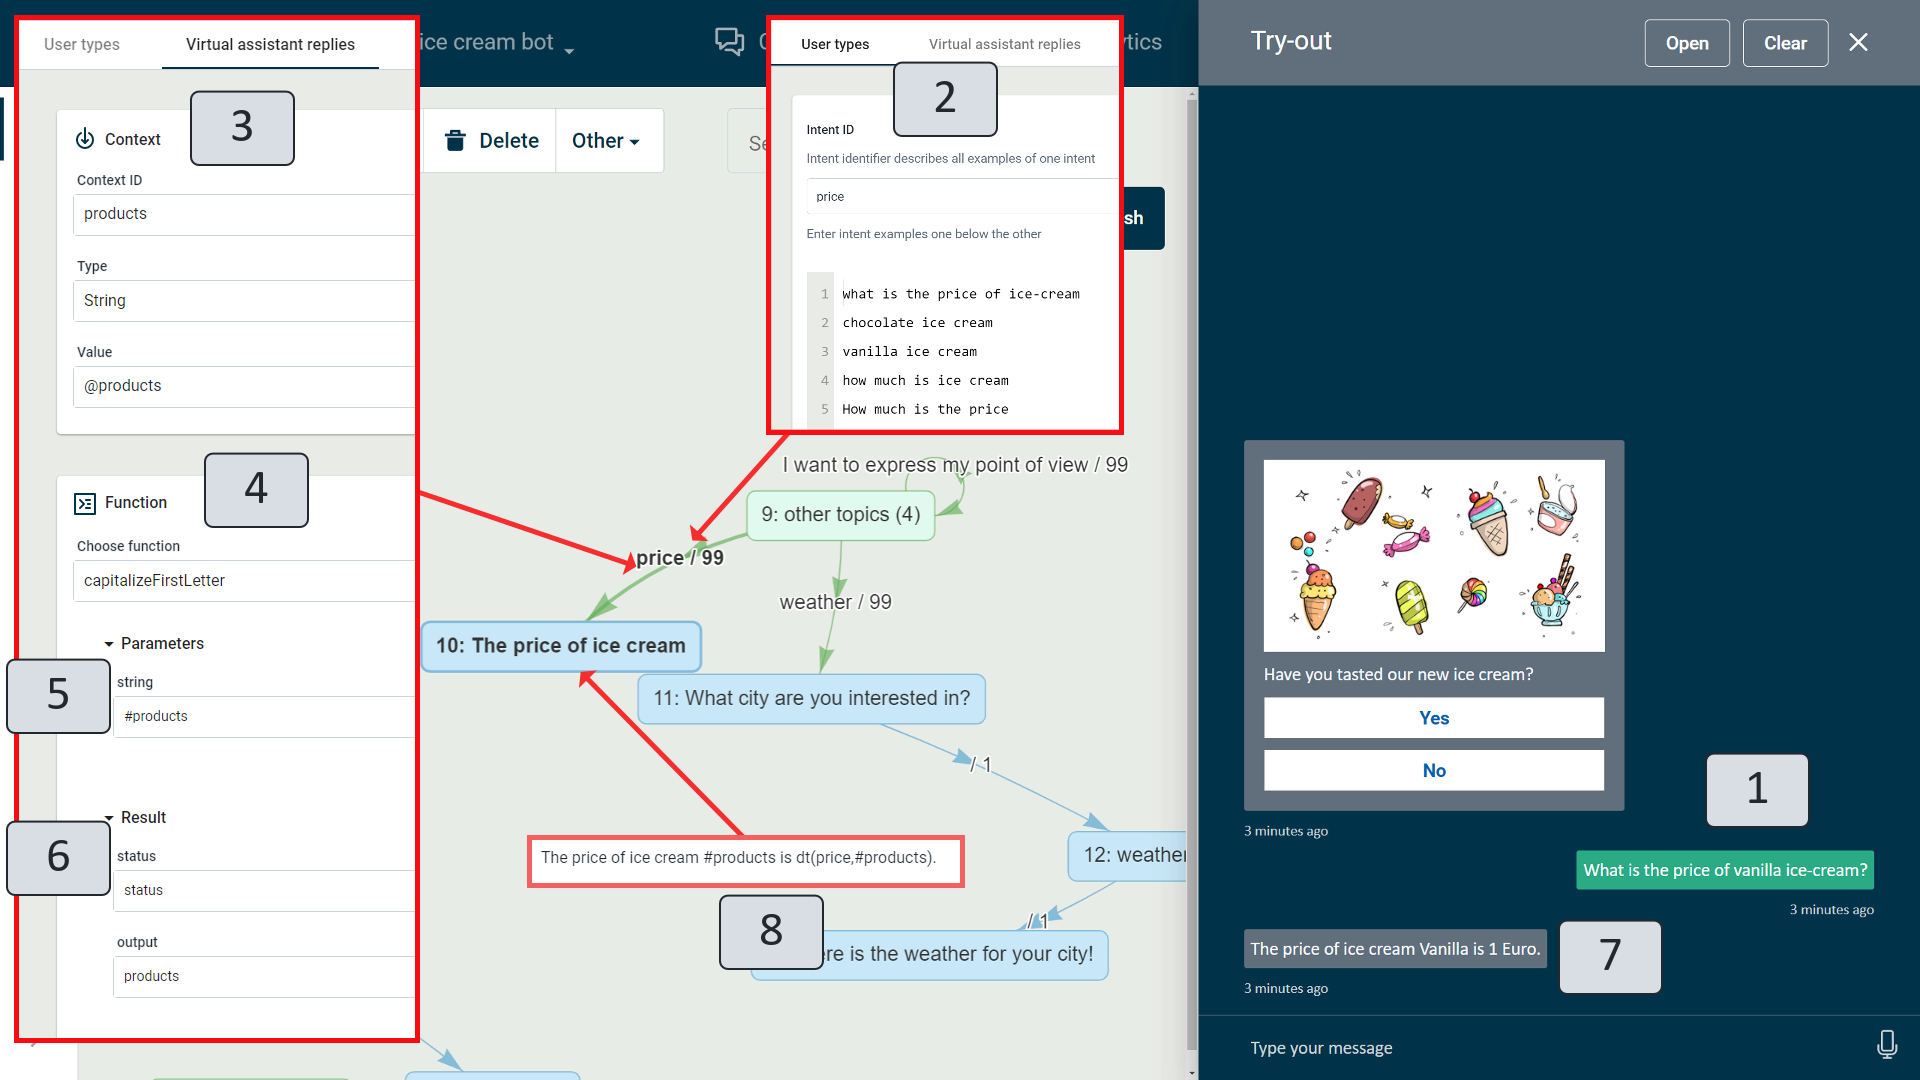
Figure 106. Including the script function in the scenario
To understand the question asked by the user “What is the price of vanilla ice-cream (1)”, the required intent is defined in the transitional section User types (2) of the scenario.
In the same transitional section Virtual assistant replies, a direction is given to save the value of the context variable that the user has mentioned during the conversation (3). In this example, the particular ice-cream name, as well as many other ice-cream names have already been defined in the VA knowledge for the ‘products’ entity. Thus, to refer to them, ‘@products’ was used in the context value field.
After you add the action Save in context, the action Function (4) is added where the function is called. First, it lists the name of the script calling function defined in the Function view, followed by the ‘#products’ parameter (5) and, finally, in the Results (6) the capitalized value is entered.
During the conversation, the user can already see the answer defined in (8) with a capitalized ice-cream name as follows: “The price of ice cream Vanilla is 1 Euro.”
From the output ‘#products’, the context-saved variable value (the name of the ice-cream provided by the user) is read, and ‘dt(price,#products)’ is used to read the data of the context-saved variable value from the data table (price of the respective ice-cream).
There is one more - a simple way to use function results without storing them in the variable. You can write the function directly into the output of the VA:
#$function(arg1, arg2)
#$ – call a function result
function – the name of the function
(arg1, arg2) – the values of the parameters
For example, in the Function view, we have a JS function "getdatetime" (Figure 106.1) that returns the current time and date.
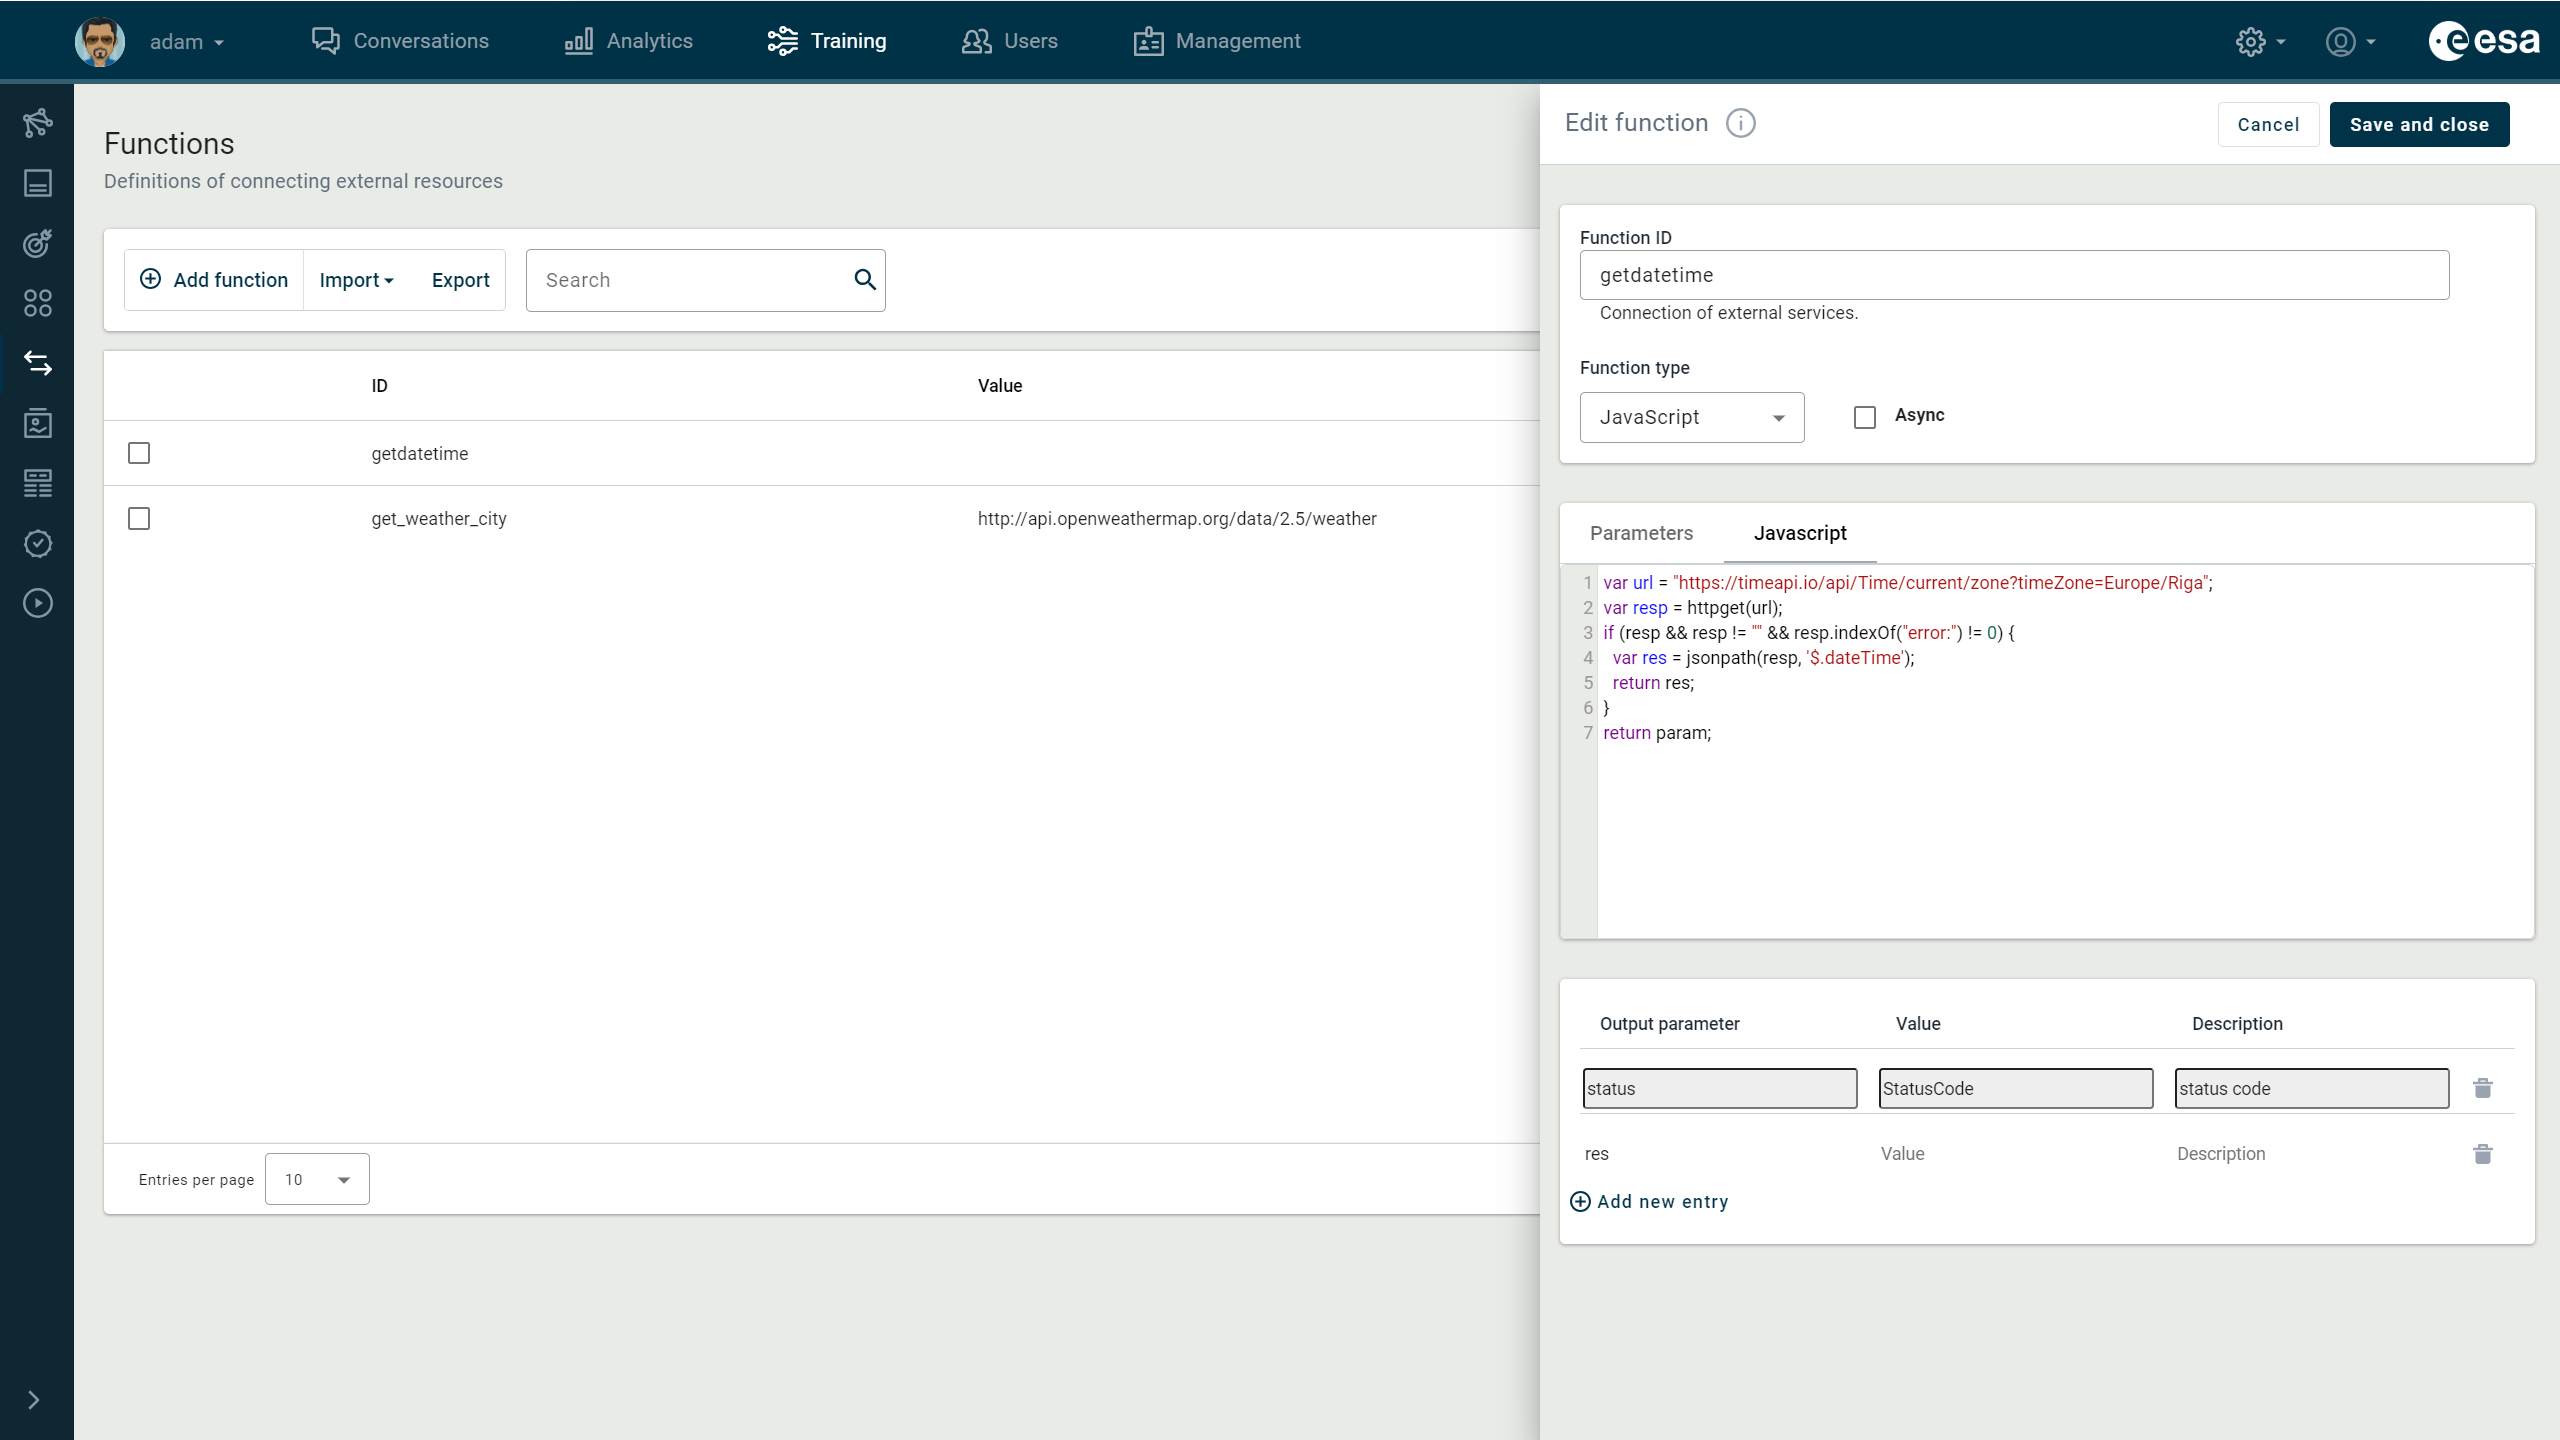
Figure 106.1. GetDateTime function
To display the current time and date in VA responses, call the result of the function in the output by typing it like this: Hello! It is #$getdatetime(0). (Figure 106.2. (1)).
The user sees the current date and time in the VA chat window (Figure 106.2. (2)).
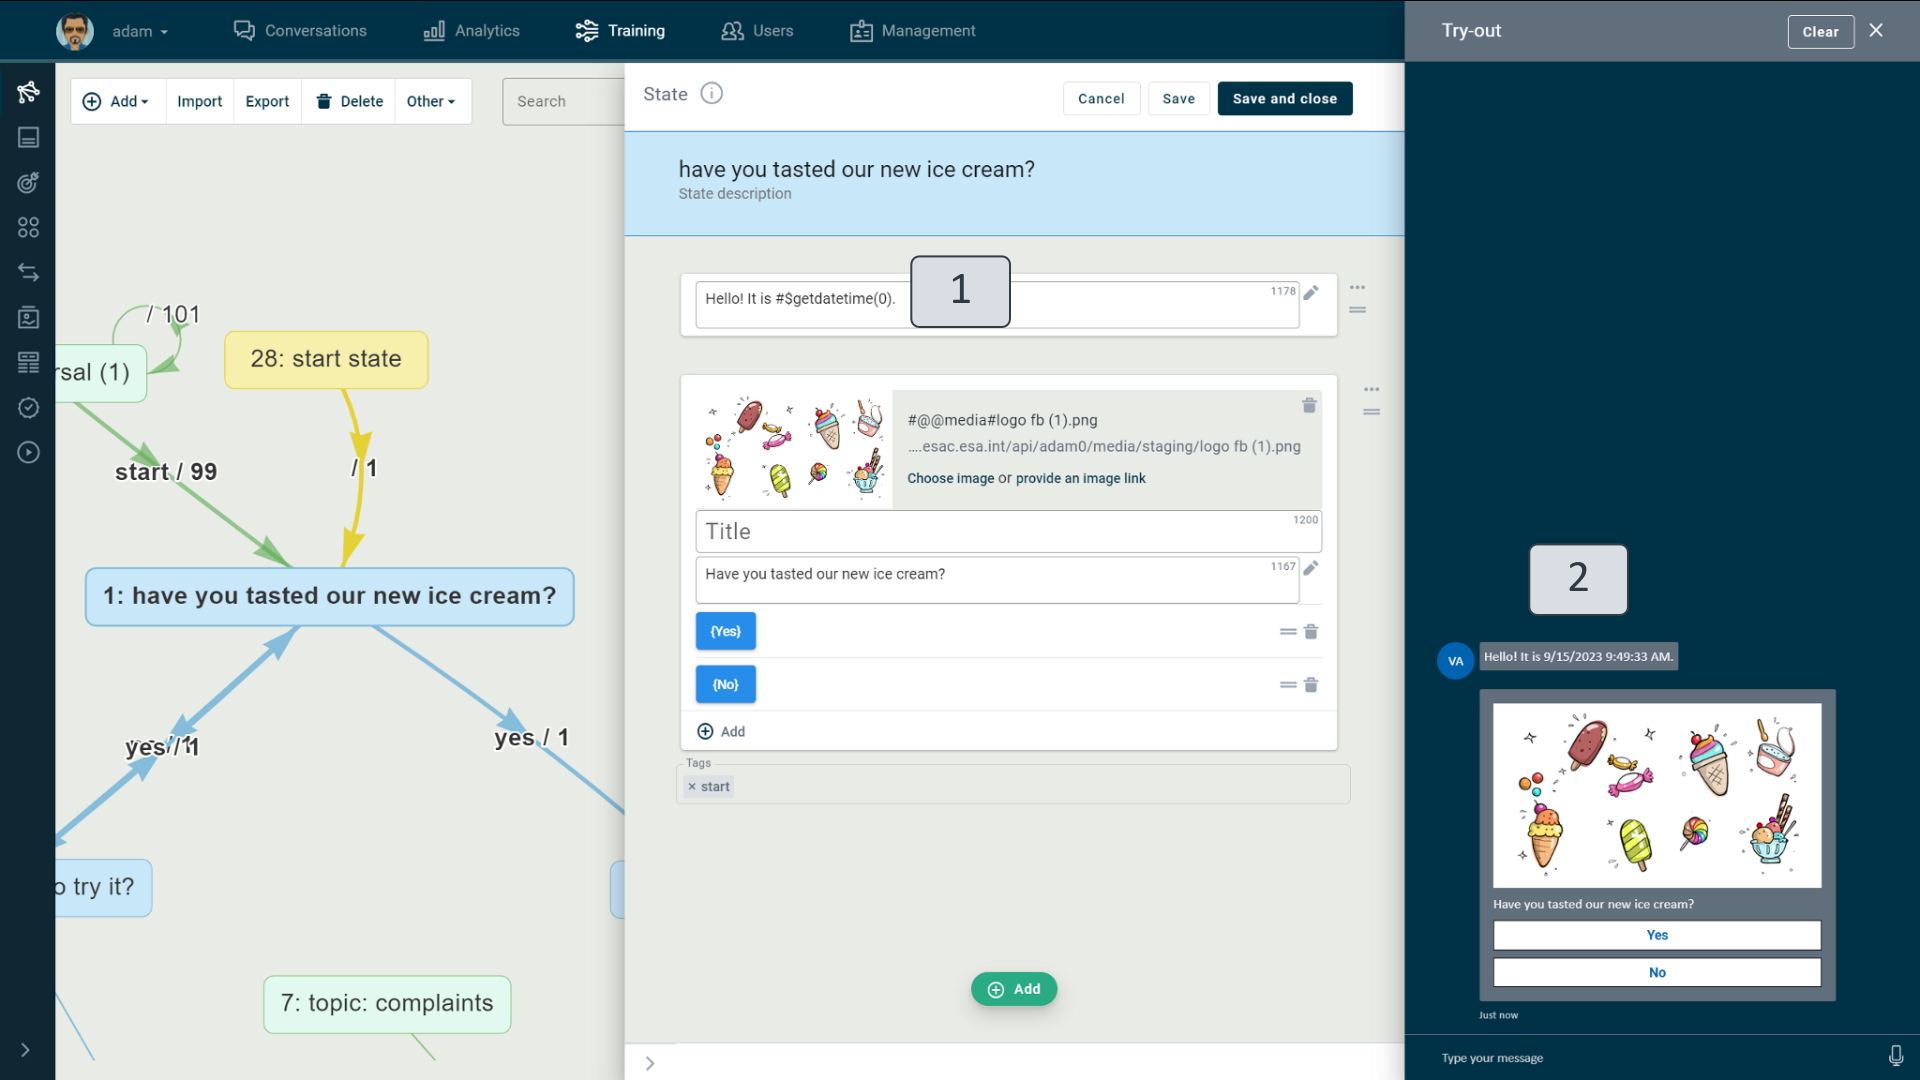
Figure 106.2. Calling a function result from output
Asynchronous function
Async in Function Editing Window
Typically, all the operations are executed synchronously one after the other. The functions can be asynchronous, which opens up more possibilities. This means that with an asynchronous function you enable your virtual assistant to start a potentially long-running task, polling, or another process and still be able to be responsive to other events while that task runs, rather than having to wait until that task has finished. If you need to send a text to a user, you can use the ‘sendmessage’ function, which provides the text you want to send as a parameter, such as sendmessage("text for sending").
For example, the picture (see picture) shows an async function that performs a countdown. In the scenario, the user can take an ice-cream quiz with a time limit.
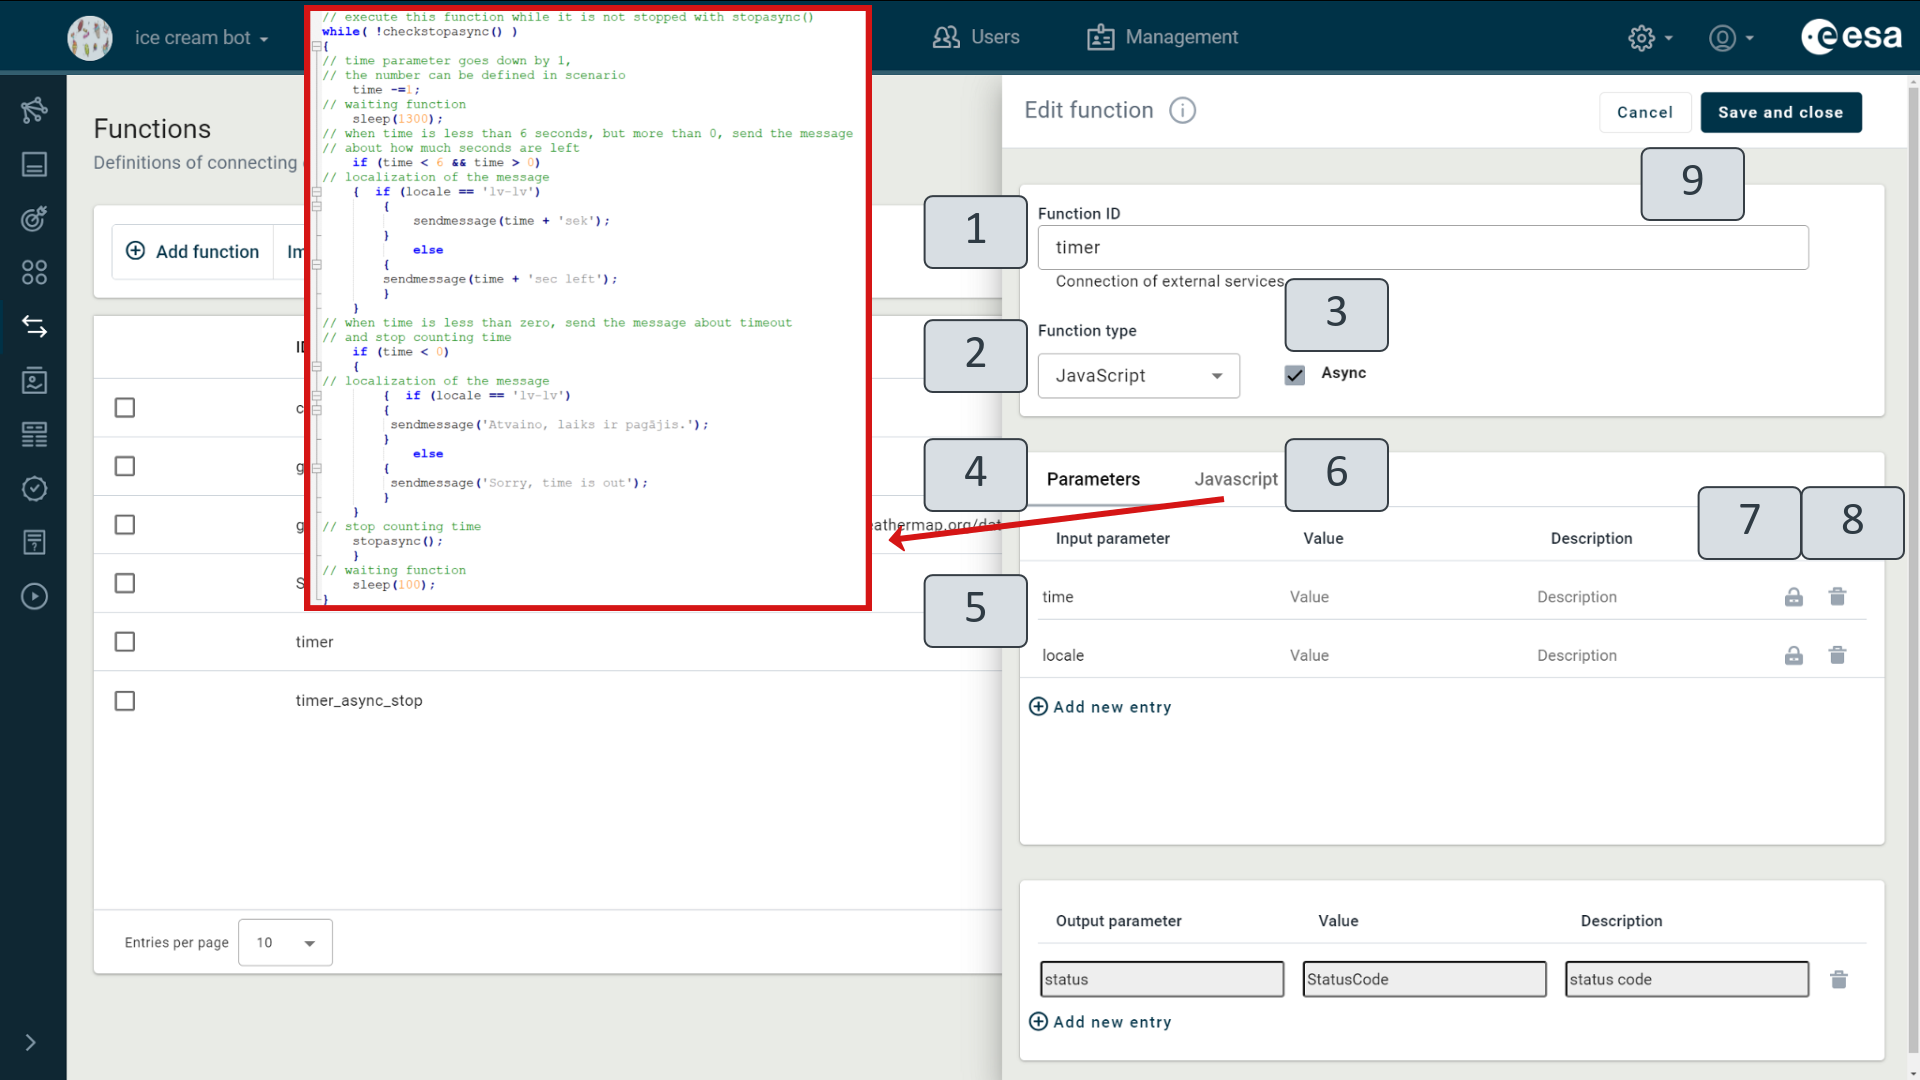
Figure 106.3. Asynchronous function
In the Function editing window (Figure 106.3), Function ID (1) field, a function identifier must be entered.
In the Function type (2) field, the required type of action should be selected: in this case, in defining the script, it should be JS (JavaScript).
Select the Async check box (3) to indicate that the function must make a countdown timer work in the background in parallel with other processes. If the box is not selected, the function will function synchronously.
If JS is selected as the function type, JavaScript (6) appears next to Parameters in the Edit function window; information should be entered by relying on the JS script. In the example, you can see a script that launches a countdown timer from a freely selected number of seconds to one. The function shows the report to the user in the chat window for the last five seconds. If the function is not stopped in the scenario (with the stop function “timer_async_stop”) and the task of time counting is complete, a message appears to the user in the chat window that the time for the quiz is over.
while( !checkstopasync() )
{
time -=1;
sleep(1300);
if (time < 6 && time > 0)
{ if (locale == 'lv-lv')
{
sendmessage(time + 'sek');
}
else
{
sendmessage(time + 'sec left');
}
}
if (time < 0)
{
{ if (locale == 'lv-lv')
{
sendmessage('Atvaino, laiks ir pagājis.');
}
else
{
sendmessage('Sorry, time is out.');
}
}
stopasync();
}
sleep(100);
}
In the Parameters section (4), you should enter parameter identifiers and the required values. Input parameters in this case are two: ‘time’ and ‘locale’ (5). To lock the parameters, click on the lock icon  (7). A locked parameter will have a black lock icon
  . Locking is used to enter constant values that do not change during execution and should not be executed in the scenario view. For unlocked values, you will have to enter the preferred values in the dialog when you create the scenario. In this particular case, in defining the script parameters with unlocked value were used (5). If you need to delete the defined parameter, click on the Recycle bin icon (8).
When all sections and fields are completed, to close the window and save changes click on Save and close. If no changes need to be saved click on Cancel (9).
To end the process of countdown without expecting a result (for example, the user finishes the quiz in time), you must create another related additional function (see the picture 106.4) that stops the previous function.
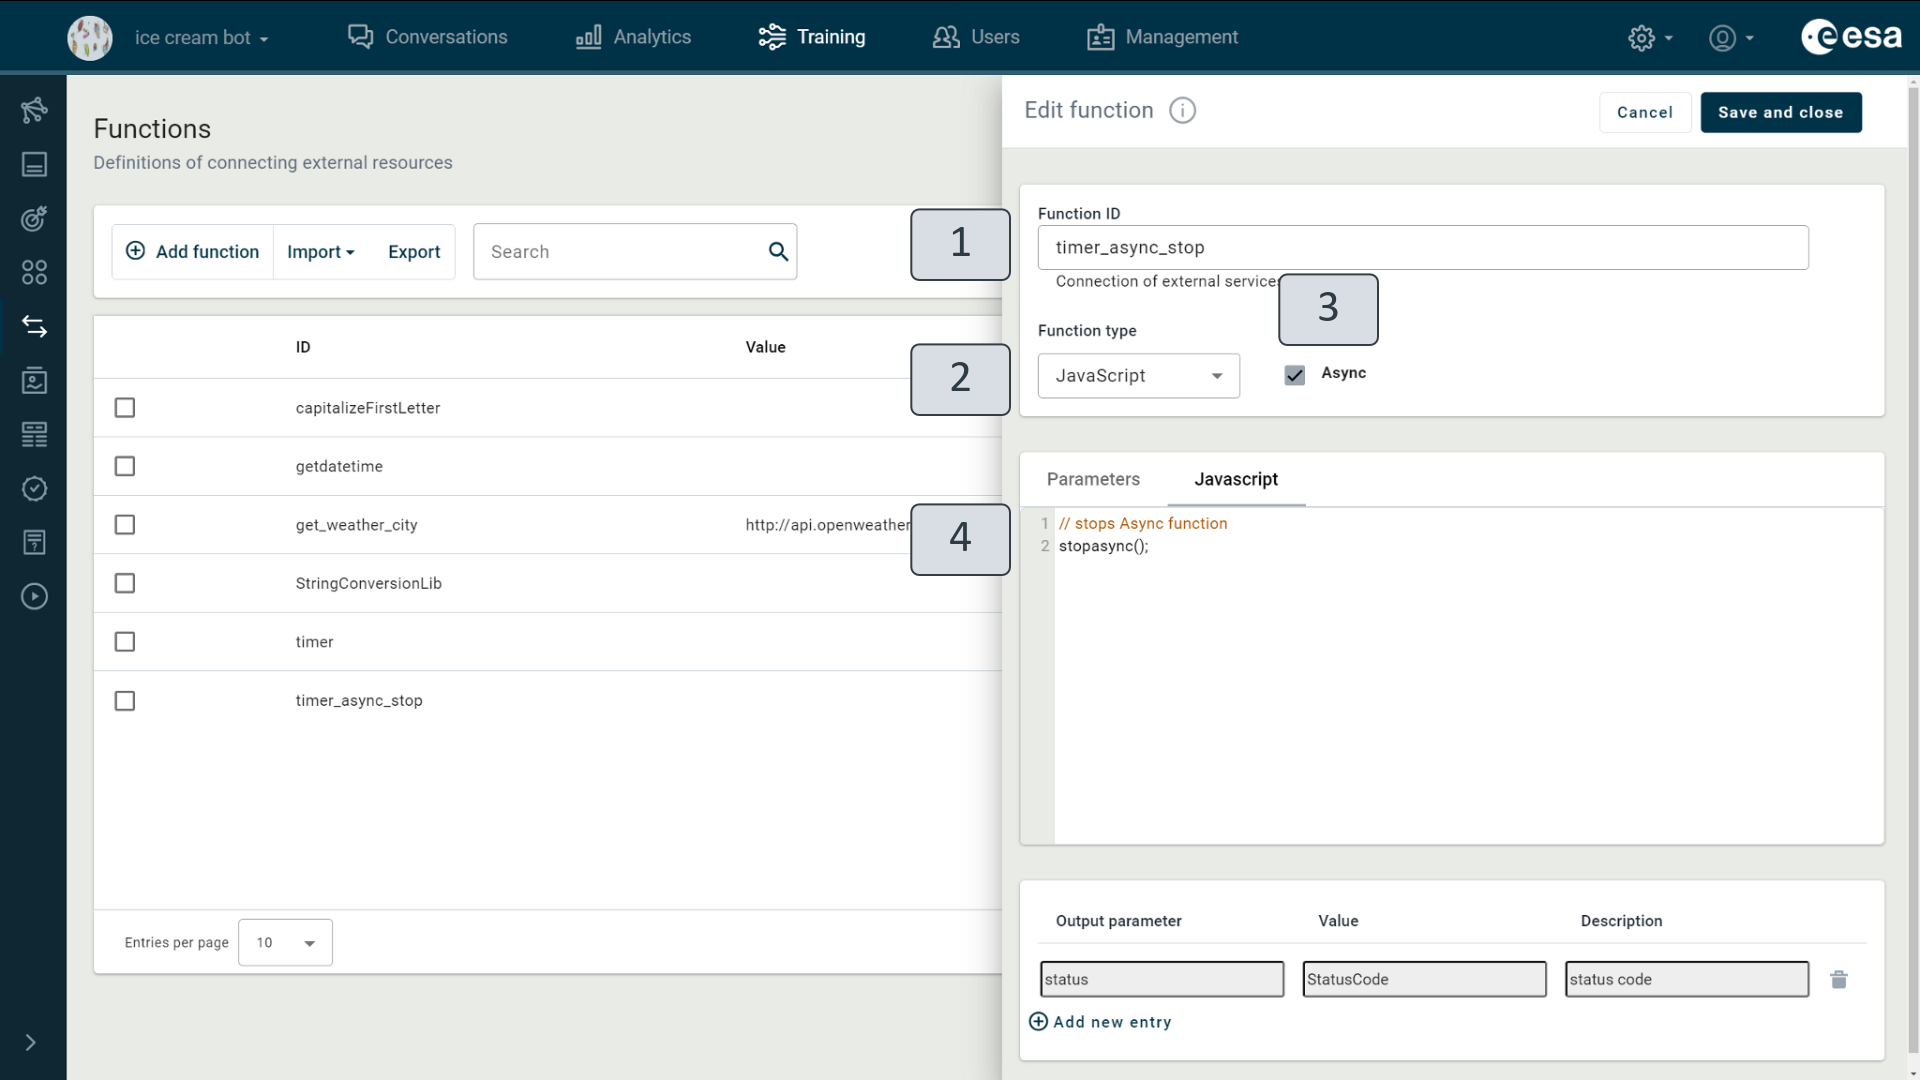
Figure 106.4. Async stop function
In the Function editing window, Function ID (1) field, a function identifier must be entered. In this case – “timer_async_stop”.
In the Function type (2) field, the required type of action should be selected: JS (JavaScript).
Select the Async check box (3) to indicate that the function uses an asynchronous process.
Fill the section Javascript with a script (4): stopasync ();
To call the scripts, the functions should be included in the scenario, see the next chapter.
Including the asynchronous function in the Scenario
In the conversation, the virtual assistant offers a user to check his knowledge of ice cream by taking the quiz and answering three questions in 30 seconds. As soon as the user clicks the “Start quiz” button (see picture 106.5 (1)) and the dialogue takes the transition to the next state, the function that is indicated on the same transition (2) starts the countdown timer of 30 seconds.
Two parameters are specified for the function:
“time” – 30 seconds selected in this example;
“locale” - #@@locale that reads the language used in multilingual virtual assistants to know in which language to return the result messages.
While the function is working in the background, the user continues the quiz and answers the questions (3) asked by the virtual assistant. If a user fails to answer quiz questions within 30 seconds, the function displays the last five-second countdown messages in the chat window and the final message: “Sorry, time is out.” (4).
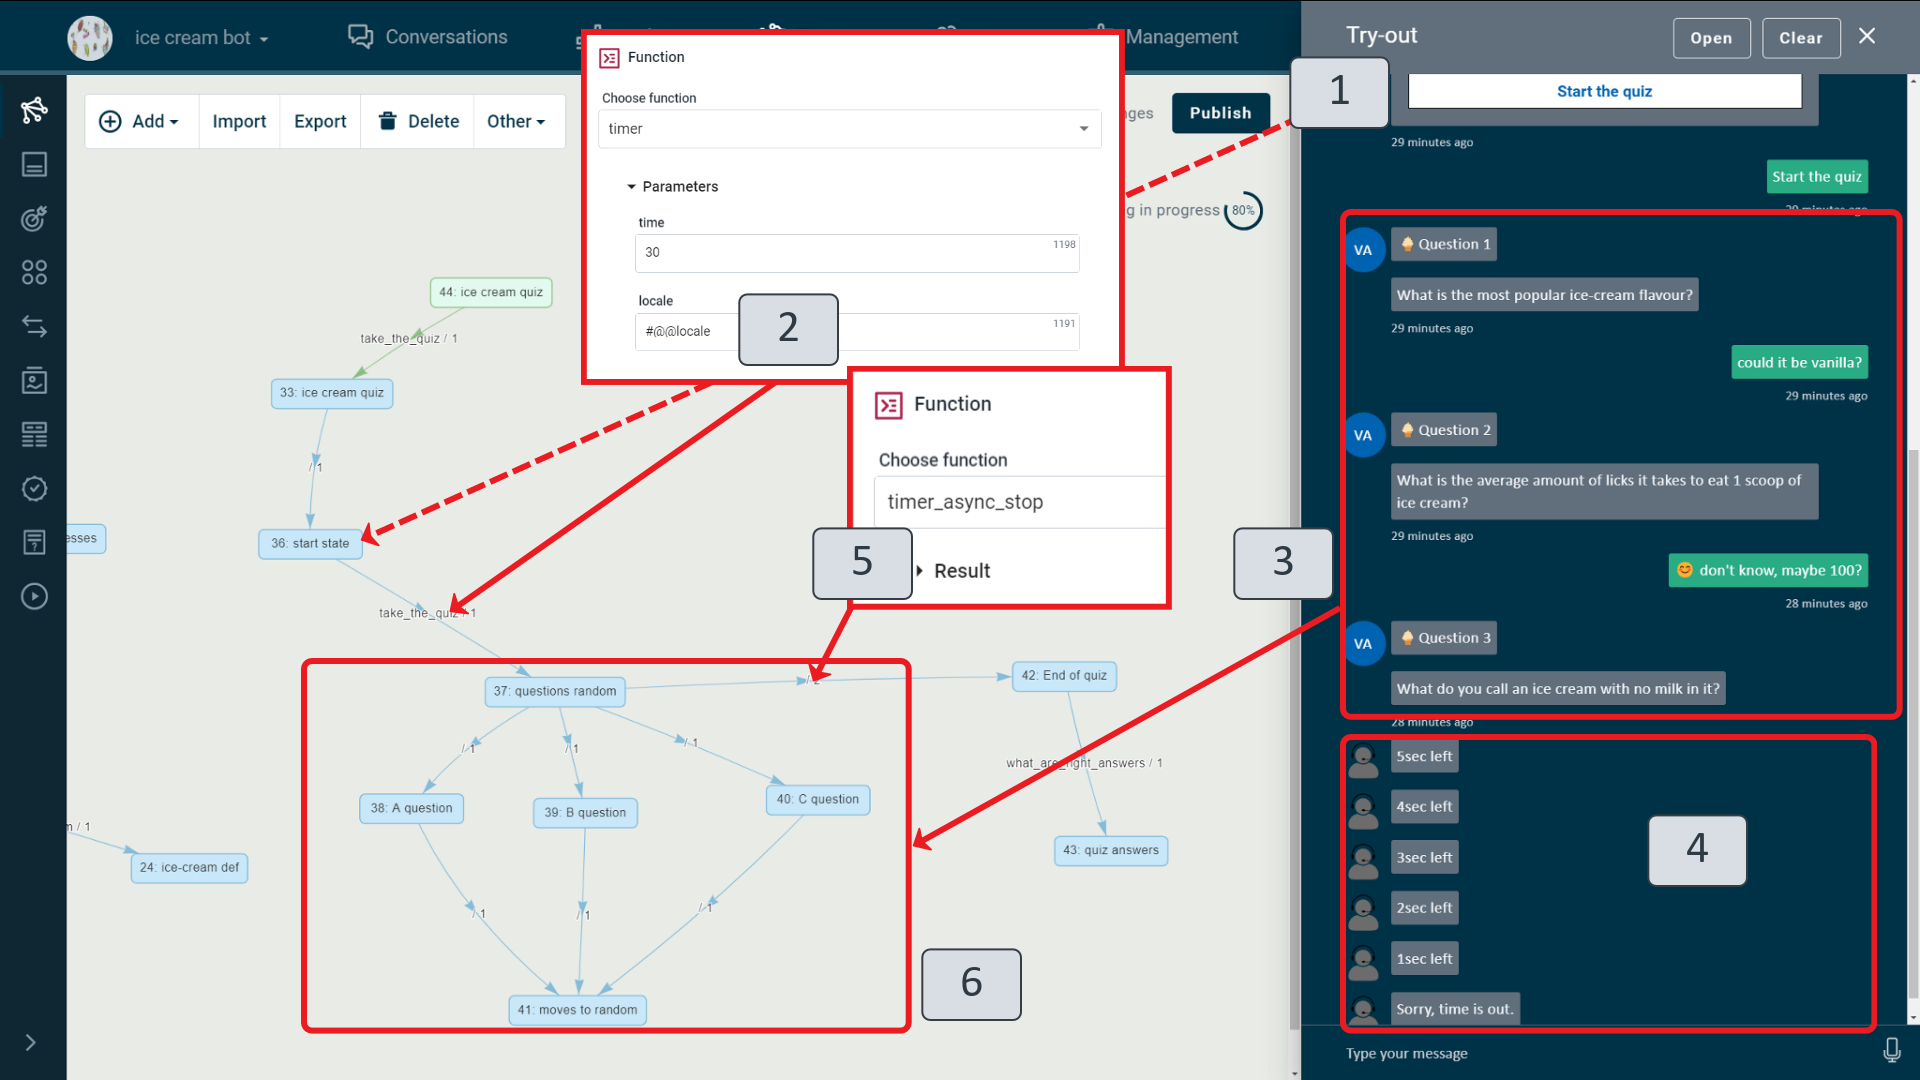
Figure 106.5 Quiz with a countdown timer
If the user finishes the quiz in time, the countdown function is stopped (5) and the scenario proceeds further by displaying the results and correct quiz responses.
Streaming functions
In addition to synchronous API functions, scripts, and asynchronous functions, the platform offers streaming functions for dynamic and continuous data retrieval. Unlike conventional functions that return results all at once, streaming functions deliver results in small, incremental portions. These functions are particularly useful for interfacing with external web services that provide output as a stream. Examples include accessing large language models or generative AI services.
Specifying Streaming Functions
You can specify a streaming function much like any other API function that interacts with an external web service. Follow the standard procedure outlined in the "Calling an API" chapter of this manual. In the example provided in Figure 106.6, note how the function ID (1), its type (2), and the service URL (3) are filled in.
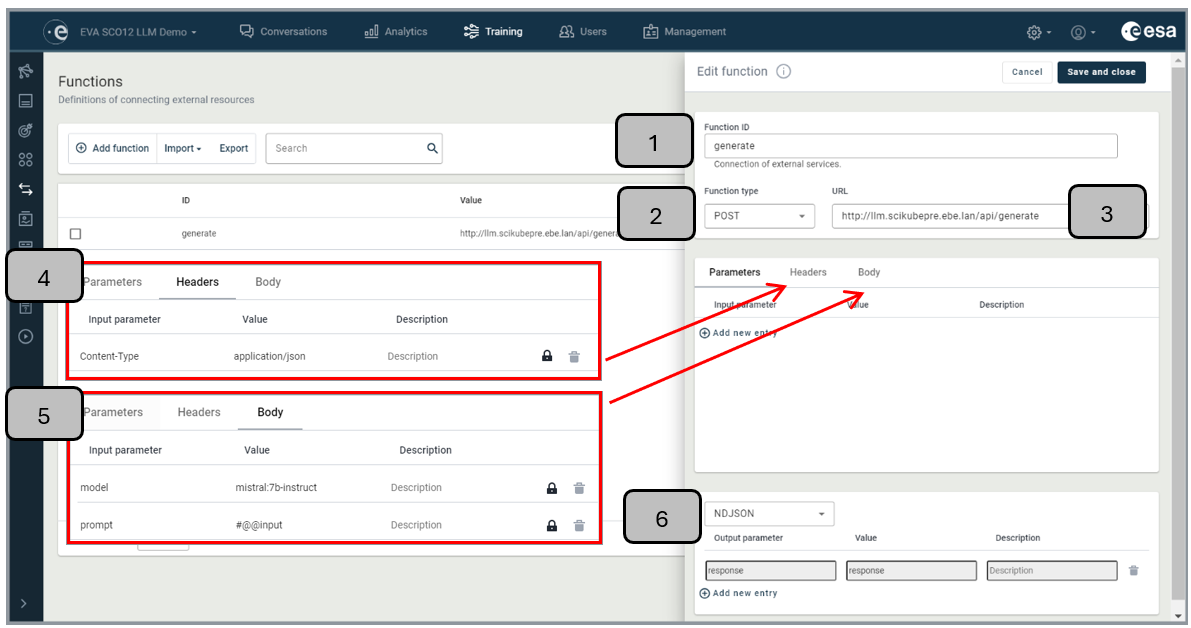
Figure 106.6. Streaming function
However, the key difference arises when specifying the output type of the function. While most web services return results as text or JSON, streaming services yield results as a stream of JSON objects, known as Newline Delimited JSON (NDJSON). By indicating the output format as NDJSON (6), the function's output will be automatically streamed to the Virtual Assistant output as an incrementally updating text message.
For streaming functions, the request type is typically POST (2). Ensure you specify the Content-Type as application/json in the header (4), and provide request parameters in the request body (5).
Using Streaming Functions in VA Scenario
To integrate a streaming function into a VA scenario, simply include it in the VA actions. The function's response will then be automatically sent to the VA output as an incrementally updating text message. Refer to the example in Figure 106.7 for a clearer understanding of how to incorporate streaming functions within your VA scenarios.
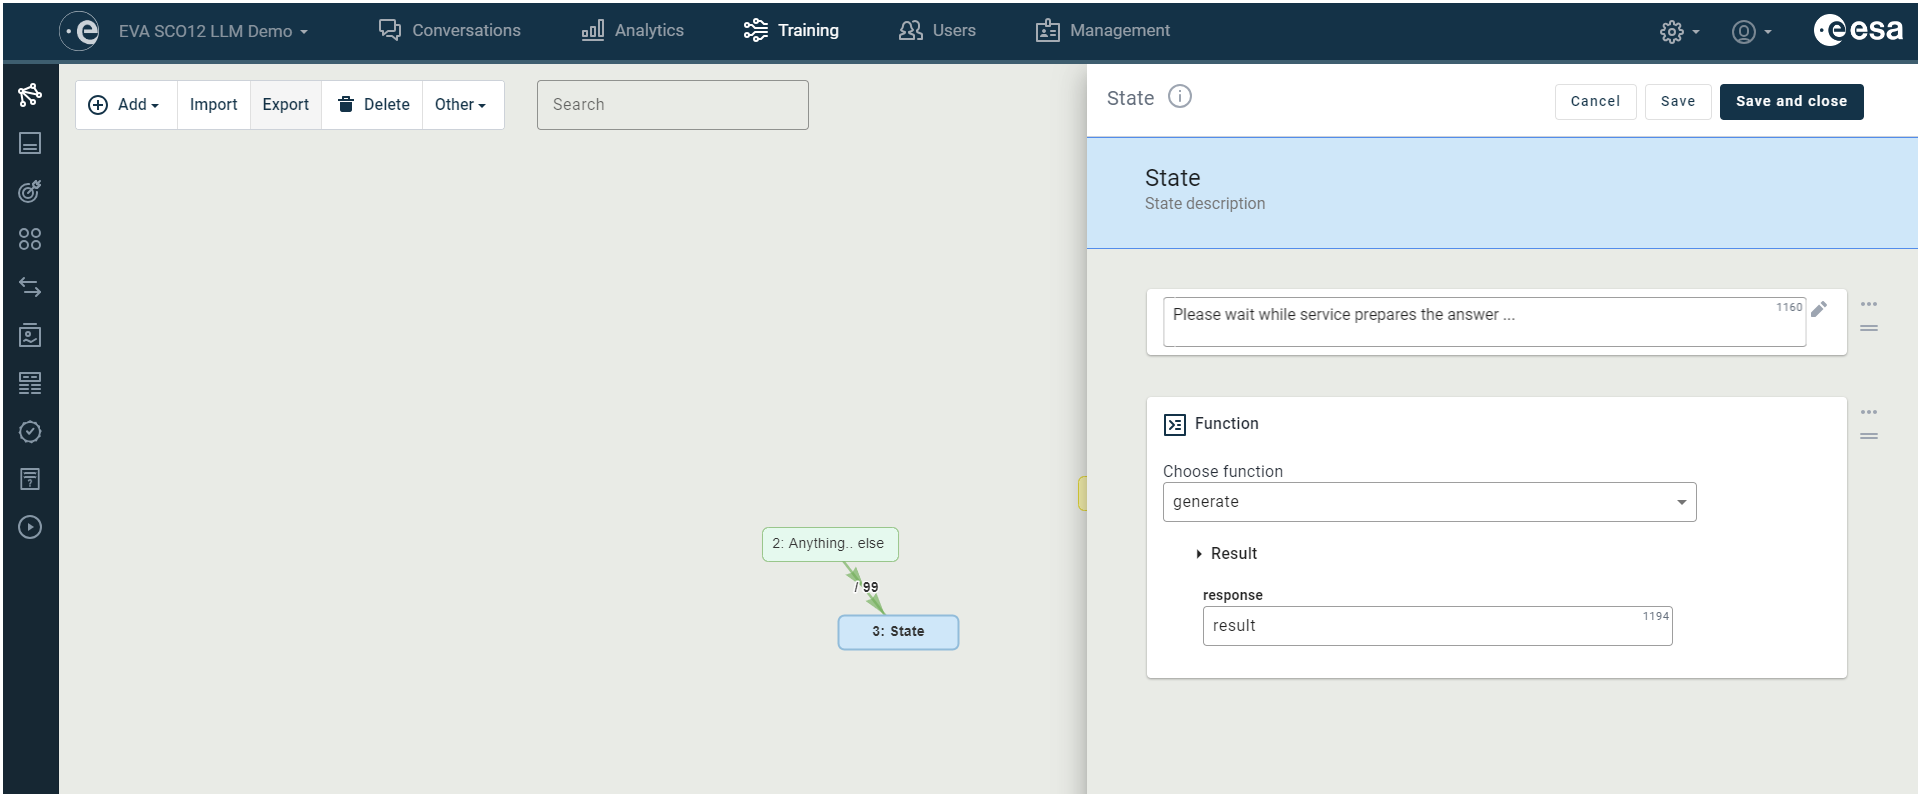
Figure 106.7. Using streaming function in VA scenario
Predefined functions
The website contains predefined functions that VA trainers can use in a scenario. You can add the function you need by selecting its name from the list of available functions in the “Function” action in the scenario state.
Function "setname"
There is no explicit information about chatbot users in the Conversations view of the platform. You can utilize the predefined “setname” function to promptly make user name data available to your operator in authorized scenarios.
In the state action “function”, select the predefined function “setname” from the list and fill in the parameters (Figure 106.8)(1).
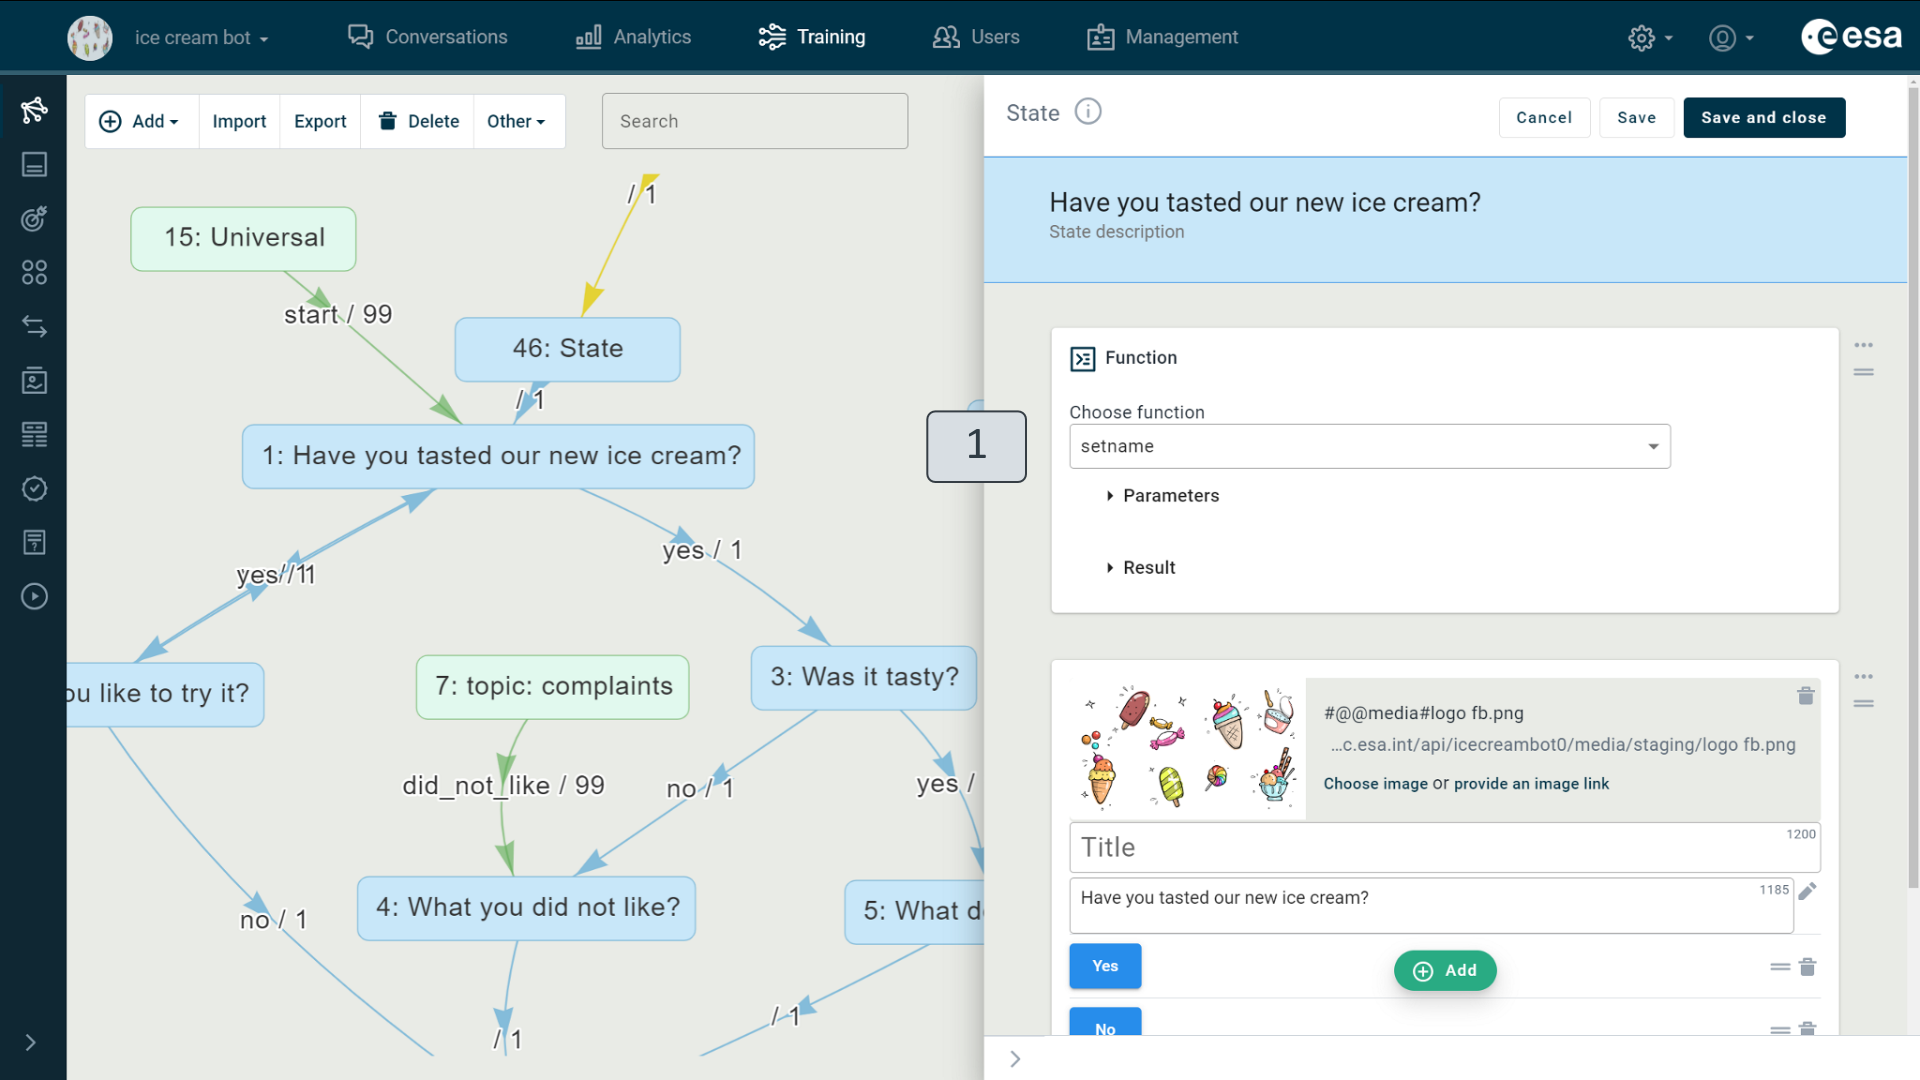
Figure 106.8. Function “setname” in a scenario
When a user talks to a VA, the user's name is saved and the Conversations view shows the user's name (Figure 106.9.)(1) instead of the anonymous “user” in the conversation list as the identifier for each conversation. The bot trainer can filter conversations by user (2).
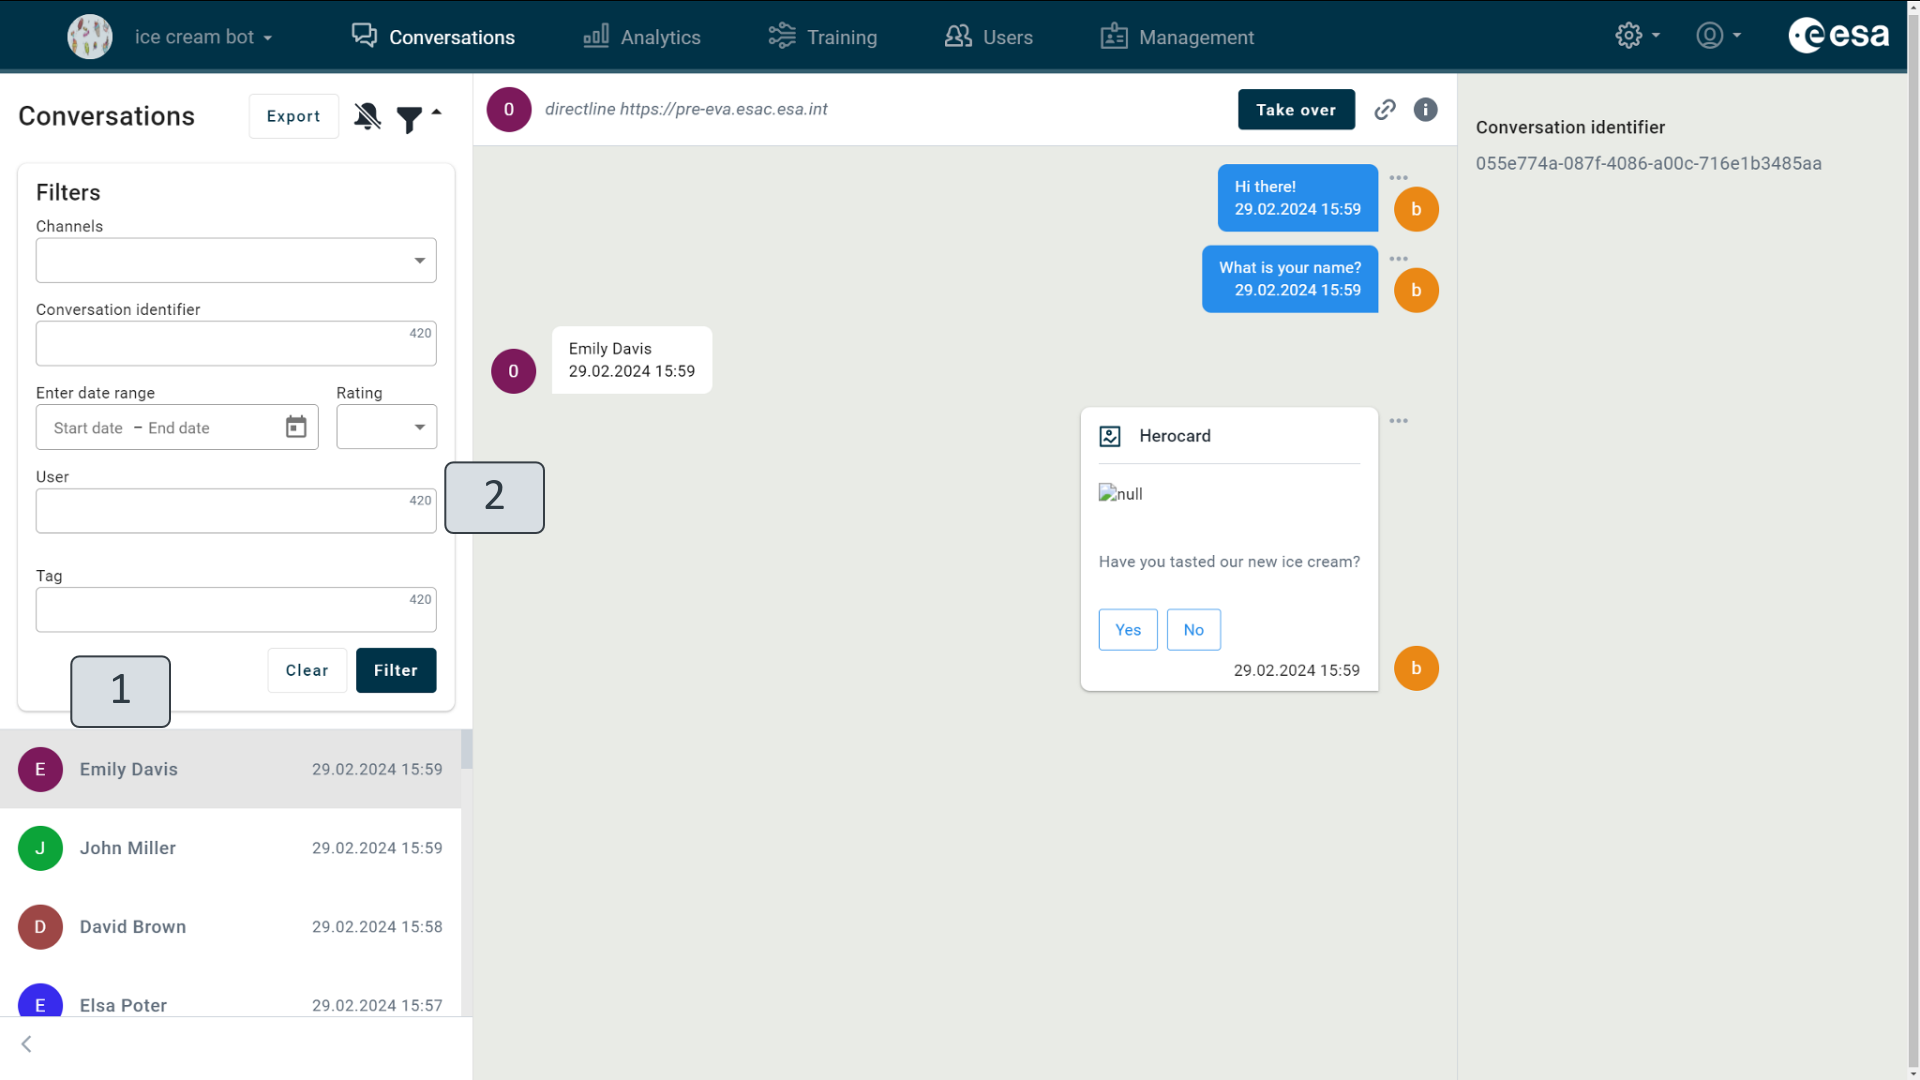
Figure 106.9. The “setname” function in Conversations view
Function "smtp"
The SMTP function is used to prompt VA to send specific information collected from a user to a specified email during a conversation. When specifying a function in a scenario, fill in the required fields with the parameters:
- Address: the email address to which the VA should send the message.
- Subject: the email subject line.
- Body: the content of the email.
- Attachment URL: the link to any attachment (if, for instance, a scenario allows users to upload files during a chat).
- History PDF: conversation history.
To view an example that has already been completed, refer to Figure 106.10. In the required scenario (1), the information request card clarifies the user's response regarding the taste of ice cream (2, 3), which is stored in the VA's context. The subsequent step (5) incorporates the SMTP function with parameters for the email address (6) where the VA should send the information, the email subject (7), and the email body (8). The content of the email provides details of the aforementioned user-provided response about the taste of ice cream. This allows the dialogue to continue between the user and the VA (9) after collecting the information, simultaneously sending the collected data to the specified email address in the scenario.
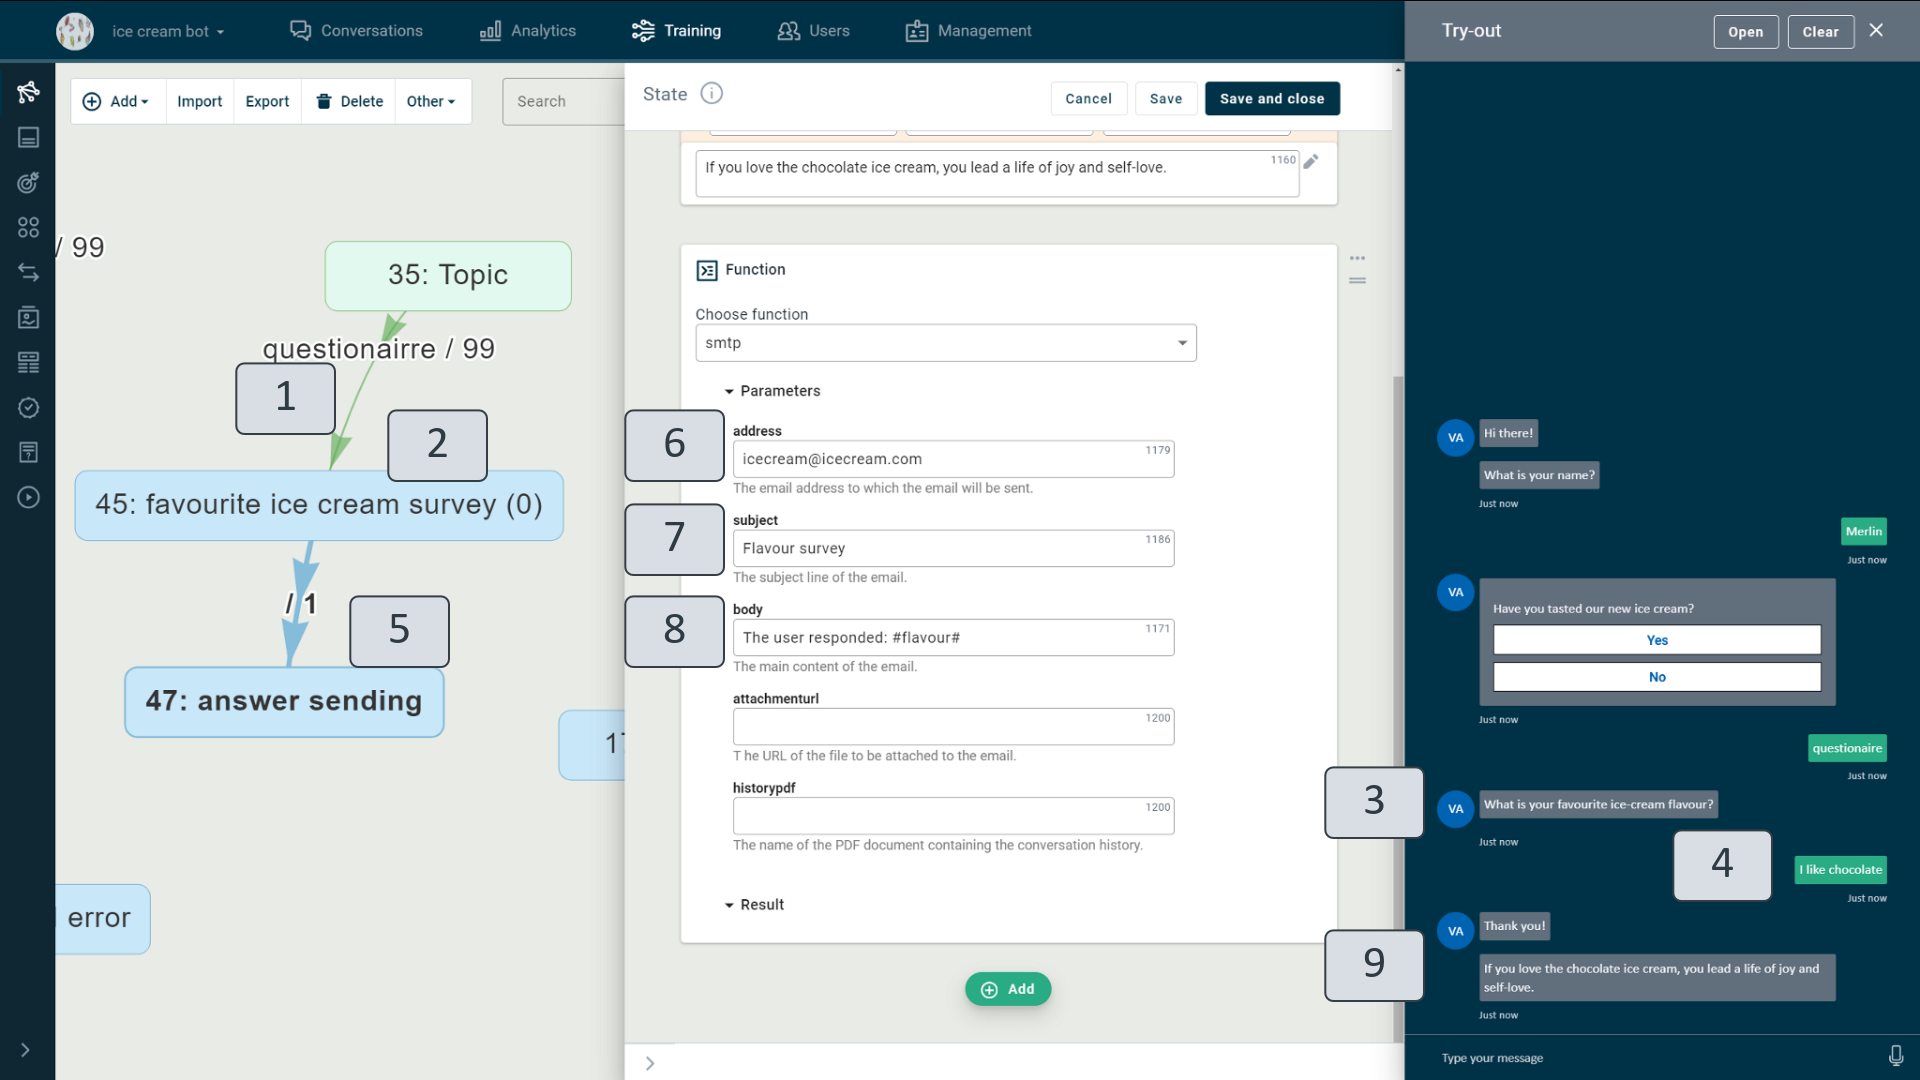
Figure 106.10. VA sends the email.
For the function to work, it must be configured in the VA settings available to the VA global administrator.
Function "generateanswer"
The “generateanswer” function (Figure 106.11) activates automatic text generation in the scenario. It enables the generation model to create a suitable response using the data added to the Knowledge base view (read the chapter "Knowledge base").
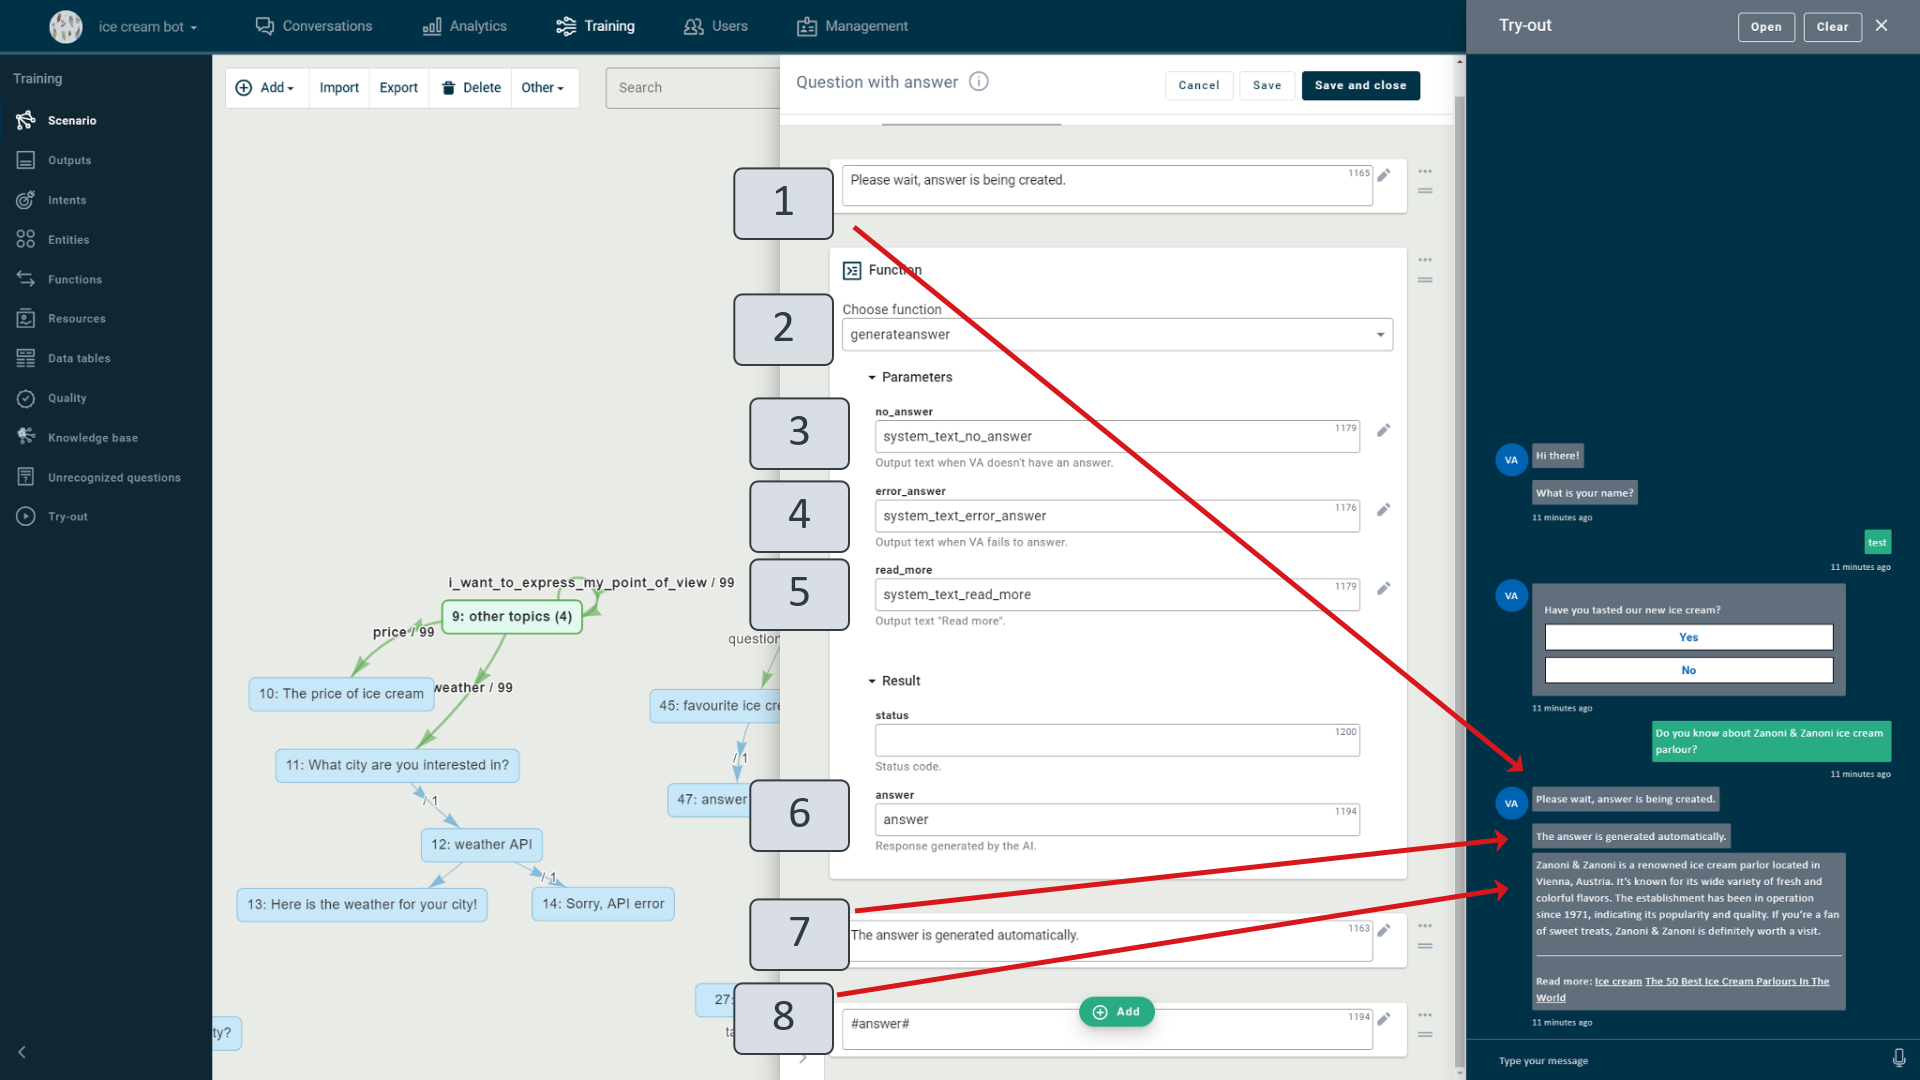
Figure 106.11. Function “generateanswer”.
For new VAs created, the function is added to the scenario by default and is placed in a topic with a self-loop that has no intent and the lowest priority (100 or higher). For the default function, fields are automatically populated (except for the “answer” field), and the associated outputs with identifiers are displayed in the Outputs view. As soon as a new VA is created, if the VA does not detect the intent of the question during a chat with the user and therefore cannot provide a pre-prepared answer, text generation is enabled, which automatically generates an answer using the information in the knowledge base.
In other VAs, you can enable the function manually (this feature only works with the Knowledge base view - the global administrator should commit the "llm"-"true" VA setting in the Management section):
- In the scenario, add the function, select the predefined function “generateanswer” from the list and fill in the function parameters with the values (Figure 106.11).
Parameter | Value | Explanation |
system_text_no_answer (3) | system_text_no_answer | Specifies the output when an answer cannot be automatically generated. |
system_text_error_answer (4) | system_text_error_answer | Specifies the text that the VA should output if the user question is perceived by the text generation model as ethically inaccurate or fails to generate an answer for any other reason. |
system_text_read_more (5) | system_text_read_more | Specifies the text that the VA displays next to the link to the reference, providing additional information about the topic. |
answer (6) | answer | The automatically generated response of AI. |
2. In the Output view (Figure 106.12), specify the function field values as output identifiers (1) and fill in the new output value fields, localising them (2).
Output ID | Example of a value | Explanation |
system_text_no_answer | Sorry, I don't know. | Output when the text generation model has not generated an answer. |
system_text_error_answer | I've misunderstood the question, please requery! | Output if the text generation model detects the question as unethical or fails to generate an answer. |
system_text_read_more | Read more: | Text in chat at the reference link to more information. |
The output view may also include the following parameter, which is not mentioned in the function:
Output ID | Example of a value | Explanation |
system_text_prompt | Please answer in friendly, simple sentences. Give examples and show pictures if they are in context... | Prompt. This is explanatory information that helps a text generation model create accurate answers. The prompt should be detailed and preferably written in English. To verify the prompt's effectiveness, navigate to the Knowledge base view and select Knowledge test. |
3. When connecting a function, it is advisable to include explanatory text in the scenario. This will warn the user about generating an automatic response (see Figure 106.11) (1,7).
To output the generated response to the user in the chat window, define it in a separate output (8) as #answer#.
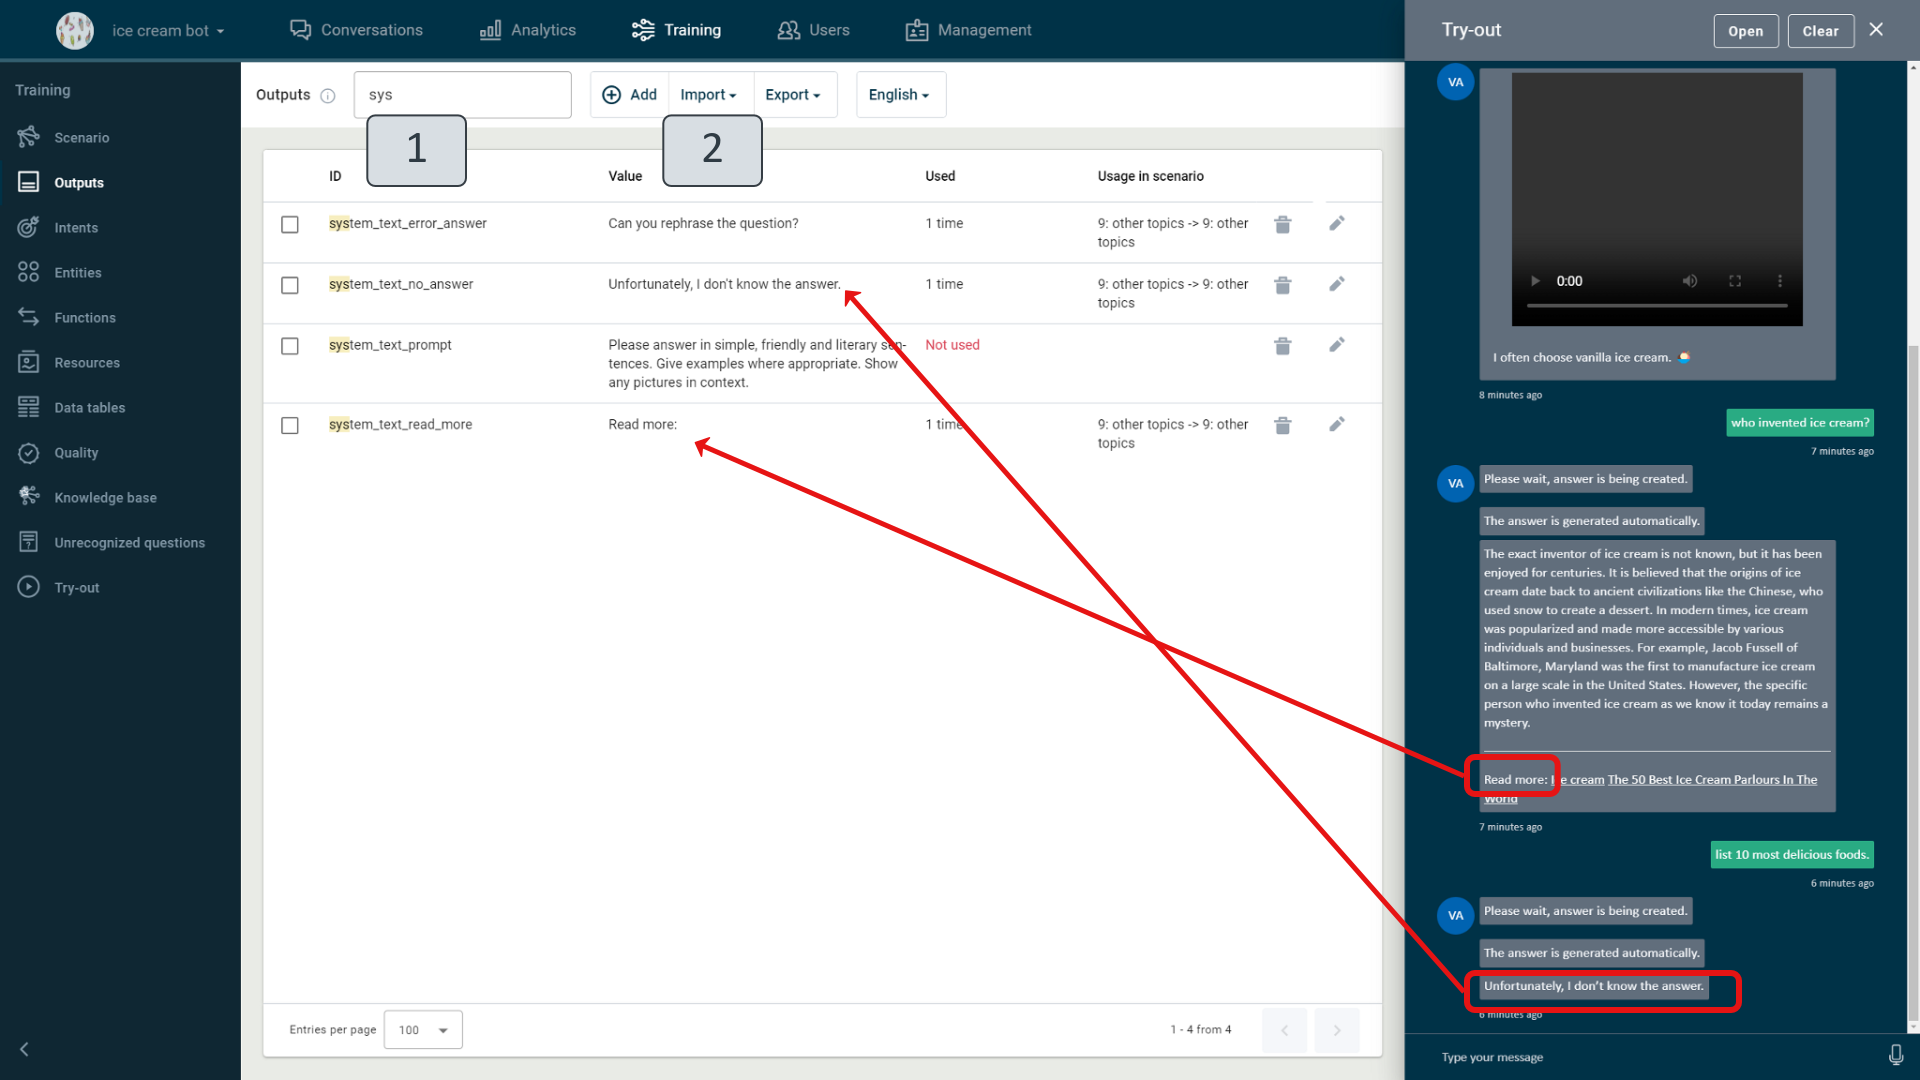
Figure 106.12. Function outputs with values.
Adaptive cards
Adaptive cards are an open card exchange format enabling developers to exchange UI content in a common and consistent way. Card author describe his content as a simple JSON object. That content can then be rendered natively inside a host application, automatically adapting to the look and feel of the host.
On the VA management site, you can add the adaptive card as a function and describe it in the Functions view. To create the card you want and get a description of it in JSON format, use the Adaptive Card Designer tool at: https://adaptivecards.io/designer.
Upon finalizing the appearance and components of the card, you can copy the code that is automatically generated on the aforementioned site, make modifications and customizations to it, and then implement it, detailing its function on the VA management site.
In the following sections, you'll read about how the adaptive card is used in the example to display neatly arranged data, alongside two other externally called API’s that provide date, time, and weather information.
Adaptive card in Function Editing Window
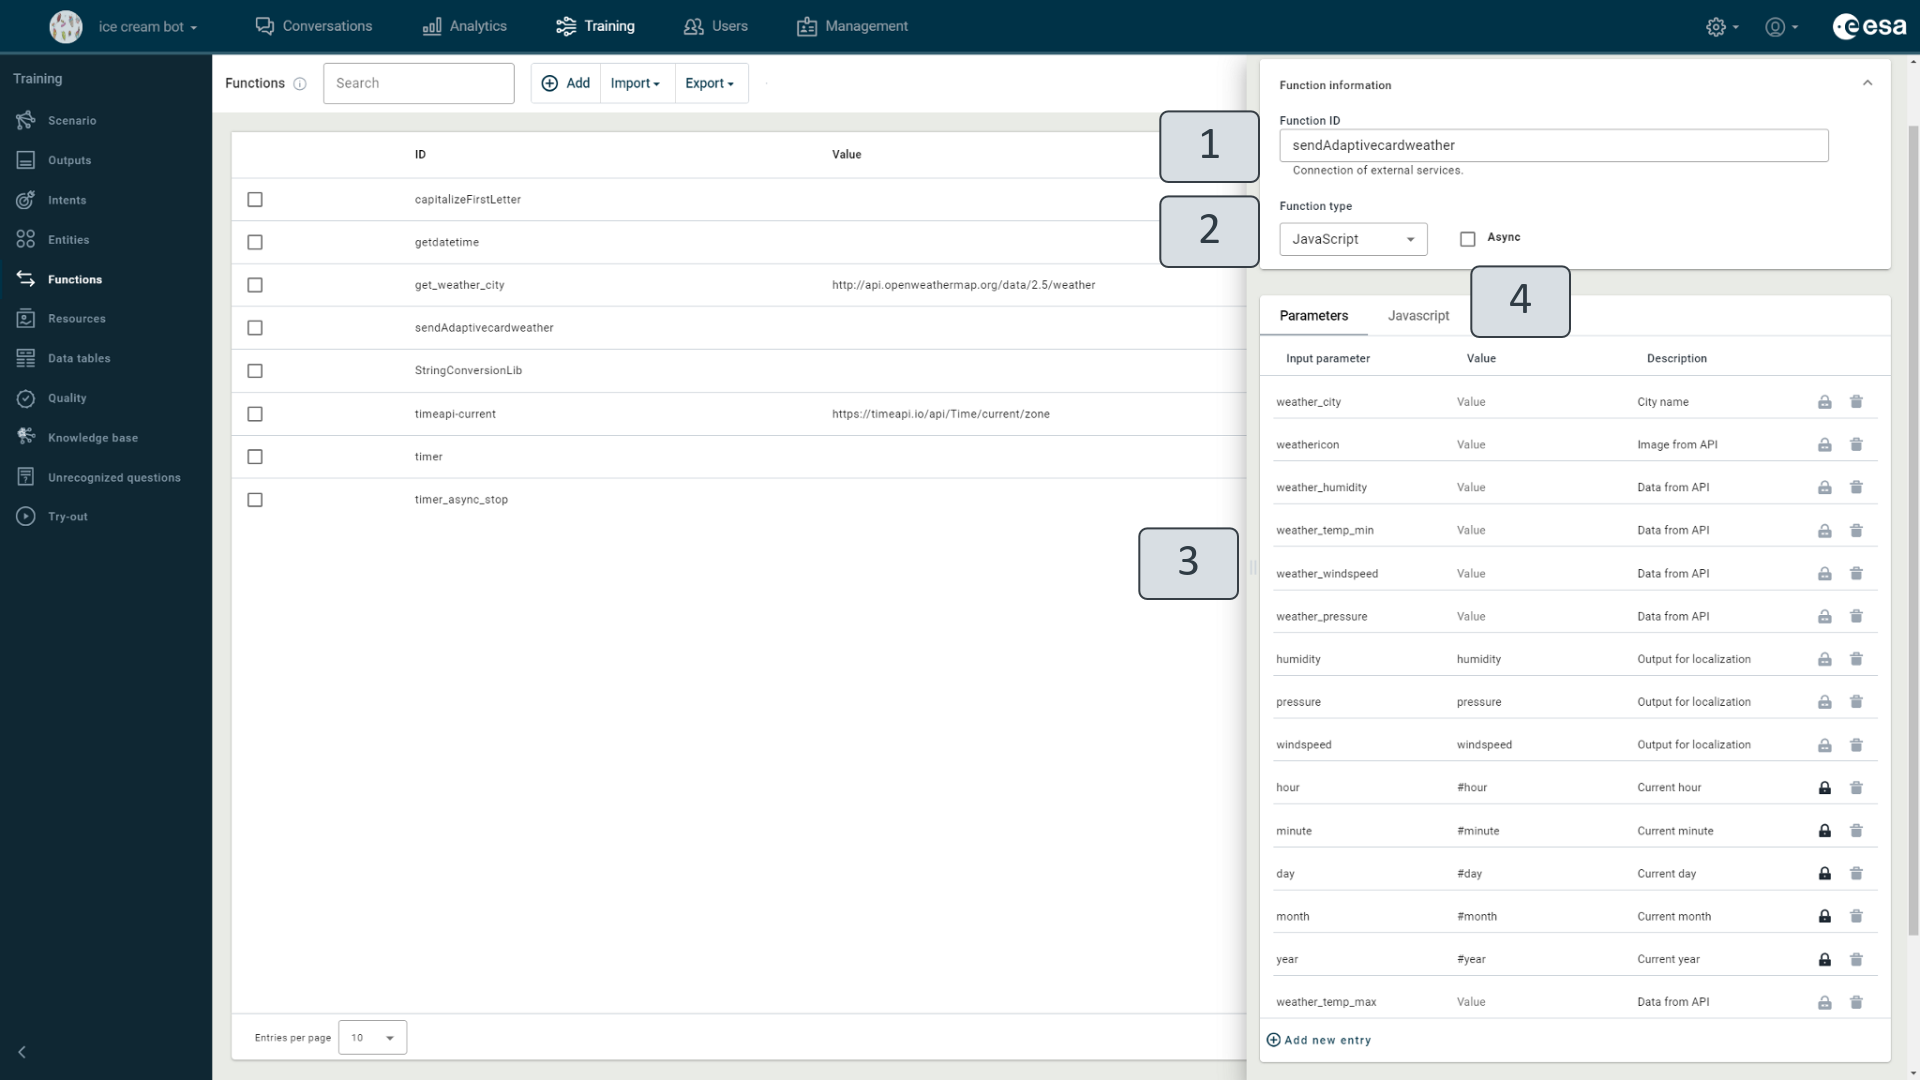
Figure 106.13. Adaptive card "sendAdaptivecardweather".
- To create an adaptive card, open the Functions view and create a new function. Think of a name for it (Figure 106.13).
- Select "JavaScript" (2).
- If the output information contains variable data, specify it in the function parameters (3).
- In the "JavaScript" section (4), type the code that will indicate what the card will look like. The sample below shows the code used in the sendAdaptivecardweather function to display information in a specially arranged way.
//sendmessage("weathericon"); var weathericonlink="https://cdn.pixabay.com/photo/2022/08/30/09/15/permission-7420699_960_720.png";
if (weathericon=="01d") { weathericonlink="http://openweathermap.org/img/wn/01d@2x.png"; } else if (weathericon=="02d") { weathericonlink="http://openweathermap.org/img/wn/02d@2x.png"; } else if (weathericon=="03d") { weathericonlink="http://openweathermap.org/img/wn/03d@2x.png"; } else if (weathericon=="04d") { weathericonlink="http://openweathermap.org/img/wn/04d@2x.png"; } else if (weathericon=="09d") { weathericonlink="http://openweathermap.org/img/wn/09d@2x.png"; } else if (weathericon=="10d") { weathericonlink="http://openweathermap.org/img/wn/10d@2x.png"; } else if (weathericon=="11d") { weathericonlink="http://openweathermap.org/img/wn/11d@2x.png"; } else if (weathericon=="13d") { weathericonlink="http://openweathermap.org/img/wn/13d@2x.png"; } else if (weathericon=="50d") { weathericonlink="http://openweathermap.org/img/wn/50d@2x.png"; } else if (weathericon=="01n") { weathericonlink="http://openweathermap.org/img/wn/01n@2x.png"; } else if (weathericon=="02n") { weathericonlink="http://openweathermap.org/img/wn/02n@2x.png"; } else if (weathericon=="03n") { weathericonlink="http://openweathermap.org/img/wn/03n@2x.png"; } else if (weathericon=="04n") { weathericonlink="http://openweathermap.org/img/wn/04n@2x.png"; } else if (weathericon=="09n") { weathericonlink="http://openweathermap.org/img/wn/09n@2x.png"; } else if (weathericon=="10n") { weathericonlink="http://openweathermap.org/img/wn/10n@2x.png"; } else if (weathericon=="11n") { weathericonlink="http://openweathermap.org/img/wn/11n@2x.png"; } else if (weathericon=="13n") { weathericonlink="http://openweathermap.org/img/wn/13n@2x.png"; } else if (weathericon=="50n") { weathericonlink="http://openweathermap.org/img/wn/50n@2x.png"; }
const obj = { $schema: "http://adaptivecards.io/schemas/adaptive-card.json", type: "AdaptiveCard", version: "1.0", backgroundImage: "https://dev-botplatform.tilde.lv/api/adam0/media/staging/sky_blue2.png", body: [ { "type": "TextBlock", "text": weather_city, "weight": "Bolder", "size": "large", "isSubtle": false, "wrap": true }, { "type": "TextBlock", "text": day + "/" + month + "/" + year + " " + hour + ":" + minute, "size": "medium", "spacing": "none", "wrap": true }, { "type": "ColumnSet", "columns": [ { "type": "Column", "width": 35, "items": [ { "type": "Image", "url": weathericonlink, "size": "stretch", "altText": "Mostly cloudy weather" } ] }, { "type": "Column", "width": 65, "items": [ { "type": "TextBlock", "text": "Min: " + weather_temp_min + " °C", "size": "medium", "spacing": "none", "wrap": true, "spacing": "Small", "color": "dark" }, { "type": "TextBlock", "text": "Max: " + weather_temp_max + " °C", "size": "medium", "spacing": "none", "wrap": true, "spacing": "Small", "color": "dark" },
      ]

      , "spacing": "Medium",
      "separator": false
    }
  ]
},
{
  "type": "TextBlock",
  "text": "----------------------------"
},
{
  "type": "ColumnSet",
  "columns": [
    {
      "type": "Column",
      "width": "stretch",
      "items": [
        {
          "type": "TextBlock",
          "text": humidity,
          "horizontalAlignment": "Center",
          "wrap": true
        },
        {
          "type": "TextBlock",
          "text": weather_humidity + " %",
          "horizontalAlignment": "Center",
          "wrap": true
        }
      ]
    },
    {
      "type": "Column",
      "width": "stretch",
      "items": [
        {
          "type": "TextBlock",
          "text": windspeed,
          "horizontalAlignment": "Center",
          "wrap": true
        },
        {
          "type": "TextBlock",
          "text": weather_windspeed + " m/sec",
          "horizontalAlignment": "Center",
          "wrap": true
        }
      ]
    },
    {
      "type": "Column",
      "width": "stretch",
      "items": [
        {
          "type": "TextBlock",
          "text": pressure,
          "horizontalAlignment": "Center",
          "wrap": true
        },
        {
          "type": "TextBlock",
          "text": weather_pressure + " hPa",
          "horizontalAlignment": "Center",
          "wrap": true
        }
      ]
    }
  ]
},
{
  "type": "TextBlock",
  "text": "----------------------------"
}
], actions: [] };
sendadaptivecard(JSON.stringify(obj));
The first part of the code defines which images to display on the card when specific weather icon data is received from the application. The following section outlines the structure of the card, including the adaptive card version (the site supports version 1.0) and describes its specific elements in sequence. At the end of the code, there is a line that converts the object into JSON format.
5.Once you have completed the function, save and publish it.
To display the result in the try-out window, you must include the function in the scenario.
Adaptive card in Scenario
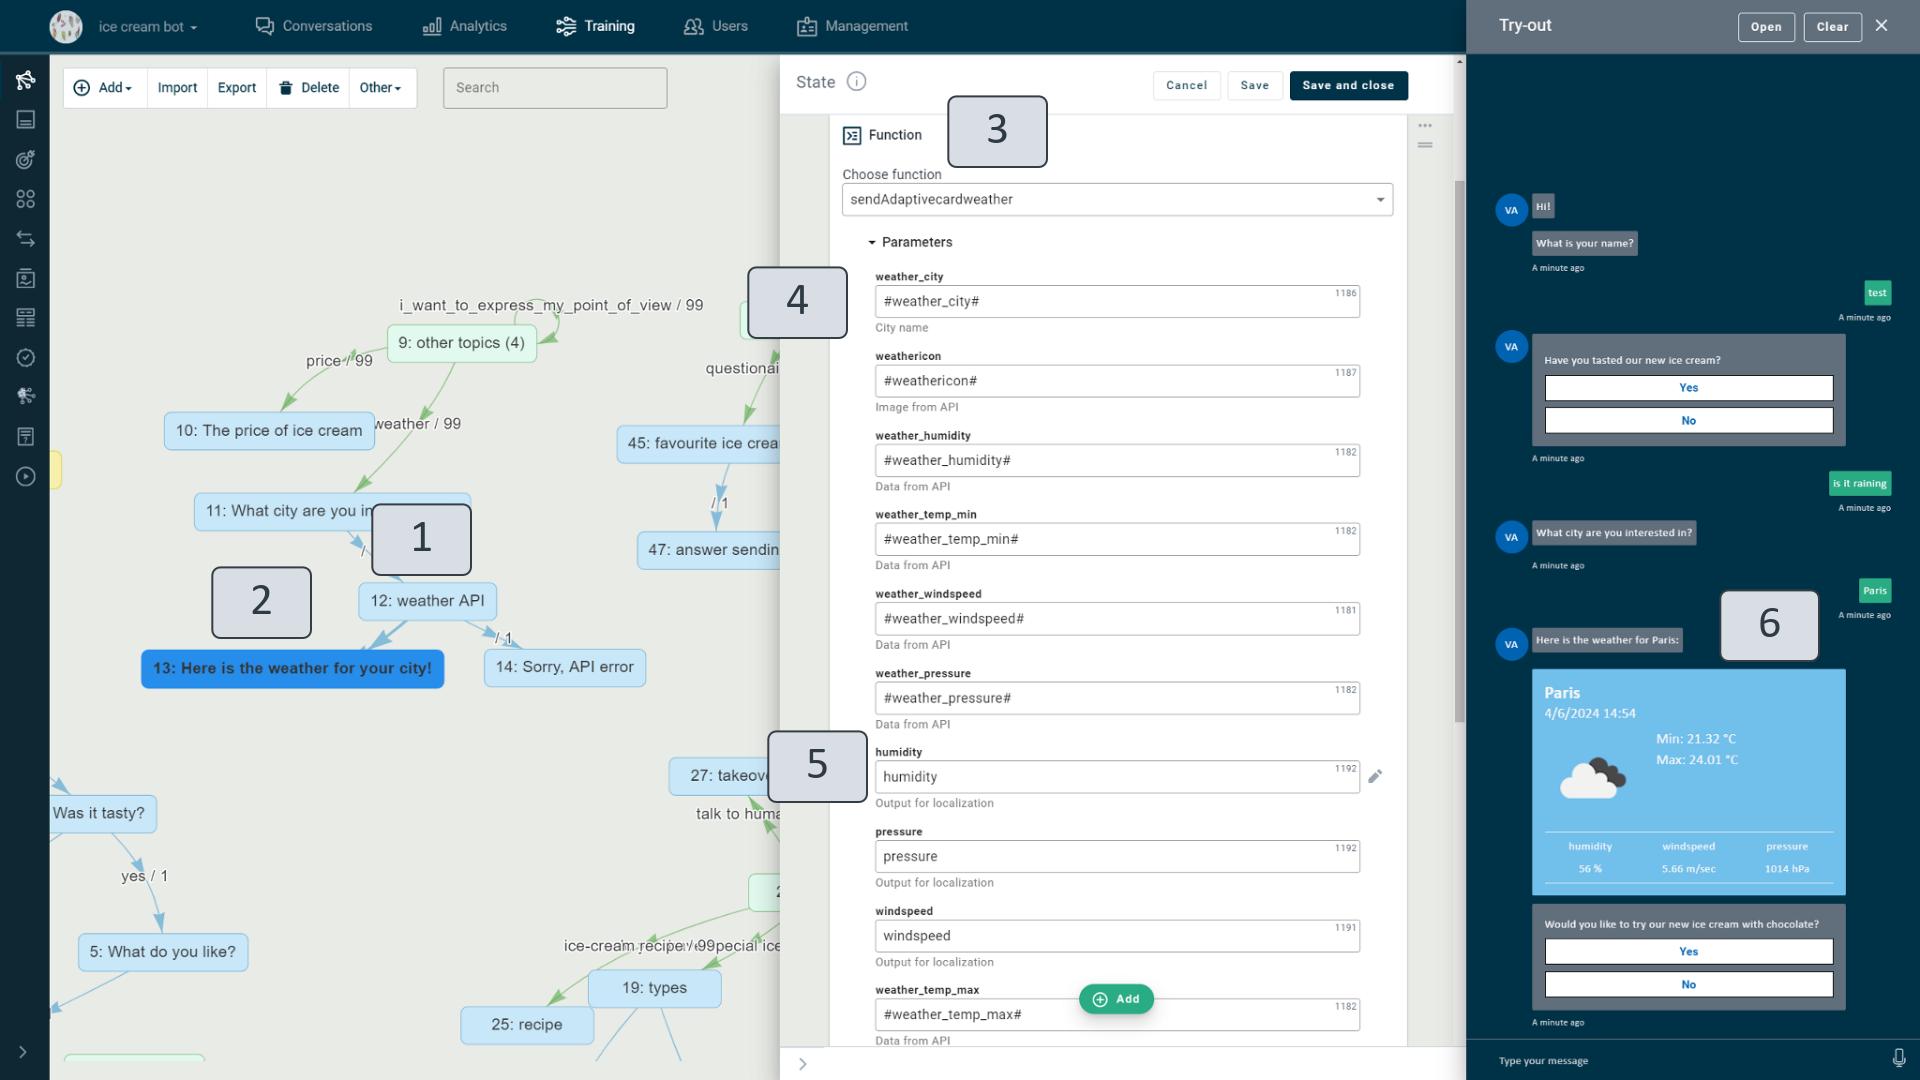
Figure 106.14. Adaptive card "sendAdaptivecardweather" in the scenario.
- Choose the state in which to show the adaptive card to the user.
In the example of retrieving weather and date data, the adaptive card will be inserted into the next state (Figure 106.14.) after the data is retrieved (1) to display the data to the user. - Add a function to the state and select the name of the adaptive card function (3) from the list. Fill in the required fields for the function.
In the example of the adaptive card sendAdaptivecardweather, parameter fields are filled with information data (4), as well as separate fields intended for displaying text information in multiple languages (5): visible identifiers are also added to the output view, where they are translated into all languages of the virtual assistant. - After filling in the fields, save the changes and publish the scenario. Check in the chat window how the adaptive card is displayed (6).
N.B.! The display of cards may vary by channel (e.g., Facebook, Teams, webchat).
Resources
In the "Resources" training view (Figure 107), you can manage all images, audio files and video files that are used in VA actions in one place.
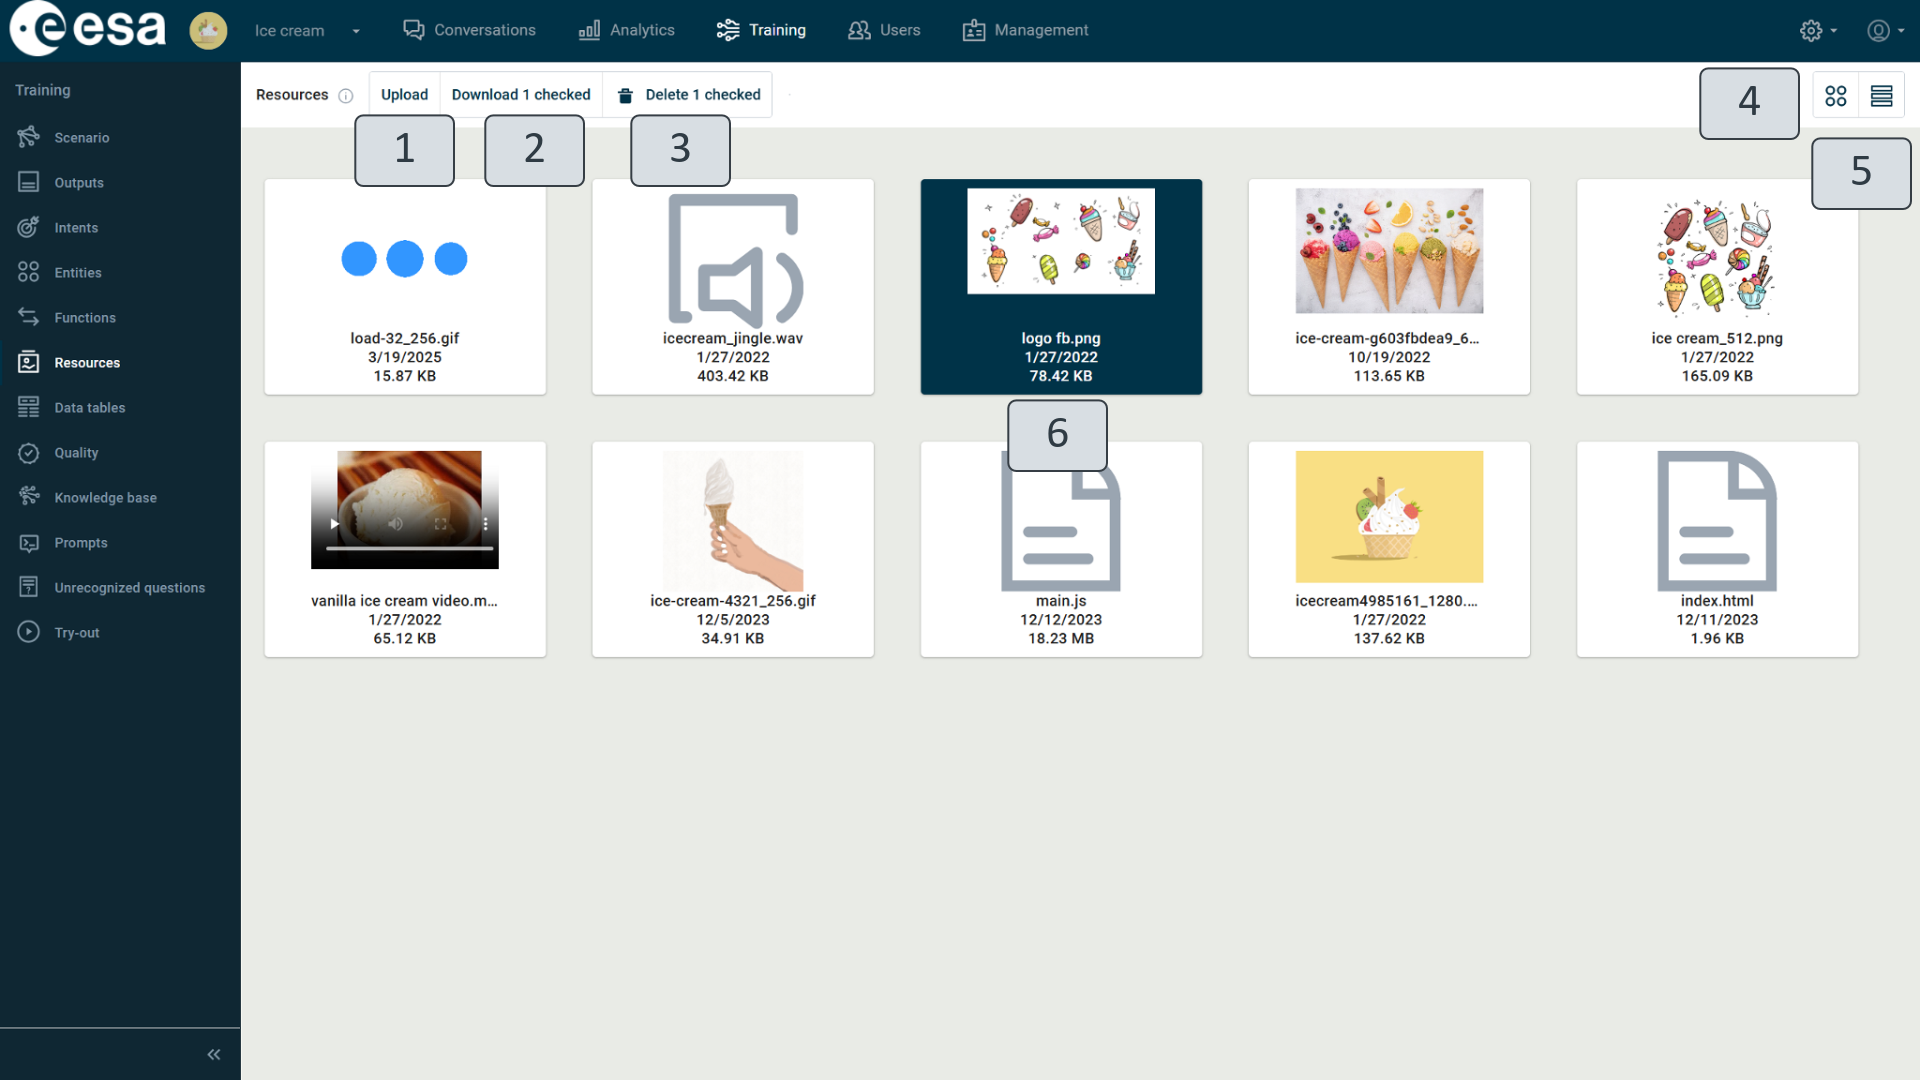
Figure 107. Training View "Resources"
You can upload the required images and other files (1) to the view, with a maximum size of 30 MB, and you can also download them from the view (2) or delete (3) the selected files (6).
Supported file format extensions:
- Images – .jpg; .jpeg; .png; .gif
- Audios – .wav; .mp3; .mp4a; .aac
- Videos – .3gp; .mp4; .flv; .mov
- Other – .json; .pdf
If you no longer need one of the resources, clicking it highlights it and the "Delete" button (3) displays the name "Delete 1 checked", which when clicked on, will result in the deletion of the item. On the right hand side, you can switch to the layouts in which you can view resources. When you click on an icon with circles (4), all resources appear in the main window as thumbnails. To view the resources arranged in a list, you must click an icon with rectangles (5).
Data tables
The "Data Tables" (Figure 108) training view is included to make it easier and more convenient to design actions with outputs, which use different data with a specific structure, such as branch addresses, phone numbers and e-mail addresses, etc.
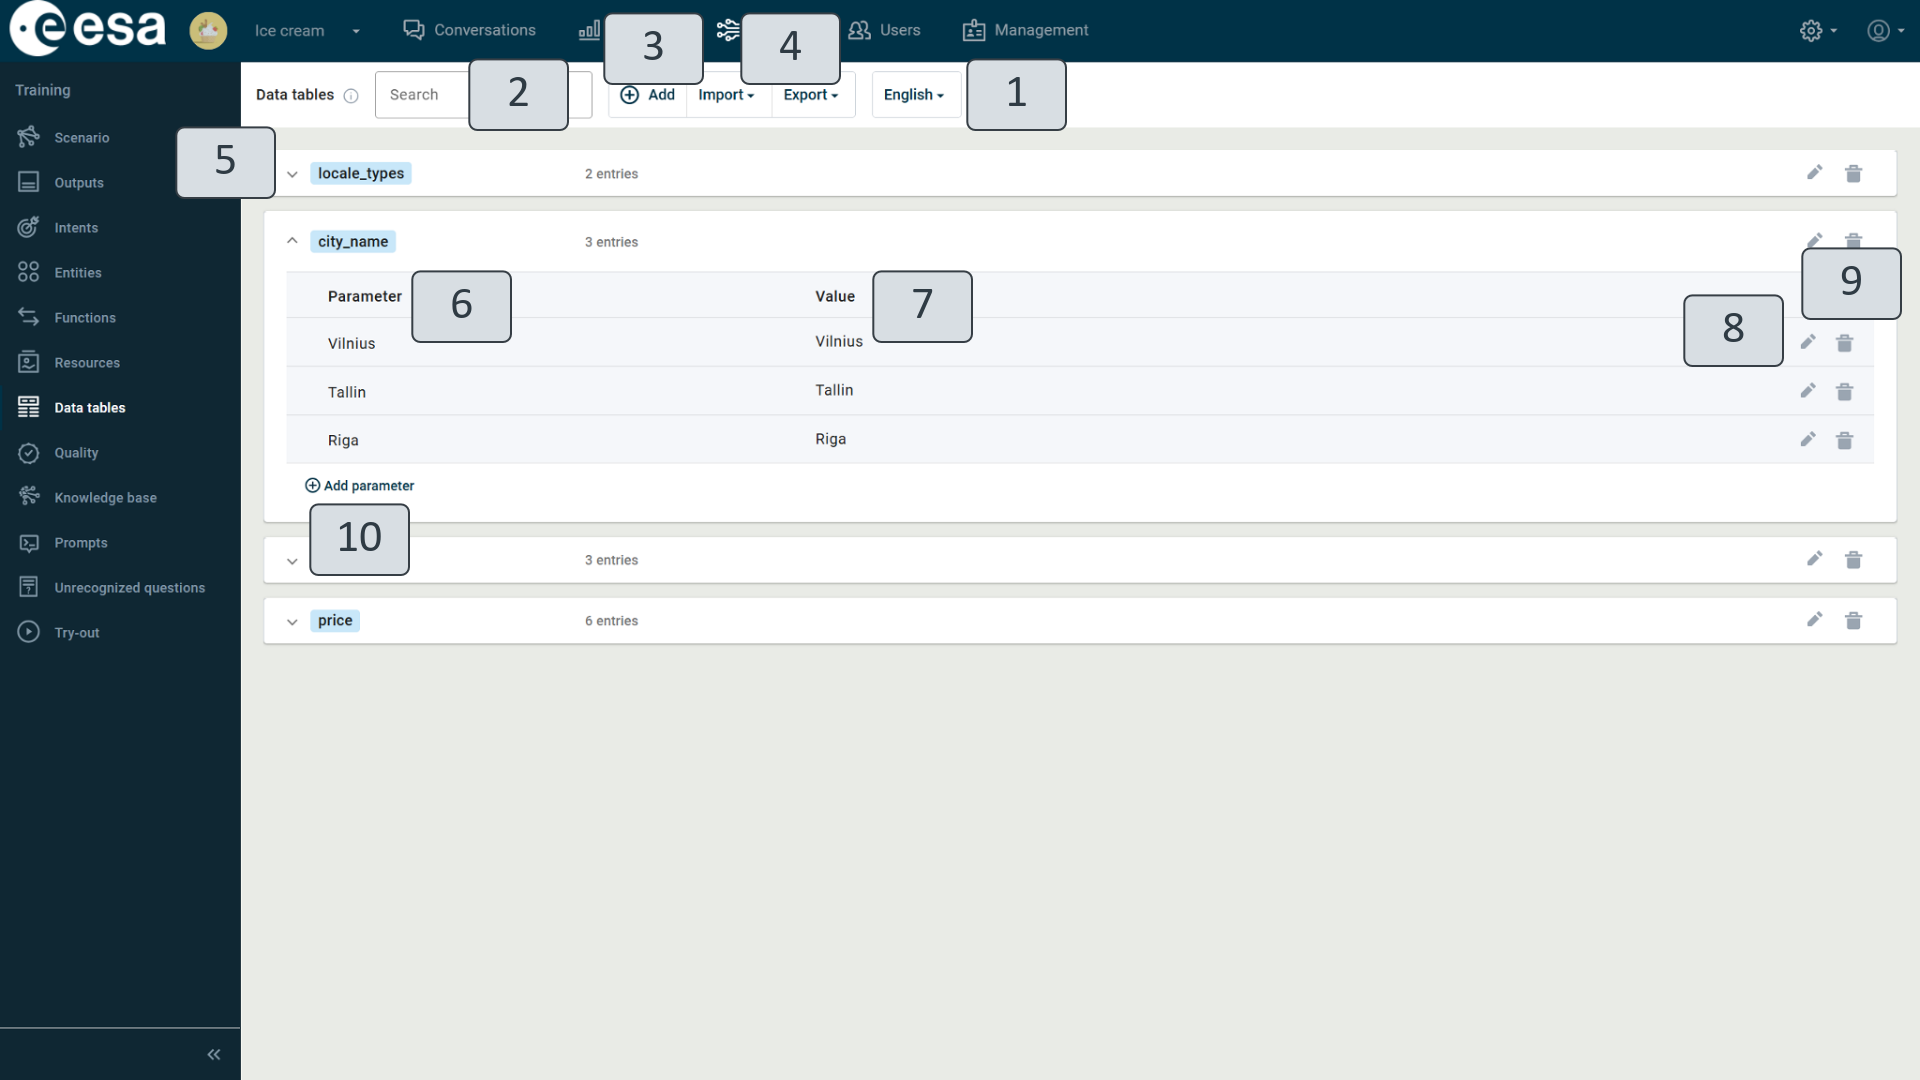
Figure 108. Data tables
The view (Figure 108) contains a changeable language (1), you can export and import data in JSON format (3). When importing data tables, you are prompted to choose one of two options:
- "Add" - all existing data tables are saved and imported ones are added to them;
- "Replace" - delete and replace all existing data tables with new, imported ones.
You can browse data table titles or parameters by typing the information you're looking for in the search field (4).
In the top right-hand corner of the view, a message is displayed to the user if changes have been made to data tables, which have not yet been published. For them to take effect, the "Publish" button must be clicked.
All data tables are displayed by their main name in the form of a list in the middle of the screen. To include a new table in the data table view, you must click on "Add table" (2). Blank record fields in the new table will be opened. Table data fields (5) consist of a parameter column (6) and a value column (7). To add a new parameter to the table, click "Add parameter" (10). You can edit both the table and the individual parameters by clicking the pencil icon on the right hand side (9), or delete them by clicking the Recycle Bin icon (8).
When writing output, the data in the table is referred to in an entry as follows: data table (table title, parameter) - for example, referring to the price of "Pols" ice cream price: dt(price,pols).
In the following example of a data table (Figure 108), we see that five ice cream prices are shown. In order to record them in a scenario, five different outputs should be recorded in the output view, which should then be specified in the scenario. Moreover, in order to define when each particular output is to be displayed to the user, the scenario should indicate a prerequisite for each output, namely the output for "Pols" ice cream should be shown when the user's choice is "Pols" ice cream.
If the data is arranged in a data table, only one output should be written and indicated in a scenario, which allows you to read the desired variable value stored in the context at the same time: "The price of the ice cream #products is dt(price,#products)." (Figure 109).
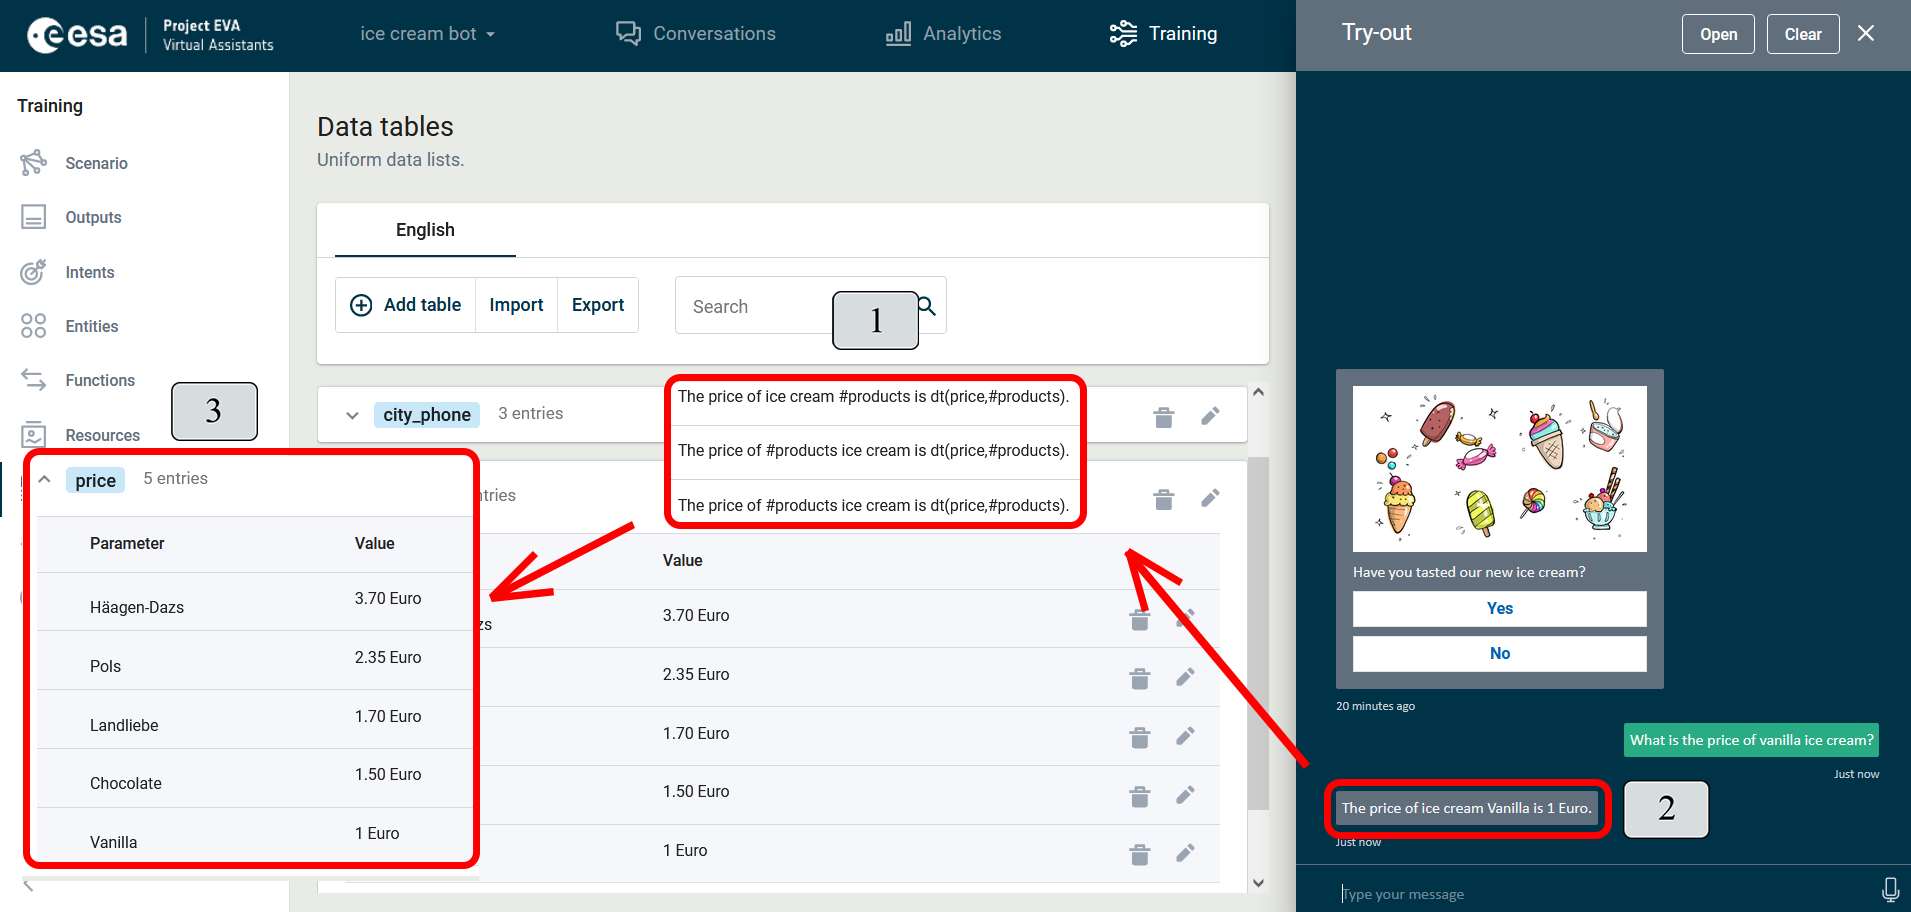
Figure 109. Example of reading data from the data table
In example (Figure 109), the price information for a certain type of ice cream (2) is read from the data table (3). The transcript of its record (1) is as follows:
- dt - reference to the data table;
- price - name of data table;
- #products - an indication in a given scenario to take any variable with the identifier "products" saved in the previous context;
- other text - normal output text.
Quality
The "Quality" training view (Figure 110) has been developed for VA intent browsing. If the VA's knowledge is particularly extensive, some intents can be quite similarly worded, and therefore hard to distinguish for the assistant. To understand which intents will require changes to make recognition quality even better, the quality view is easy to use.
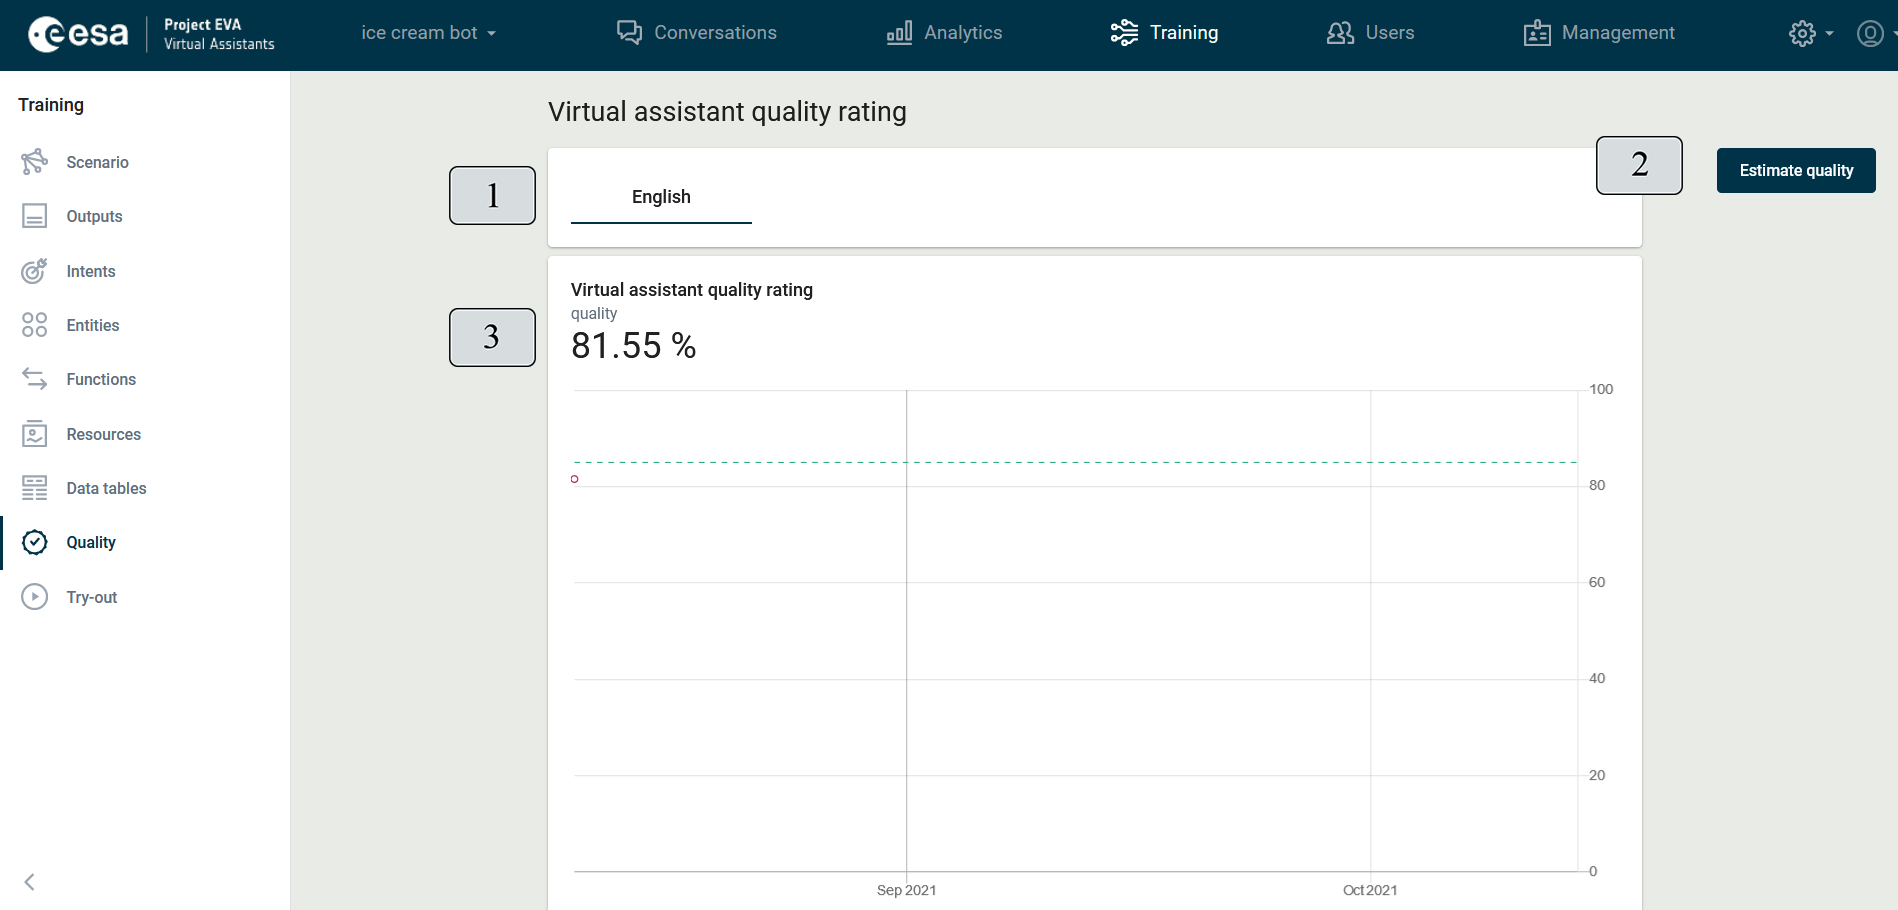
Figure 110. Training View "Quality"
In the "Quality" view (Figure 110), you can see VA intent quality indicators. For each of the assistant's languages, you can switch your own quality window (1) by clicking the name of the language you need.
To estimate the quality of all the intents, you must first add and publish the necessary intents and examples of them in the "Intents" view. In case if there is at least one intent in the "Intents" view with less than 5 examples, the button "Estimate quality" will not appear. Add missing examples and publish the intents in the "Intents" view, and then click the "Estimate quality" button in the "Quality" view (2). The estimation process is initiated. When the quality estimation has been completed, a VA quality percentage rating (3) appears, and when you scroll down the window describes the data in more detail that the VA might misunderstand (Figure 111).
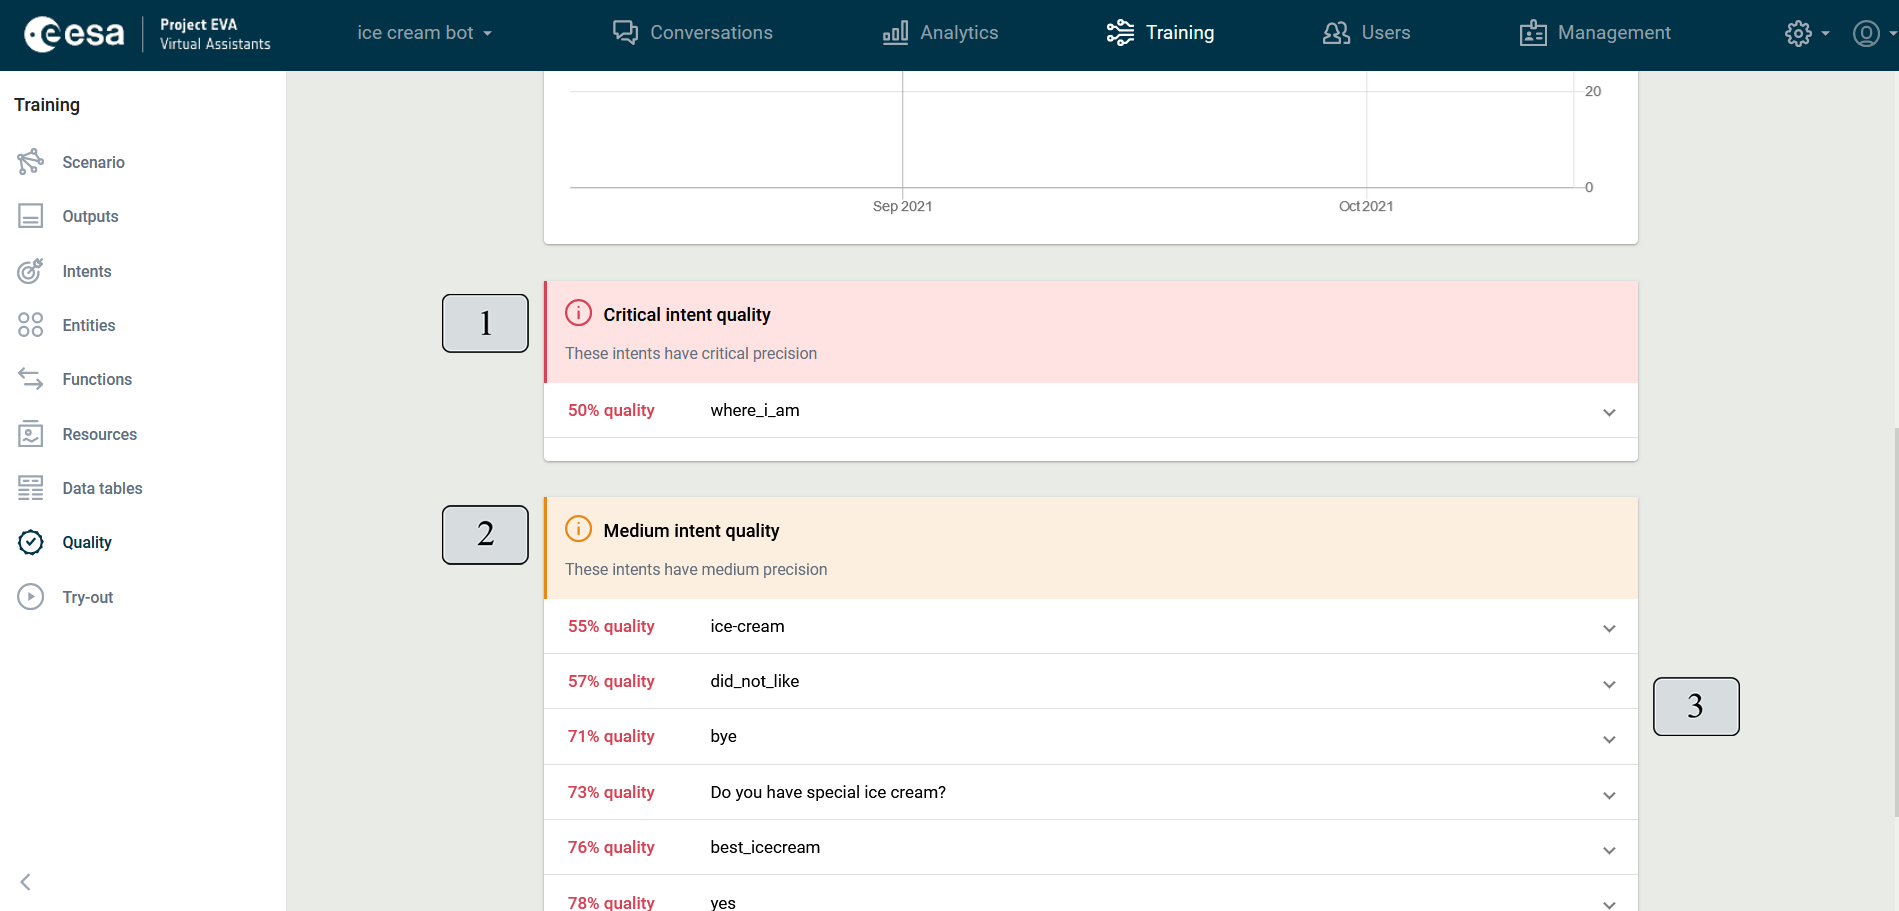
Figure 111. Intent Quality Indicators
A window is displayed separately for intents of critical quality (Figure 111) (1) along with a window showing medium-quality intents (2).
Data that the VA considers to be ambiguous can also work in this view, thus improving it. Clicking the downward arrow opposite the intent (Figure 111) (3) opens a menu with a message about ambiguous intents and the titles of intents which the specific example overlaps (Figure 112) (1).
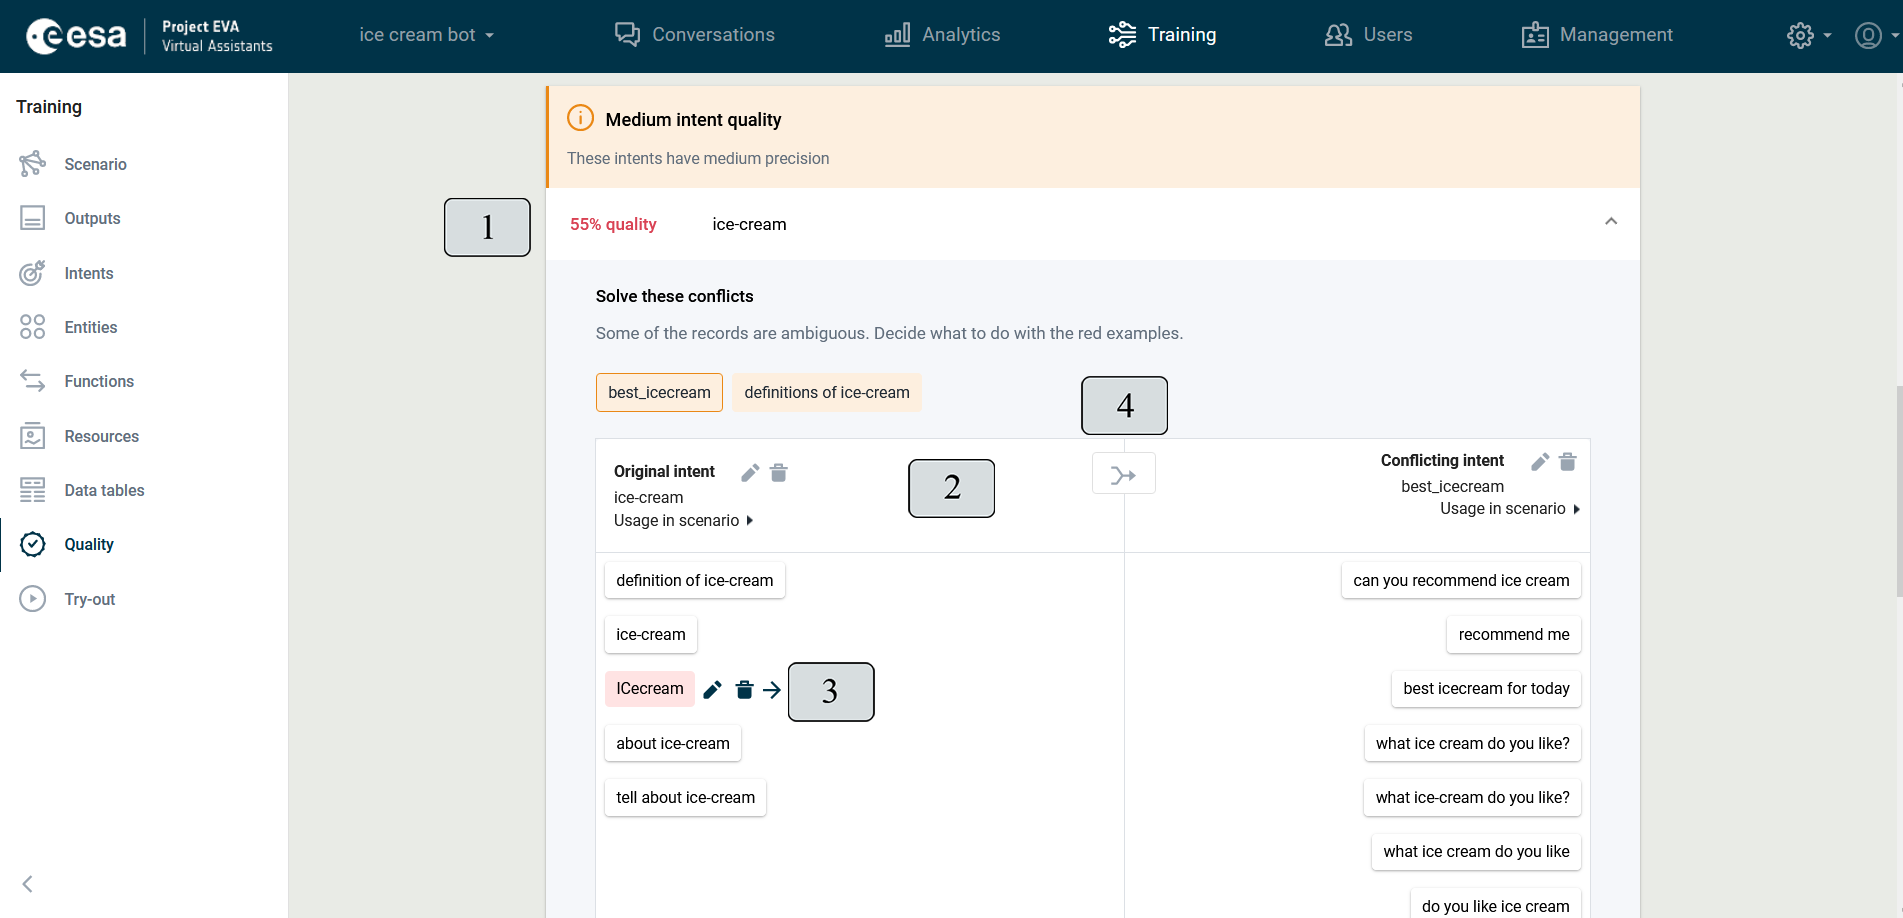
Figure 112. Work in Quality View
When you click on one of the intent titles, specific examples of both comparable intents (2) and the ambiguous example highlighted in red are displayed.
In example, three actions can be taken (3):
- edit - pencil icon;
- delete - recycle bin icon;
- move the example to a second intent - arrow icon.
You can combine both goals into one by clicking the join icon (4) in between the examples of both intents.
When the fine tuning work has been completed, the objectives must be re-published and the quality estimation can be repeated.
Knowledge base
The Knowledge base view connects separately.
See ESA-MLSOVA-OM-0002, section "Working with the knowledge base", for detailed information on the knowledge base structure, contents, and usage instructions.
File editing window
For details about file data and guidance on working with files, refer to ESA-MLSOVA-OM-0002, section "File editing window".
Preparing files
For details about working with files, reder to ESA_MLSOVA-OM-002, section "Preparing files".
Prompts
See ESA-MLSOVA-OM-0002, section "Prompts", for detailed instructions.
Prompt editing window
See ESA-MLSOVA-OM-0002, section "Prompt editing window", for detailed instructions.
Referencing a prompt in the platform
See ESA-MLSOVA-OM-0002, section "Referencing a prompt in the platform", for detailed instructions.
Unrecognized questions
The “Unrecognized questions” view (Figure 112.5) shows all user utterances that have not gained enough confidence in the conversation with the VA to detect the intent.
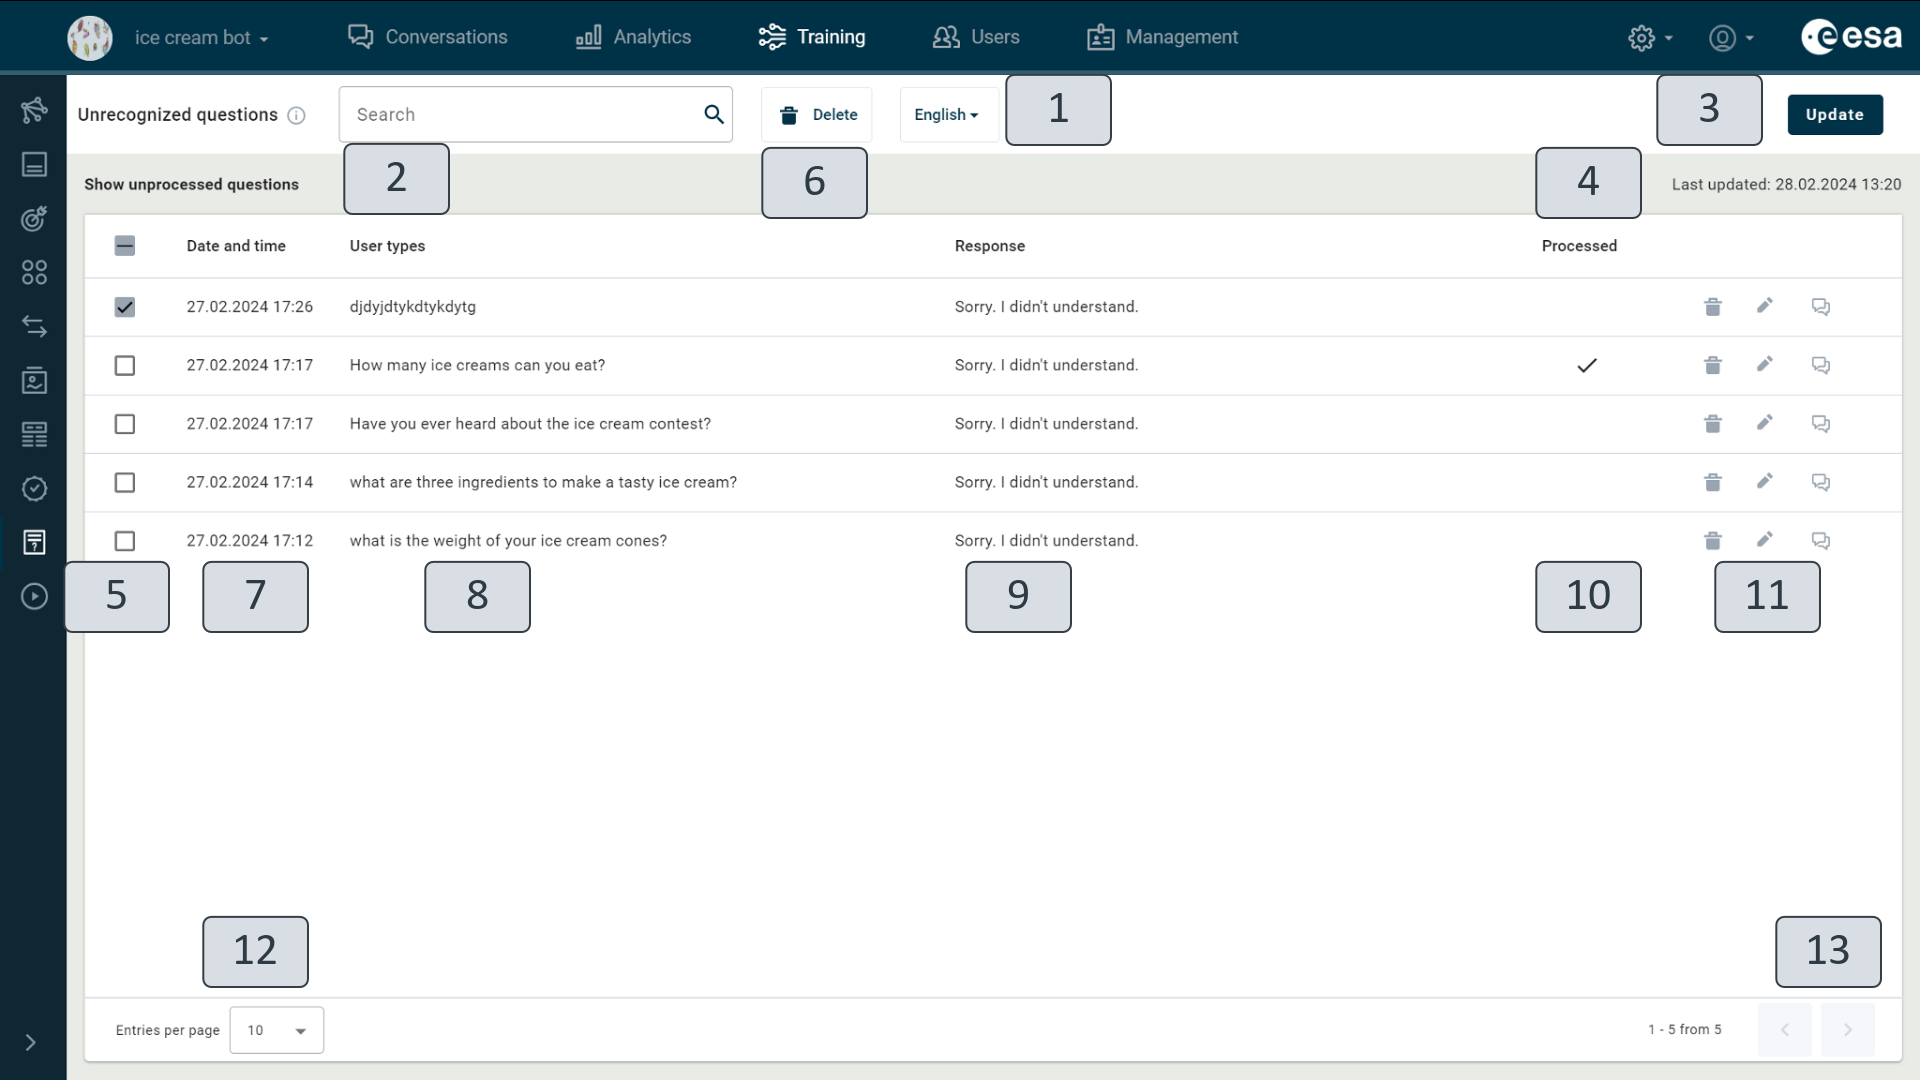
Figure 112.5 Training view “Unrecognized questions”
The view contains a language menu (1). If there are multiple languages in a VA, you can view unrecognized questions by language by selecting the desired language.
There are two options to browse the view (2):
- Show unprocessed questions – shows questions that have not yet been added to the intent.
- Show all questions – shows all unrecognized questions, including processed questions.
To see the latest unrecognized questions from users, click the “Update” button (3). The date and time of the last update are shown on the right-hand side of the view (4).
You can mark the questions that are worthless or have already been processed (5) and delete them altogether (6). For each question, the “Date and time” column shows the date and time it was added (7) and the “User types” column shows the content of the question (8). The “Response” column (9) displays a preview of the response to provide an idea of what the VA responded to in the conversation. If a trainer has already added the question to the intent, a checkmark will appear in the “Processed” column (10). You can also delete questions individually by clicking on the recycle bin icon (11).
You can choose how many questions to display on a page (12), and go to the next page (13) if you have many records.
Unrecognized question processing window
The “Unrecognized questions” view allows you to easily browse and instantly process user phrases that are not recognized by the VA.
There are two ways in which the VA trainer can improve VA knowledge:
- Extend the knowledge base by teaching the answer information in a broader explanatory text and saving it in the knowledge base for future use by the automatic response generation model.
- Supplement intents by teaching the unrecognized and unanswered question to the VA as an intent and specifying the answer.
When you click on the text that you want to process or the pencil icon next to it (Figure 112.5) (11), the unrecognized question processing window opens on the right side of the page (Figure 112.6).
Extending the knowledge base. A VA trainer can add a descriptive text answer to the knowledge base file instead of adding an example to the intent or creating a whole new intent. The next time a user asks such a question, the answer will be automatically generated.
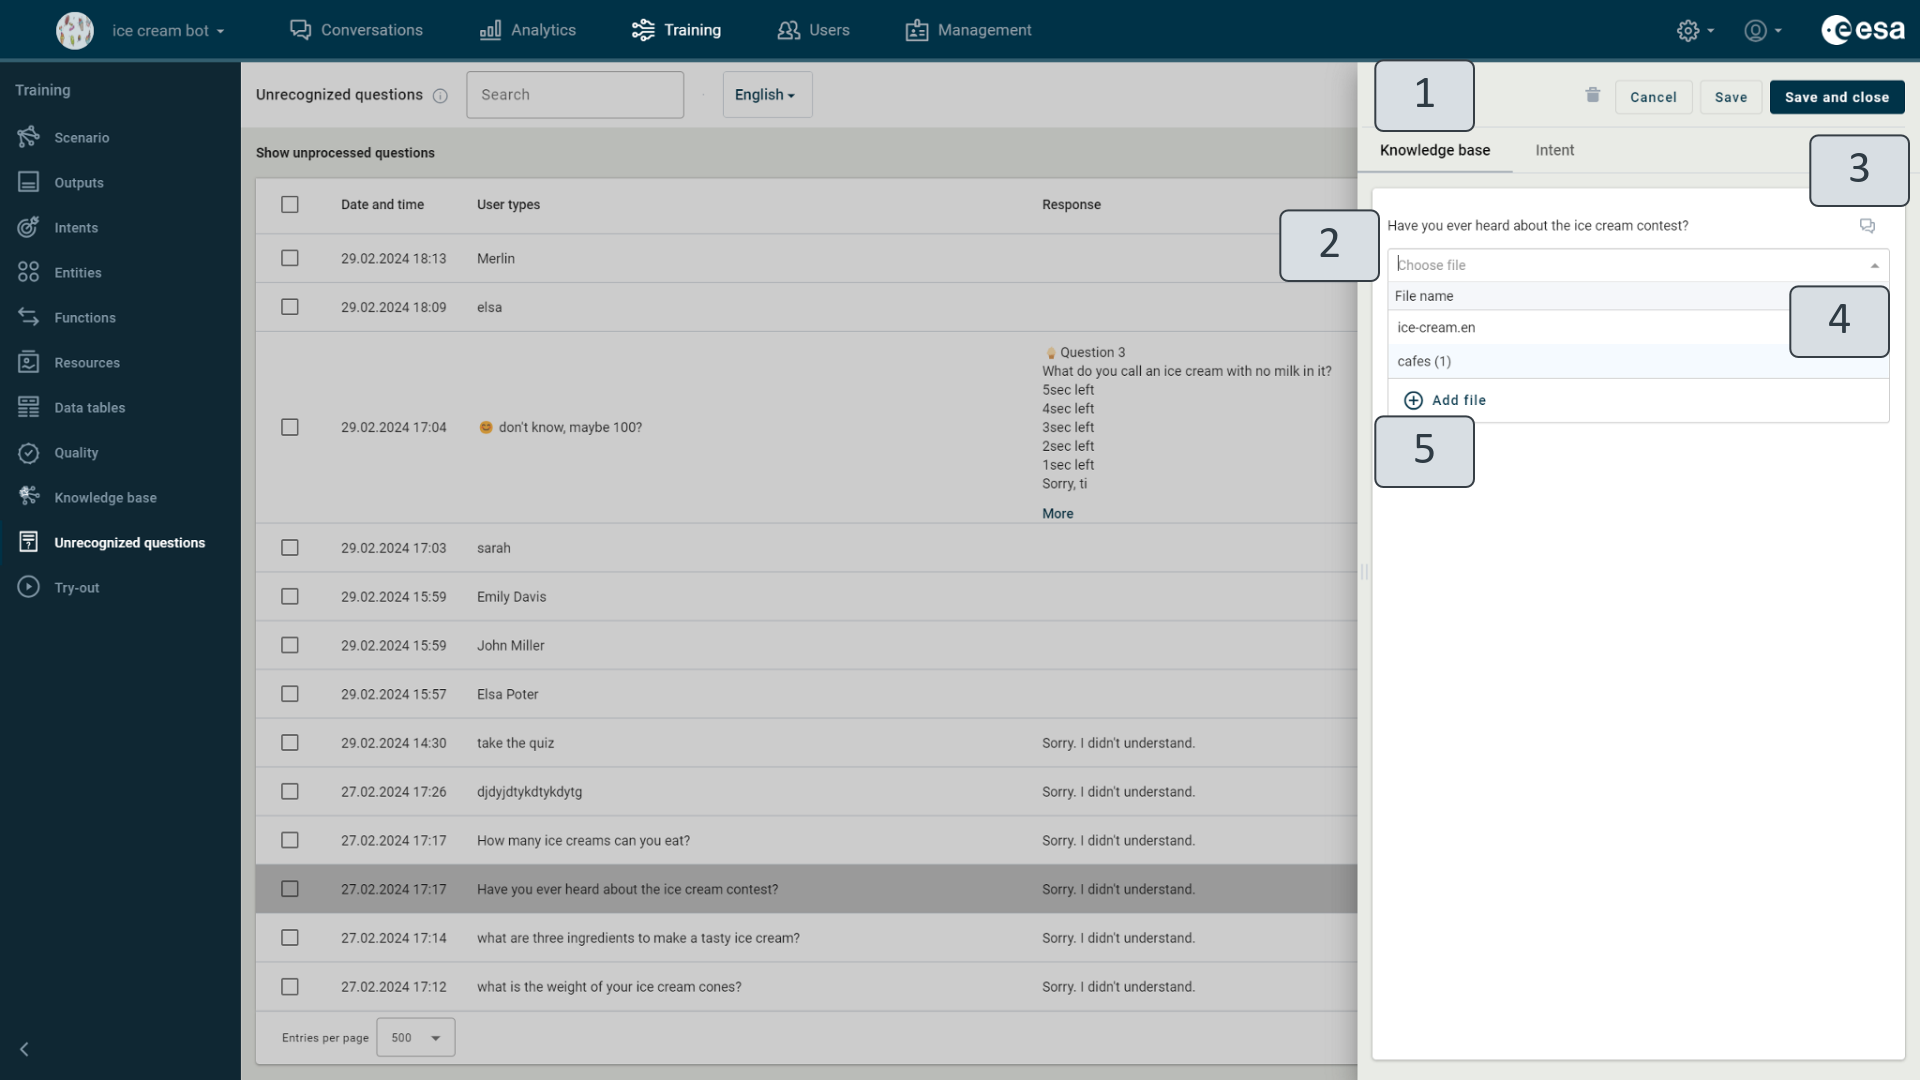
Figure 112.6. Unrecognized questions. Knowledge file selection.
To add new knowledge, click on Knowledge base (Figure 112.6) (1). In the window you can see the question written by the user (2) and, if necessary, the whole conversation that took place (3). You can select one of the files already in the Knowledge base from the drop-down menu (4). If you select this file, the new information will be added at the end of the file. Alternatively, you can create a new file (5).
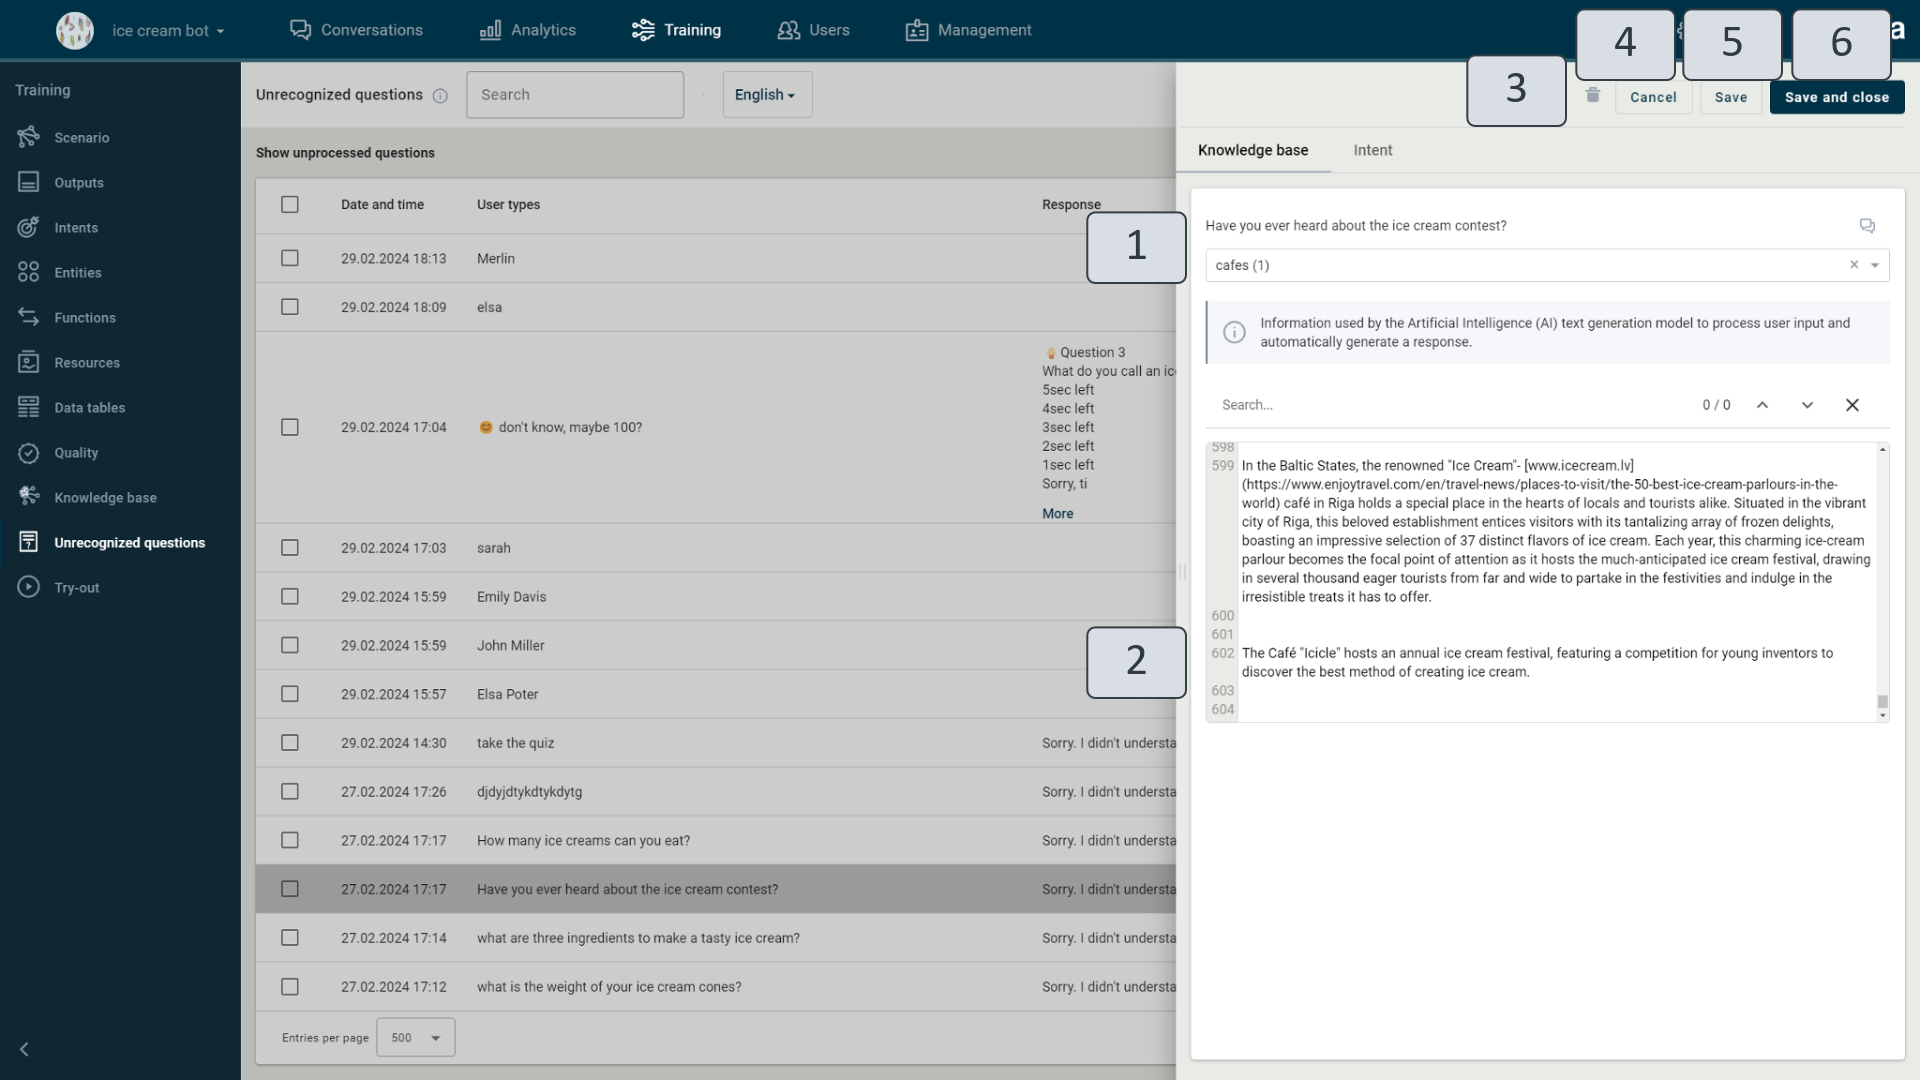
Figure 112.7. Unrecognized questions. Supplementing knowledge base file.
When you select a file to add information to (Figure 112.7) (1), the file content is displayed. Enter the new information in the desired place within the existing content (2), using broad and complete sentences to ensure that the thought is clear even without context. The automatic response model will learn from this text. After clicking “Save” (5), the new text is saved and processed automatically into the specified information file in the Knowledge base view. Clicking “Save and close” (6) will save the changes and close the window. To prevent the information from being saved, click “Cancel” (4).
Clicking the Recycle bin icon (3) will delete the record containing the unrecognized question from the view.
Supplementing intents. The VA trainer has a second way of supplementing the VA's lack of knowledge about what the user is asking – by adding the user's unrecognized expression to the intents. This way, the next time the user asks such a question, it will be recognized and answered appropriately in the scenario. The “Intent” section (Figure 112.8) (1) shows the unprocessed question (2). You can see the context, i.e. the conversation in which the question was included. Clicking on the dialog icon (6), will open a new tab with this conversation. To add the unrecognized example to the intent, click in the intent field. A drop-down list will open with the closest intents (3) by confidence (4) that you can select. You can also create a completely new intent for the unrecognized question by clicking “New intent” (5).
The “Intent” section (Figure 112.2) (1) shows the unprocessed question (2). You can see the context, i.e. the conversation in which the question was included. Clicking on the dialog icon (6), will open a new tab with this conversation. To add the unrecognized example to the intent, click in the intent field. A drop-down list will open with the closest intents (3) by confidence (4) that you can select. You can also create a completely new intent for the unrecognized question by clicking “New intent” (5).
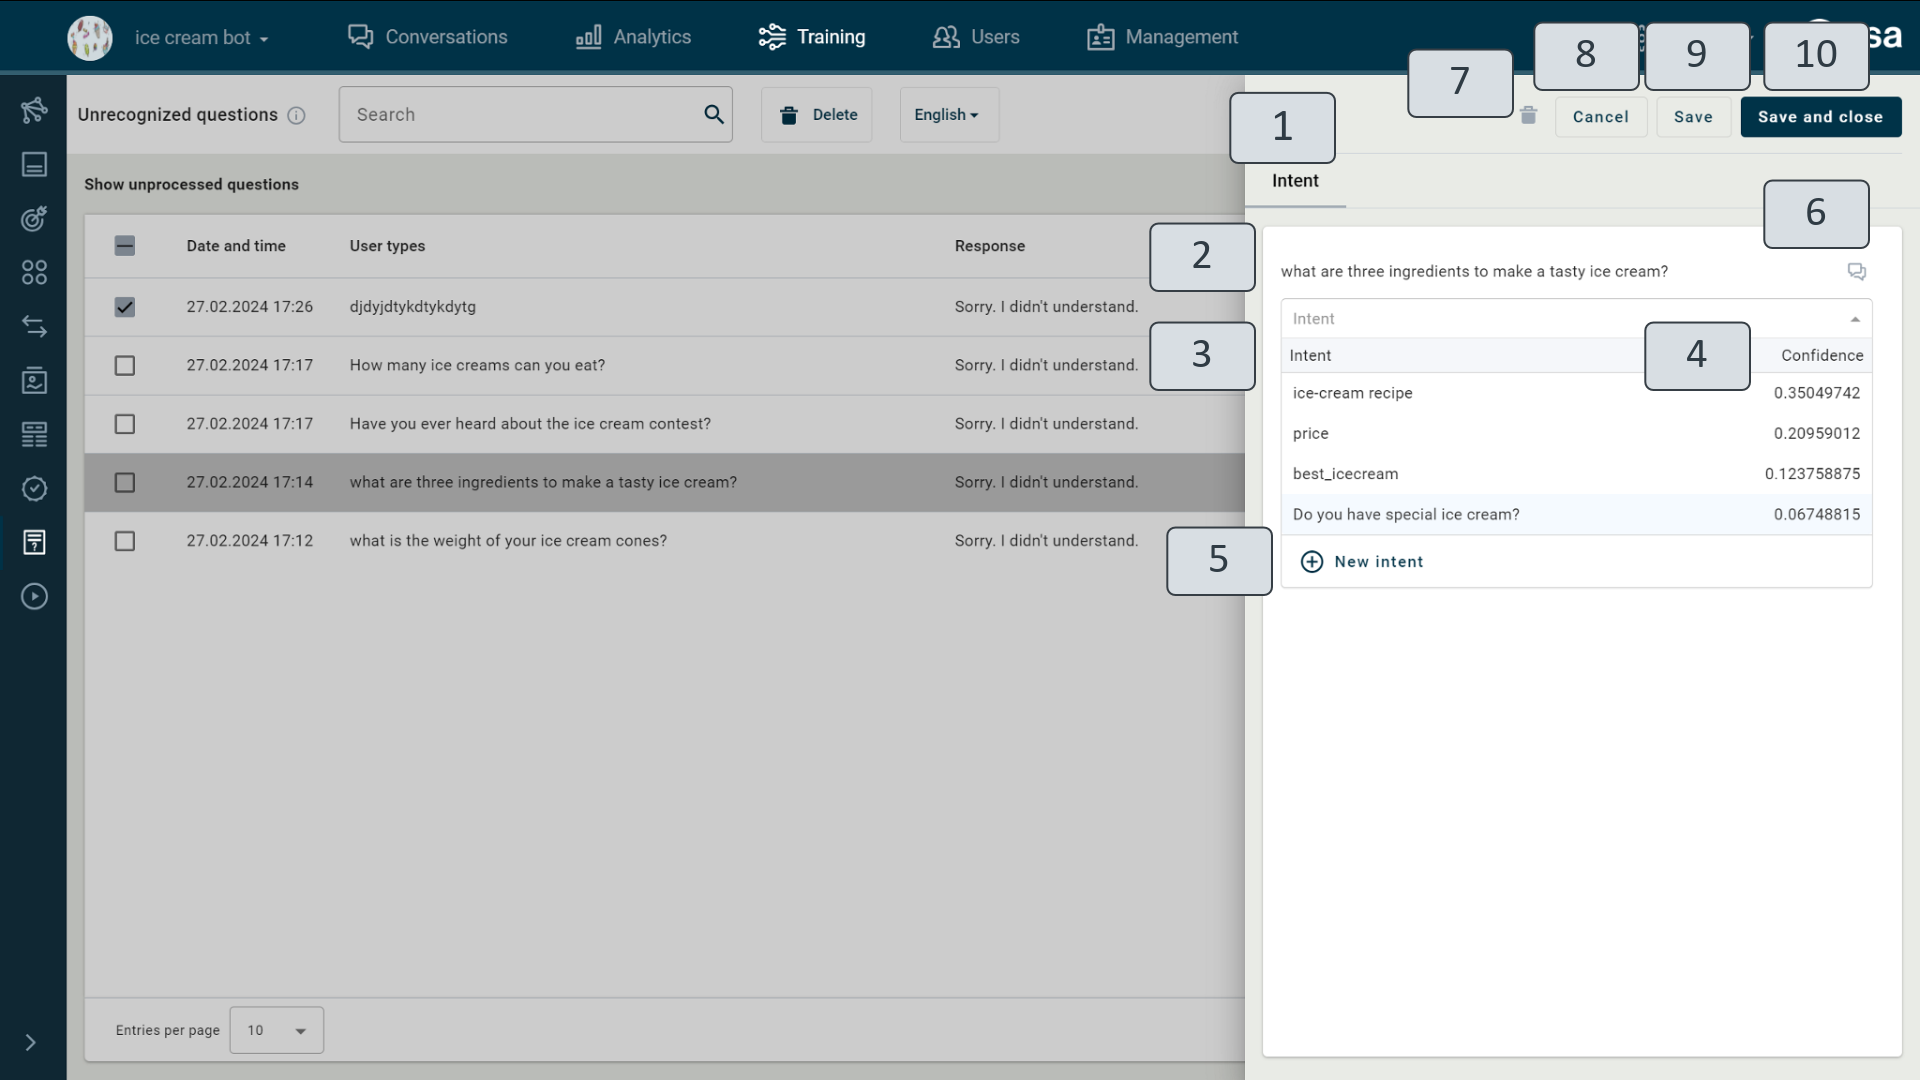
Figure 112.8 Unrecognized questions. Intent.
If you click “Cancel” (8), the window will close without saving your changes. To save your changes, click on “Save” (9). To close the window and save your changes – "Save and close" (10). If the entry does not need to be edited and added to VA knowledge, you can delete it from the table by clicking on the recycle bin icon (7).
When the desired intent is selected (Figure 112.9) (1), the section switches to the intent editing window. The new example is highlighted in yellow (3). You can edit intent examples as needed. The opened intent can be edited immediately in all other languages added to the VA by switching the language menu (2).
Click “Cancel” (4) to avoid saving the changes and adding the suggested example to the intent. To save your changes, click “Save” (5) or “Save and close” (6).
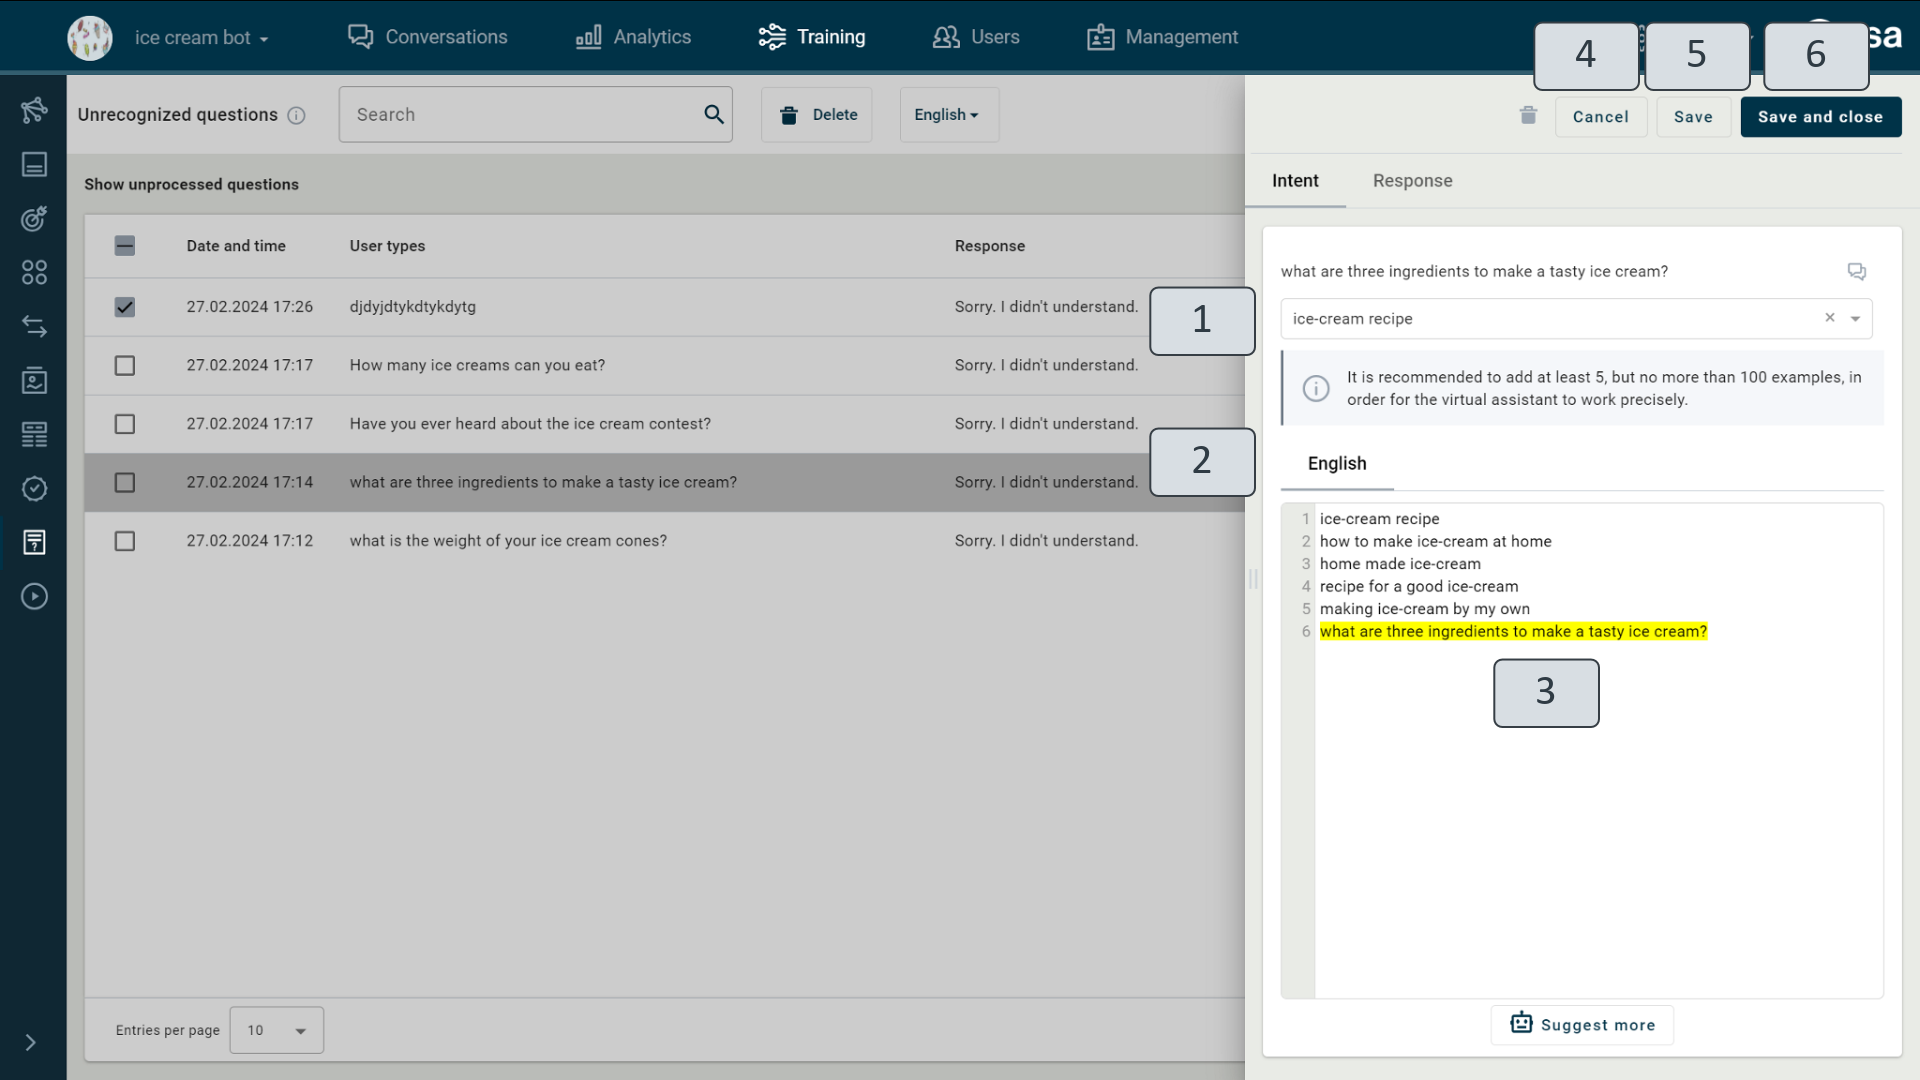
Figure 112.9. Unrecognized questions. Editing the intent.
If you only need to add the unrecognized question to an existing intent as a new example, you can save the information and close the window. To recognize the attached example, you will need to publish intents.
The range of user questions also tends to include utterances for which intent and answer have not yet been created in the VA scenario. In the “Unrecognized questions” view, you can create an intent for the new example in any language and specify the answer you want to provide in a scenario in a particular state or topic. A new intent should be added and edited in the same way as an example of an existing intent by selecting "New intent" under "Intent" (Figure 112.2) (5) and specifying at least five intent examples.
Once this has been done, in the "Response" section (Figure 112.10) (1), in the "Choose topic" field (2), specify the topic or scenario state to which the new intent should be added with the answer: a self-loop will be created in the scenario for the selected topic or state. You can change the priority of the transition by clicking on the gear icon next to the selected topic or state (3). Here you can also mark the check box "After input only".
You can define the answer (5) that the VA must provide by clicking on the “Add” button (4) and selecting the required action type. (For more information on action types, see the “State Editing Window” chapter). If many actions have been added, you can change their order by clicking on the parallel lines, and there are other options next to the three dots (a more detailed description can be found in the sub-chapters with the name of the action type). To close the window without saving your changes, click on "Cancel" (7). To save your changes, click on "Save" (8), and to close the window with the saved changes, click on "Save and close" (9).
Saving changes adds a self-loop with the new intent and answer to the selected state or topic in the scenario. The scenario must be published using the “Publish all” button for the changes to take effect.
To delete an entry from the list of unrecognized questions, click the recycle bin icon (10).
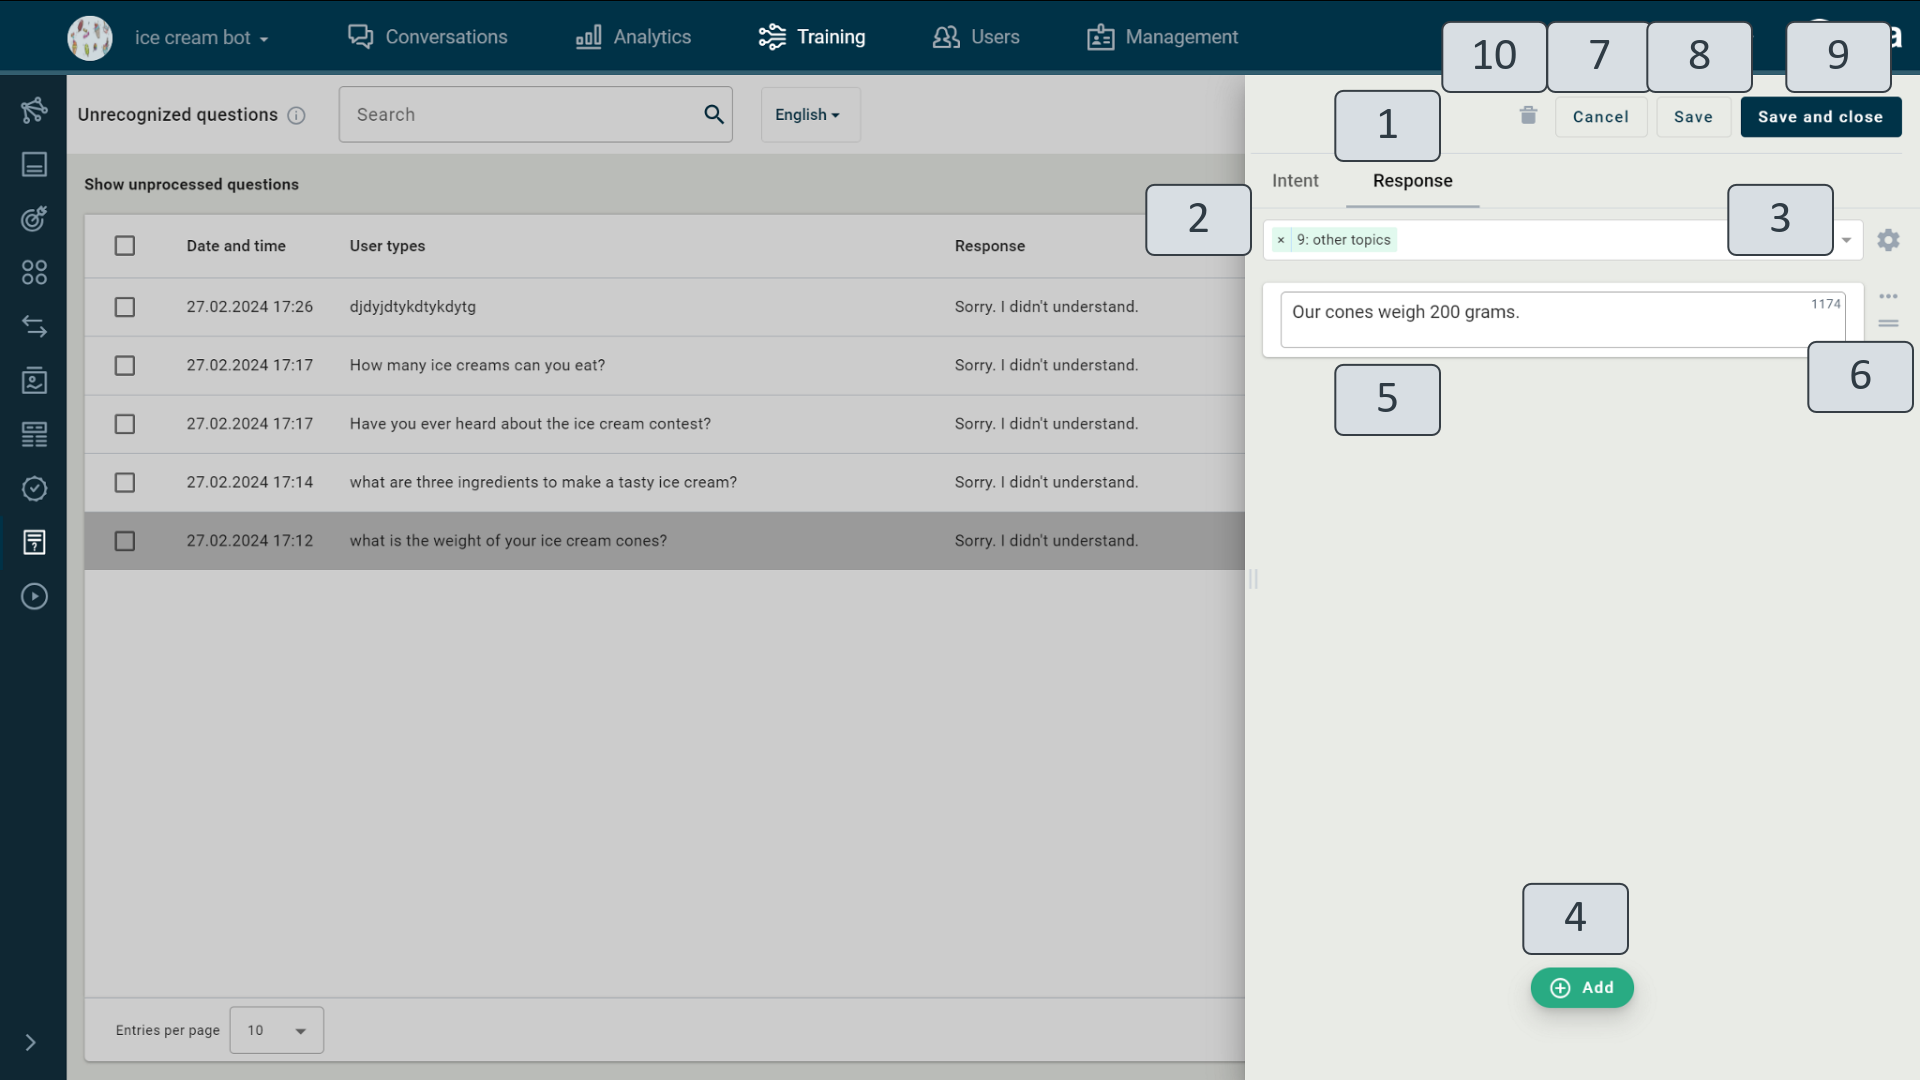
Figure 112.10. Unrecognized questions. Response.
Try-out
In Training view, the try-out window (Figure 113) (1) opens on the right-hand side of the site and is available in all training subviews, allowing you to have a conversation with the VA and check whether changes made to the scenario and text data in the dialogue work as expected.
In the conversation in the try-out window with the VA, all the buttons integrated into the scenario along with other functions work properly. A message to the assistant can be entered in the text entry field at the bottom of the window (2). You can press the Enter key to send the message. Alternatively, you can use the microphone button (2) on the right-hand to speak with the assistant.
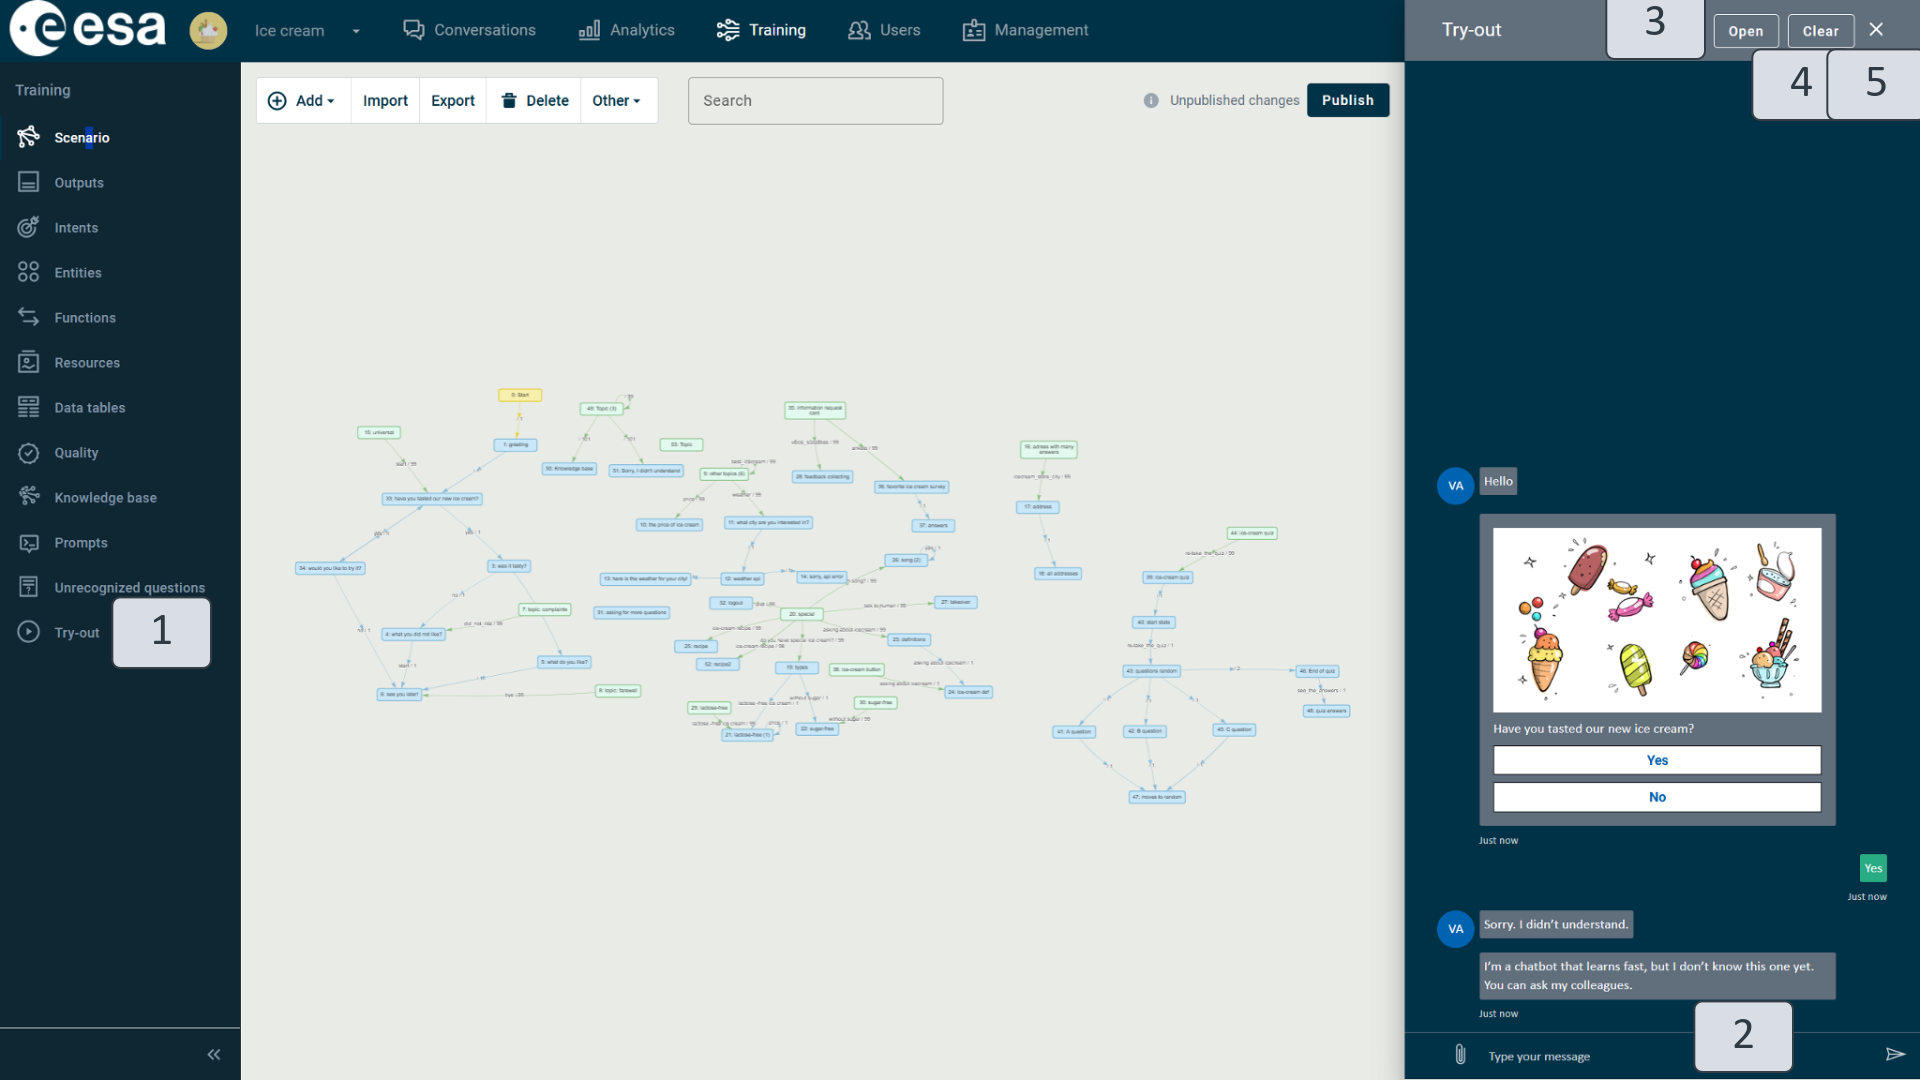
To analyze the current conversation in more detail, click “Open” (3) – the conversation will be opened in the “Conversations” view and you will have access to more detailed information about it. To delete and resume an existing call, you must click the "Clear" button (4). Close the window completely by clicking the cross in the top right-hand corner (5).
Users
The Users view (Figure 28) (1) can be accessed only by global users. The global user role is assigned by the system administrator.
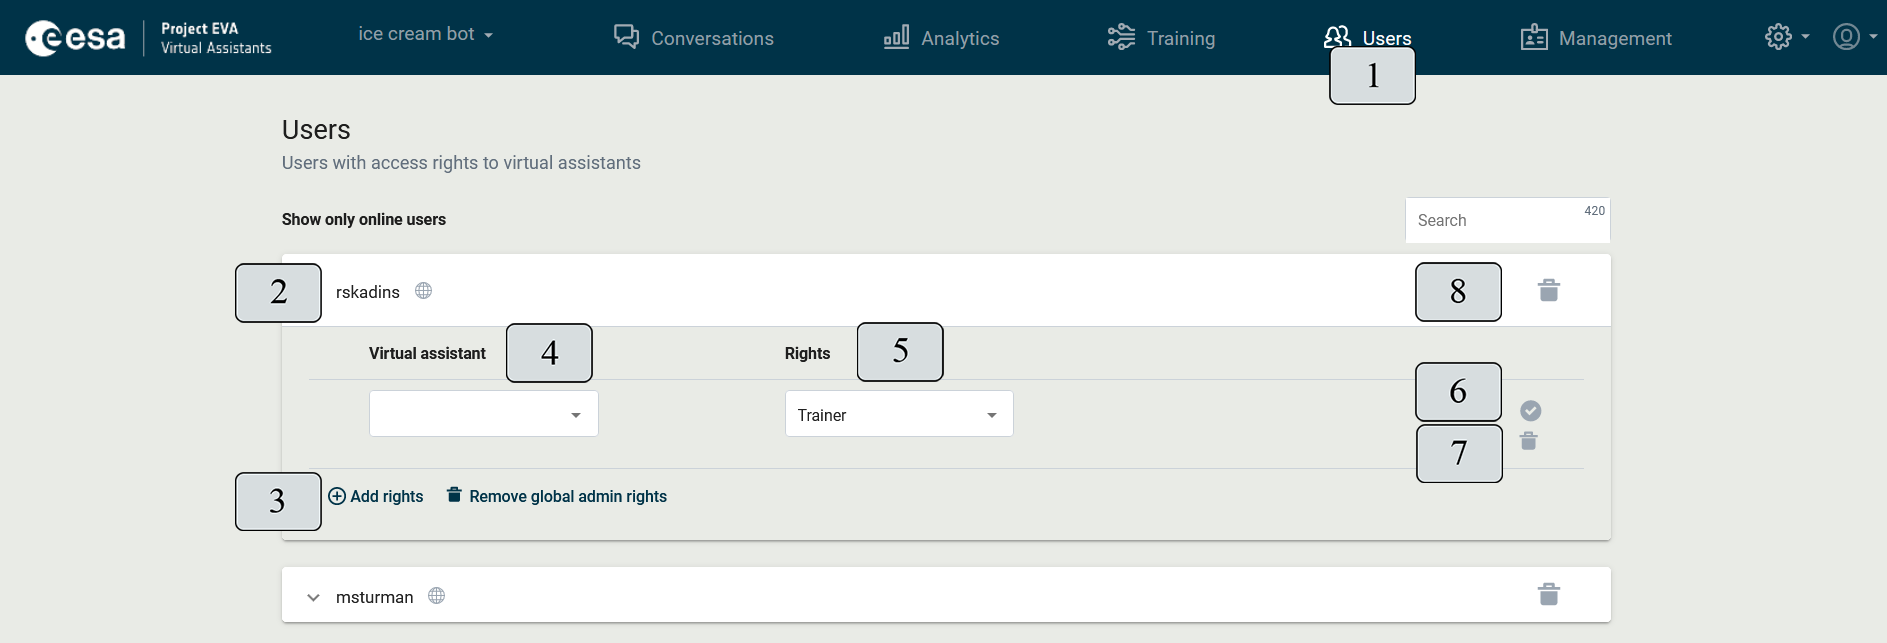
Figure 114. "Users" view
The view allows managing all the users with access rights to virtual assistants. A list of users is displayed. By clicking the down arrow next to the username (Figure 114) (2) field displays a drop-down list of virtual assistants that a user can access. To assign permission for another virtual assistant, click on the "Add rights" (3), select from the dropdown list a virtual assistant (4), and allocate rights (5). There are five types of rights (see Table 9. Types of rights). To save the new information, click the checkmark icon (6). If you need to edit already existing rights, you must click the pencil icon that appears in the same place next to the corresponding assistant. User rights to access VA can be deleted by clicking the recycle bin icon (7).
To delete the user and all his rights for virtual assistants, you must click the recycle bin icon next to the relevant user name (8).
Management
The Management view (Figure 115) (1) can be accessed only by global users. The global user role is assigned by the system administrator.
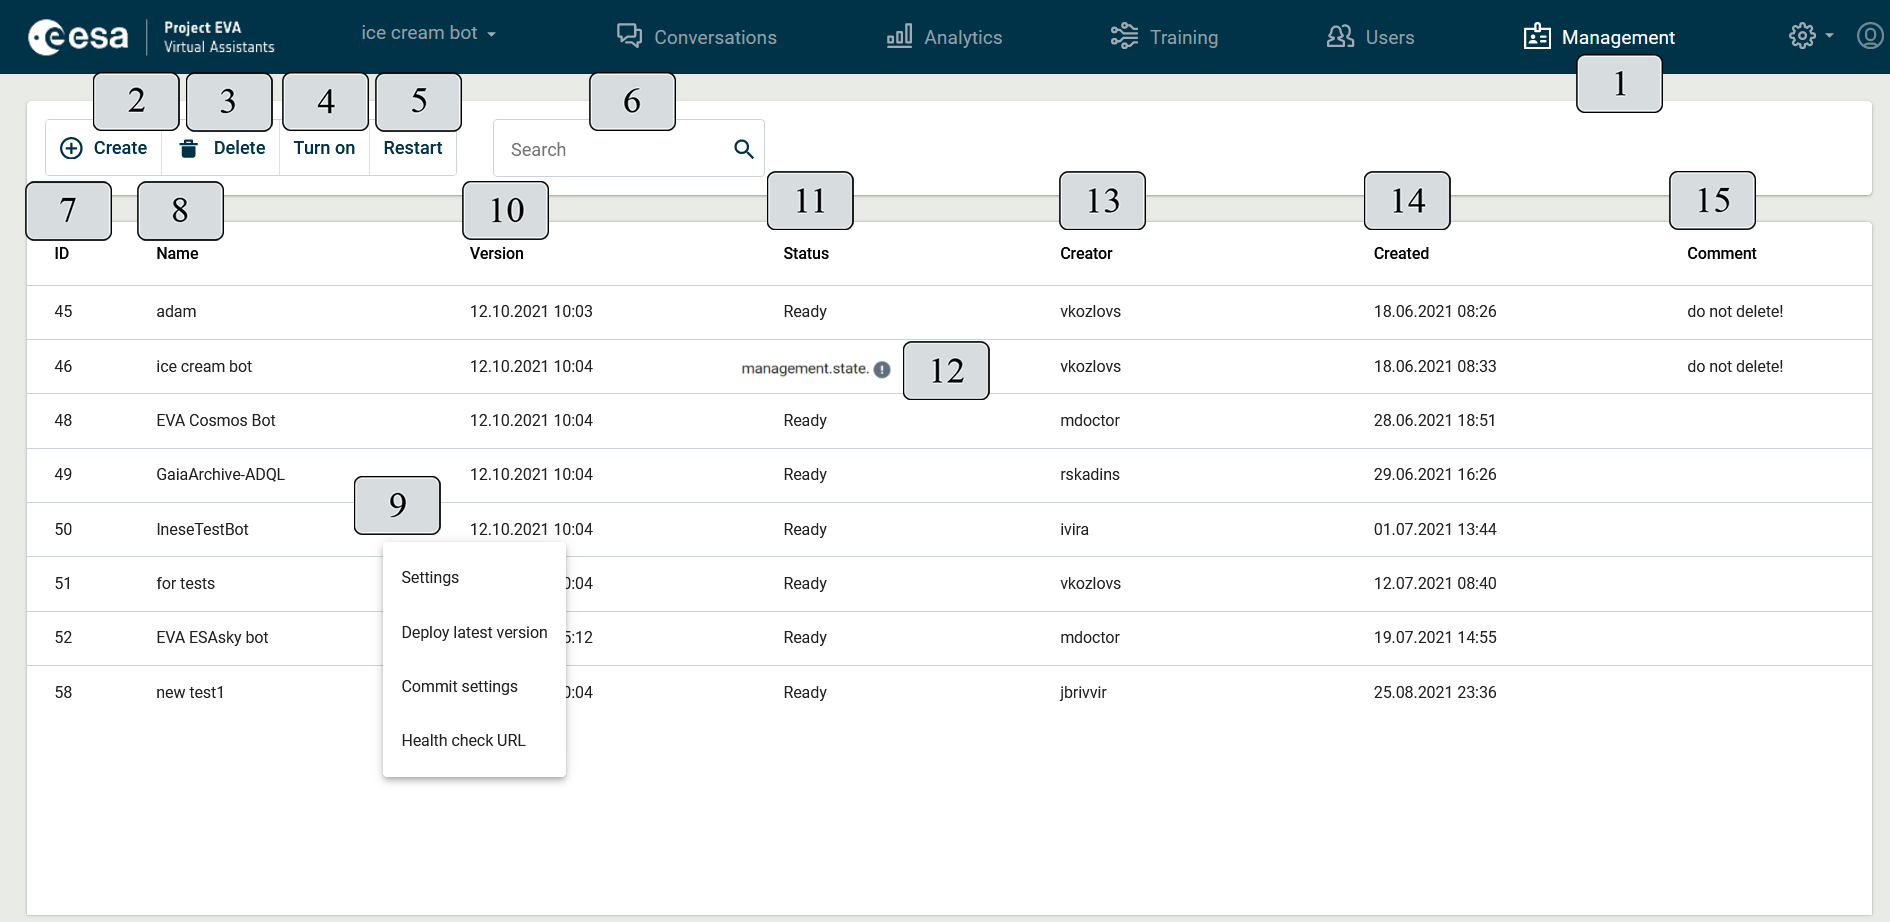
Figure 115. "Management" view
Management view (Figure 113) (1) offers more sophisticated technical VA information. The view has its own toolbar.
The "Create" (2) button creates a new virtual assistant. The "Delete" (3) button allows you to delete an already existing VA that is selected from the list below. You can turn on (4) and restart (5) the VA selected from the list. In the search field (6), you can search for a VA by typing its name, which is convenient when there are a lot of assistants on the list.
All VA are arranged in a list of seven columns with the following technical information.
The first column with the title "ID" (7) contains a VA identifier that is unique to each VA.
The second column "Name" (8) shows the name of the VA. By pointing the mouse pointer next to it, the three dots is displayed (9) and by clicking it, more detailed information can be accessed:
- Settings: view system settings and add additional parameters;
- Set version: set one of the previous assistant system versions;
- Commit settings;
- Health check URL: get an URL for monitoring so that you can keep a constant eye on VA performance and make sure that the system works well.
The third column with the title "Version" (10) indicates the latest installed VA version.
The fourth column, called "Status" (11), provides more detailed information about the status of the VA creation process. If a delay has occurred, you can resume the process by clicking the exclamation mark "Repair" (12) next to the status information.
The fifth column with the title "Creator" (13), gives information about the creator of the given VA.
The sixth column "Created" (14) shows the date of VA creation and the seventh column "Comment" (15) is for making any notes about VA that are important when reviewing the entire VA list.
VA settings
Clicking the gear icon on the View toolbar (Figure 116) (1) reveals a drop-down menu with VA setting views and additional information: "Settings", "Users", "Connections", “Monitoring" and "Help". When you select one of the options offered, the corresponding window appears on the left-hand side of the view. Selecting "Help" will open the VA management site help document in a new tab.
VA settings can also be accessed from the VA settings view toolbar on the left side (2), where the following sections are available: “Virtual assistant personality,” “Virtual assistant’s locales,” “Users,” “Connections,” and “Restore the previous versions.”
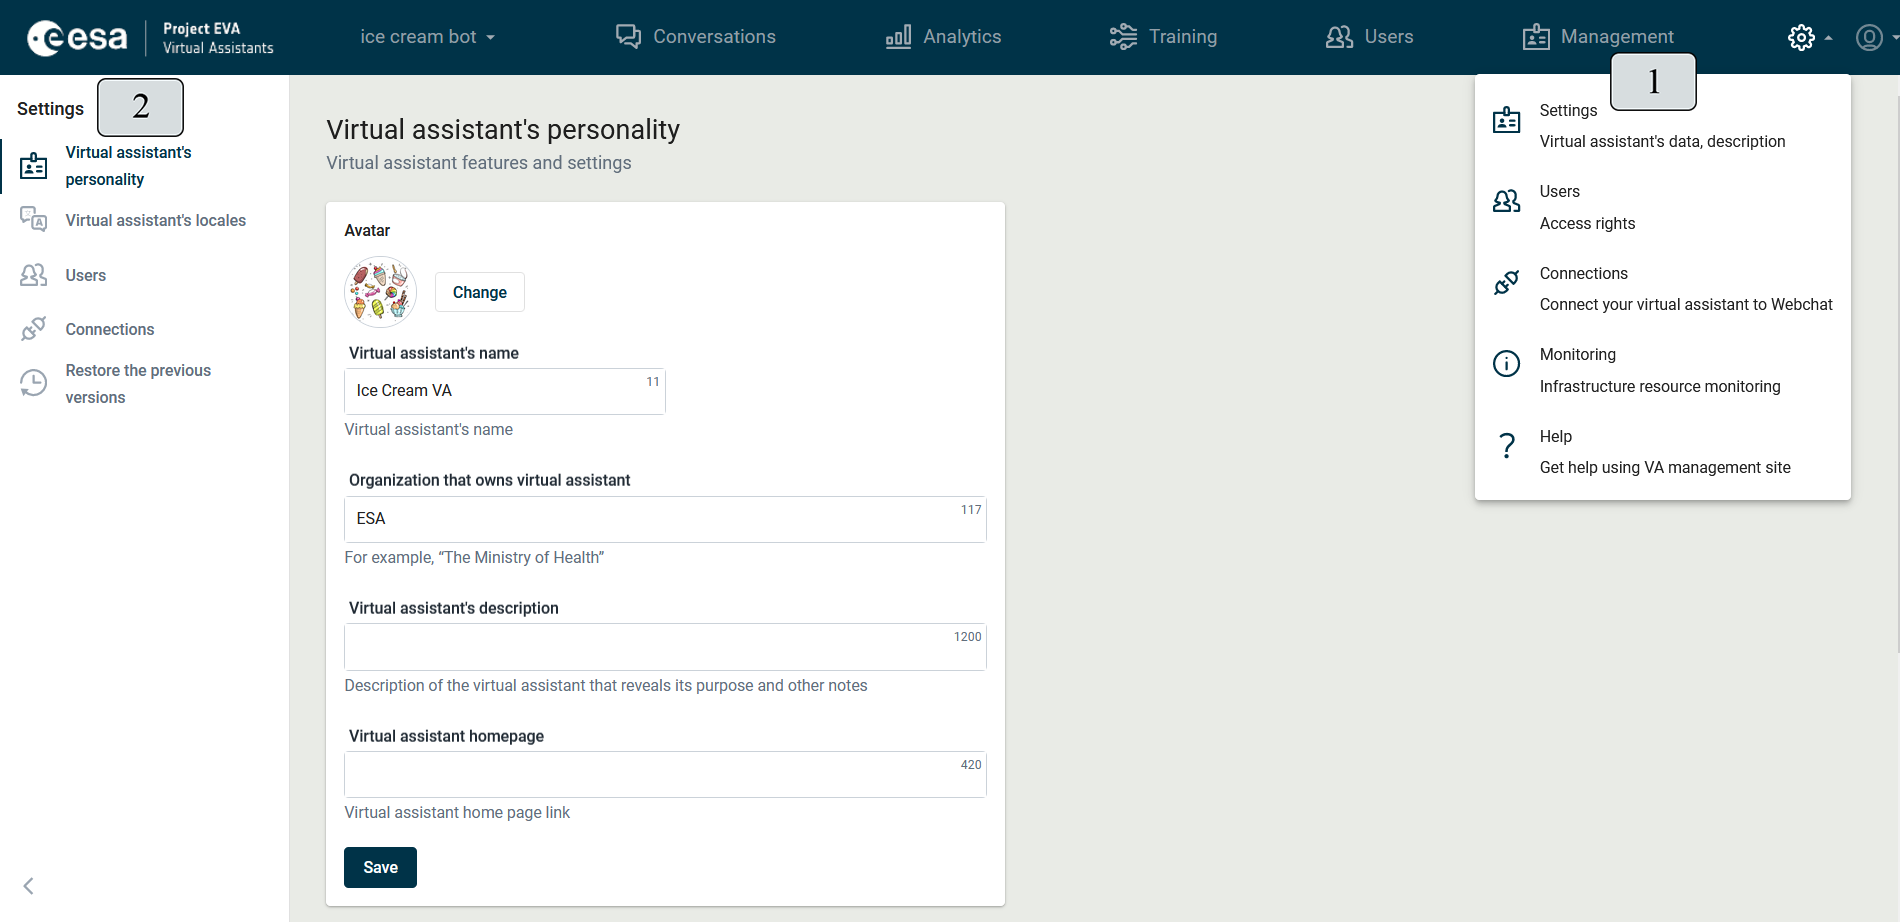
Figure 116. VA settings
VA personality.
You can change the assistant's avatar in the VA Personality Settings window (Figure 117), and specify the following general VA features:
- VA name
- Organization that owns the VA
- VA description
- VA homepage link
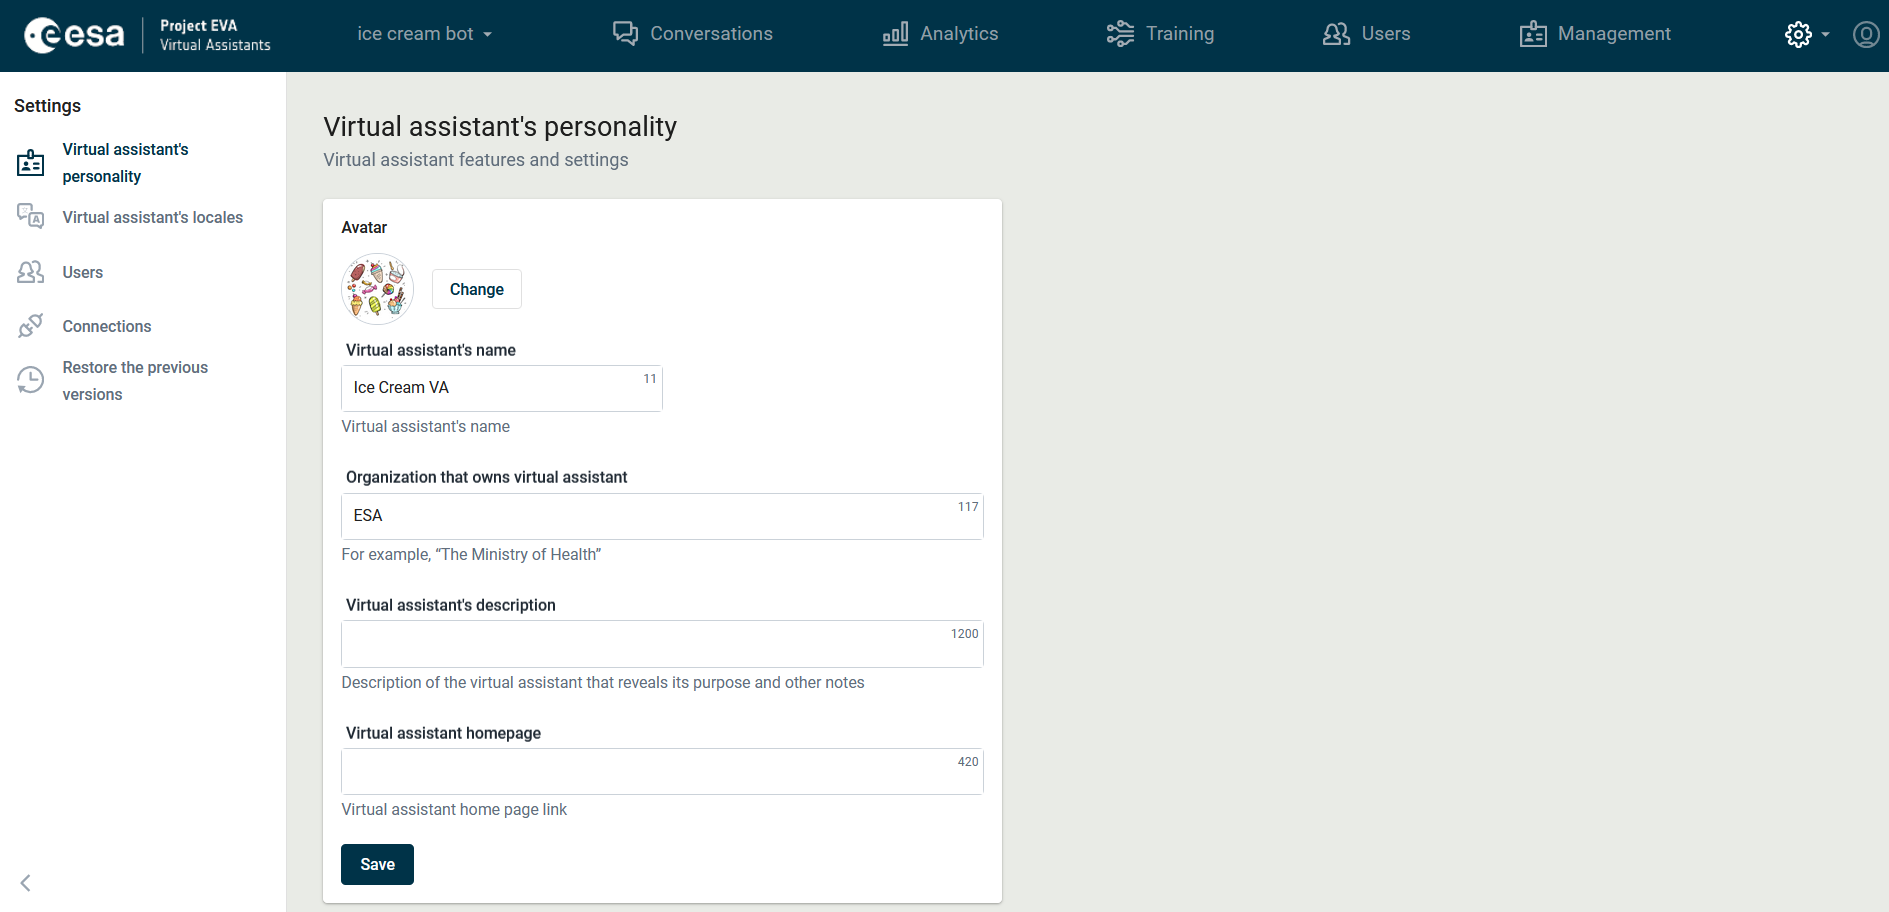
Figure 117. VA personality
When you scroll down (Figure 118), other options are available:
- import and export the whole VA as together (1);
- turn it on to make it visible to the public or turn it off (2).
- specify that information should be sent by e-mail on the training process and quality estimation of VA intents (3).
- set the number of days the VA will store the conversation history (4).
- To change large language model configuration. The llmconfig setting is a manually added parameter that specifies which large language model (LLM) to use. The llmconfig setting can be accessed not only by the global administrator but also by virtual assistant trainers with administrator rights to the virtual assistant. To specify the LLM configuration, a VA administrator should fill in the information in the Large language model configuration field. (5)
The llmconfig parameter may include details such as which embedding model or similarity threshold to use for a given topic, what metadata to add to a file, and how to filter the vector store based on metadata. Read more: Configuring LLM VA
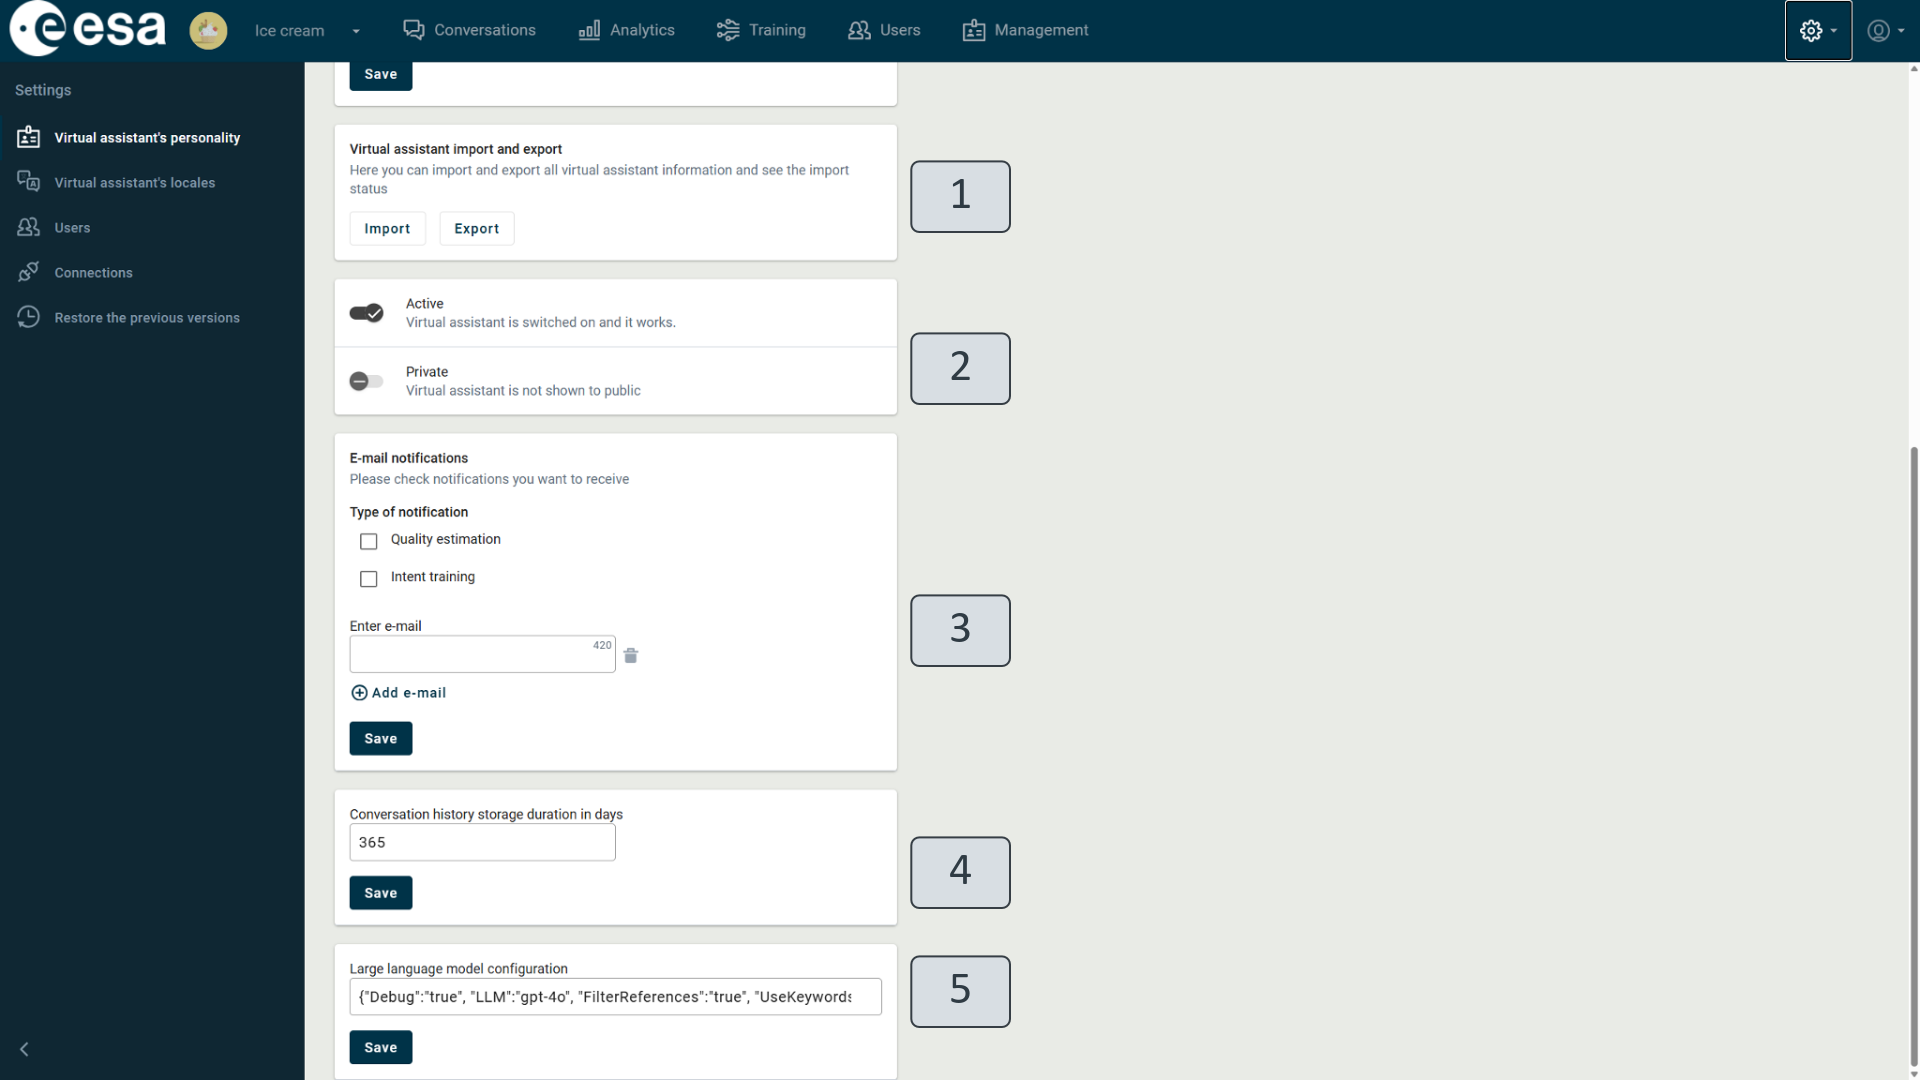
Figure 118. VA personality and settings
VA languages.
You can specify several languages in which the VA answers. The assistant's locales (Figure 119) show the available languages, which you can delete by clicking the Recycle Bin icon (1). At the moment, only one language, English, is available on the site, although it is possible to add other languages.
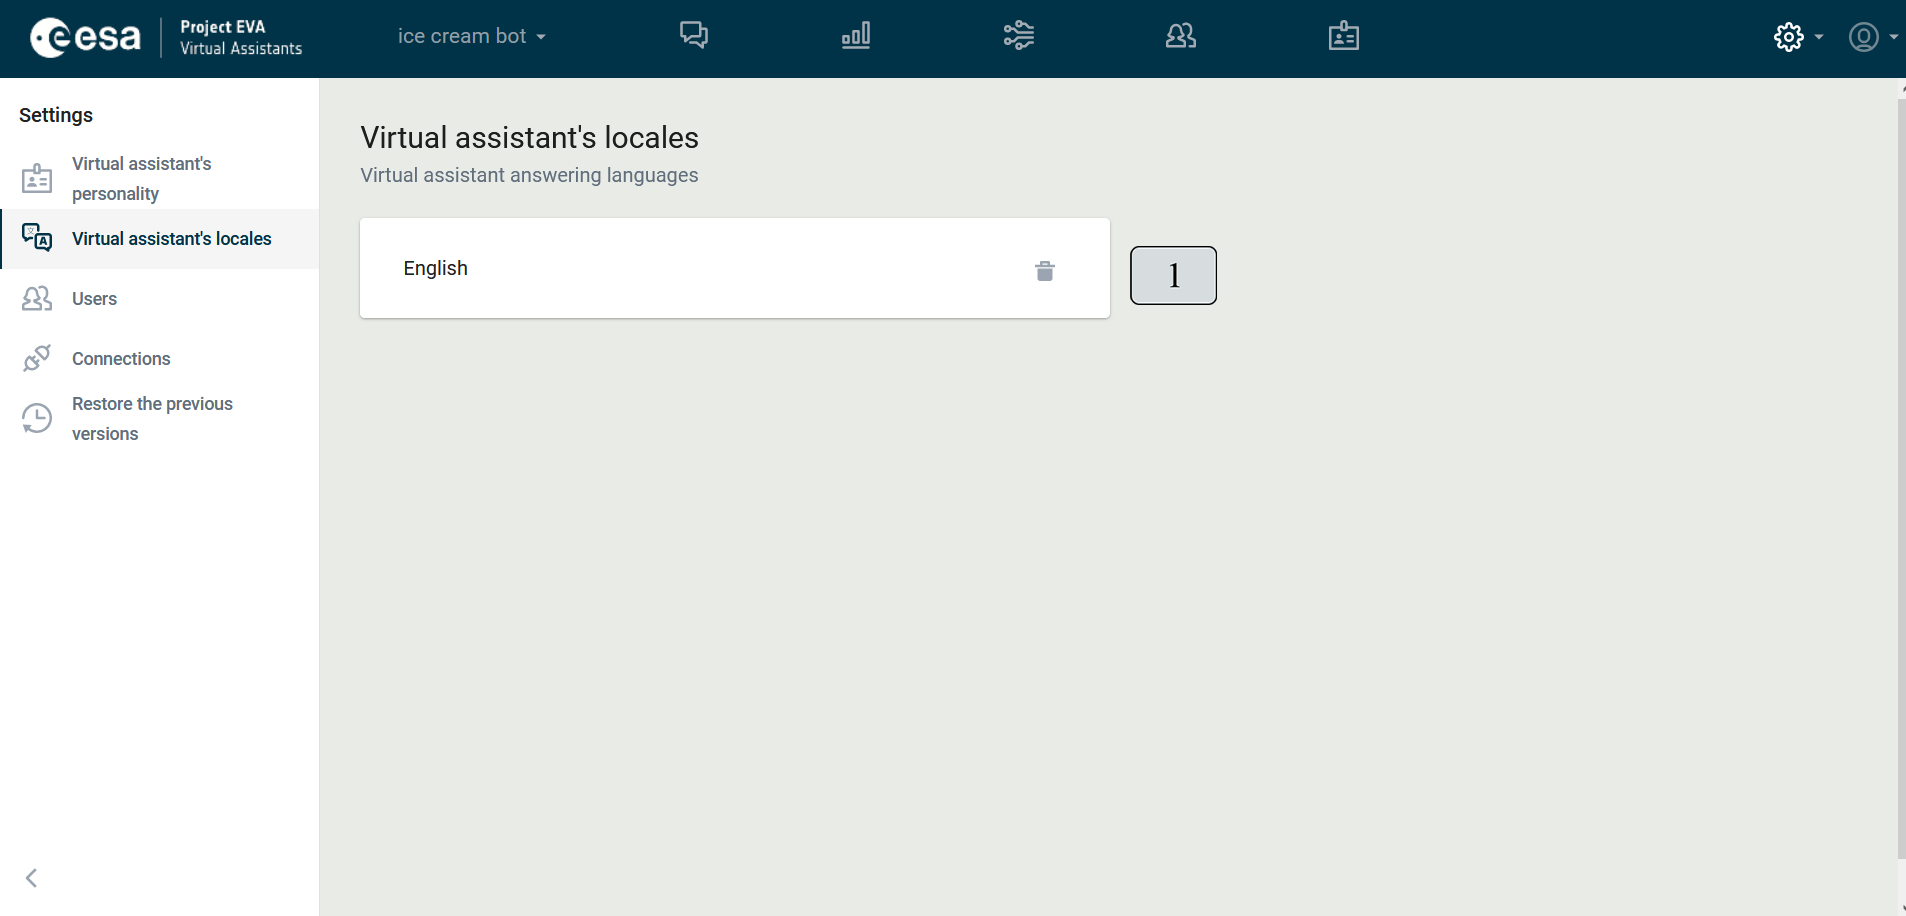
Figure 119. VA languages
Users.
You can see all users with access rights to edit the assistant in the VA "Users" settings (Figure 120). The user list contains user names and the type of rights allocated to them. Include a new user on the list by clicking "Add user" (1) at the end of the list.
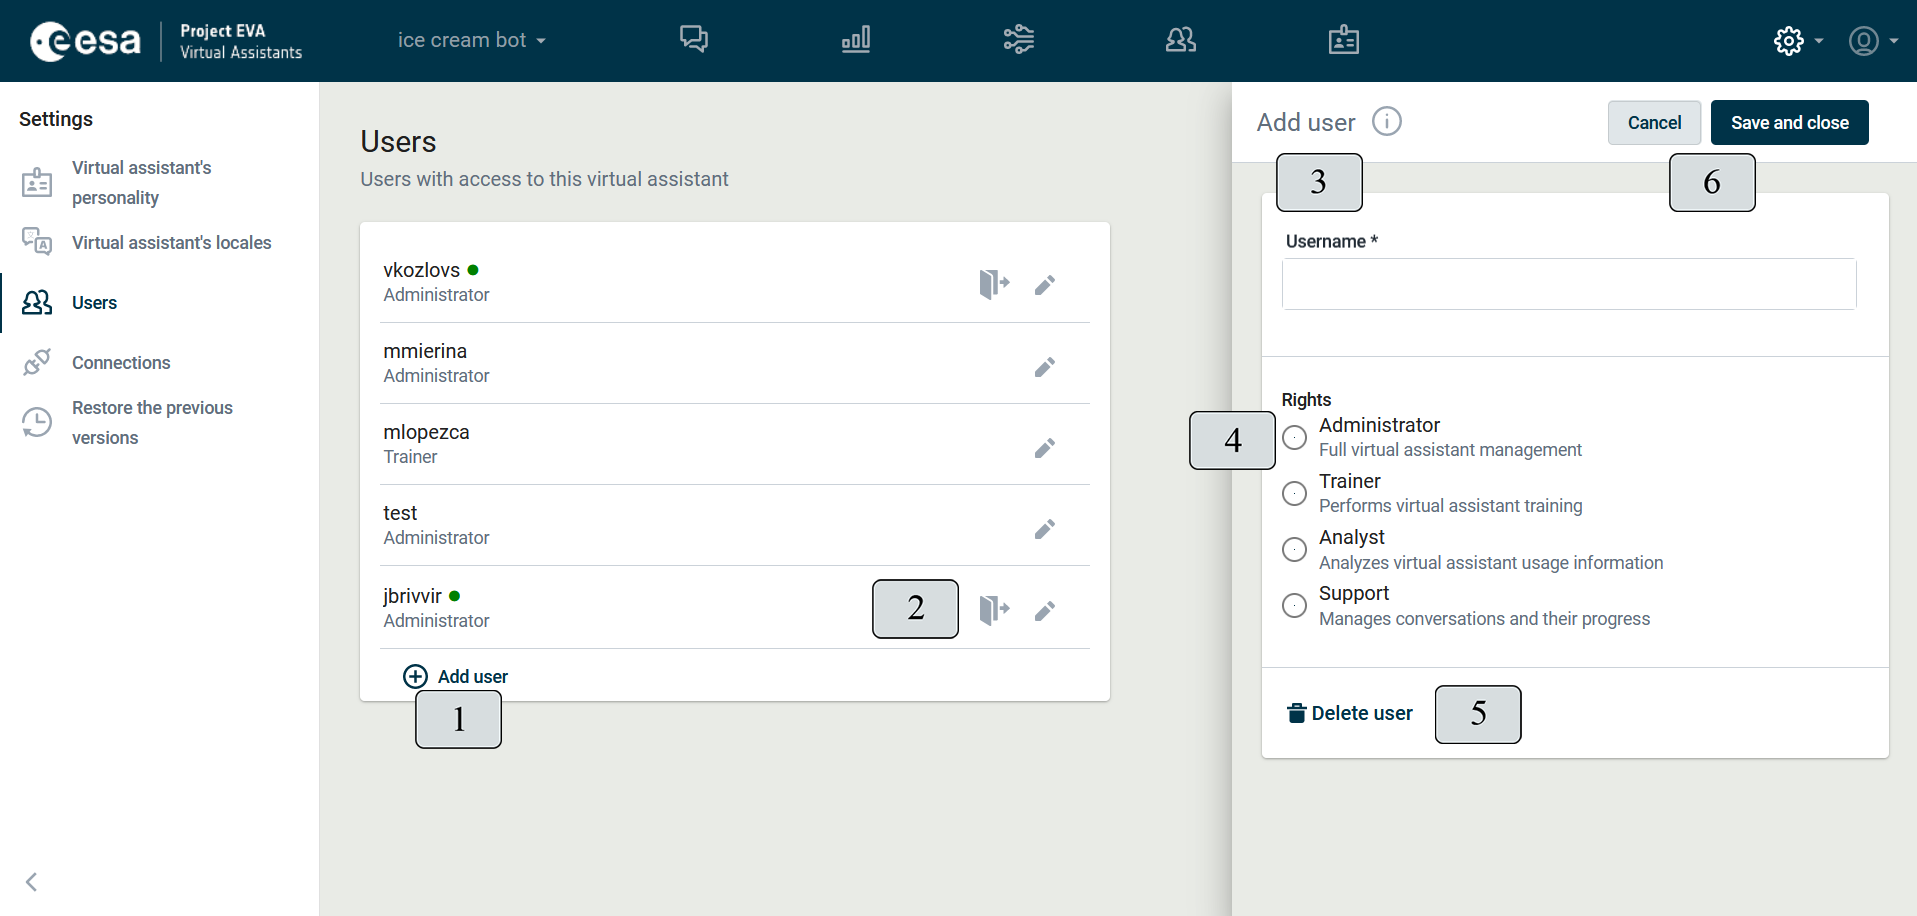
Figure 120. Users
If you need to edit someone's rights or delete user data, you must click the pencil icon (2) next to the corresponding user name to open the user settings window. A green dot appears next to users currently working on the site. To log the user out of the site, click on the door icon (available for global users).
When you click the pencil icon (2) or the name "Add user", the user settings window opens, where you can specify the information you need. You must fill in the "Username" field (3) and allocate the type of rights (4) to the new user, and create a check mark under the relevant title. There are five types of rights (see Table 9. Types of rights). To delete user, click "Delete user" (5).
Table 9. Types of rights
Title | Rights |
Administrator | All VA management site capabilities are available. |
Trainer | You can view conversations, analytical data, train VA. Not entitled to take over conversations. |
Analyst | You can view and export VA conversation and analytics data. |
Support | You can view, export, and take over conversations. |
Assistant Trainer | You can train VA in permitted topics. |
Audit log analyst | Views and analyzes audit logs (not used in ESA) |
To save the changes and close the windows, you must click "Save and close" or click "Cancel" (6) if the changes do not need to take effect.
Connections.
In the VA "Connections" settings (Figure 121), you can specify the connection information so that the assistant works on different communication channels.
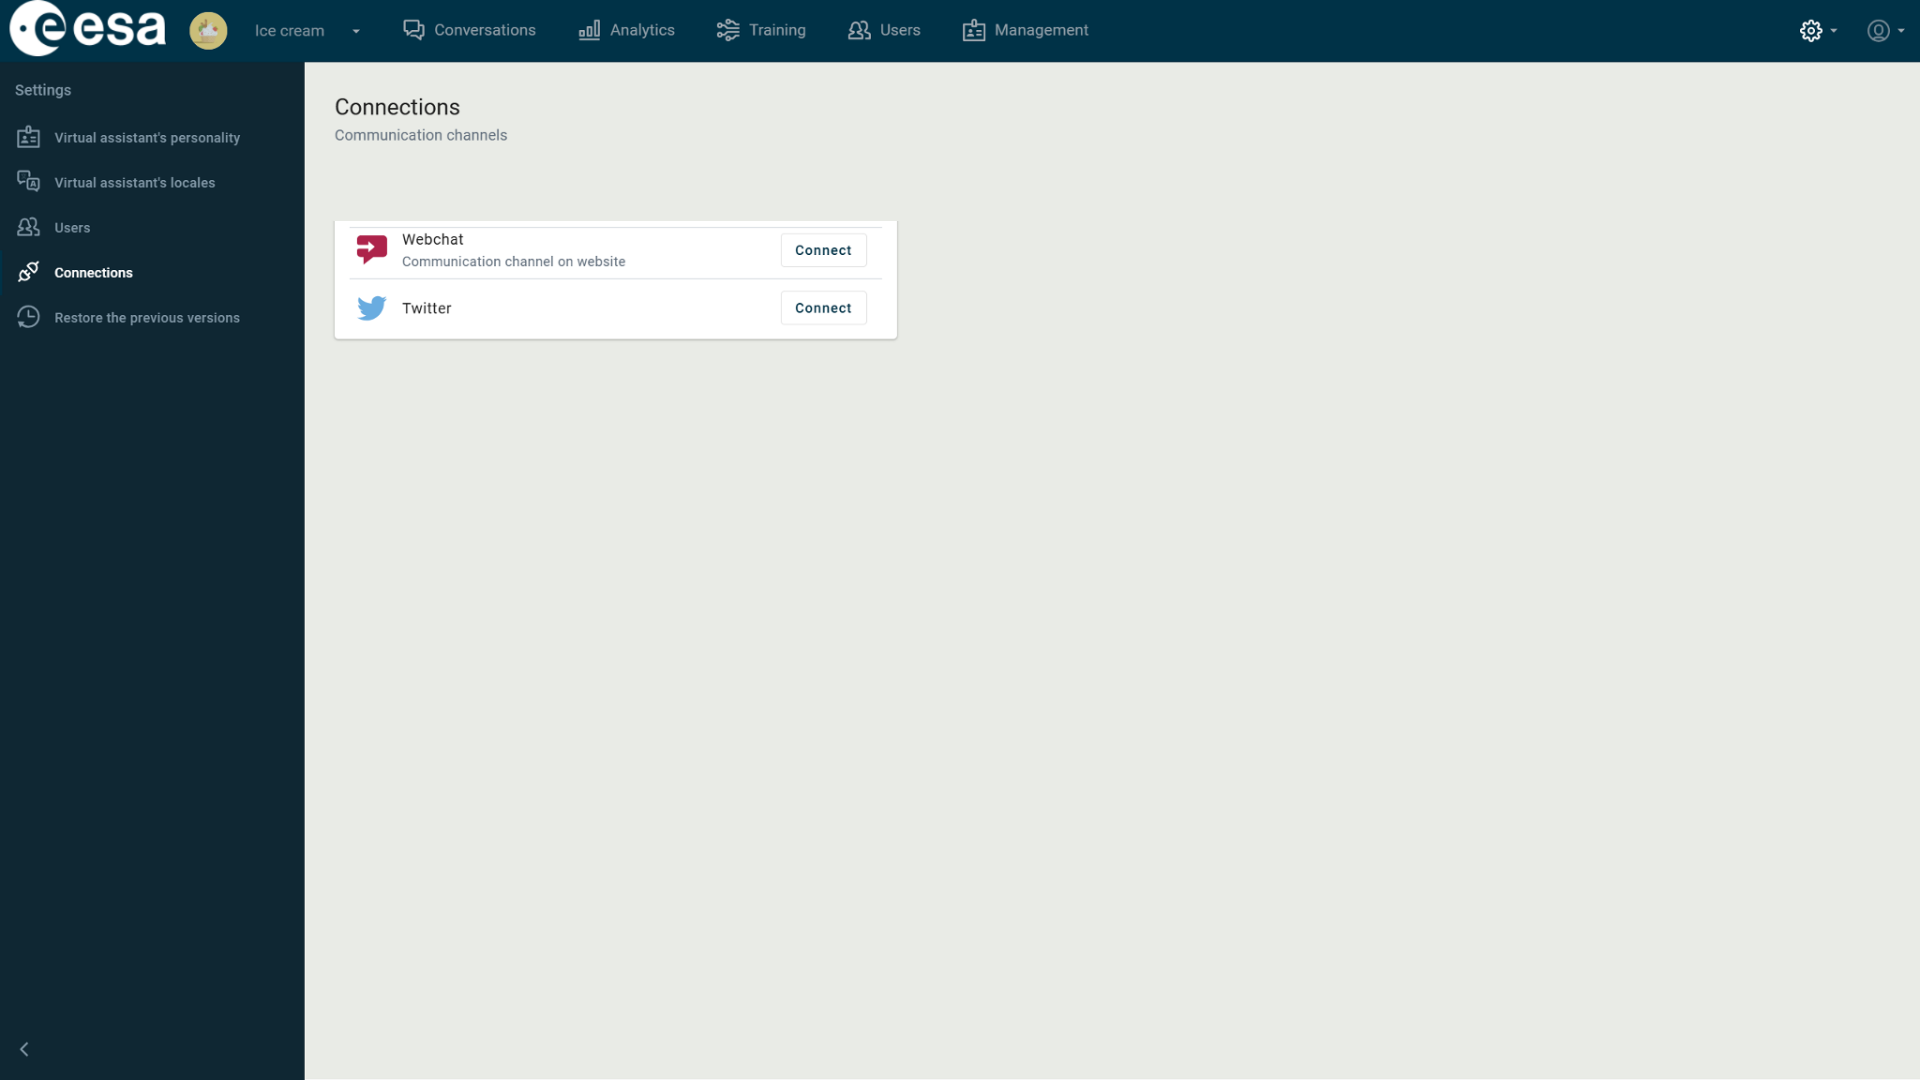
Figure 121. Connections
Webchat.
To insert VA on a website, click "Connect" (Figure 121.1) (3) next to the title "Webchat" (2).
A window appears on the right-hand side of the view, specifying more details about how the VA should appear in a web chat.
It is possible to define how the chat window will appear (3):
- Popup – the chat window can be opened in the bottom right corner of the website. Its width and height can be defined in the advanced settings (Figure 121.2 (5)).
- Side navigation – the chat window is available in a collapsible side panel.
- Fullscreen – the chat is available in fullscreen mode and occupies the entire screen. To enable fullscreen chat, the global administrator of the website must first activate the fullscreen parameter for the respective virtual assistant. Read more: Configuring a Fullscreen Webchat
- Accessibility – the chat window is designed in accordance with accessibility guidelines to ensure it is user-friendly for people with visual impairments or other special needs. It supports screen readers, keyboard navigation, and provides options for adjusting contrast and font size.
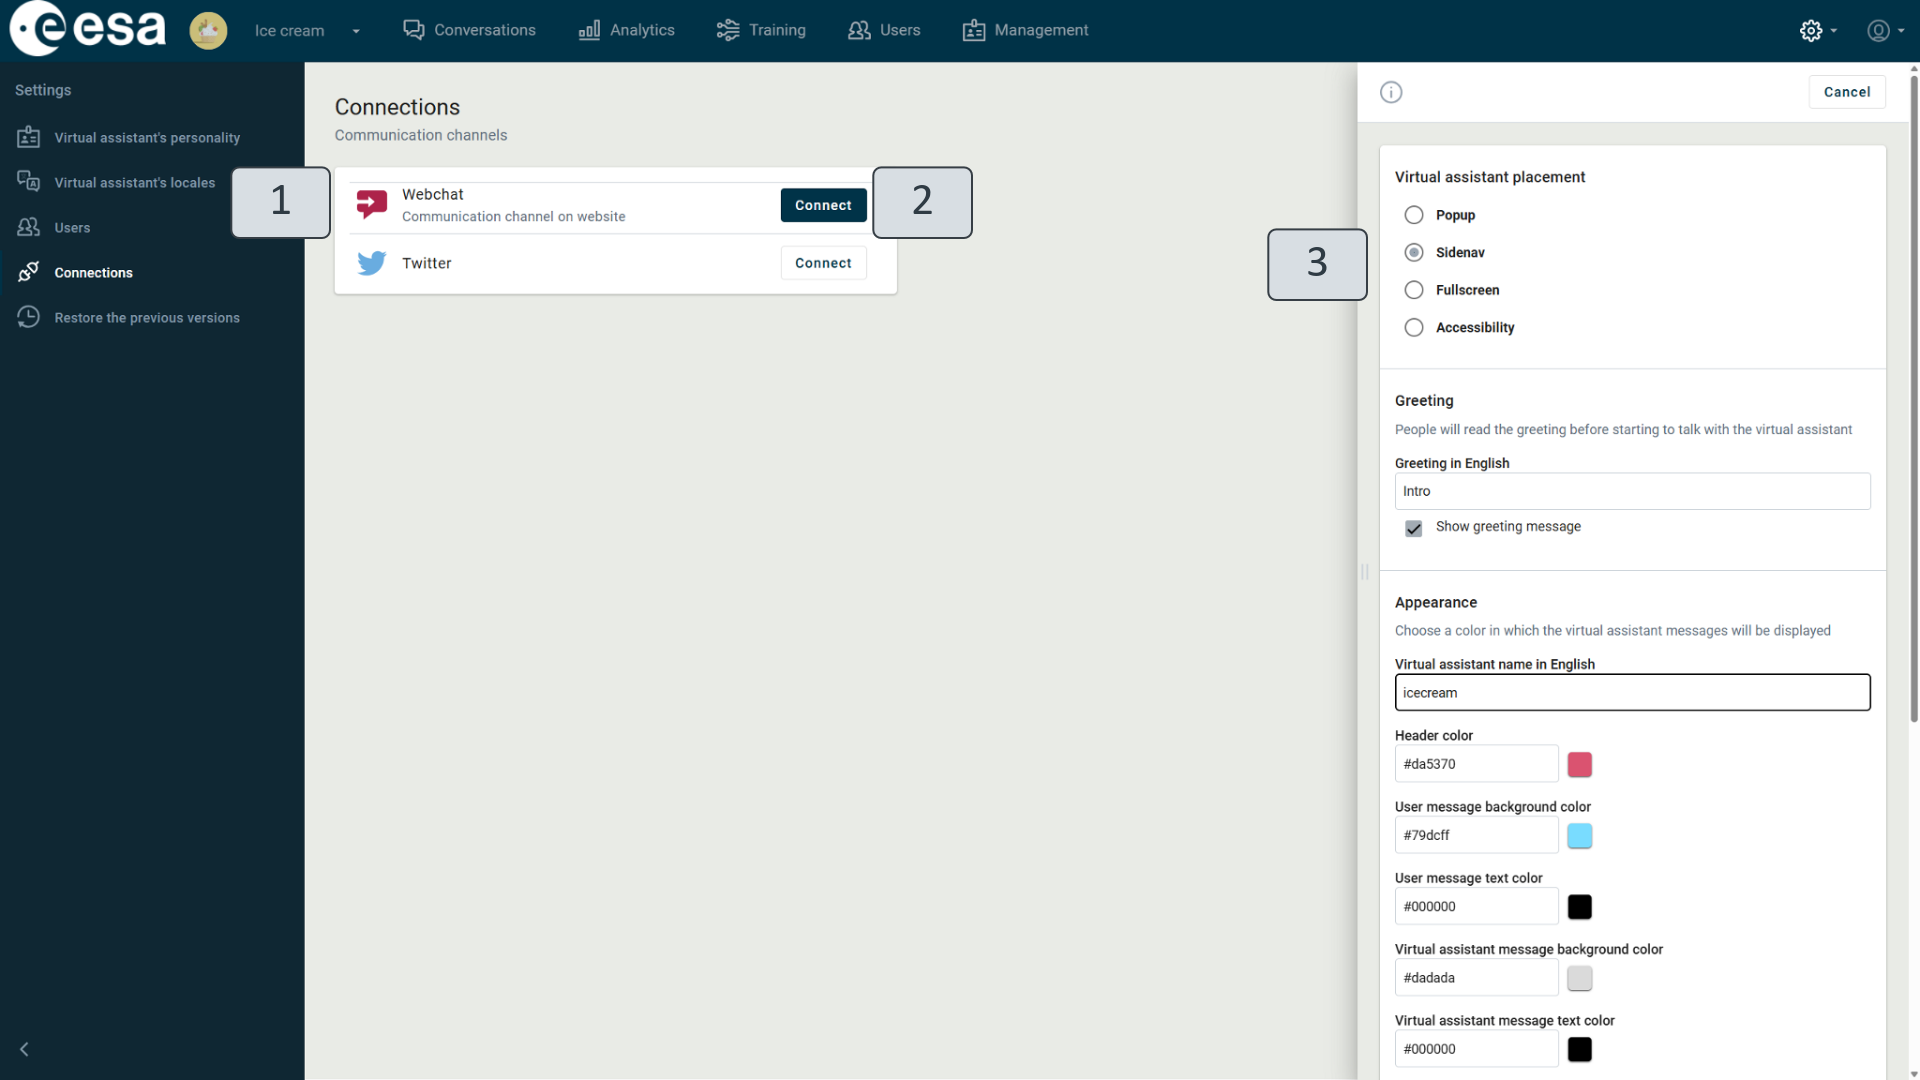
Figure 121. Connections
When defining chat window parameters:
- Set a greeting text that the user will see before clicking on the VA chat window (Figure 121.2) (1).
- To set speech values, in the speech section, type the information for connecting to speech services. Enter speech subscription key (5) (in the Azure portal (https://docs.microsoft.com/en-us/azure/cognitive-services/), create an account, new cognitive services resource, and get an endpoint and a key for authenticating your speech service). Paste speech voice parameter for preferred voice (https://docs.microsoft.com/en-us/azure/cognitive-services/speech-service/language-support#neural-voices) in the next text field (6).
- Enter a VA name that the user will see at the top of the chat window during a conversation (2).
- Define the color of the chat window, the background and text of the user messages, and the background and text of the VA messages (4).
- Pick the desirable width and height for the VA chat window (5).
- You can define your own CSS style (6).
- You can define your own actions with JS (7).
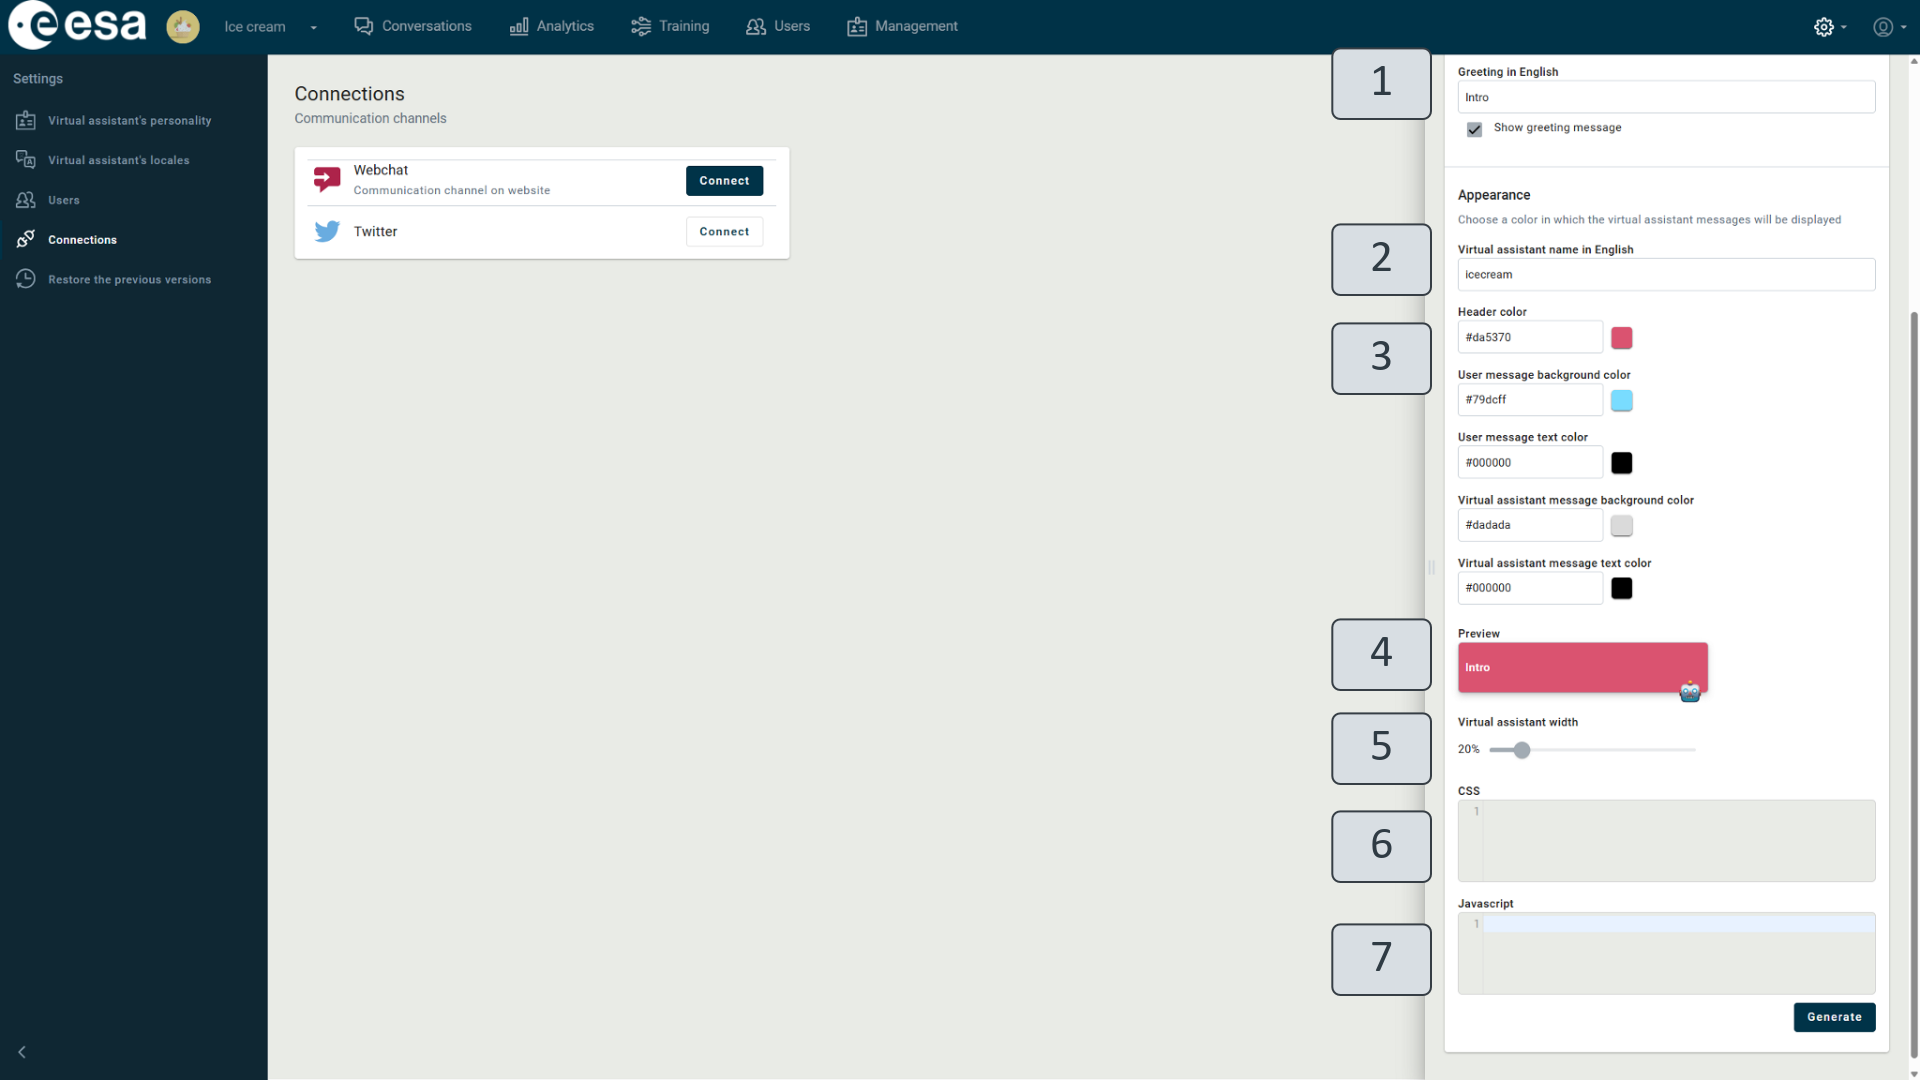
Figure 121.2 Webchat settings
Once display texts, voice, and colors for the VA chat window are selected, click on "Generate" (Figure 122) (1) to generate a VA code (2). You can access and change all the parameters and set the style for a VA in the code or define your own additional styling options as well (3). See styling samples in Table 10.
Table 10. Styling options
Styling option | Sample | |
|---|---|---|
Background | Webchat background color | backgroundColor: 'White', |
Avatar | Bot avatar size | avatarSize: 40, |
Bot avatar color if used with initials | botAvatarBackgroundColor: undefined, | |
URL to bot avatar image | botAvatarImage: '', | |
Bot Initials | botAvatarInitials: '', | |
Defaults to accent color user avatar color | userAvatarBackgroundColor: undefined, | |
User avatar image | userAvatarImage: '', | |
User avatar initials | userAvatarInitials: '', | |
Bubble | Bot bubble background color | bubbleBackground: 'White', |
Bot bubble border color | bubbleBorderColor: '#E6E6E6', | |
Bot bubble border radius | bubbleBorderRadius: 2, | |
Bot bubble border style | bubbleBorderStyle: 'solid', | |
Bot bubble border width | bubbleBorderWidth: 1, | |
User bubble background color | bubbleFromUserBackground: 'White', | |
User bubble border color | bubbleFromUserBorderColor: '#E6E6E6', | |
User bubble border radius | bubbleFromUserBorderRadius: 2, | |
User bubble border style | bubbleFromUserBorderStyle: 'solid', | |
User bubble border width | bubbleFromUserBorderWidth: 1, | |
User bubble text color | bubbleFromUserTextColor: 'Black', | |
Image height used in hero cards | bubbleImageHeight: 240, | |
Screen width = 600px bubble max width | bubbleMaxWidth: 480, | |
Bubble minimal height | bubbleMinHeight: 40, | |
Bubble minimal width | bubbleMinWidth: 250, |
Paste the generated code in every web page or website where you need a VA to be. Before that, you can check how the VA will look with the colors you choose by clicking "Give it a try" (4): a new browser site opens with a VA chat window in the lower right-hand corner that lets you try how the VA works and looks, and check for any corrections before publishing.
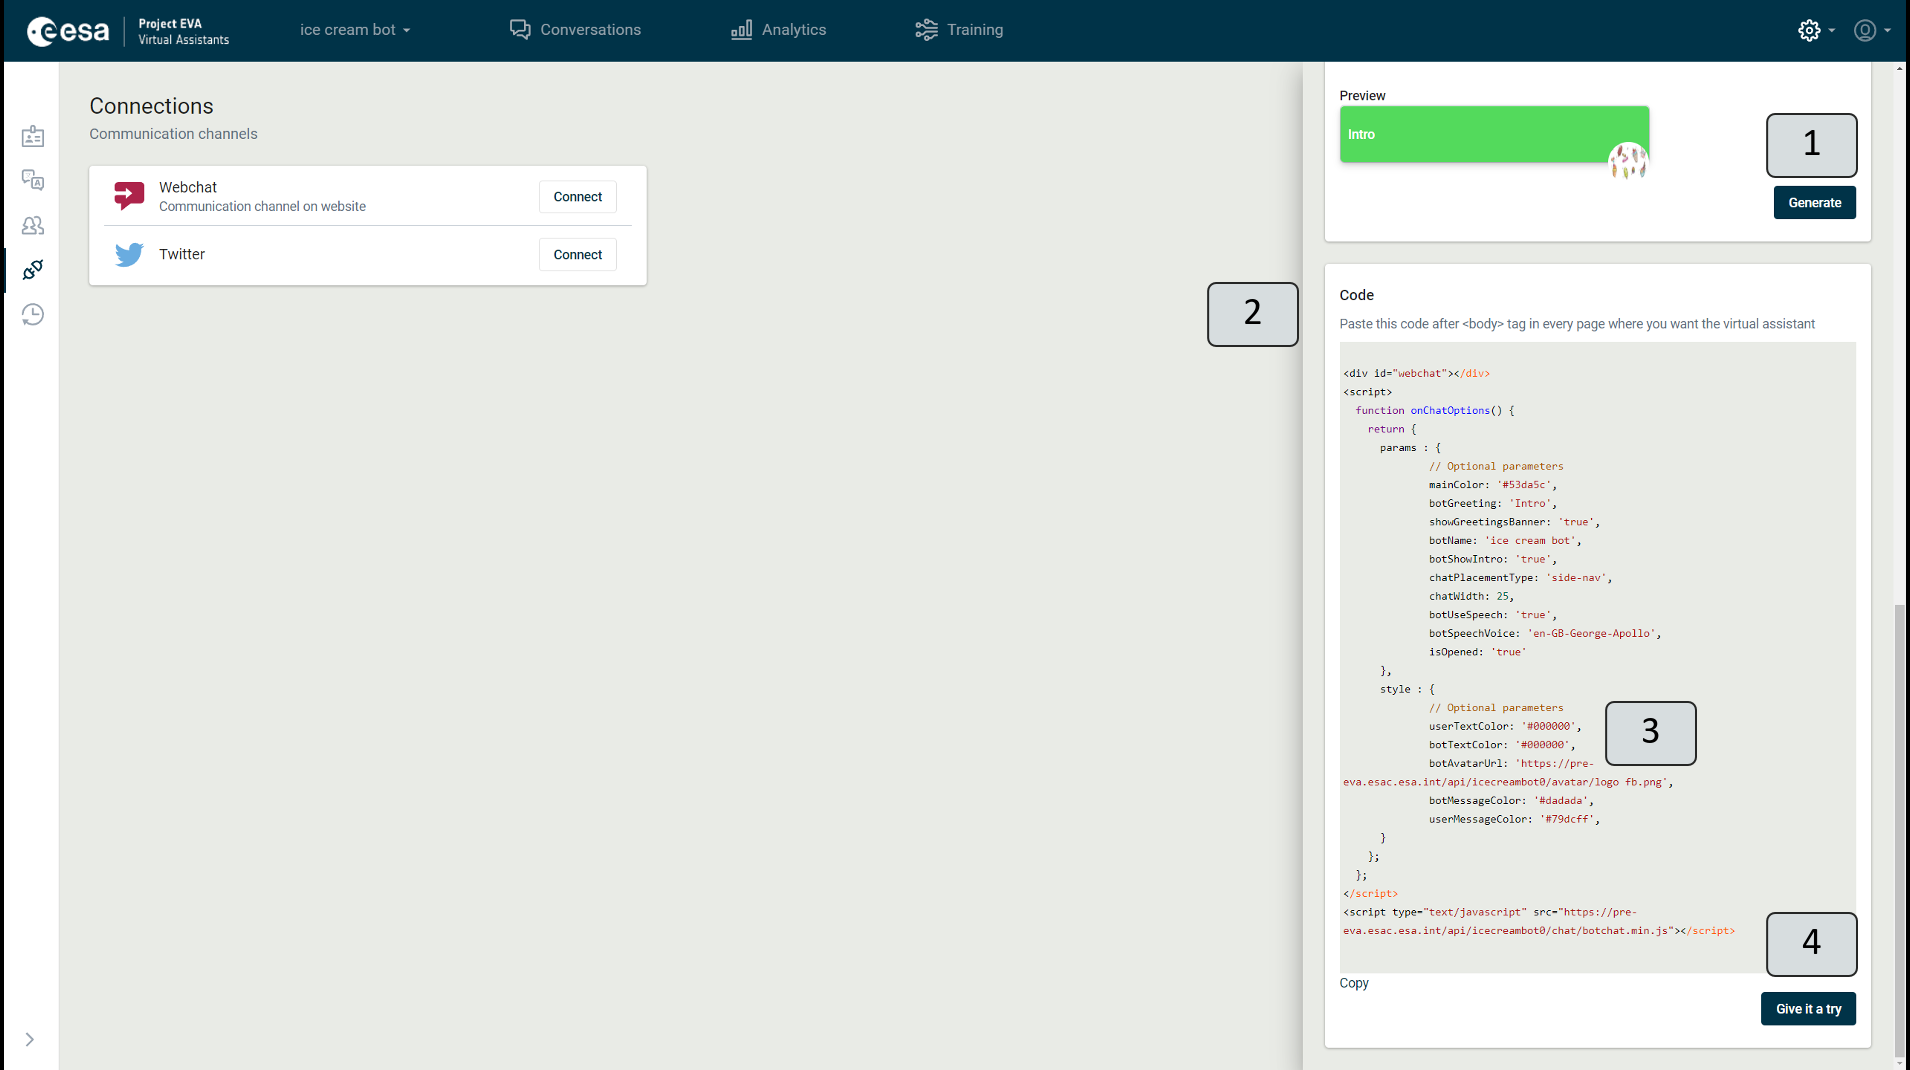
Figure 122. Webchat code
Twitter.
When you click "Connect" (Figure 123) (1) next to Twitter, a window appears on the right-hand side of the view, defining all the values to connect.
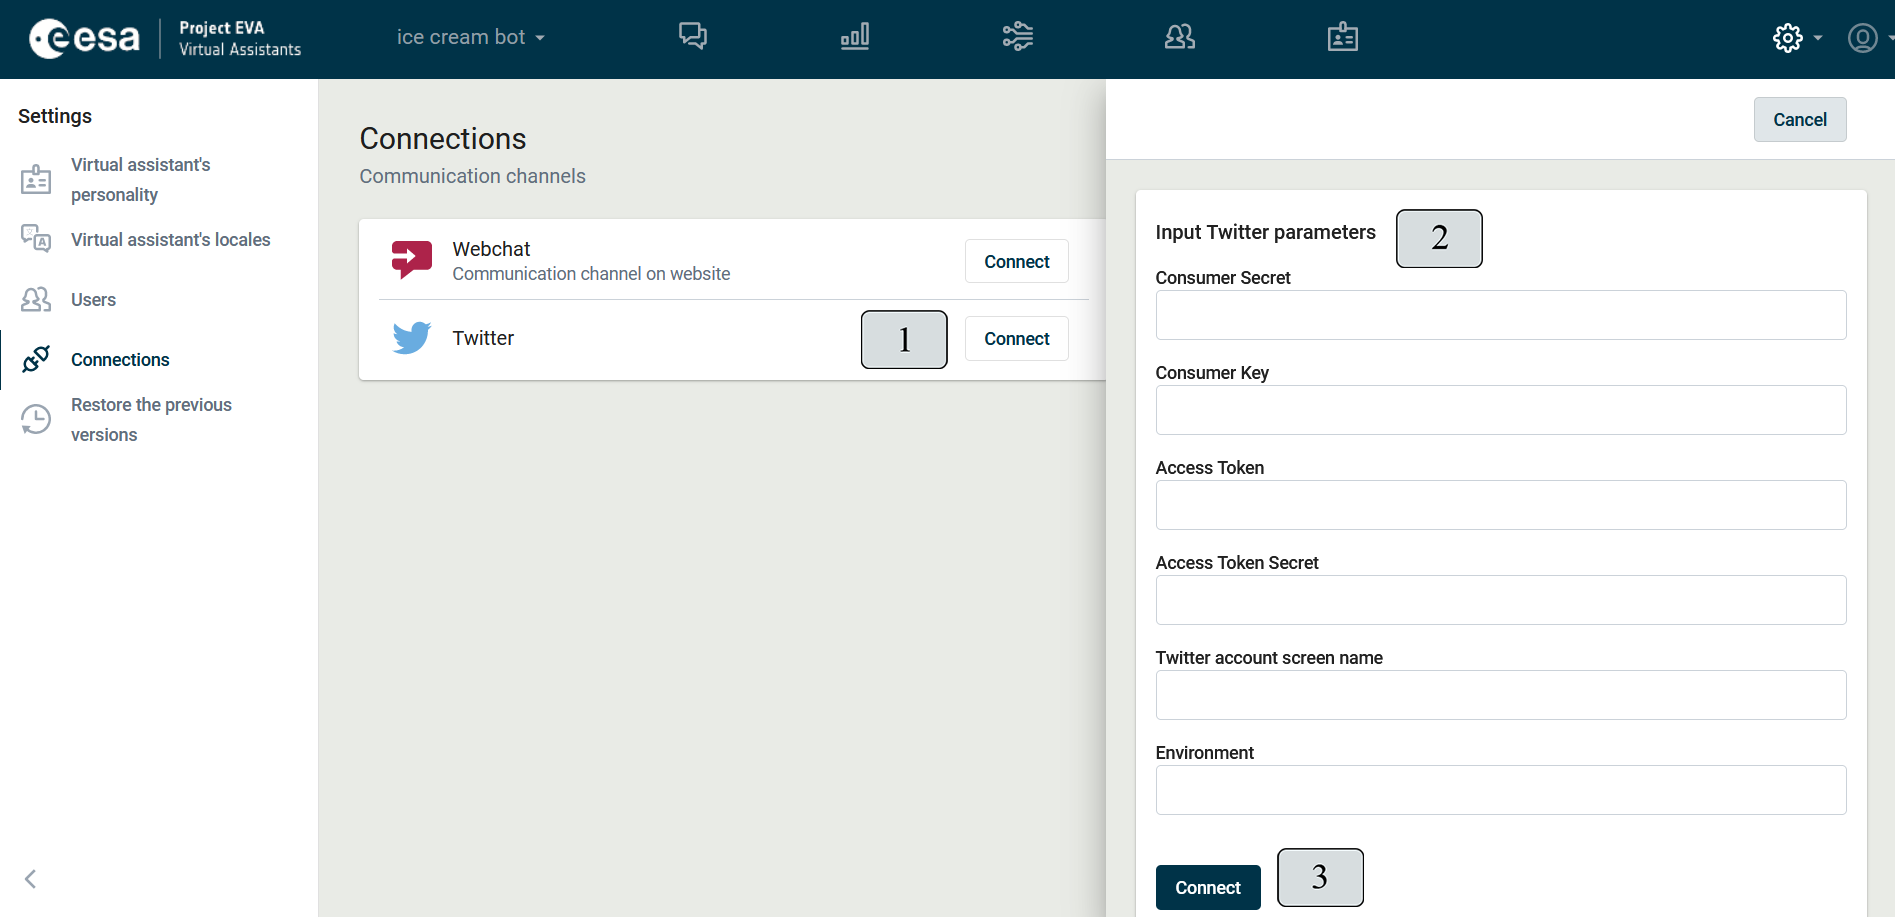
Figure 123. Twitter
The window shown in the example above (2) asks you to fill out the fields to ensure that the VA functions on Twitter. Look for the necessary information for filling the fields in the Twitter account holder repository readme.md file. To connect VA to Twitter, click the button "Connect".
When this has been done, a green dot (Figure 124) (1) appears next to the title "Twitter". If the connection failed, it is marked with a red dot.
To remove a connection, click on "Remove connection" (2).
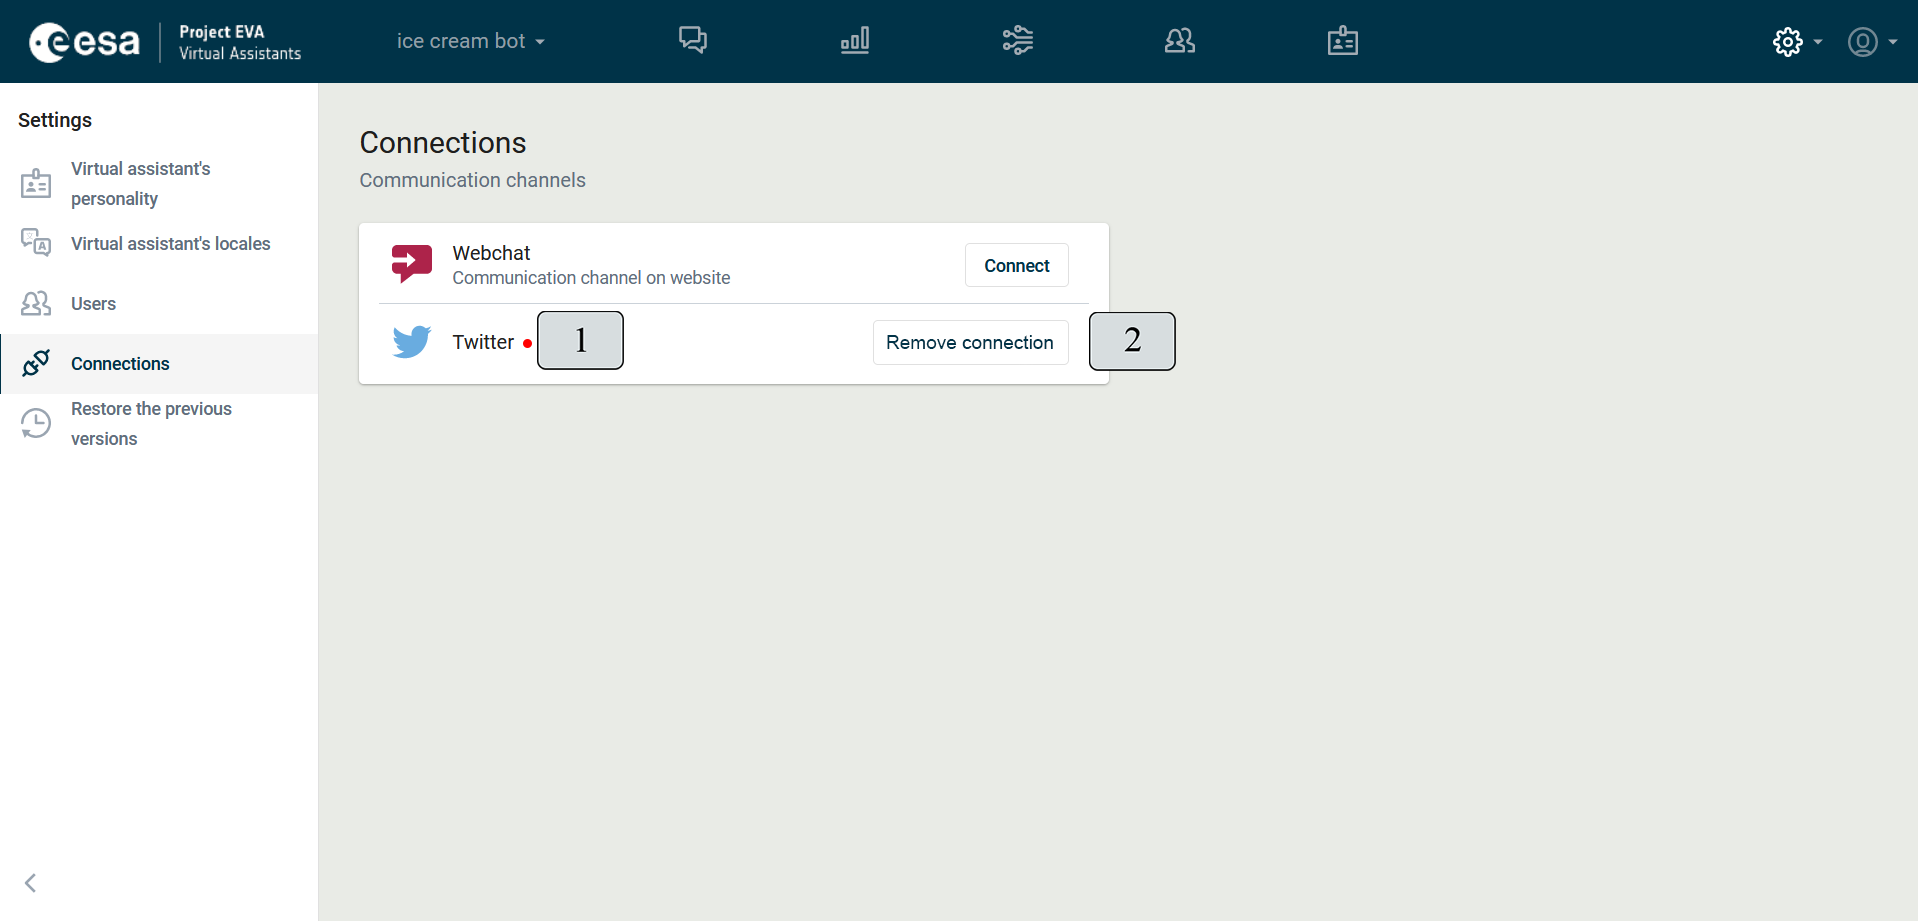
Figure 124. Remove twitter connection
Restore previous versions
VA scenarios, outputs, intentions, entities, functions, and data tables can be restored in one of the previous versions. To do this, you must select the language (Figure 125) (1) to which the renewal applies and mark the desired item (2).
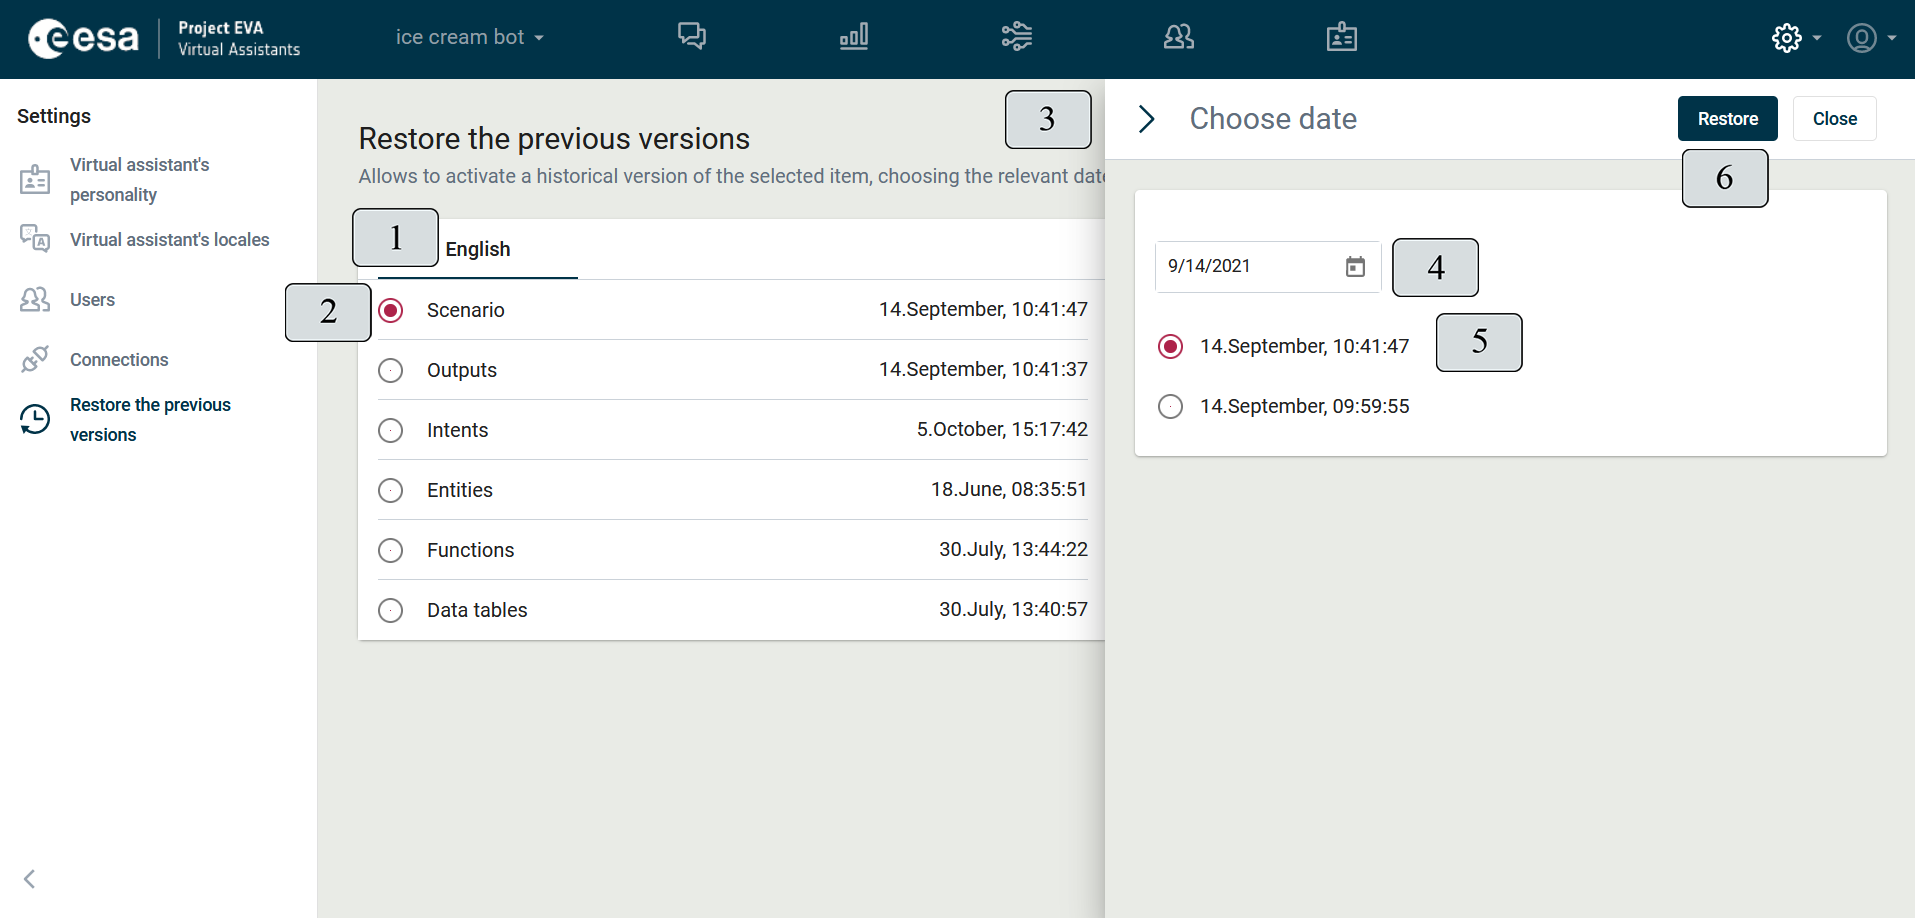
Figure 125. Restore previous versions
On the right-hand side, the selection window for renewable versions (3) opens. It contains a calendar (4) on which the required date of the renewable version should be indicated. When this has been done, click on the renewable version (5) and "Restore" (6). If you do not need to restore, you can close the window by clicking "Close" (6).
User Profile
You can access the user profile by clicking the human icon (Figure 126) (1) in the right-hand corner of the main toolbar. A drop-down menu appears with two options: "User profile" (2) and "Logout" (3).
When you click "Logout" (3), the user session is terminated and the initial login window for the VA management site appears.
Clicking "User profile" (2) opens the profile window (4), where you can change an interface language, if available, - mark the language (5) in which the user wants to see all interface messages.
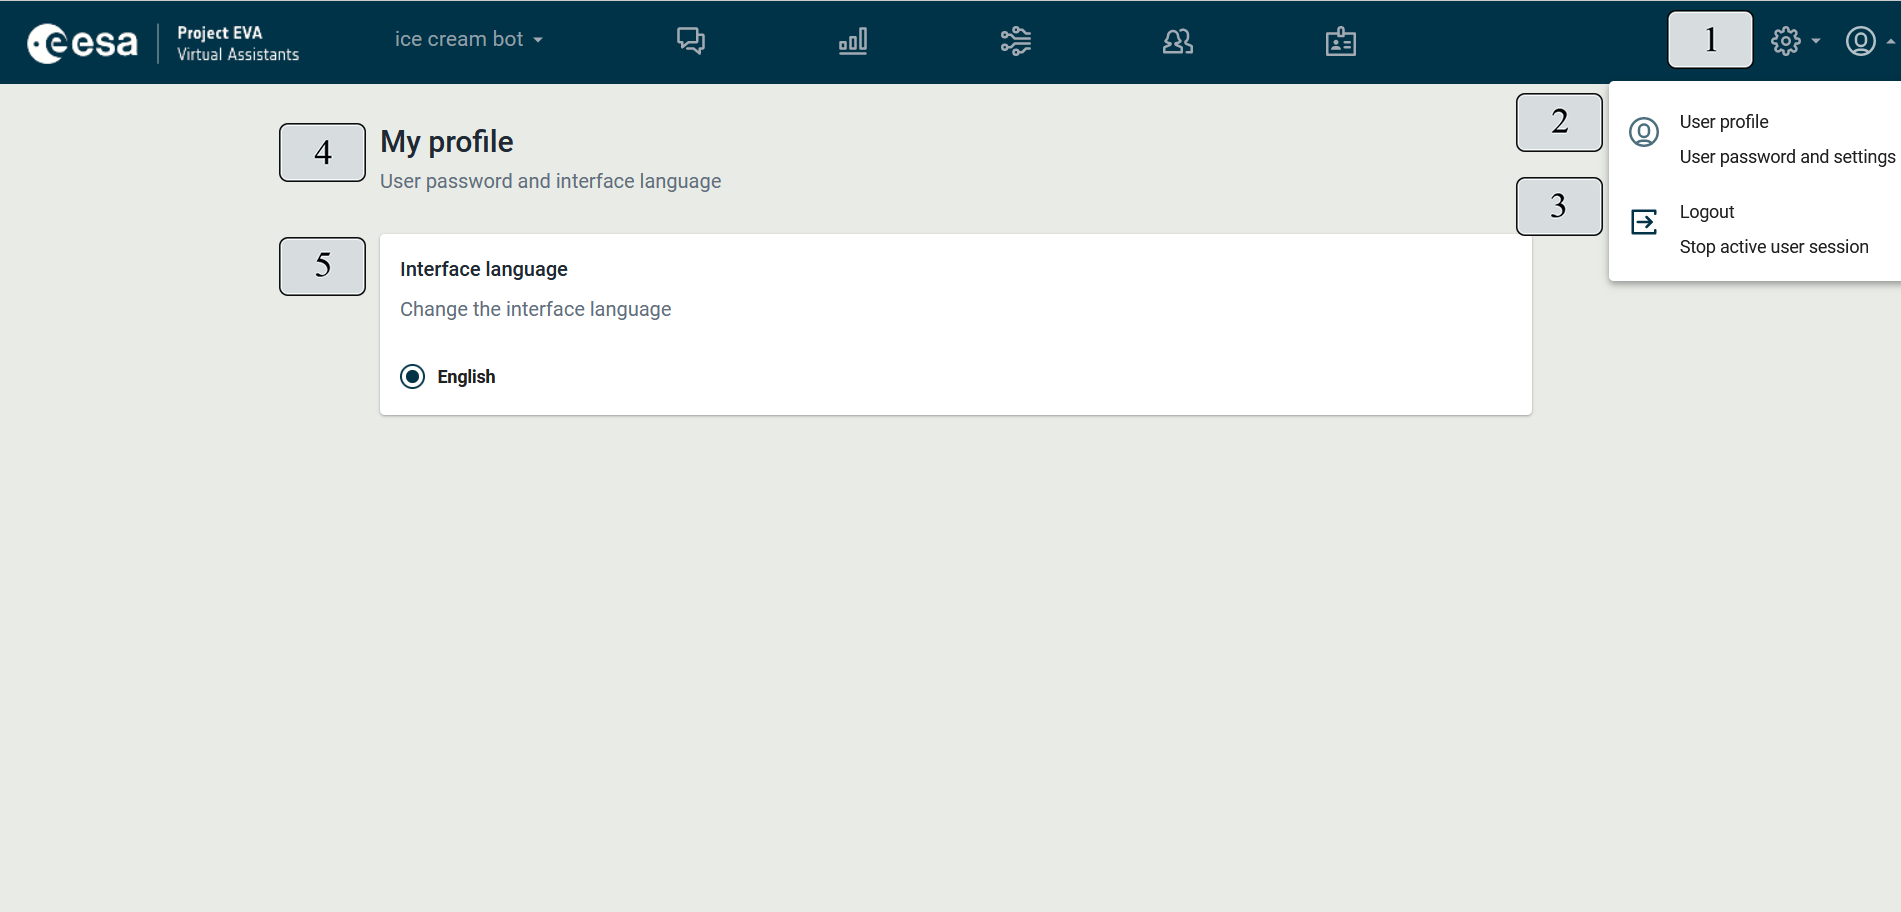
Figure 126. User Profile