General
This document provides a guide to creating, configuring, and managing a Large Language Model (LLM) Virtual Assistant (VA) within the EVA platform. It provides the necessary steps to set up a new VA, configure its settings, and integrate it with a knowledge base to ensure optimal performance.
Key topics covered in this guide include:
Creating a New LLM VA: Step-by-step instructions on how to create a new VA using the Management view in EVA.
Configuring the LLM VA: Detailed explanations of key configuration settings, including llm and llmconfig parameters, which define the VA’s functionality and interaction with the knowledge base.
Training and Managing the VA: Insights into how the VA with LLM operates in the training environment.
Working with the Knowledge Base: Best practices for structuring and maintaining the VA’s knowledge base to ensure accurate and relevant responses.
Creating a new LLM VA
A new VA can be created using the Management view on the EVA platform. To do this, the administrator should go to the management view of the EVA platform and click 'Create' in the top left part. A sidebar will be revealed from the right side with a single input field where the VA name should be provided. Next, you can click on 'Create' at the top right corner and wait for the process to complete. After completion, you will be greeted with a notification and the VA list will display the newly created VA.
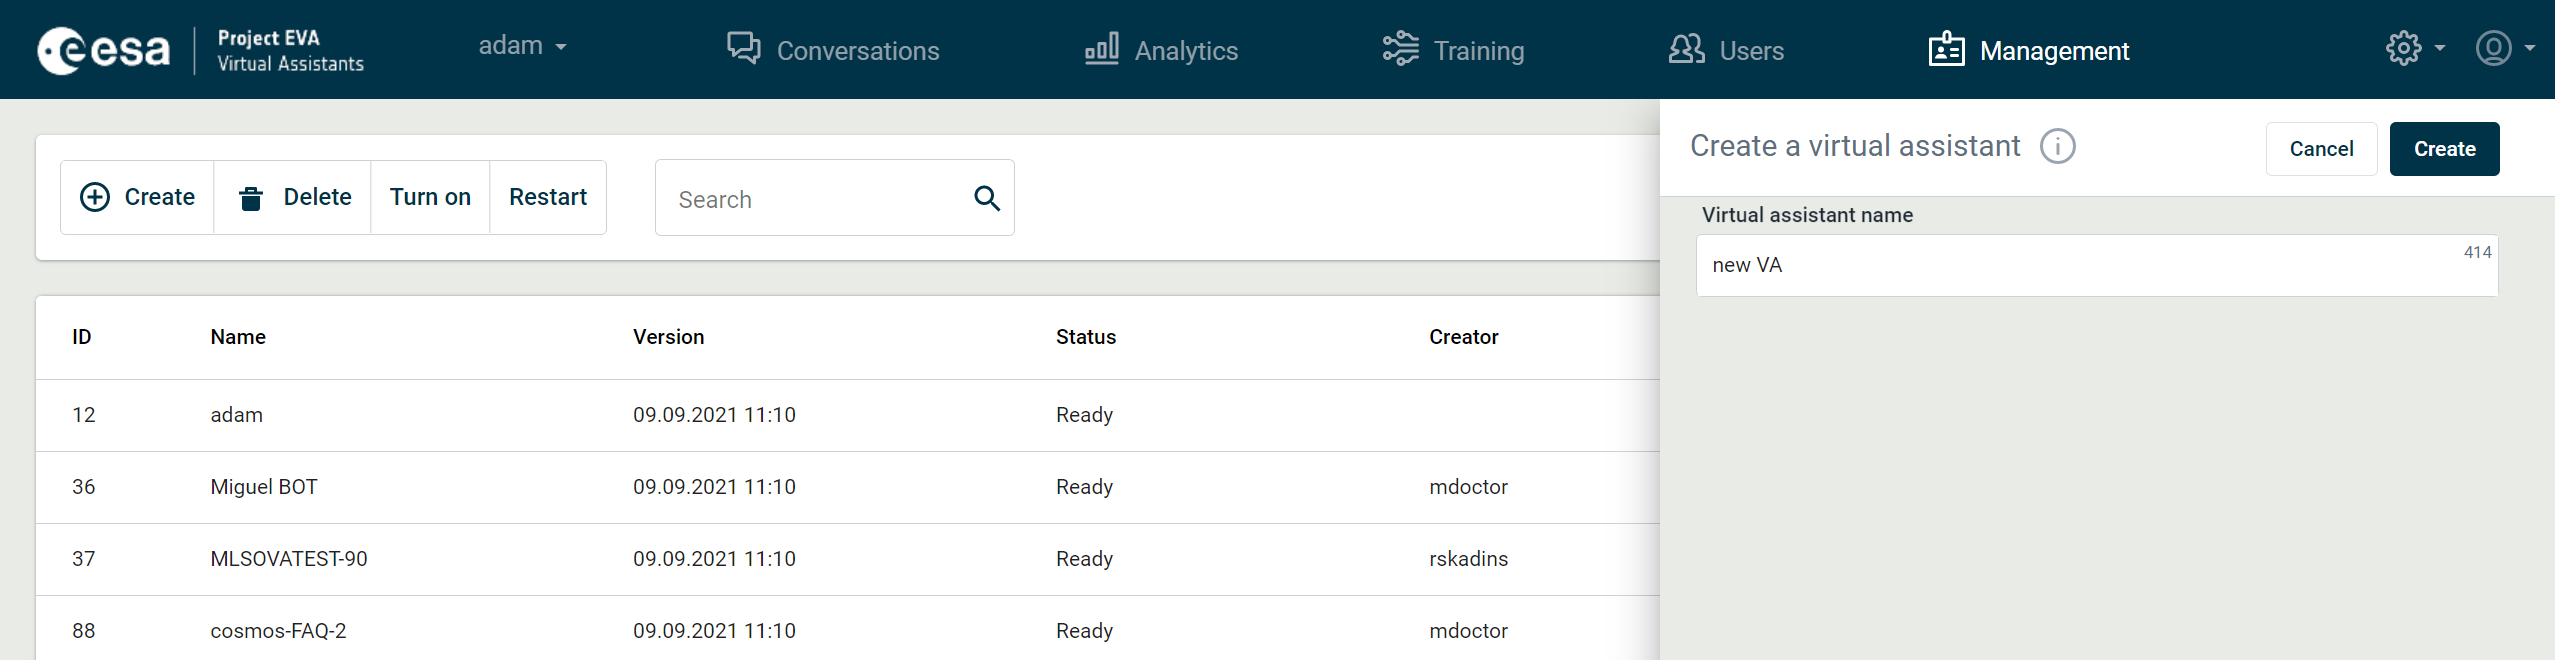
Figure 1. Creation of new VA
Configuring LLM VA
There are typically two VA settings connected to an LLM bot: llm and llmconfig.
The llm setting is created automatically. When set to 'true', it enables the knowledge base (or retrieval-augmented generation) feature in the bot. The default value, if not specified, depends on the system configuration; for EVA, it is set to 'true'.
The llmconfig setting is a manually added parameter that specifies which LLM to use. For the EVA project, where we utilize the Ollama web service hosted by ESA, the configuration is as follows:
{"DifferentLLM":{"type":"ollama","url":"http://sci-ai02.evsp.lan/","model":"qwen3-coder-next:latest"}}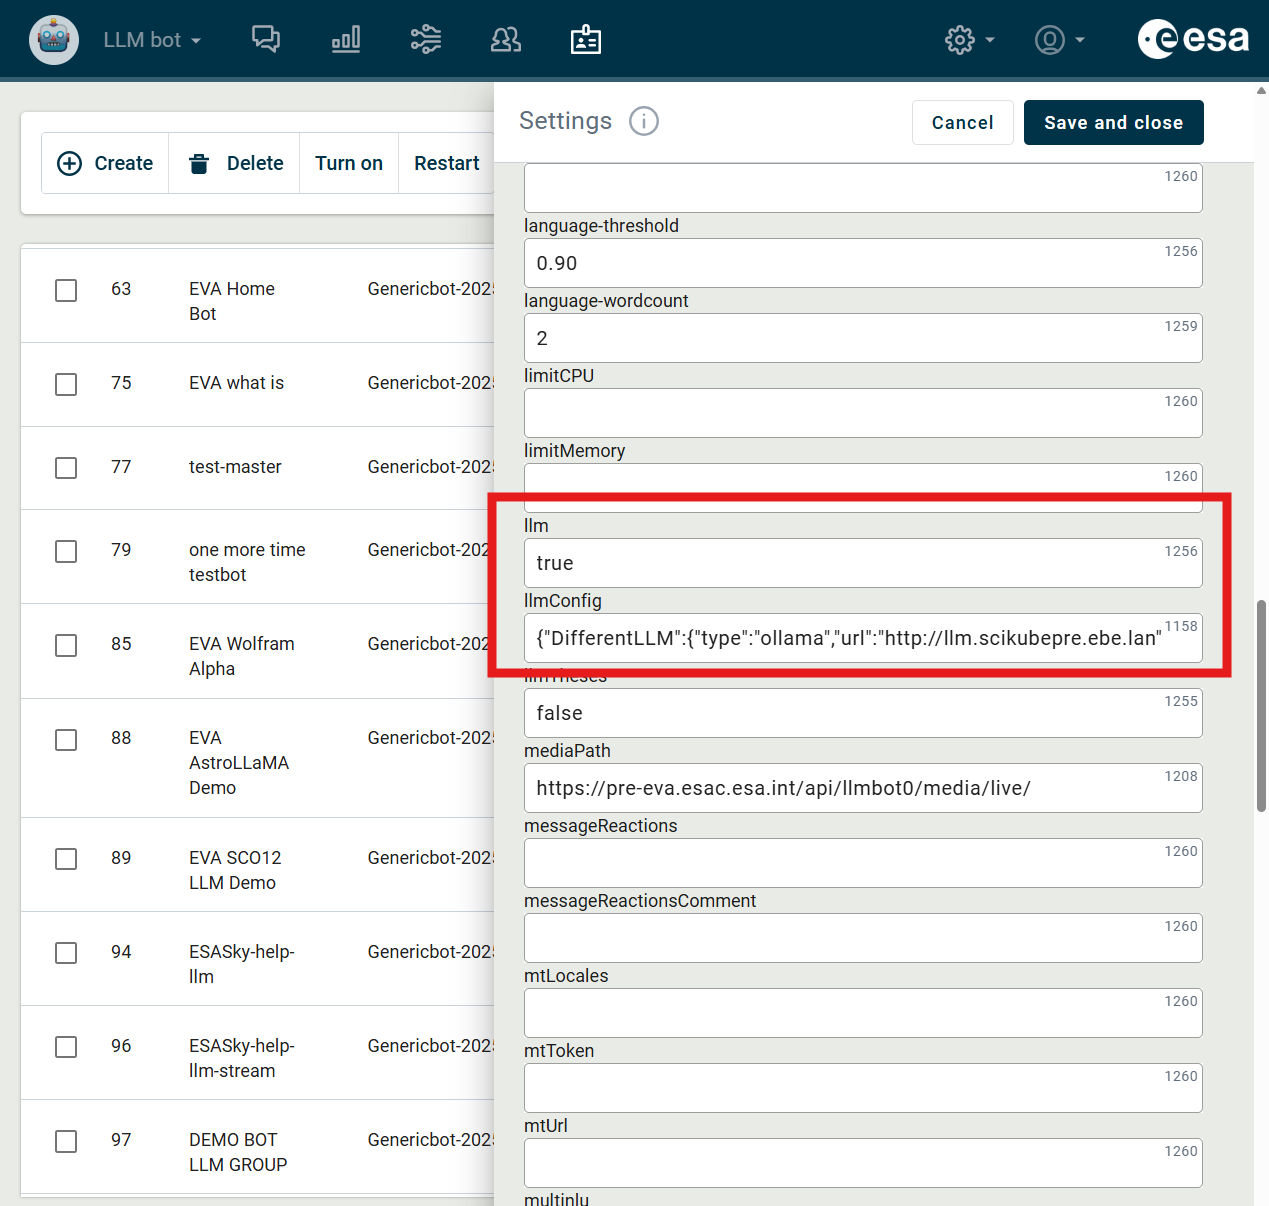
Figure 2. LLM VA settings
The llmconfig setting can be accessed not only by the global administrator but also by virtual assistant trainers with administrator rights to the virtual assistant (Figure 2.1). To specify the LLM configuration, a VA administrator should click on VA Settings (the gear icon), navigate to Virtual assistant’s personality, and fill in the information in the Large language model configuration field.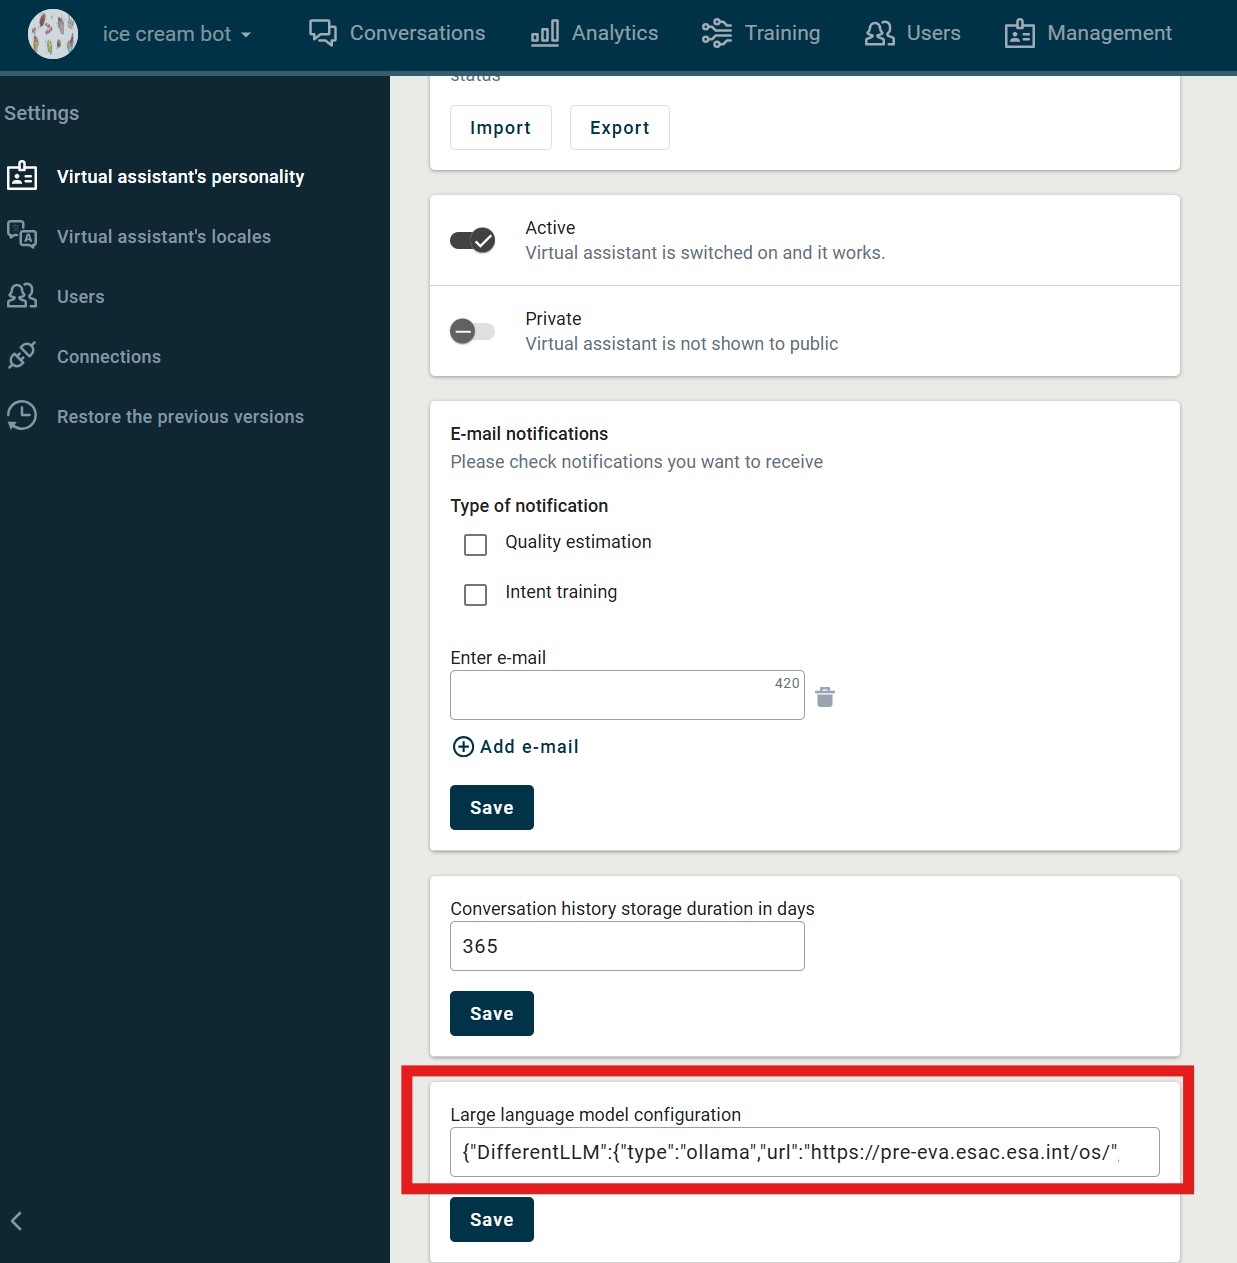
Figure 2.1. LLM configuration in VA local settings
The llmconfig parameter may include details such as which embedding model or similarity threshold to use for a given topic, what metadata to add to a file, and how to filter the vector store based on metadata.
The llmconfig JSON can include the following keys, which are passed to the LLMQnA service when invoking its methods:
- Metadata
Defines metadata settings, including filtering conditions.
"Metadata":{"shop":"true","services":"true","and_or":"and","exclude":{"ChunkNr":"8","public":"true"}}- For file searches, metatag values can be lists.
- Filters by default are joined by logical operator 'or'. To use 'and' you have to specify it with the metatag 'and_or' (this tag is optional).
- In markdown context files, #, ##, and ### are interpreted as text segment separators, with # xxx, ## yyy, and ### zzz being added to metadata as H1:xxx, H2:yyy, and H3:zzz. A line containing #### somekey:somevalue is added to metadata as somekey:somevalue, and a line with only #### signals a mandatory segment break.
- Threshold
Sets the similarity threshold for comparisons using cosine similarity, excluding segments that do not meet the threshold.
"Similarity":{"metric":"cosine_sim","threshold":"0.75"}- Debug
Enables or disables debug mode. (If value is 'true' the complete prompt with context and history passed to LLM in "LLMinput” key, and the conversation history in "history" key are returned for chat method)
"Debug":"true"- LLM (not used in ESA)
Specifies an alternative language model to use.
"LLM":"gpt-4o"- DifferentLLM
Defines another LLM model.
"DifferentLLM":{"model":"gpt-35-turbo","version":"xxx", "azure_deployment":"xxx", "azure_endpoint":"https://xxx.openai.azure.com/","api_key":"xxx"}"DifferentLLM":{"type":"ollama","url":"http://xx.xx.xx.xx:11434","model":"llama3","context_window":"8192"}
- Embedding
Different embedding model (from another URL) – configures an embedding model from an external source.
"Embedding":{"model":"gte-multilingual-base","url":"http://xx.xx.xx.xx:12345"}"Embedding":{"model":"bge-m3","url":"http://xx.xx.xx.xx:12345"}- UseKeywords
Values: 'true' or 'false' (default is 'true'). Enables keyword-based search and filtering. Keyword search is used in addition to semantic search when selecting context segments. Segments are filtered using keywords.
"UseKeywords":"true"- Language
Language for keywords. Specifies the language for keyword processing.
"Language":"en"- IncludeTheses (Experimental)
Allows using theses in processing. Theses are generated for each segment and added to the vector store as additional records - one to two theses per segment. When the value is set to 'true' for the addFile method, 1-2 theses will be generated and appended to the vector store. For the getFileNodes method, the theses segments will be returned in addition to the original text segments.
"IncludeTheses":"true"- HyDe (Experimental)
Use Hypothetical Document. Enables the hypothetical document approach for improved query understanding. The value can be 'true' or 'false' (default is 'false'). When set to 'true', information is first generated using the LLM that could help answer the question. Then, semantically similar segments to this generated hypothetical segment are chosen from the vector database, instead of segments similar to the question.
"HyDe":"true"- ChunkSize
Chunk size when splitting files. Defines how large file segments should be when splitting files for processing.
"ChunkSize":"1024"- SmartChunking
Based on various text features (such as enumeration units, paragraphs, and other elements), the beginning of the next segment is determined. By default, the option is enabled with the value "true".
"SmartChunking":"false"- FilterReferences
Filter References. Enables filtering of references in processed content. When set to 'true' (default is 'false'), only references that are semantically similar to the answer, based on cosine similarity, are returned. References that are not used in the response generation are excluded.
"FilterReferences":"true"- MultiQuestions (Experimental)
If unable to answer, split the query into multiple questions and answer separately. Ensures that if a question is too complex, it is broken into smaller sub-questions for better results. When set to 'true' (default is 'false'), if the context does not provide an answer, the LLM will split the input into several parts and answer each part separately.
"MultiQuestions":"true"- ExtractPictures
Extract images from PDFs into a separate folder. Ensures that images found in PDFs are saved separately. The getpictures method later automatically saves all images in the ‘Resources’ subview within the training view and creates links in the knowledge base document as references to the virtual assistant's resources folder.
"ExtractPictures":"true"- CreateTable (Experimental)
Attach a .csv file to the SQL database as table records, in addition to segments. The SQL server must be specified when starting the container.
"CreateTable":"true"- table_metadata (Experimental)
Extract specified fields from documents and store them as individual records in the SQL database. Configures which fields to extract from documents and save in the database
"table_metadata":{"type":"contract","fields": [ {"name": "date of signing","type": "string"}, {"name": "effective date","type": "string"}, {"name": "due date","type": "string"}, {"name": "expiration date","type": "string"}, {"name": "contract value","type": "float"}, {"name": "contract owner","type": "string"}, {"name": "contracting parties","type": "string"}]}- UseSummary (Experimental)
Generate a file summary and add it to segment metadata, as well as before file segments when preparing the response context. The summary is created from the file and attached to the response context.
"UseSummary":"true"- Pdf2md (to use different tool for extracting markdown from the pdf files; for getfilecontent and addfile methods)
- type (tools accessed using API calls: 'gemini', 'llamacloudparse', 'docintelligence', 'mistral' or Python libraries: 'markerpdf', 'pymupdf4llm', 'docling')
- model (only if type is 'gemini' or 'mistral')
- key (only if type is 'gemini', 'llamacloudparse', 'docintelligence' or 'mistral')
- endpoint (only if type is 'docintelligence')
Examples of config parameter (if 'ExtractPictures' are 'true' the pictures from the pdf are saved as separate files and could be retrieved with the method getPictures):
{"ExtractPictures":"true","Pdf2md":{"type":"gemini","model":"gemini-2.0-flash","key":"<GOOGLE_API_KEY>"}}{"Pdf2md":{"type":"llamacloudparse","key":"<LLAMA_CLOUD_API_KEY>"}}{"ExtractPictures":"true","Pdf2md":{"type":"mistral","model":"mistral-ocr-latest","key":"<MISTRAL_API_KEY>"}}{"ExtractPictures":"true","Pdf2md":{"type":"docintelligence","endpoint":"<AZURE_DOCINTELLIGENCE_ENDPOINT>","key":"<AZURE_DOCINTELLIGENCE_KEY>"}}{"ExtractPictures":"true","Pdf2md":{"type":"markerpdf"}}{"ExtractPictures":"true","Pdf2md":{"type":"pymupdf4llm"}}{"ExtractPictures":"true","Pdf2md":{"type":"docling"}}LLM VA in Training view
A new VA
When creating a new VA, the VA scenario includes the "Automatically generated answer" action by default. This action enables the virtual assistant to independently understand the user's question and provide an answer based on the information available in the VA knowledge base.
For newly created VAs, the action is added to the scenario by default and placed in a topic with a self-loop that has no intent and the lowest priority (100 or higher).
For the default action, fields are automatically populated, and the related outputs, along with their identifiers, are displayed in the Outputs view.
As soon as a new VA is created, if it has no intents - or if it does but fails to detect the intent of a user's question during a chat – text generation is activated. This allows the VA to generate an answer automatically using information from the knowledge base.
The text generation action includes:
- The "Automatically generated answer" action, which is automatically added to the default scenario.
- The action's related outputs are also automatically added to the Outputs view.
- The default prompt is added to the Prompts view.
The “Automatically generated answer” action (Figure 3) activates automatic text generation in the scenario. It enables the generation model to create a suitable response using the data added to the Knowledge base view (see the chapter "Working with the knowledge base").
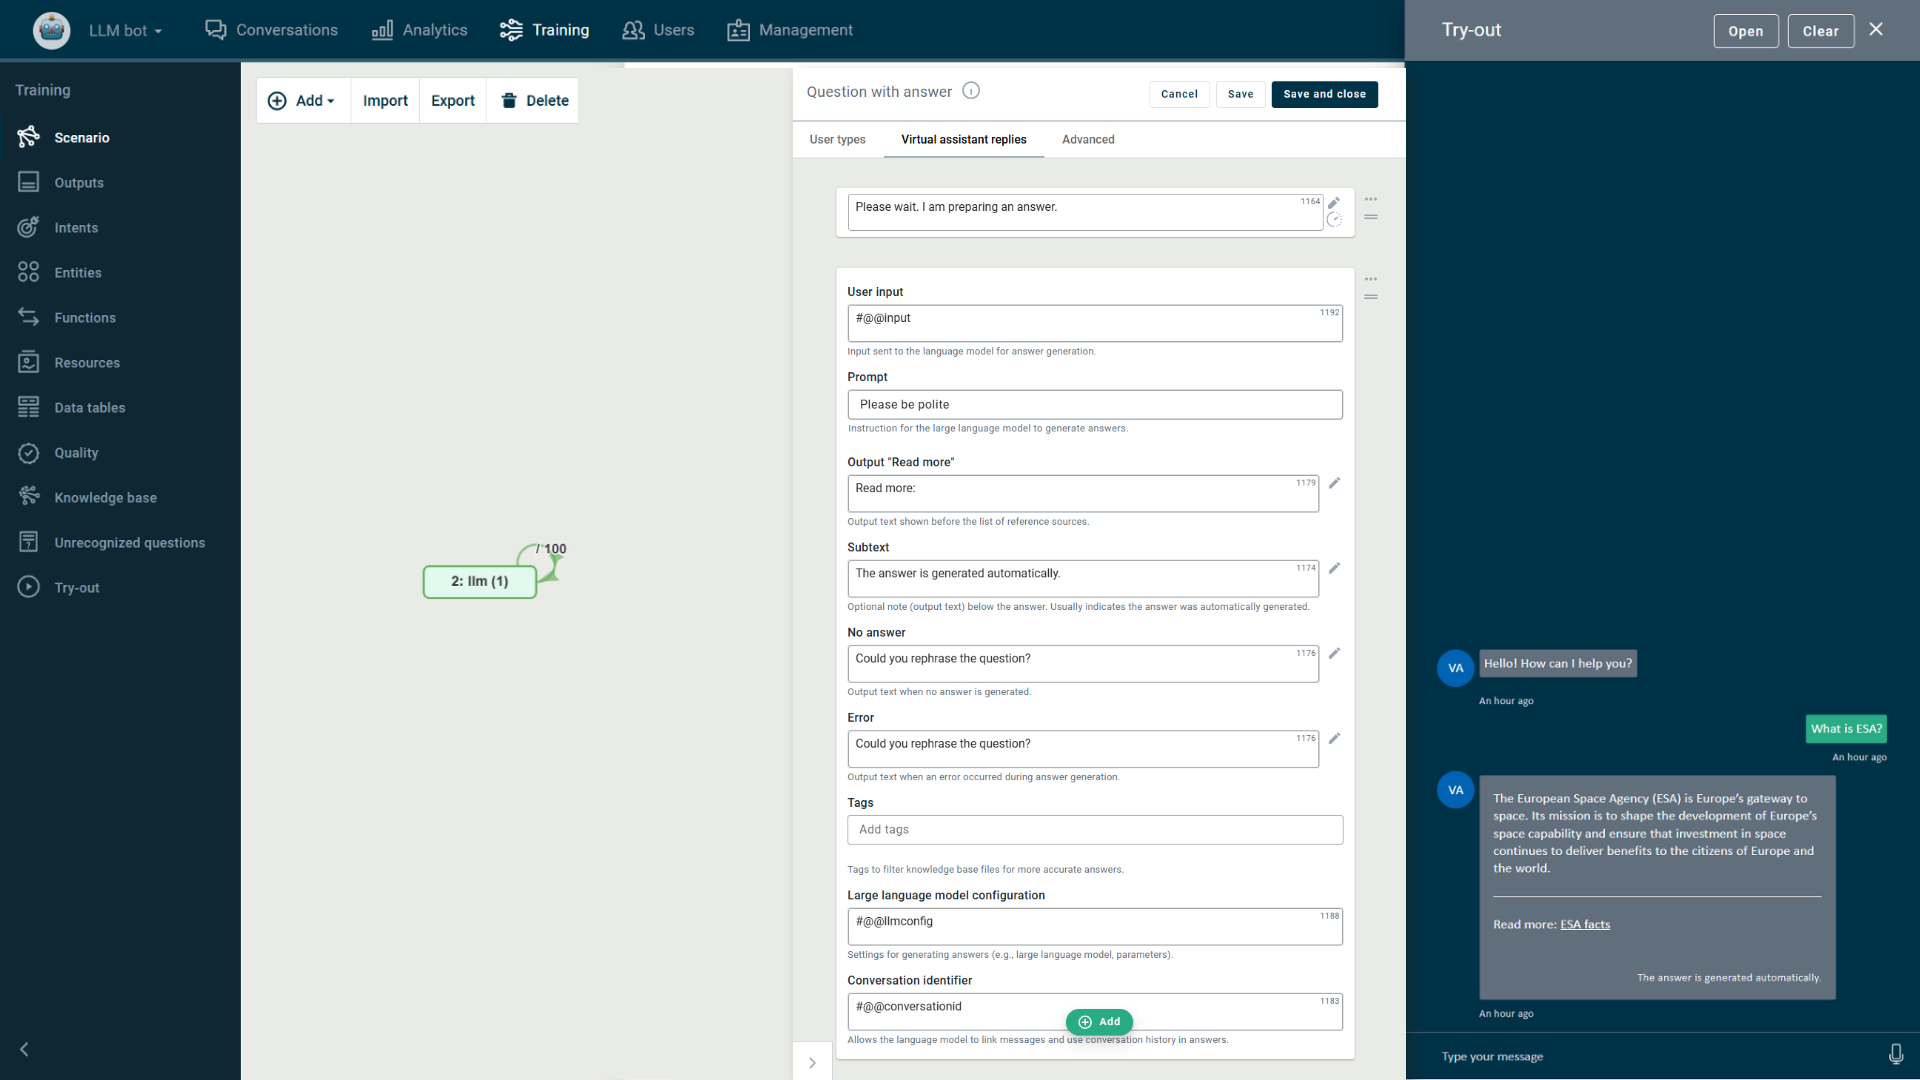
Figure 3. The action "Automatically generated answer"
Automatically generated answer
This action “Automatically generated answer” allows the VA, using the connected large language model, to understand the user’s question and automatically generate an answer based on the information provided in the knowledge base (see the chapter "Working with the knowledge base") (Figure 3.1 (11)). The action can be added both to a state and to the transition section “Virtual assistant replies”.
It is recommended to start building all new VAs by adding the “Automatically generated answer” action to the scenario and preparing the knowledge base from which the action retrieves data – because for simple question-and-answer cases, the scenario does not need to be further expanded.
For older intent-based assistants, it is recommended to add this action as a fallback mechanism in cases where the VA cannot determine the user’s intent or where no appropriate response is defined in the scenario (usually a transition with the lowest priority and no intent, leading to the answer “I don’t know”). In such situations, instead of returning “I don’t know,” the AI model will be invoked to generate a response based on the knowledge base content and display it to the user in the chat. If a response cannot be generated from the knowledge base data, only then will the user see the “I don’t know” answer.
To enable automatically generated answers in the VA, the following fields must be completed in the action (Figure 3.1):
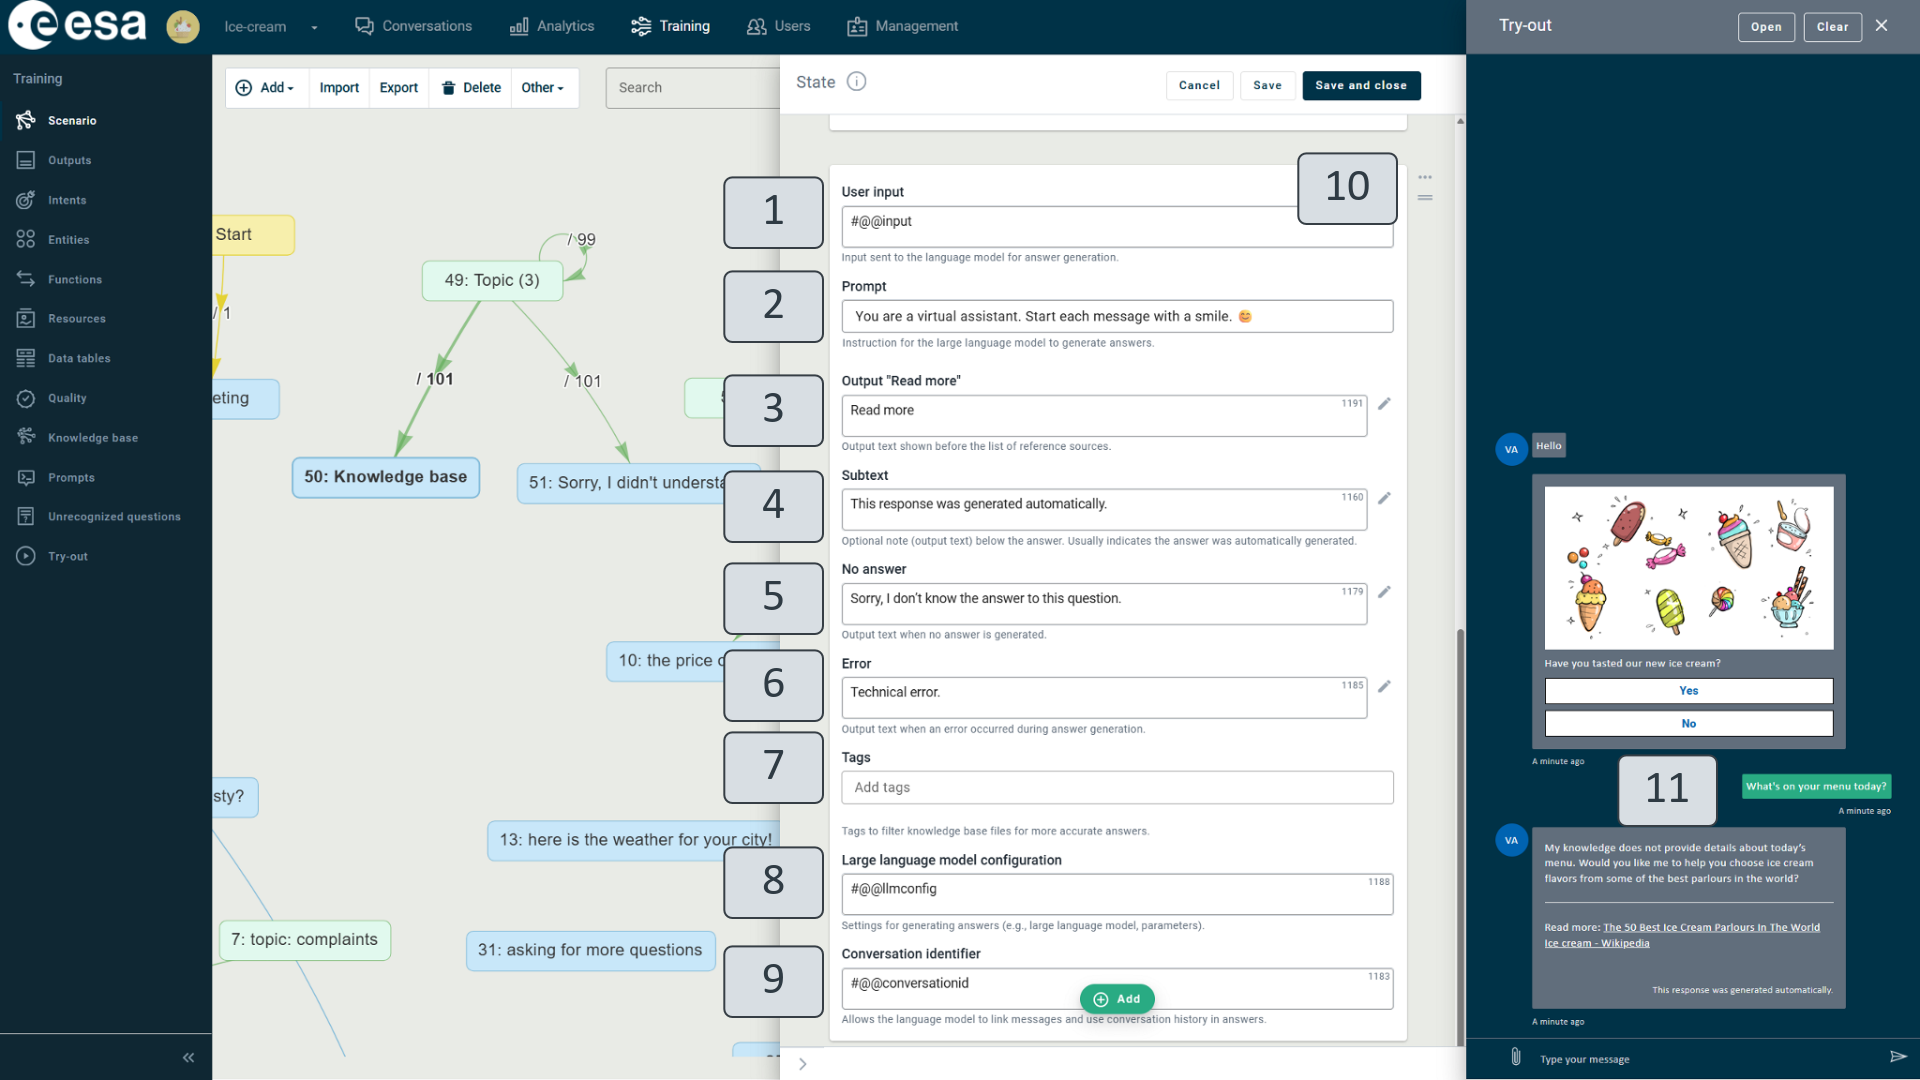
Figure 3.1. Automatically generated answer
- User input (1). This field is automatically populated by default with the user’s question (#@@input). This value is required by the large language model to generate a response.
- Prompt (2). Select the prompt that will be sent in the request to the large language model. Prompts must be defined separately in the “Prompts” view (see the section “Prompts”).
- Output “Read more” (3). Automatically generated answers can include references. To learn how to structure files so that references are displayed, see the section “Preparing files”
- Subtext (4). In the chat window, this text is shown after each generated response as a note. It is most often used to indicate that the response was generated automatically, but any text can be provided as needed.
- No answer (5). Specify the output the VA should provide if a response cannot be generated from the available knowledge base data.
- Error (6). Specify the output shown to the user if the large language model is unavailable and a response cannot be generated at that moment.
- Tags (7). This field should be used only when automatic generation needs to rely on a subset of knowledge base documents. In such cases, the corresponding files in the knowledge base must also be tagged. If document tagging is not used, leave this field empty. If a tag should contain the value of a variable stored in the context, specify it using the following format: #contextID#.
- Large language model configuration (8). By default, this field is automatically populated with #@@llmconfig, referring to the base configuration. If necessary, the configuration can be adjusted. See the chapter "Configuring LLM VA" for more details.
- Conversation ID (9). This field is automatically populated with the conversation identifier (#@@conversationid). It is used by the large language model to track the conversation history.
Note: There are additional output fields that are not displayed in the scenario but are visible in the Outputs view. These fields are built into the automatically generated answer and are used when the VA is configured to run in fullscreen mode.
To view these additional output values, set the setting isTeaBot to "true" in the Management view, then enable Fullscreen under Local VA Settings (the gear icon) → Connections → Webchat.
The additional output values are displayed in the Outputs view with the following IDs:
- answer.loc – Displays the text shown before the generated answer.
- sources.loc – Displays the text shown before the list of sources.
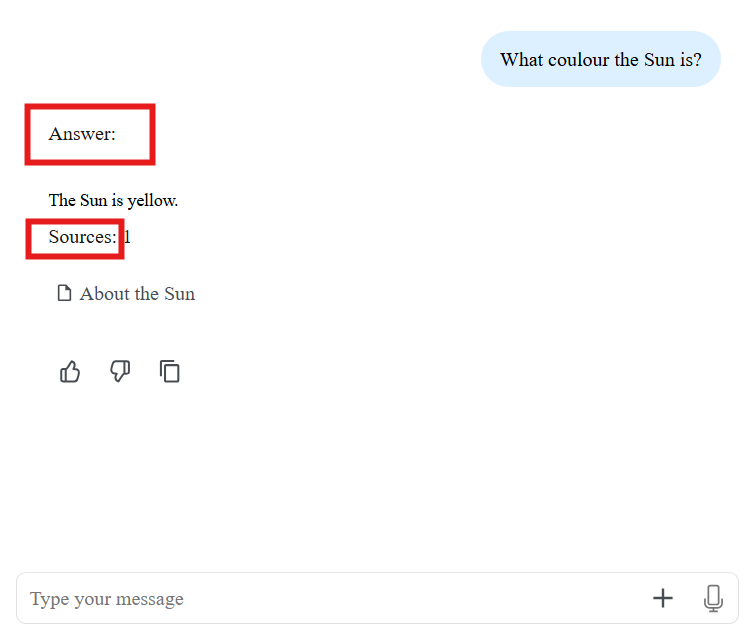
Figure 3.2. Additional output values for the fullscreen webchat
Deleting the action: The action can be deleted by clicking the three dots (10) on the right side of the window and selecting “Delete” from the dropdown menu. By clicking the three dots (10) and selecting “Add prerequisite,” you can define a prerequisite for the action. From the same menu, you can also select “Add answer” to define the next state action.
Changing the action position: If multiple actions are defined within a state, their order can be changed by clicking the icon with two horizontal lines (10) and dragging the action window to the desired position.
Older VA
In other VAs (created before the introduction of the text generation functionality), you can manually add the "Automatically generated answer" action to the scenario and configure its fields. (Read more in the chapter “Automatically generated answer”.)
This feature works only with the Knowledge base view. The global administrator must set llm to “true” in the Management section and configure the llmconfig setting accordingly.
- Create a prompt in the Prompts view (read more in the chapter “Prompts”.
- In the scenario, add the action “Automatically generated answer”, fill in the fields with values (Figure 3.1.).
- It is possible to include explanatory placeholder text in the scenario. This will warn the user about generating an automatic response.
- Add file to the knowledge base.
- Test text generation in the tryout window.
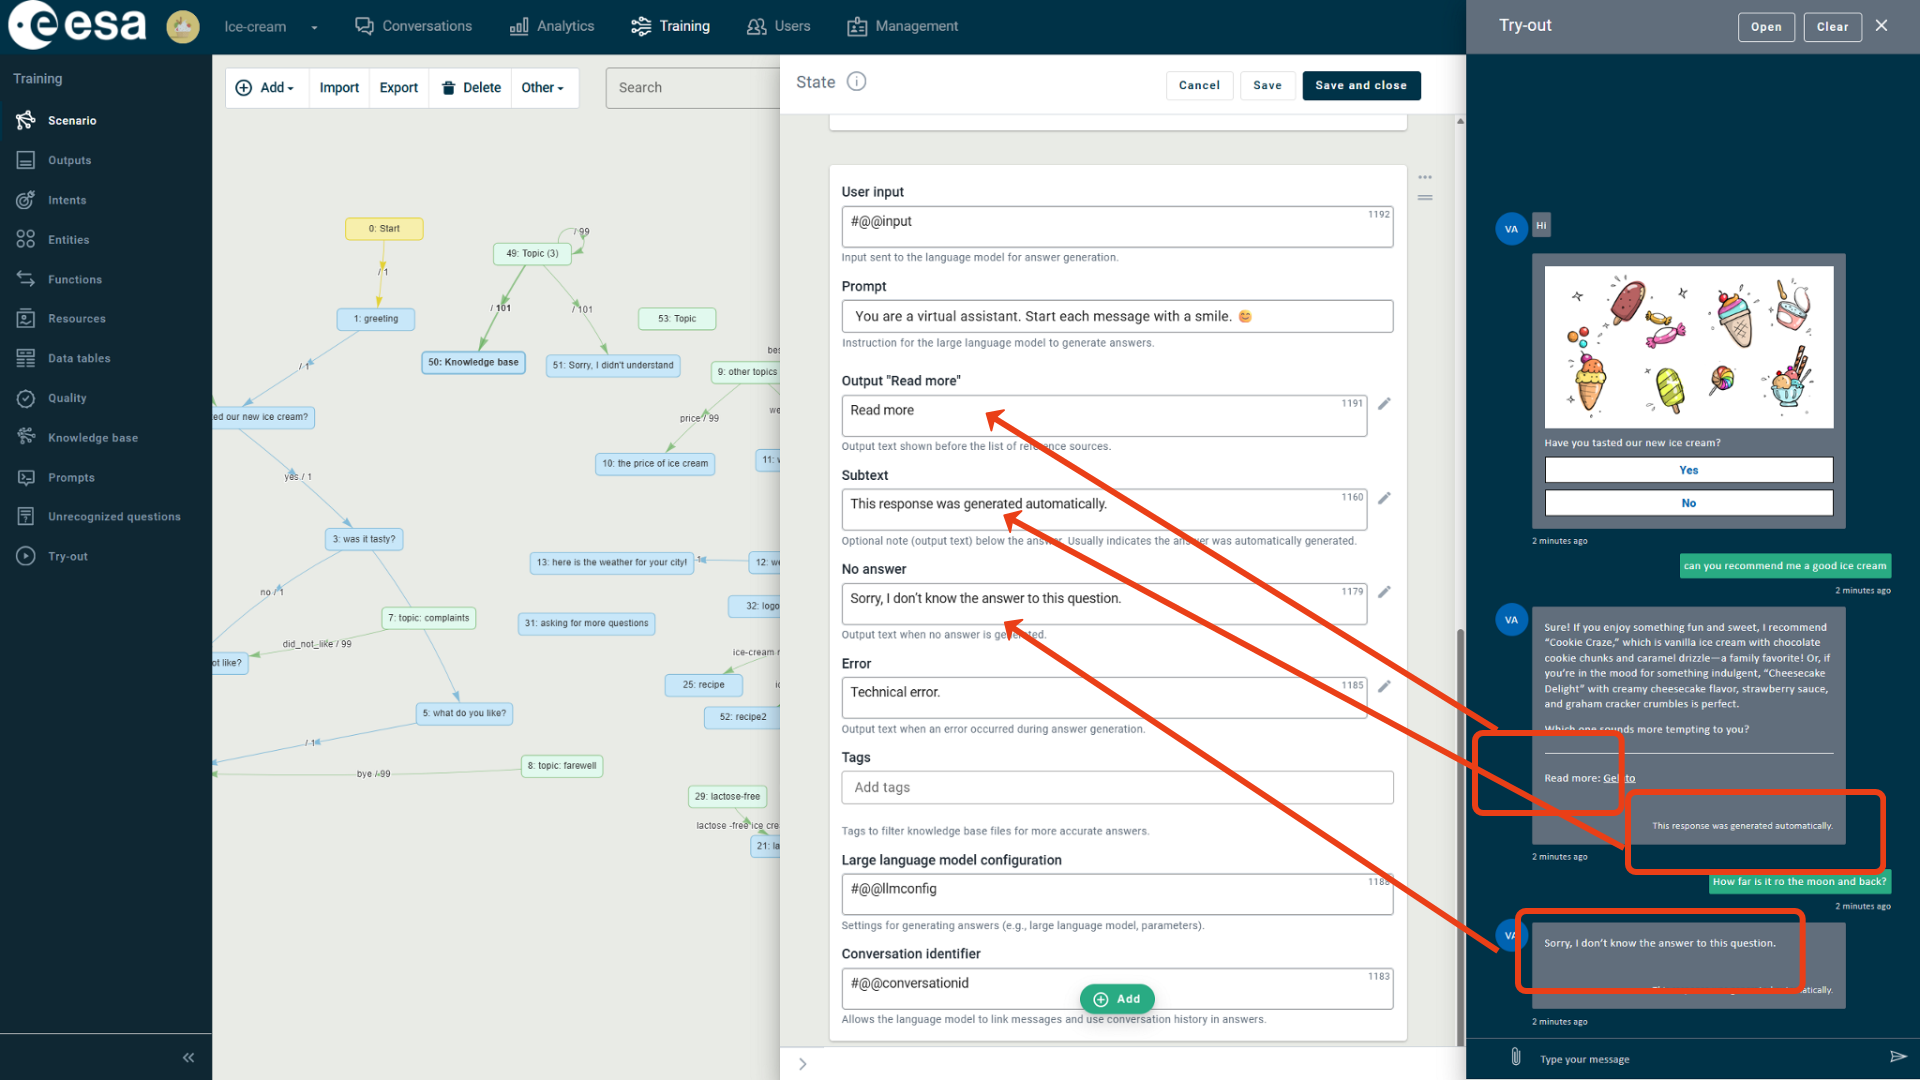
Figure 4. Fields in automatically generated answer
The function "llmgenerateanswer"
For VAs created before the introduction of the "Automatically generated answer" action, the “llmgenerateanswer” and “generateanswer” functions were available to enable the automatic text generation feature.
To enable automatic text generation using the “llmgenerateanswer” function:
- In the scenario, add the function, select the predefined function “llmgenerateanswer” from the list and fill in the function parameters with the values (Figure 4.1).
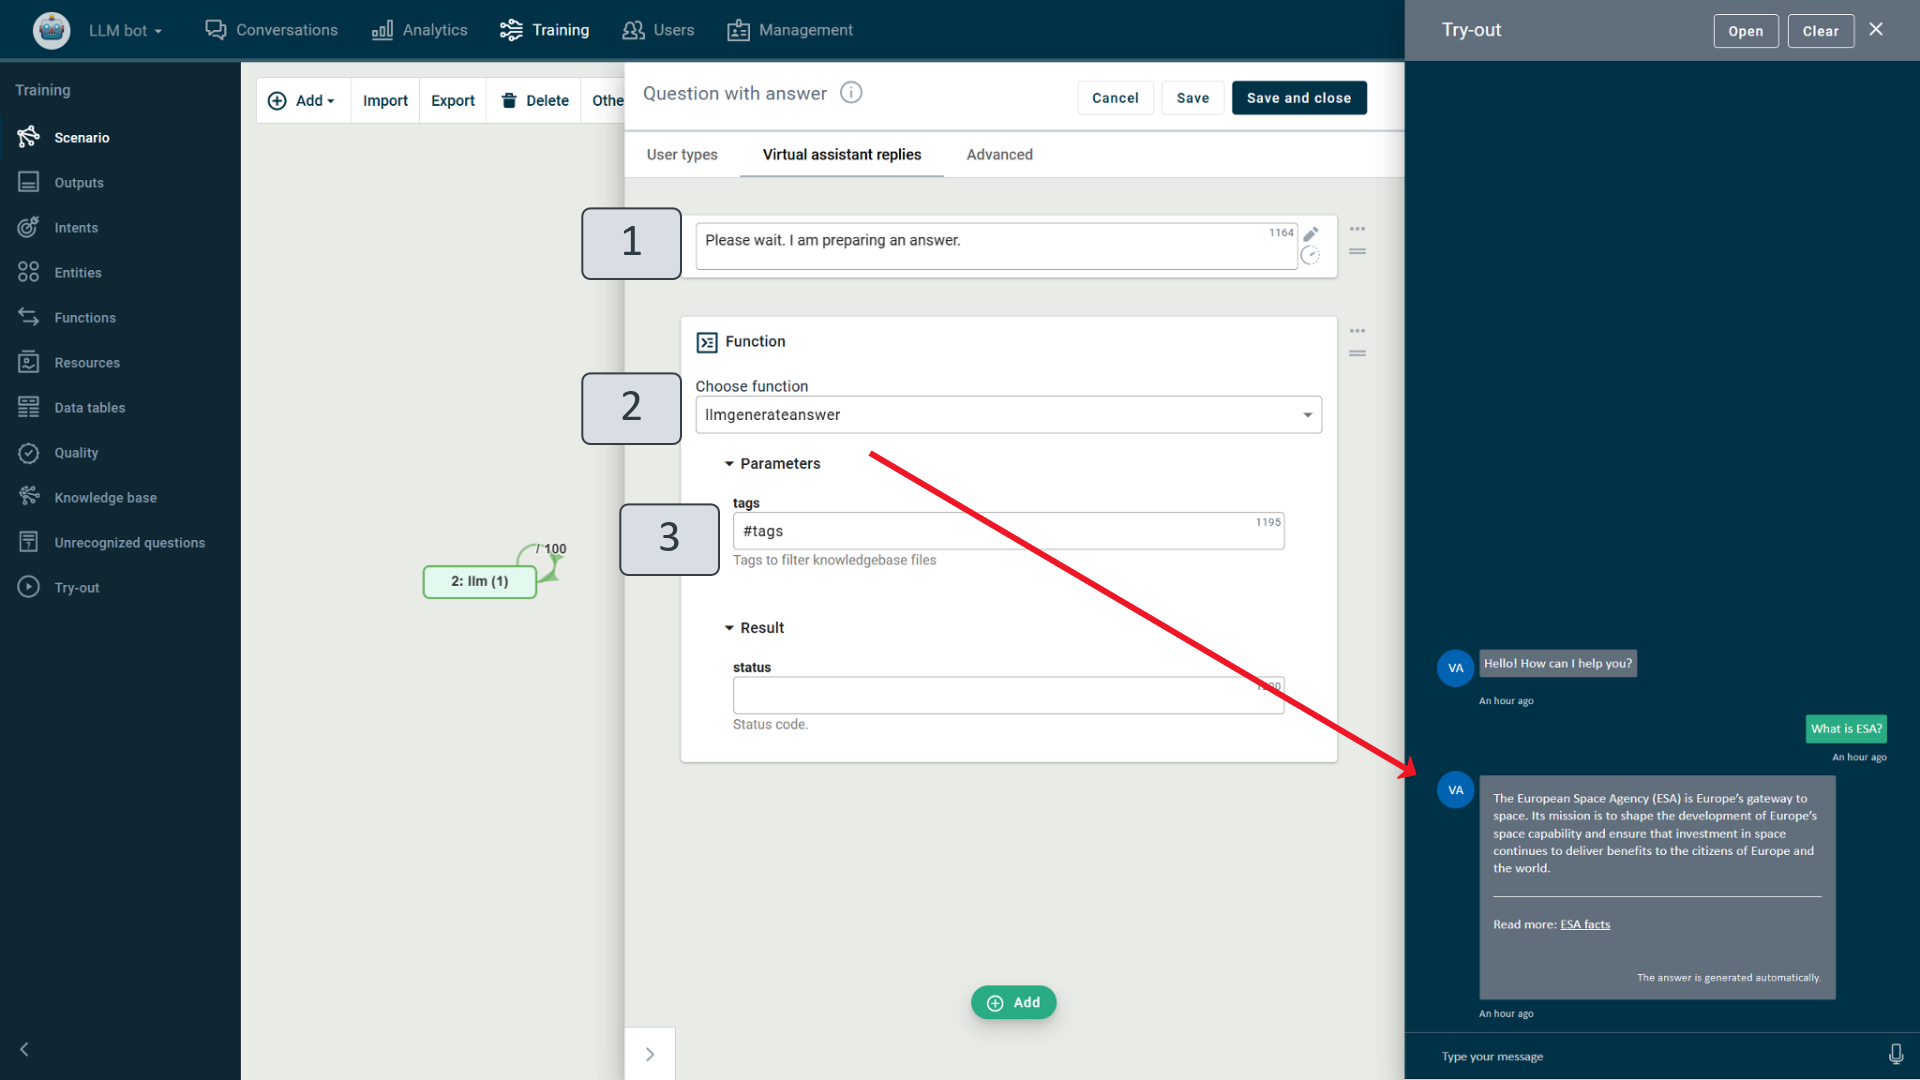
Figure 4.1. Function “llmgenerateanswer”.
- In the Output view (Figure 4.2), specify the function field values as output identifiers (1) and fill in the new output value fields (2).
Output ID | Example of a value | Explanation |
system_text_auto_generated | The answer is generated automatically. | Disclaimer text to be shown at the bottom, providing information about the generated answer. |
system_text_error_answer | Could you rephrase the question? | Output if the text generation model detects the question as unethical or fails to generate an answer. |
system_text_no_answer | Sorry, I don't know the answer. | Output when the text generation model has not generated an answer. |
system_text_prompt | Please reply politely and in English. If links and URLs to videos, video guides, and pictures are mentioned in context, display them in the answer, but never generate nonexistent links. The example of the link in the context: []() | Prompt. This is explanatory information that helps a text generation model create accurate answers. The prompt should be detailed and preferably written in English. To verify the prompt's effectiveness, navigate to the Knowledge base view and select Knowledge test. |
system_text_read_more | Read more: | Text in chat at the reference link to more information. |
3. When connecting a function, it is possible to include explanatory text in the scenario. This will warn the user about generating an automatic response (see Figure 4.1) (1).
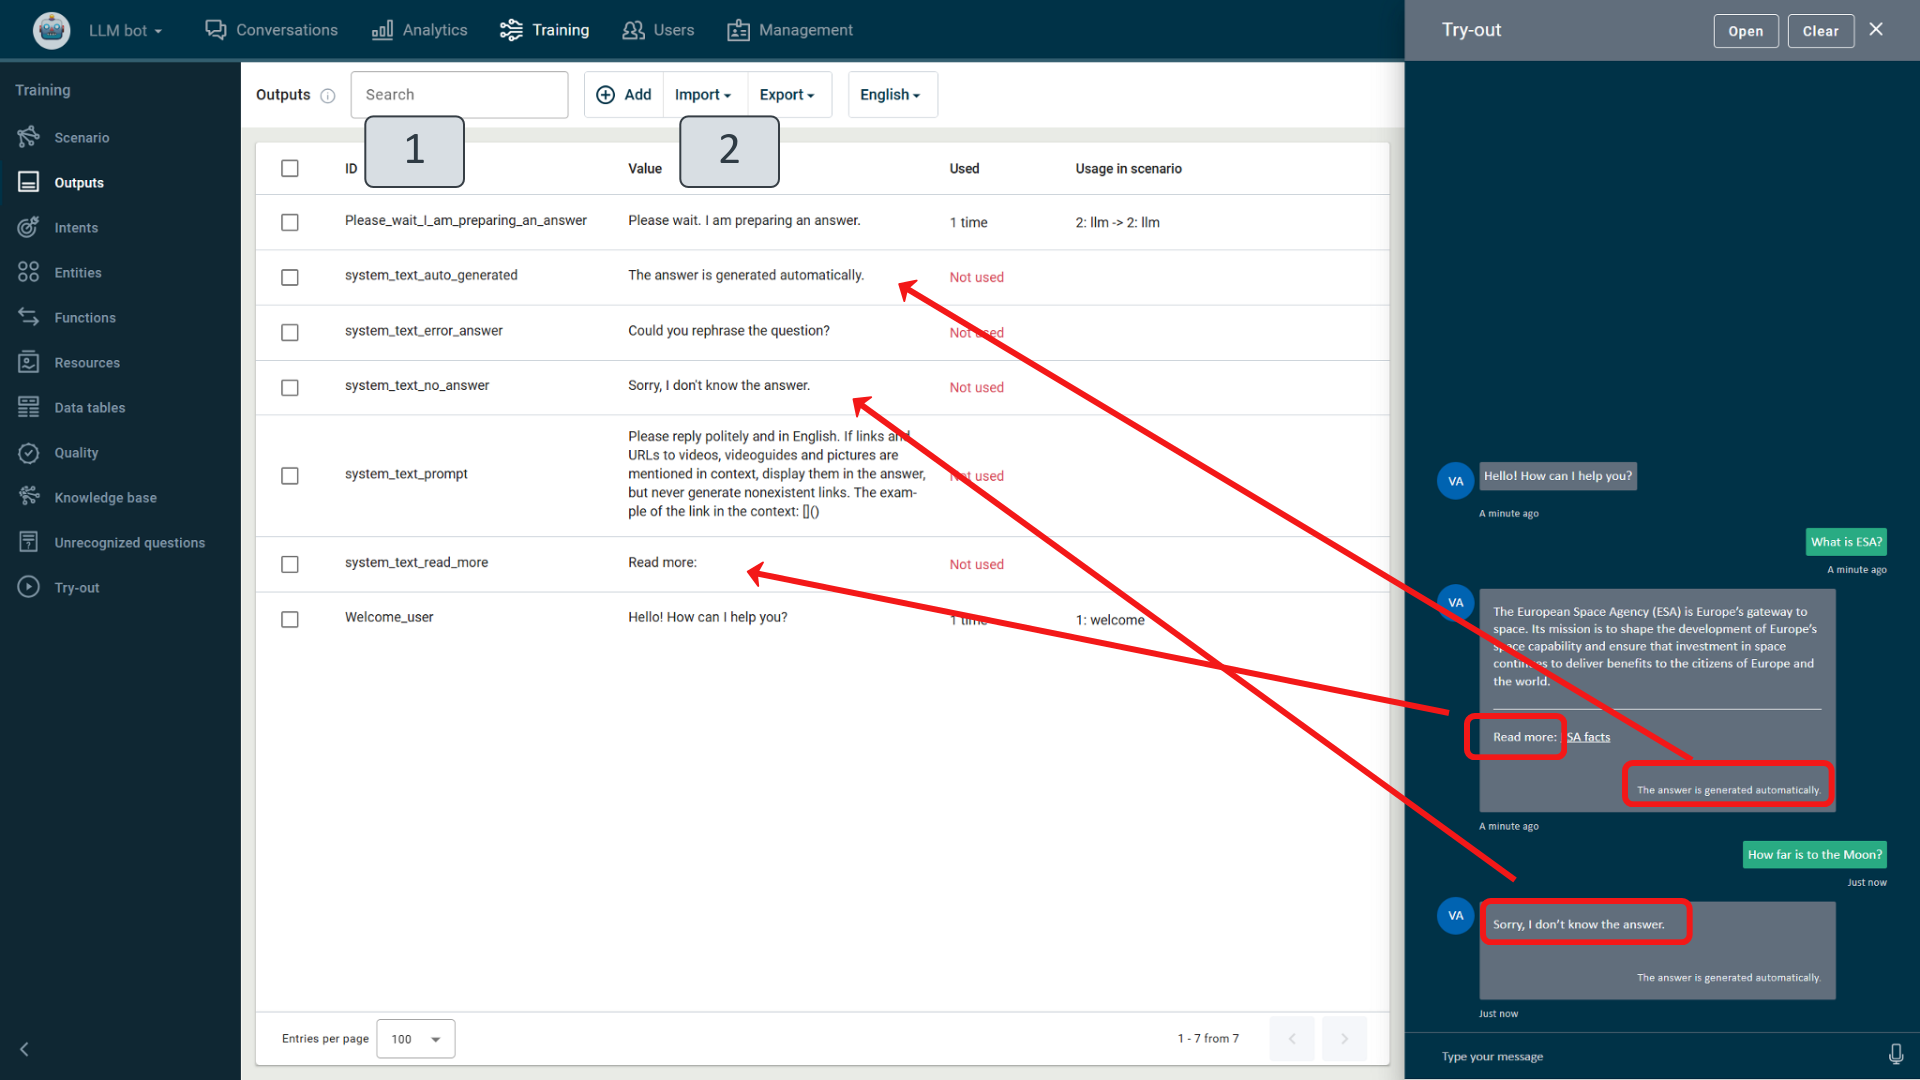
Figure 4.2. Function outputs with values.
Working with the knowledge base
The Knowledge base (Figure 5) contains information that the AI text generation model uses when processing user inputs and generating responses automatically.
For automatic text generation and knowledge base data to be used in the VA chat, the “Automatically generated answer” action (see the chapter “Automatically generated answer”), the “llmgenerateanswer” (see the chapter “The function “llmgenerateanswer”") or the “generateanswer” function must be added to the scenario.
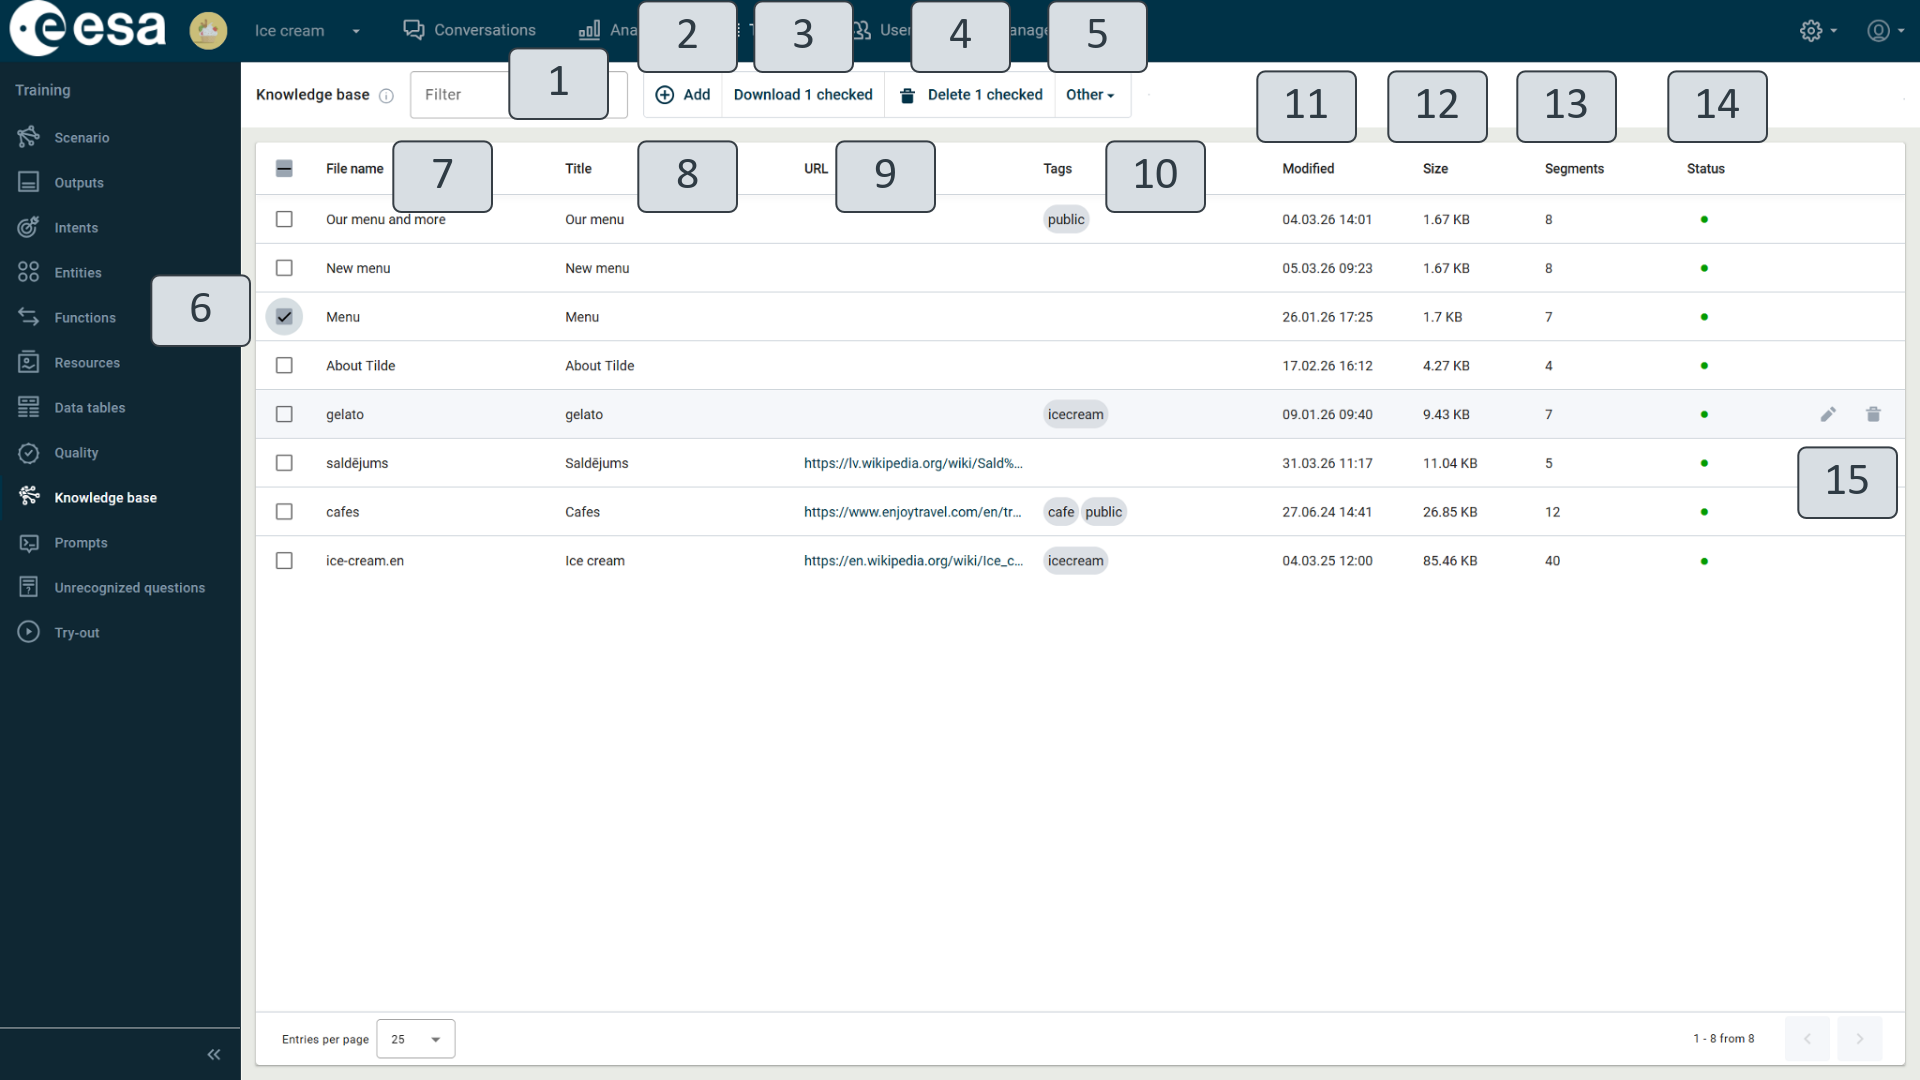
Figure 5. Knowledge base
Knowledge base files can be reviewed in a list that displays the following information about them:
- File name (7) ) – the name of a Knowledge base file that is used by system
- Title (8) – alternative name of a file.
- URL (9) - the web address of the URL, if any, used when retrieving data.
- Tags (10) – the additional context information – metatags for the document, maximum length of one tag - 30 characters.
- Modified (11) - the date and time when the file was last changed.
- Size (12) - file size.
- Segments (13) – number of text segments in the file.
- Status (14) - the current processing state of the file: gray dot – new, yellow – processing, red – error, green – processed.
If the list contains a lot of files, you can find what you want by typing the search word in the "Filter by name" field (1).
Files in the columns can be sorted by file name, title, URL, modification time, size, number of segments, and status. To do this, click on the corresponding column header.
Files can be filtered and viewed by tags (10).
You can either delete files one at a time by clicking the recycle bin icon (15) or by tagging multiple together (6) in the list (4).
You can also download files from the list (3).
To add a new file to a view, click the Add button (2). The allowed file formats are: .md, .txt, .json, .xml, .docx, .csv, .pptx, .pdf. The maximum file size to upload is 28 MB.
To edit the attached files, click on the pencil icon (15) to open the file editing window.
Knowledge testing. In the Knowledge base, under “Other” (Figure 5) (5), you can test the response generated by the text generation model to your query. To do this, click on 'Knowledge Test' (Figure 6). In the window that opens, enter the text you want to test (1).
By clicking the three dots (2), you can enter your own prompt (3) or select a prompt that you previously created in the “Prompts” view from the dropdown menu. This prompt acts as a command and provides additional instructions to the system, thereby changing the generated response result and causing the system to produce it in the desired way.
We recommend that you create a detailed prompt and specify as much detail as possible about the contextual conditions that a text generation model should consider when generating a response. The prompt is created in the “Prompts” view and then selected in the scenario view when adding the “Automatically generated answer” action.
(For older assistants the prompt is in the Outputs view under the identifier system_text_prompt.) For newer assistants, the prompt should be entered directly in the Prompt view. A well-designed assistant relies on a well-crafted prompt.
To test the generation results from specific files that are previously marked with tags, click on three dots (2) and choose “Tags”. Write the tag name in the field. (4)
It is possible to test how the language generation model responds with different knowledge thresholds (5). The threshold is a semantic similarity indicator ranging from 0.0 to 2.0. The higher the value, the less similar the segments are. The default value is 0.9. Segments with a similarity higher than the threshold are discarded. With a higher value, the generation model would answer more off-topic questions and use more knowledge from outside the knowledge base files.
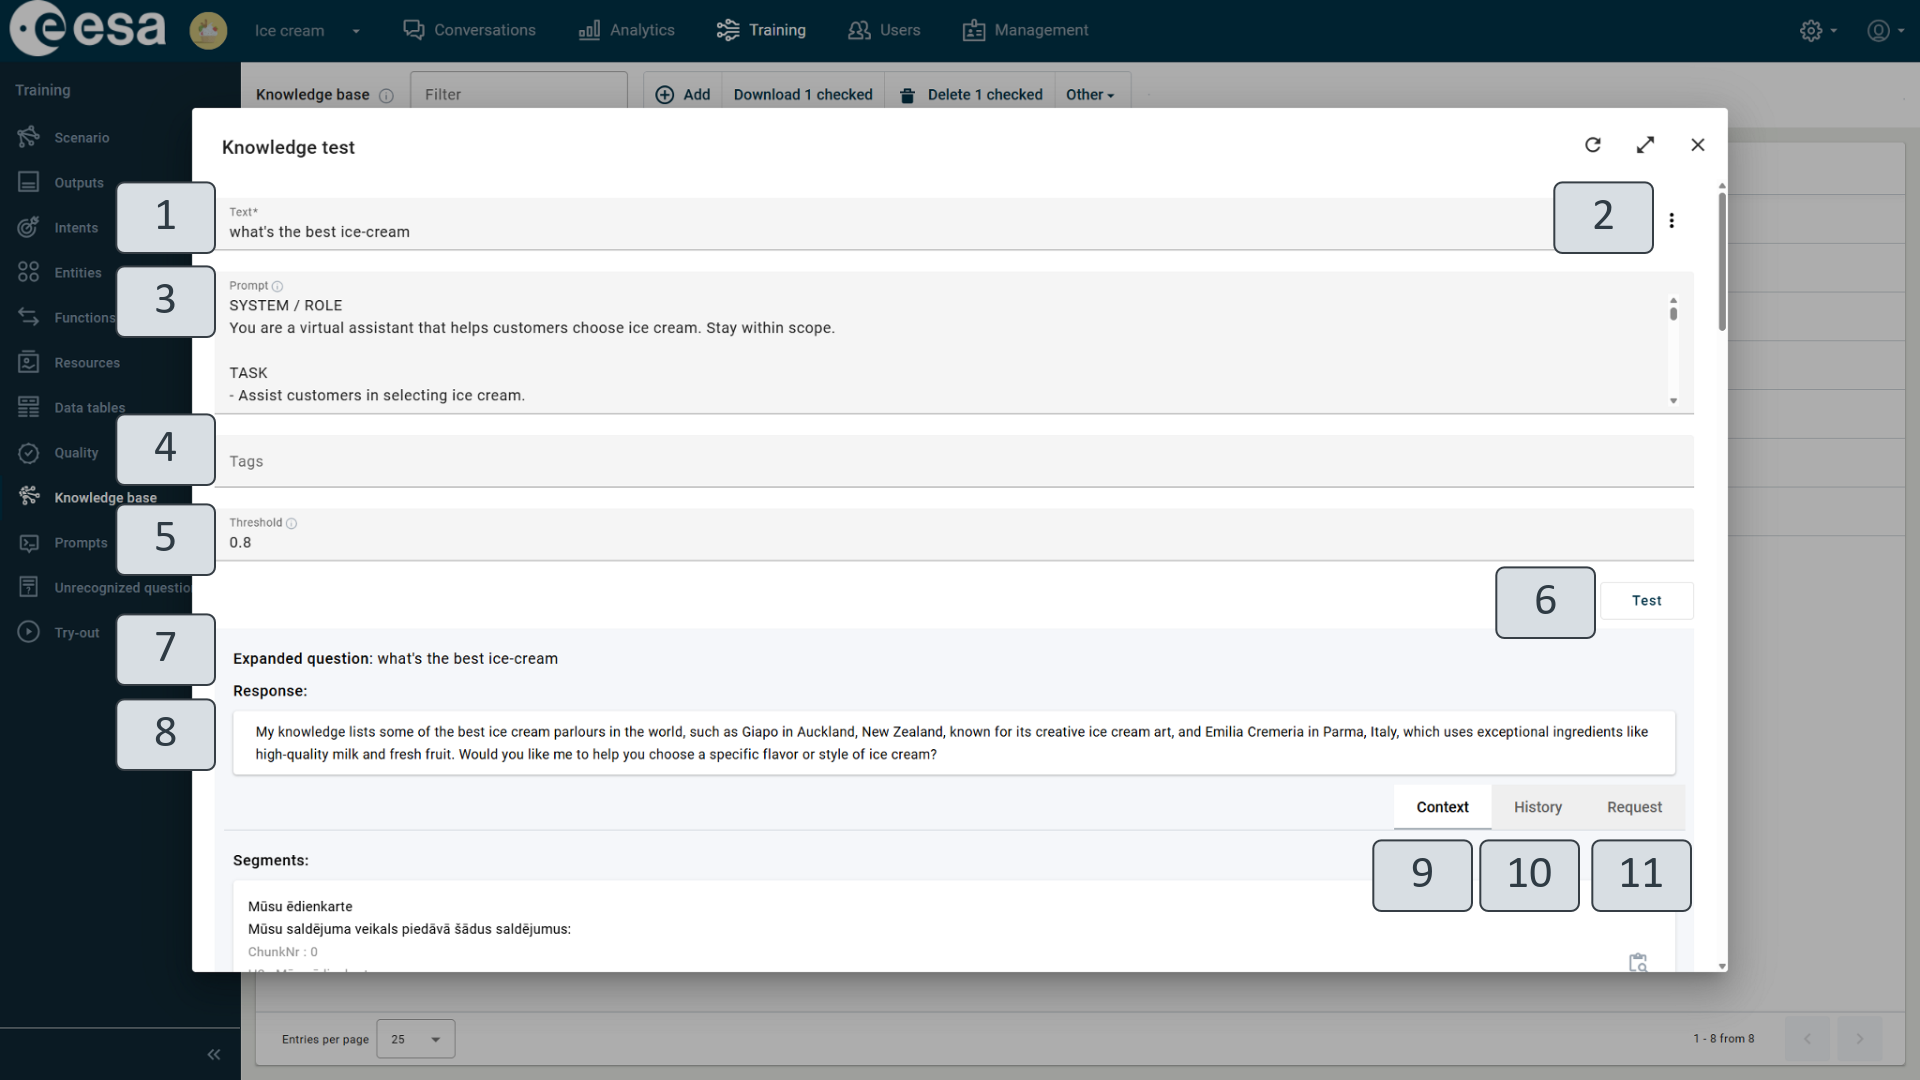
Figure 6. Knowledge testing
After filling in the fields, clicking “Test” (6) will return the generated response (8) along with the expanded question (7), which is created by the system from the previous conversation history and the new user question.
You can explore more detailed information below.
In the “Context” tab (9), segments are displayed by the greatest similarity and were used by the AI model to generate the response. The data segments are displayed sequentially with the corresponding metadata: segment number, headings, file location address, URL web address if found in the text, file name, tag information, and so on. To open the file, click the file search  icon next to the segment.
The “History” tab (10) displays the conversation history. The conversation history is also taken into account for consecutive requests within this knowledge test window. If you need to start a new conversation, click the refresh icon (a circular arrow) (2).
The “Request” tab (11) displays the full data that are used by text generation model to create the response. You can view the data sent to the large language model, including the selected segments, the prompt, and the conversation history. This tab also allows you to modify the request data and resend (click on the button “Send”) it to the large language model to test how changes in the input data would affect the generated response.
Searching in files. To search files for a word or phrase, click on “Other” (Figure 5) (5) and then on “Search in files”.
Enter the phrase in the search field (Figure 6.1) (1). To search in specific files that are previously tagged, click on three dots, choose “Tags” and enter the tag name in the field. (2). Click on "Search" (3).
The results will show the segments of information found. To open the file, click the file search icon (4) next to the segment.
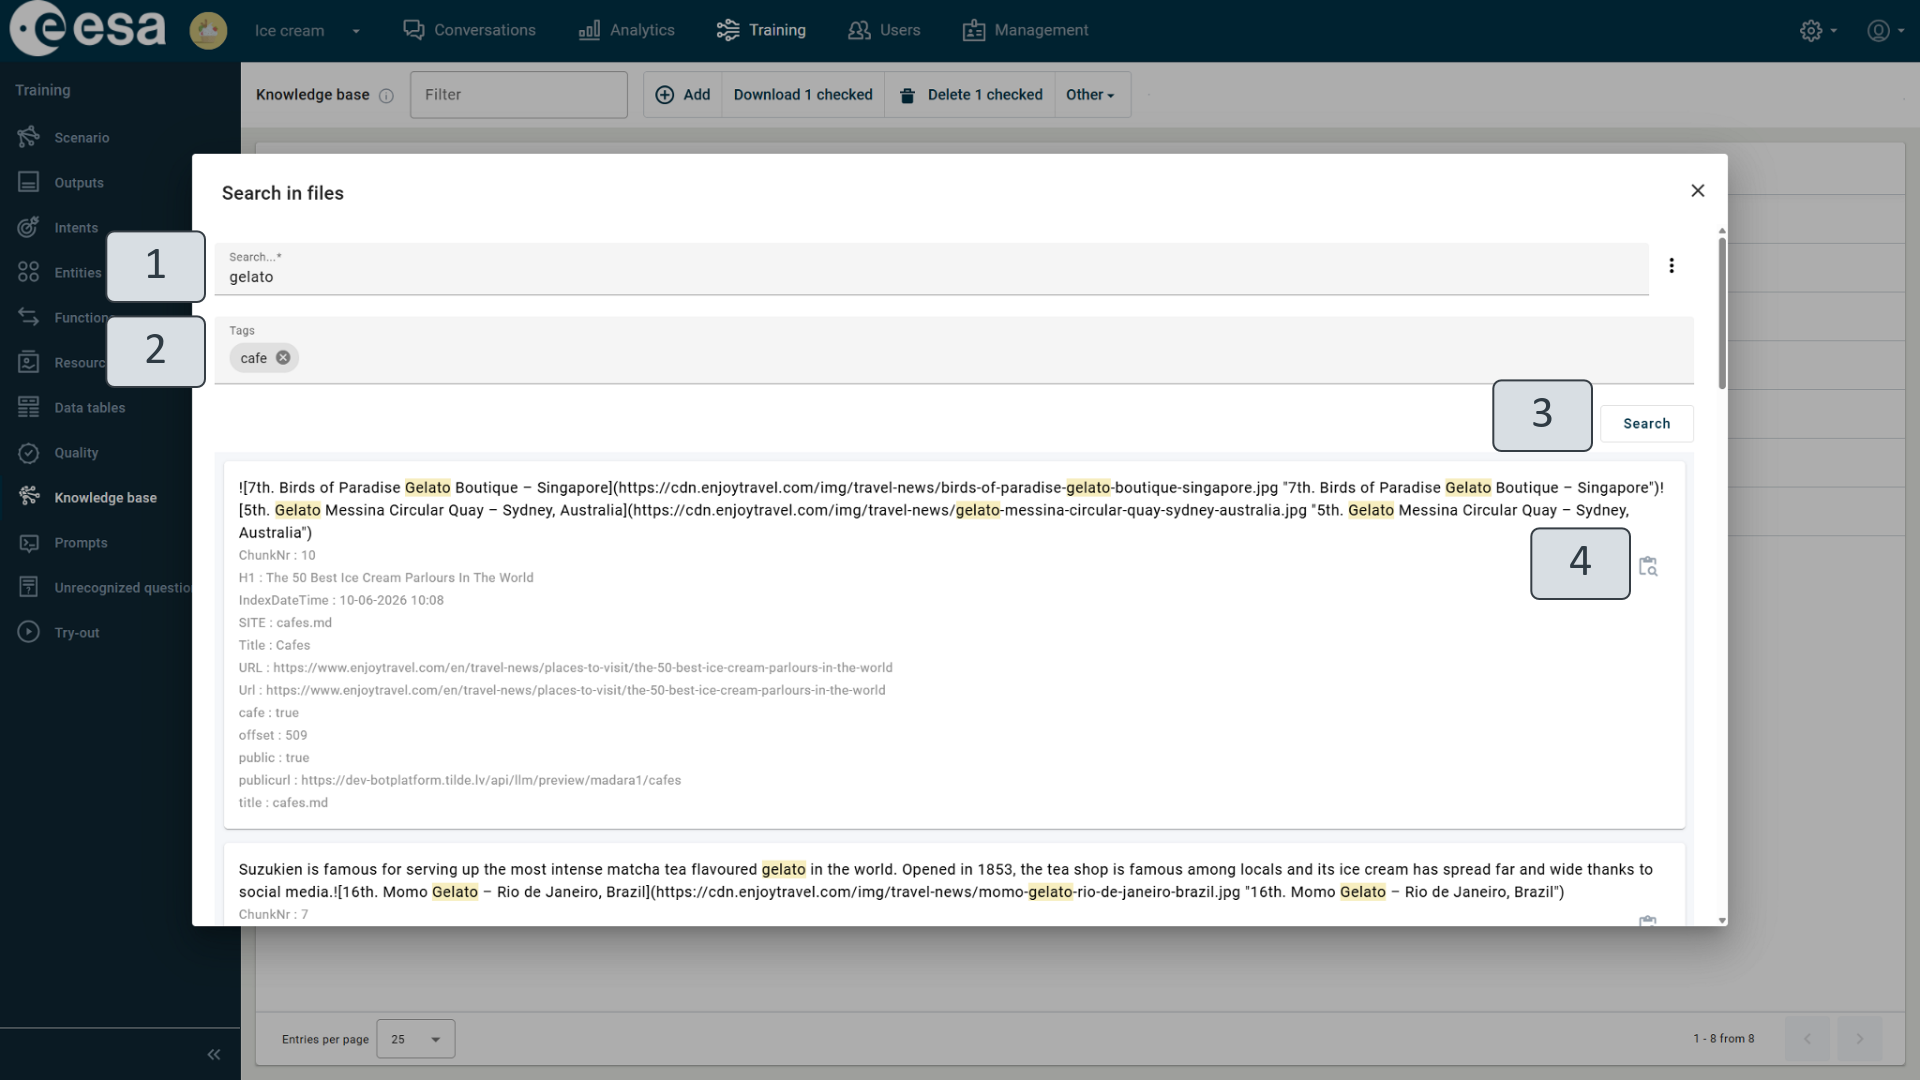
Figure 6.1 Searching in files
File editing window
When you click “Add” (Figure 5) (2) or the pencil icon (15), the file editing window opens (Figure 7).
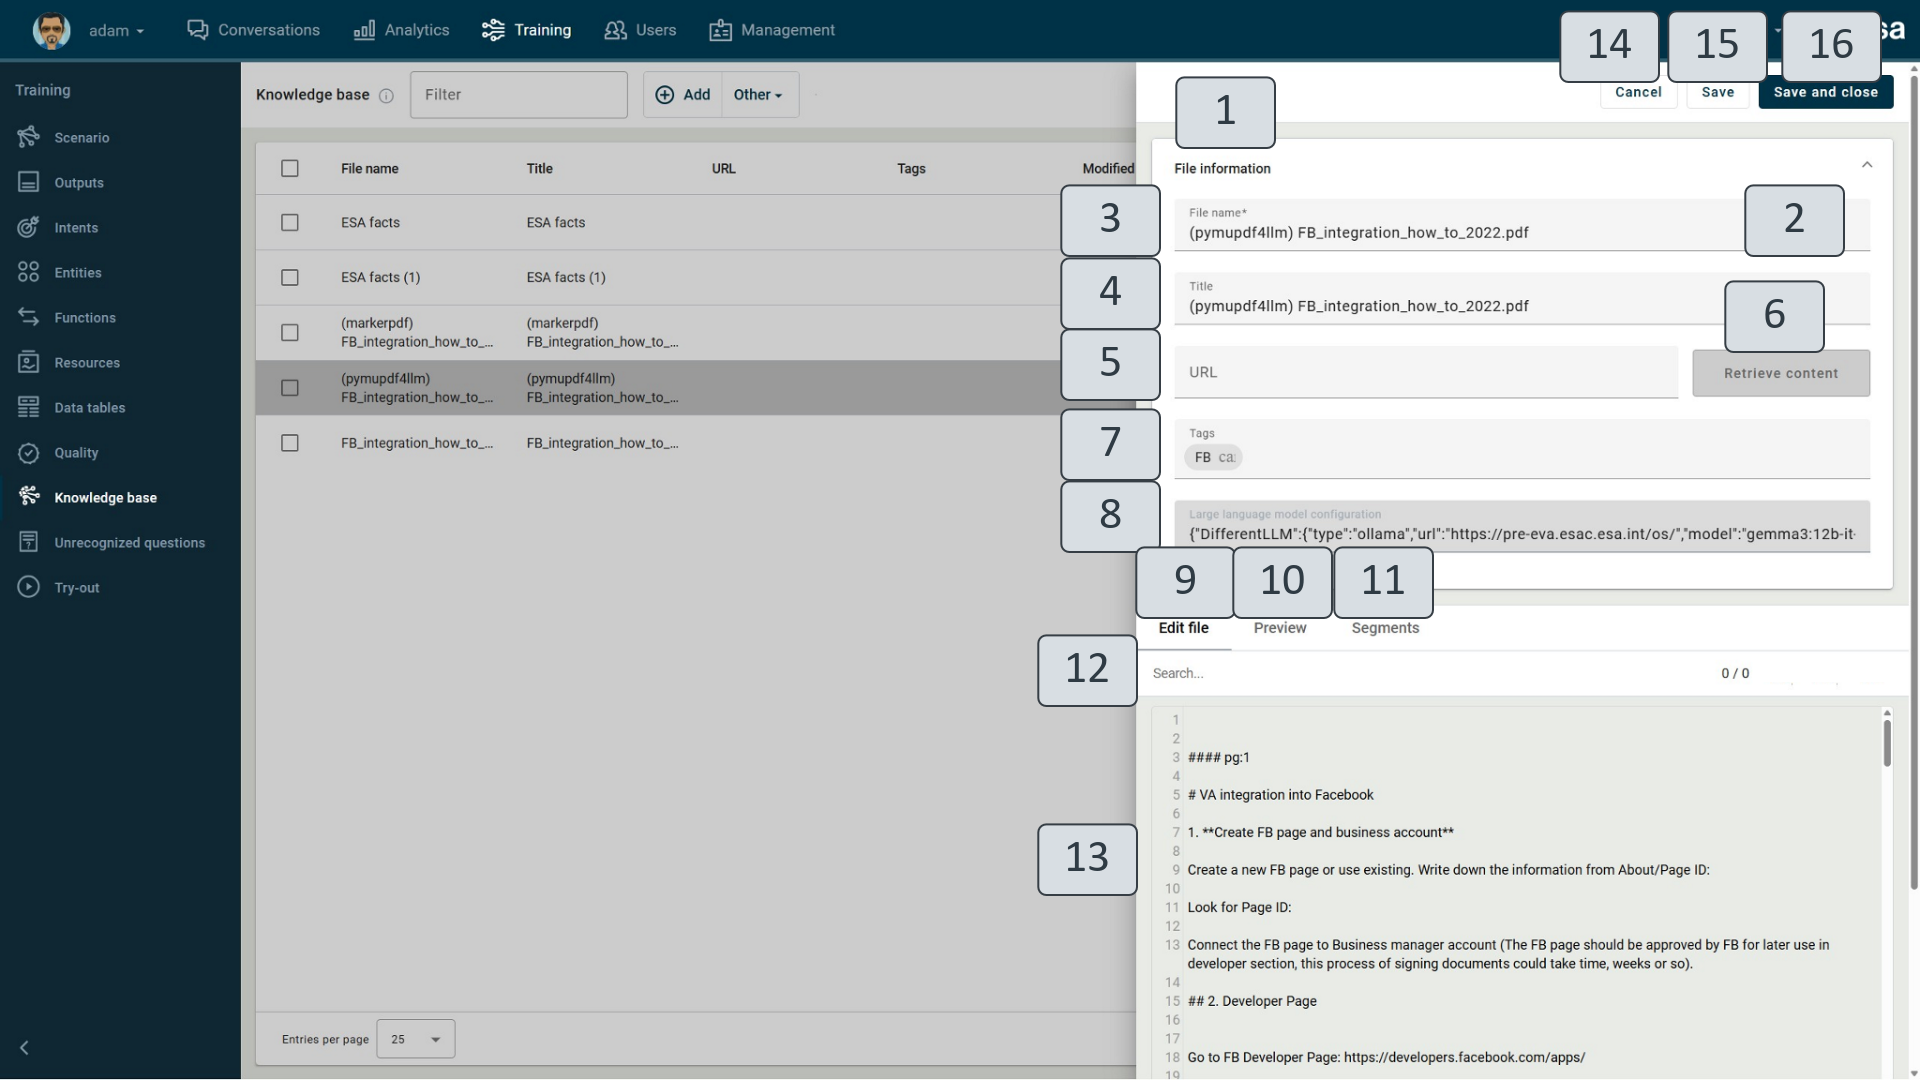
Figure 7. Knowledge file
By expanding the menu (2), you can fill in the file information (1).
File information requires a file name (3). You can upload a file by clicking the clip icon on the right side of the file name field. The selected file will then be uploaded. (2)
A file title must also be specified (5).
If the information in the file content field (13) is not entered manually or copied from your document, you can also retrieve the data from an existing website by entering the website address (5) in the URL field and clicking "Retrieve content" (6). The retrieved data is displayed into the content field (13) of the file and can be edited (9). If the information on the website changes over time, you can update the data, but note that the existing data will be completely overwritten - if you have previously made changes at the local file level, these will not be saved when you overwrite the data with the new content. You can specify metadata tags for each file by typing them in the "Tags" field and pressing Enter (7).
A bot trainer can define specific LLM configurations for individual files during the upload process. For example, one type of PDF converter can be used for one file in the knowledge base, while a different converter can be applied when adding another file to the same VA's knowledge base.
To do this, the bot trainer can use the Large language model configuration field (8) and specify the desired PDF converter. Note: The specified PDF converter in the Large language model configuration field takes effect only at the time of file upload. It does not apply to files that have already been uploaded. To apply a different PDF converter to existing files, those files must be re-uploaded.
Another useful parameter that can be easily adjusted per file is the chunk size. To improve response quality, it may be necessary to use larger or smaller chunks than the default configuration provides. In such cases, the VA trainer can enter the desired chunk size in the appropriate field. The default chunk size is 1024 tokens; increasing this value will result in fewer, larger chunks per document, while decreasing it will produce more, smaller chunks. See Figure 7.1 for the chunk size configuration.
If the Large language model configuration field is left empty, the default VA configuration will be applied.
The bot trainer can populate the field with any necessary parameters from the overall configuration.
All LLM configuration parameters discussed in the chapter Configuring LLM VA can be used and changed in Large language model configuration field (8).
File data can be previewed (Figure 7) (10), and it is possible to see how data are split into segments (11). Missing information can be added or other corrections can be made (9).
To cancel changes click Cancel (Figure 7) (14), to save click Save (15, 16).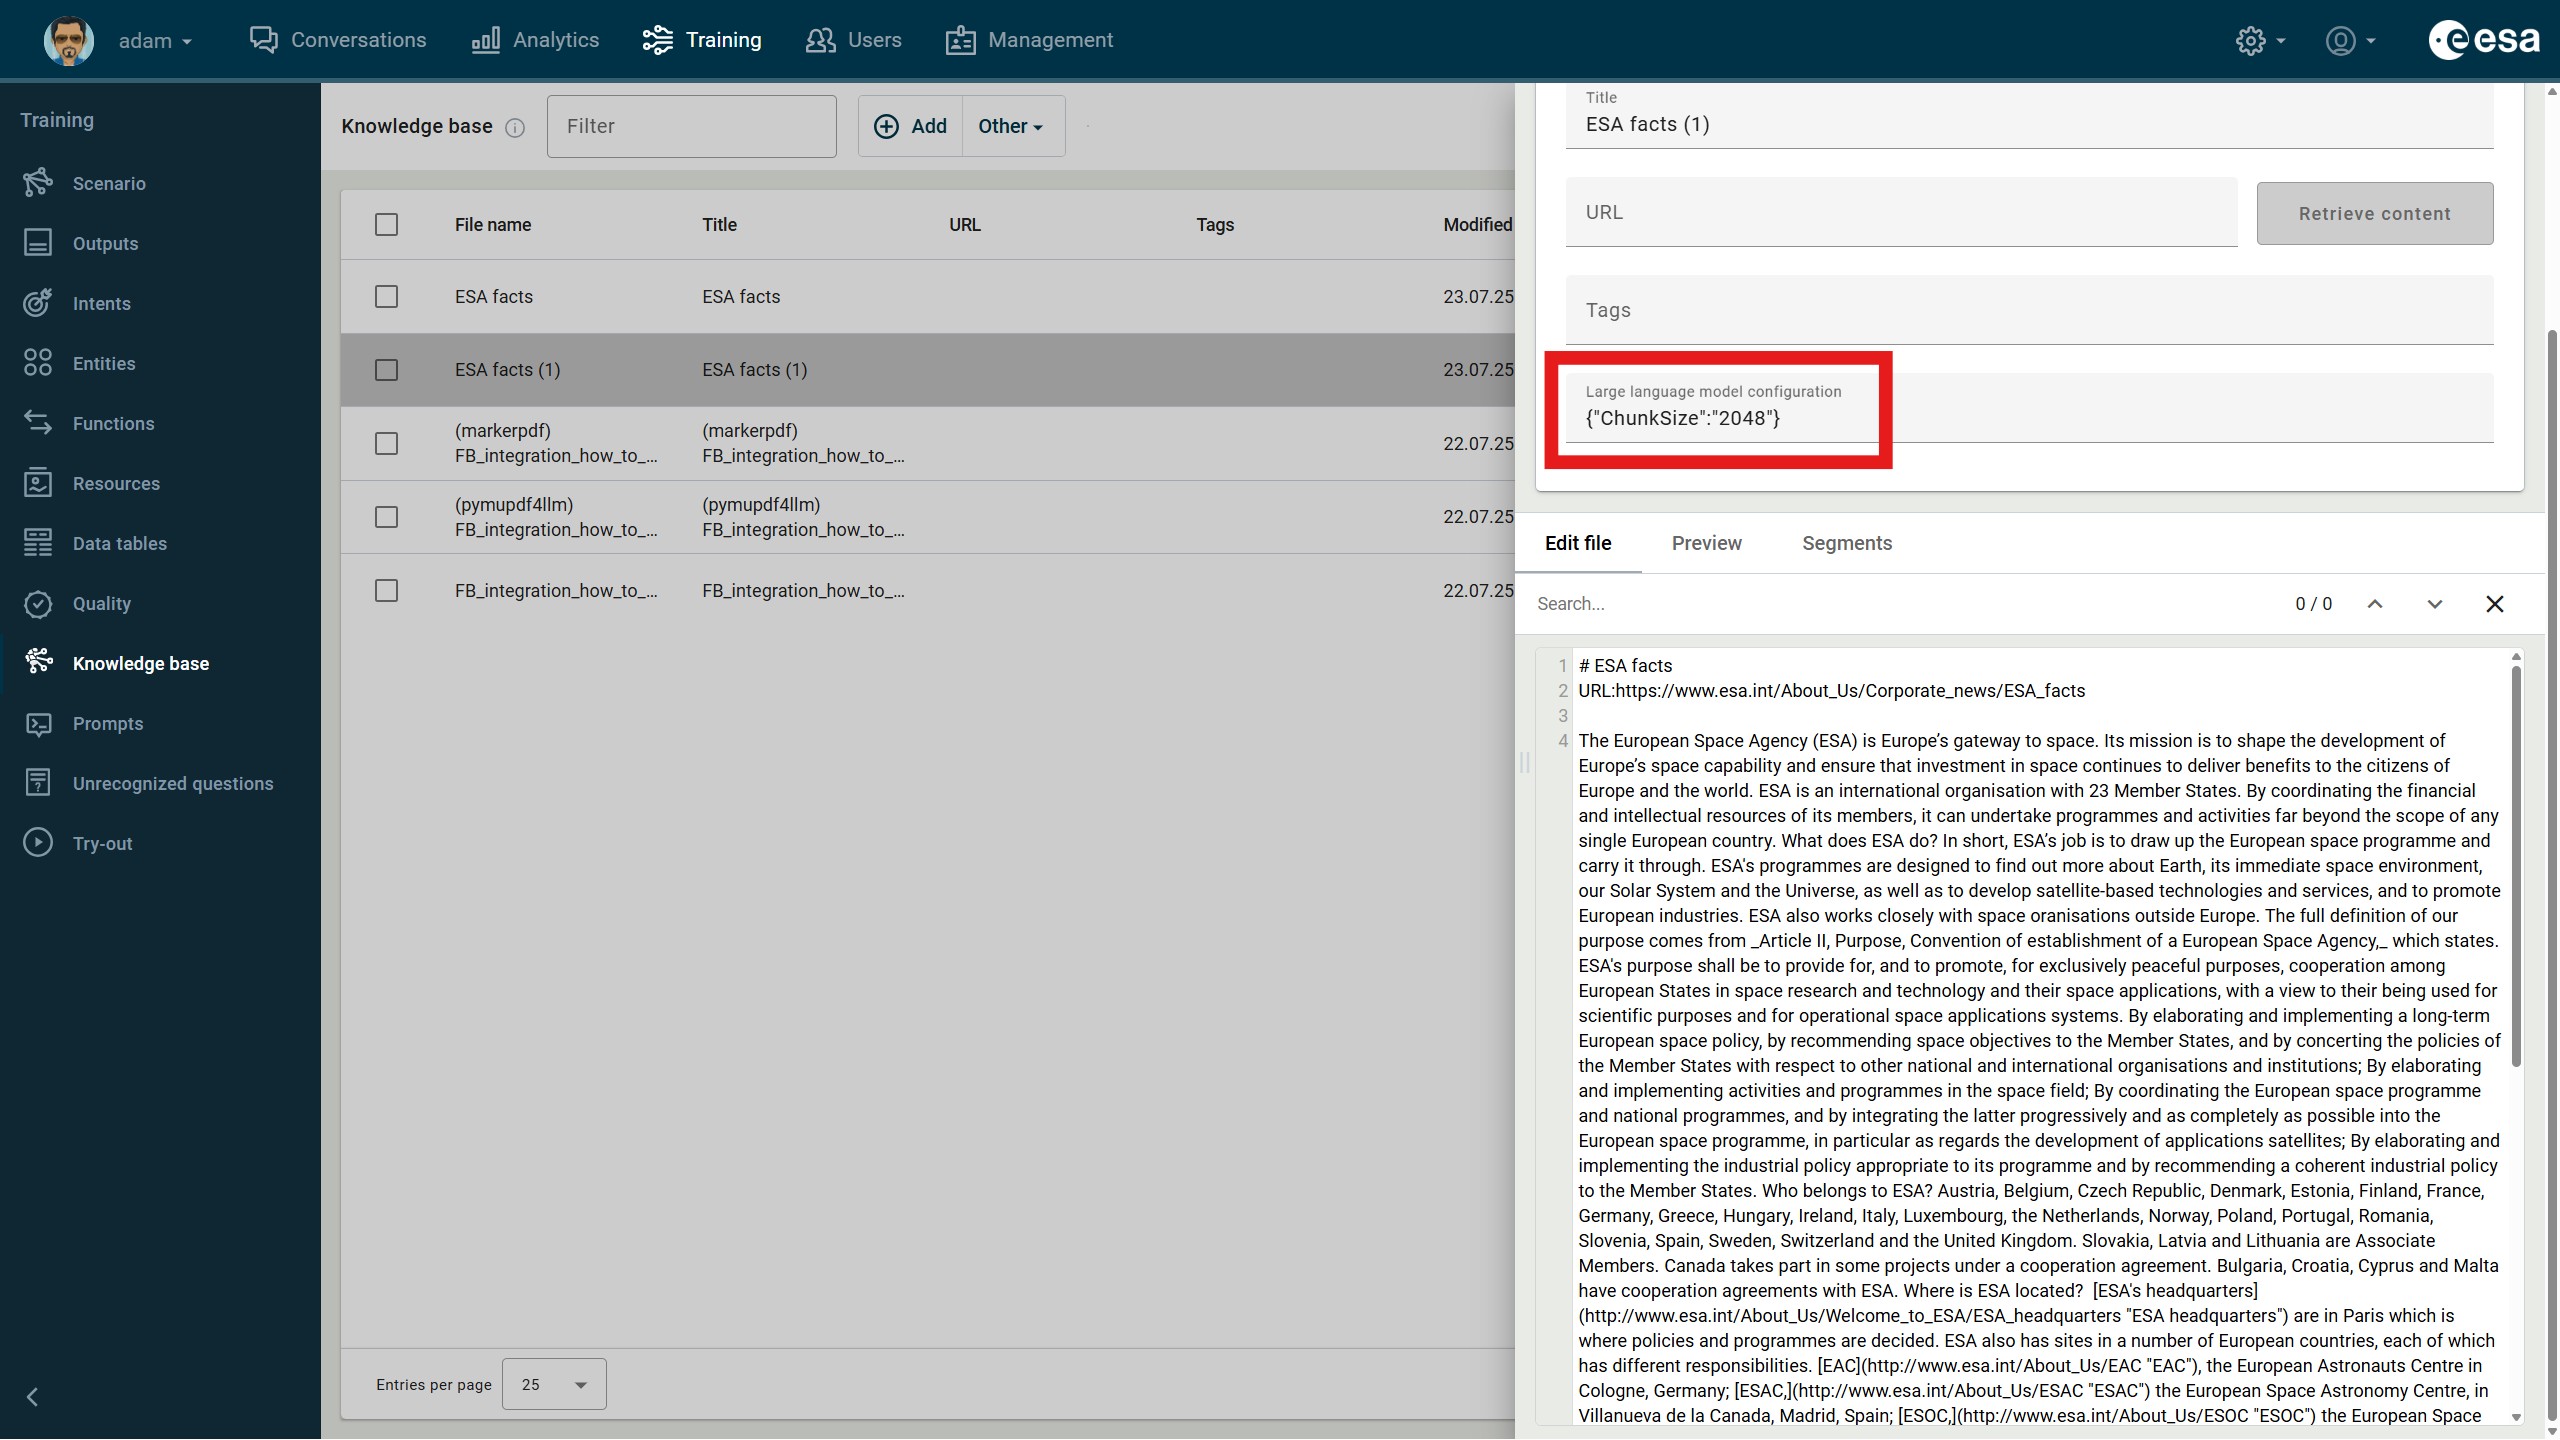
Figure 7.1. Chunk size changed for a separate file
Preparing files
In VA try-out window, you can display images, videos, and references in automatically generated replies. To understand them, the information in the file needs to be specially formatted.
Although you can add files in a variety of formats (.md, .txt, .json, .xml, .docx, .csv, .pptx, .pdf) to the Knowledge base, when creating new files, it is recommended that you create them in the markup language Markdown (.md), which is well-handled by the automatic text generation model. For example, Figure 8 demonstrates how the image written in .md (2) is displayed in the generated response within the try-out window.
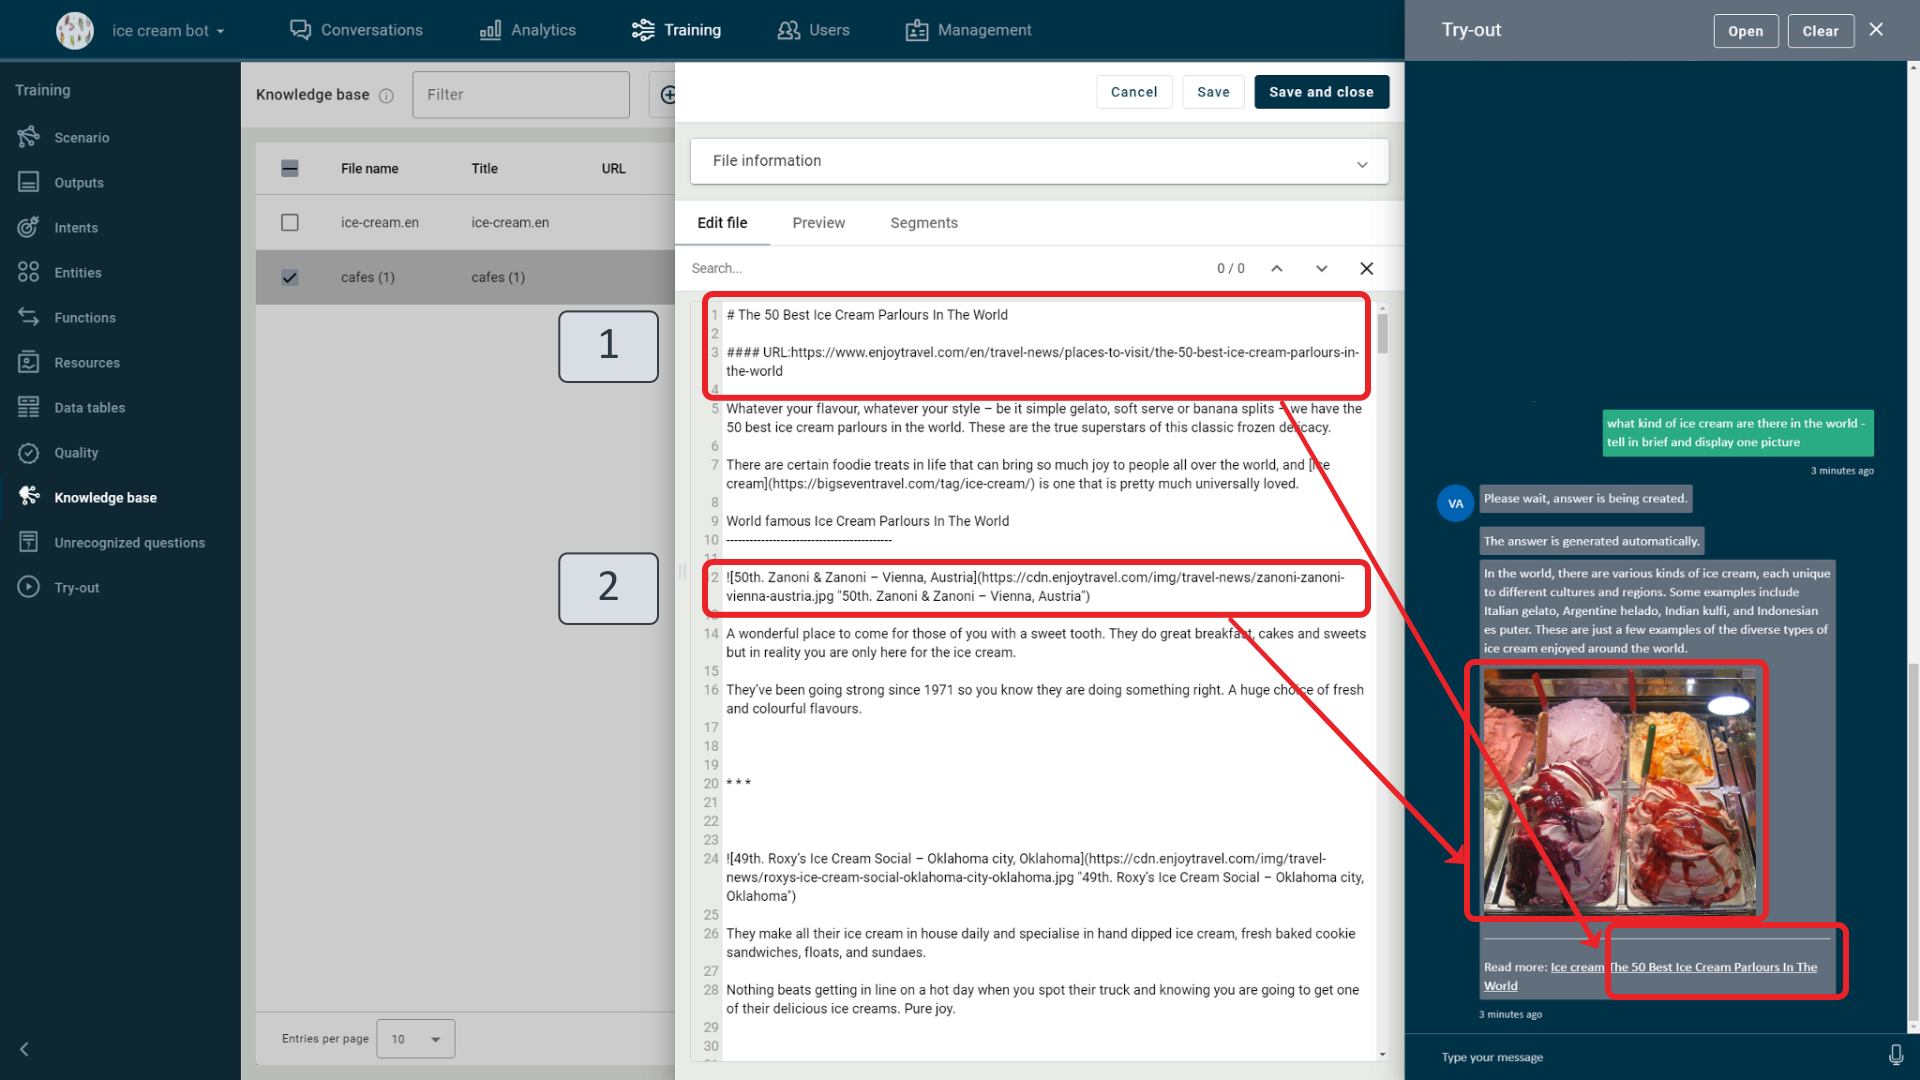
Figure 8. Markdown file information in response
When you create a file, you can also use four hashtags that store and use the tagged information to provide additional information to the generated response in the chat window.
Hashtag | Explanation | Example |
# | First level heading | # Ice cream |
## | Second level heading | ## Types of ice cream |
### | Third level heading | ### Strawberry ice cream |
#### | Metadata | #### URL:https://en.wikipedia.org/wiki/Ice_cream #### (without any data – starts a new segment) |

Figure 8 (1) shows the representation currently built into the platform by default: text presented as a first-level title (#) in a .md file, and sequential metadata information representing the URL address (####) is displayed in the chat window as an active reference link to the web address specified in the file. The alternative way to display a reference link is by filling in the file title field and URL (Figure 8 (4) (5)).
To display titles with links in references, a link address must be specified either in the file data or in the file information. References are displayed only if the metadata is completed according to one of the following conditions:
- Specified in the file text:
- # Title
- #### URL: link
In this case, the data is stored in the file metadata as H1 and URL, and it is used when generating answers from segments with such metadata.
- Specified for the file:
- # Title (in the file text)
- Link (provided in the file information URL field)
The data is stored in the metadata as H1 and Url and is used in answer generation.
- Specified in the file information fields:
- Title
- URL
These data are stored in the metadata as Title and Url and is used in answer generation.
If no link is provided, references will not be displayed after the generated answer.
File filtering
In a single VA, it is possible to develop scenarios that generate responses from different knowledge base files based on various conditions. By assigning a tag to a file in the knowledge base and incorporating it into a scenario and function, different responses can be retrieved. This approach allows for customized answers depending on the context. For example, users interacting with the VA from one website may receive general information, while those accessing the same VA from another website may receive more in-depth details.
Let’s assume that the knowledge base contains multiple files, one of which includes information about ESA and is tagged "ESA." (Figure 9).

Figure 9. File with a tag
If we build a scenario where the user selects the topic “ESA” at the beginning of the conversation (Figure 10), we can ensure that the answers to the user's subsequent questions are generated only from the documents tagged “ESA” in the knowledge base. 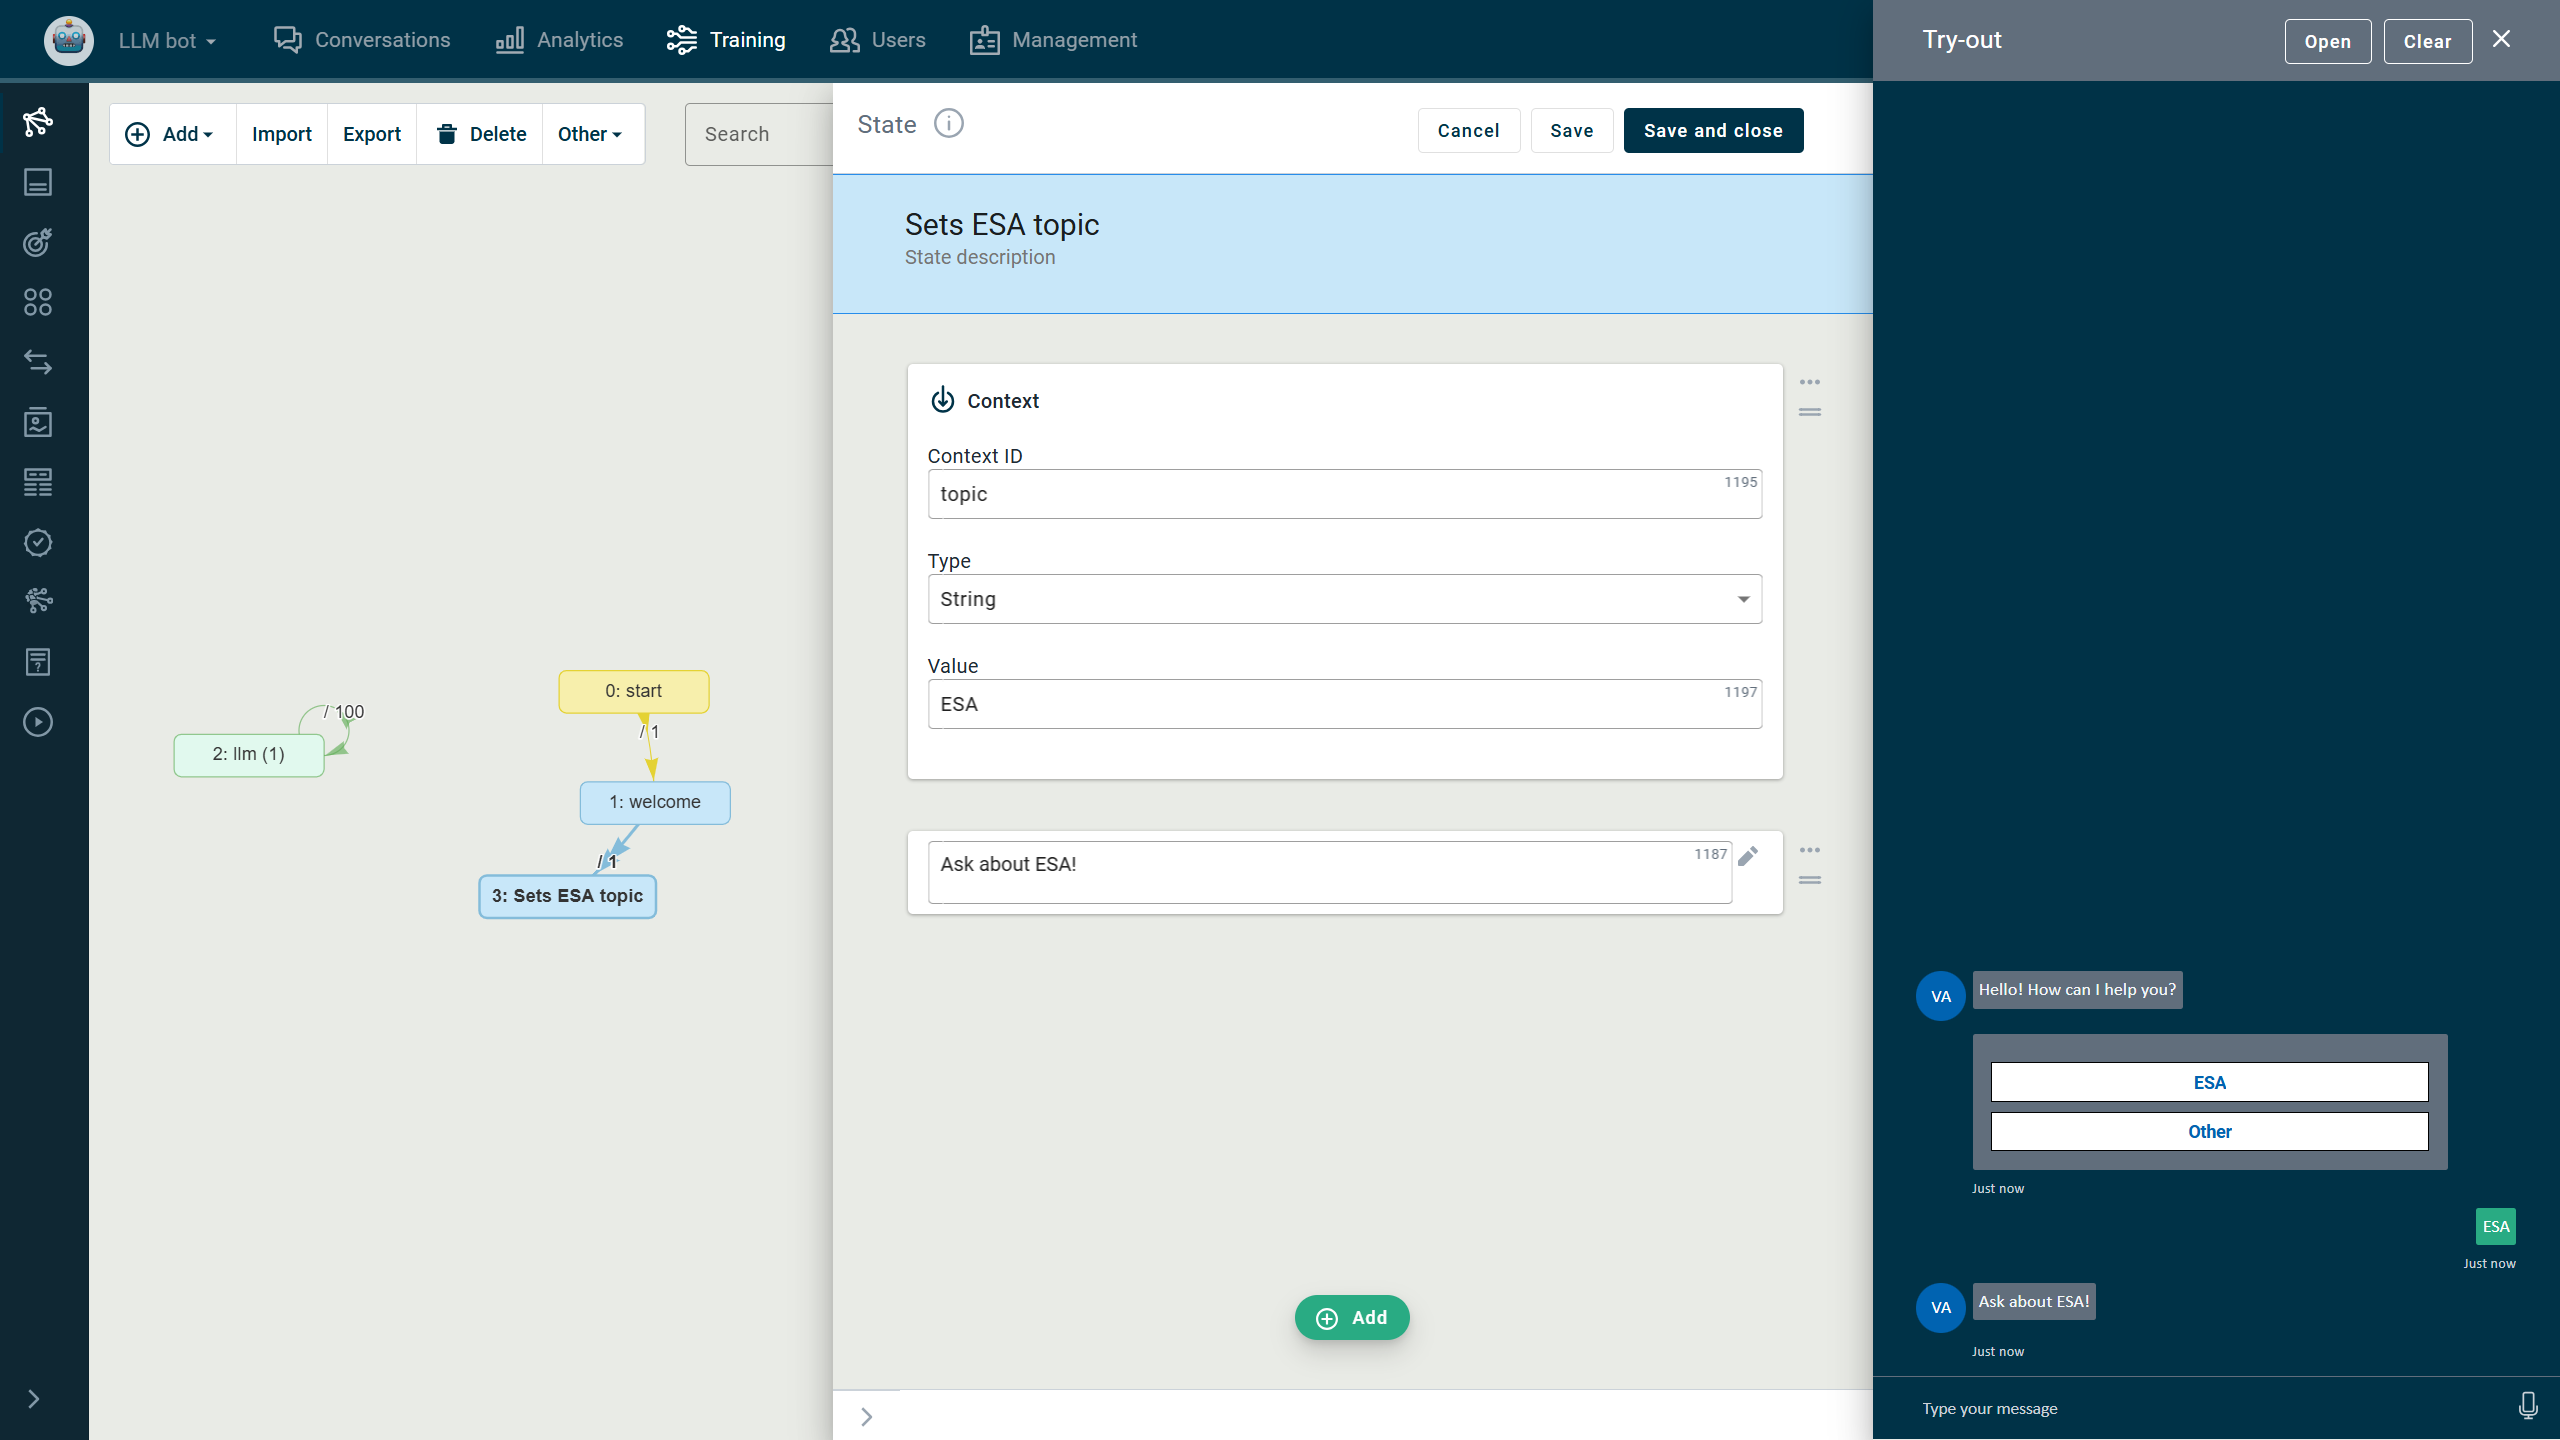
Figure 10. The start of conversation
To achieve this, the following steps are required:
- Add the ESA topic to the entities so that it can be detected during the conversation and saved in the context (Figure 11).
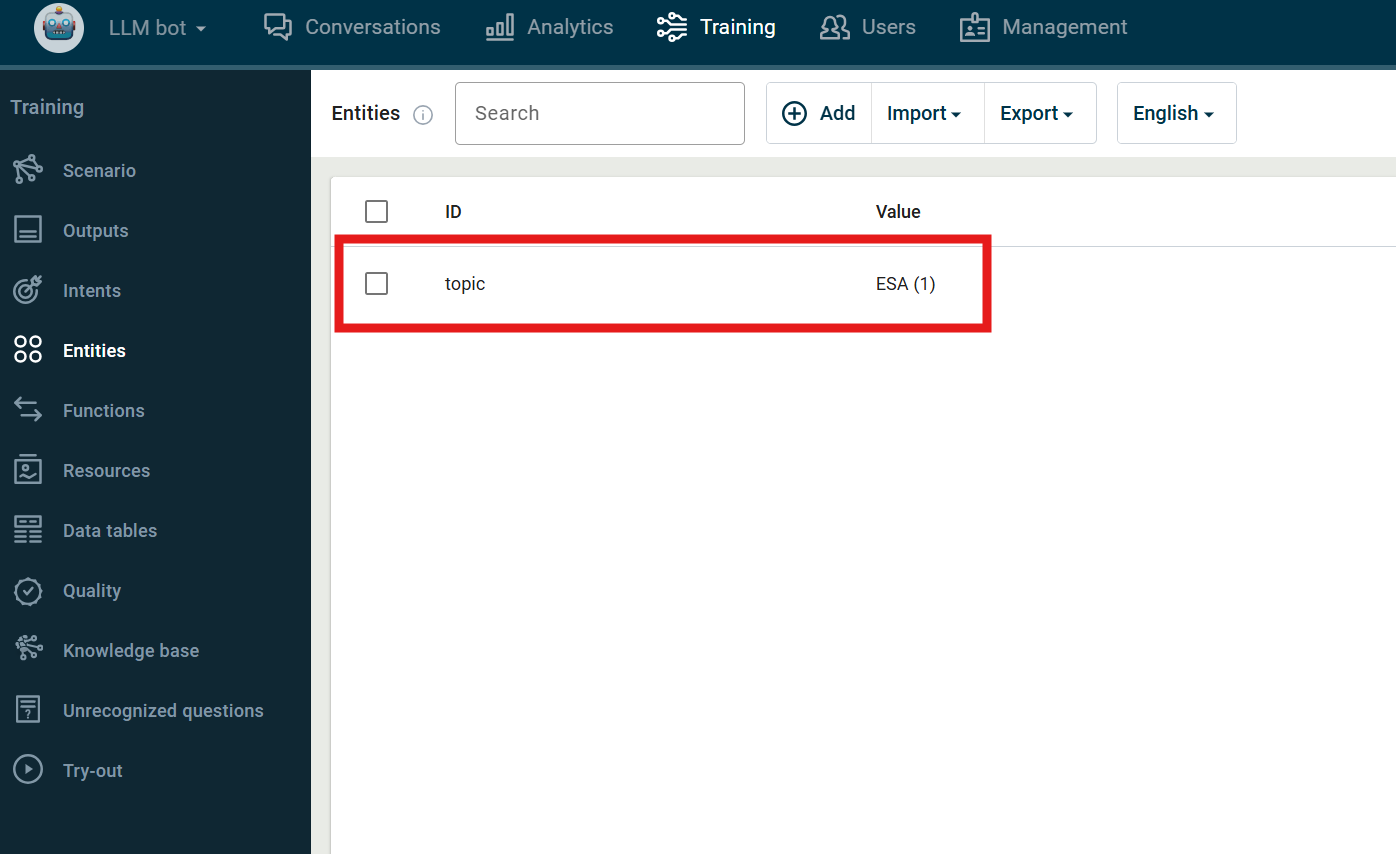
Figure 11. Defining topic in entities - Define it in the scenario within the llmgenerateanswer function (Figure 12). If there are several tags, separate them with a comma.

Figure 12. Defining a tag - Add it to the llmgenerateAnswer function (Figure 13).

Figure 13. Defining tag in the function
If the user clicks the “ESA” button (Figure 14) (2) in the Start menu (1), only information about ESA documents is available during response generation. When the user clicks the “Other” button (3), all documents become available, and the user receives a response about ice cream.
Figure 14. Filtered content in the tryout window
Different categories can be detected in the user message and later filtered based on tags in the knowledge base files, using the “preprocessInput” function, which is included by default in LLM bots (Figure 14).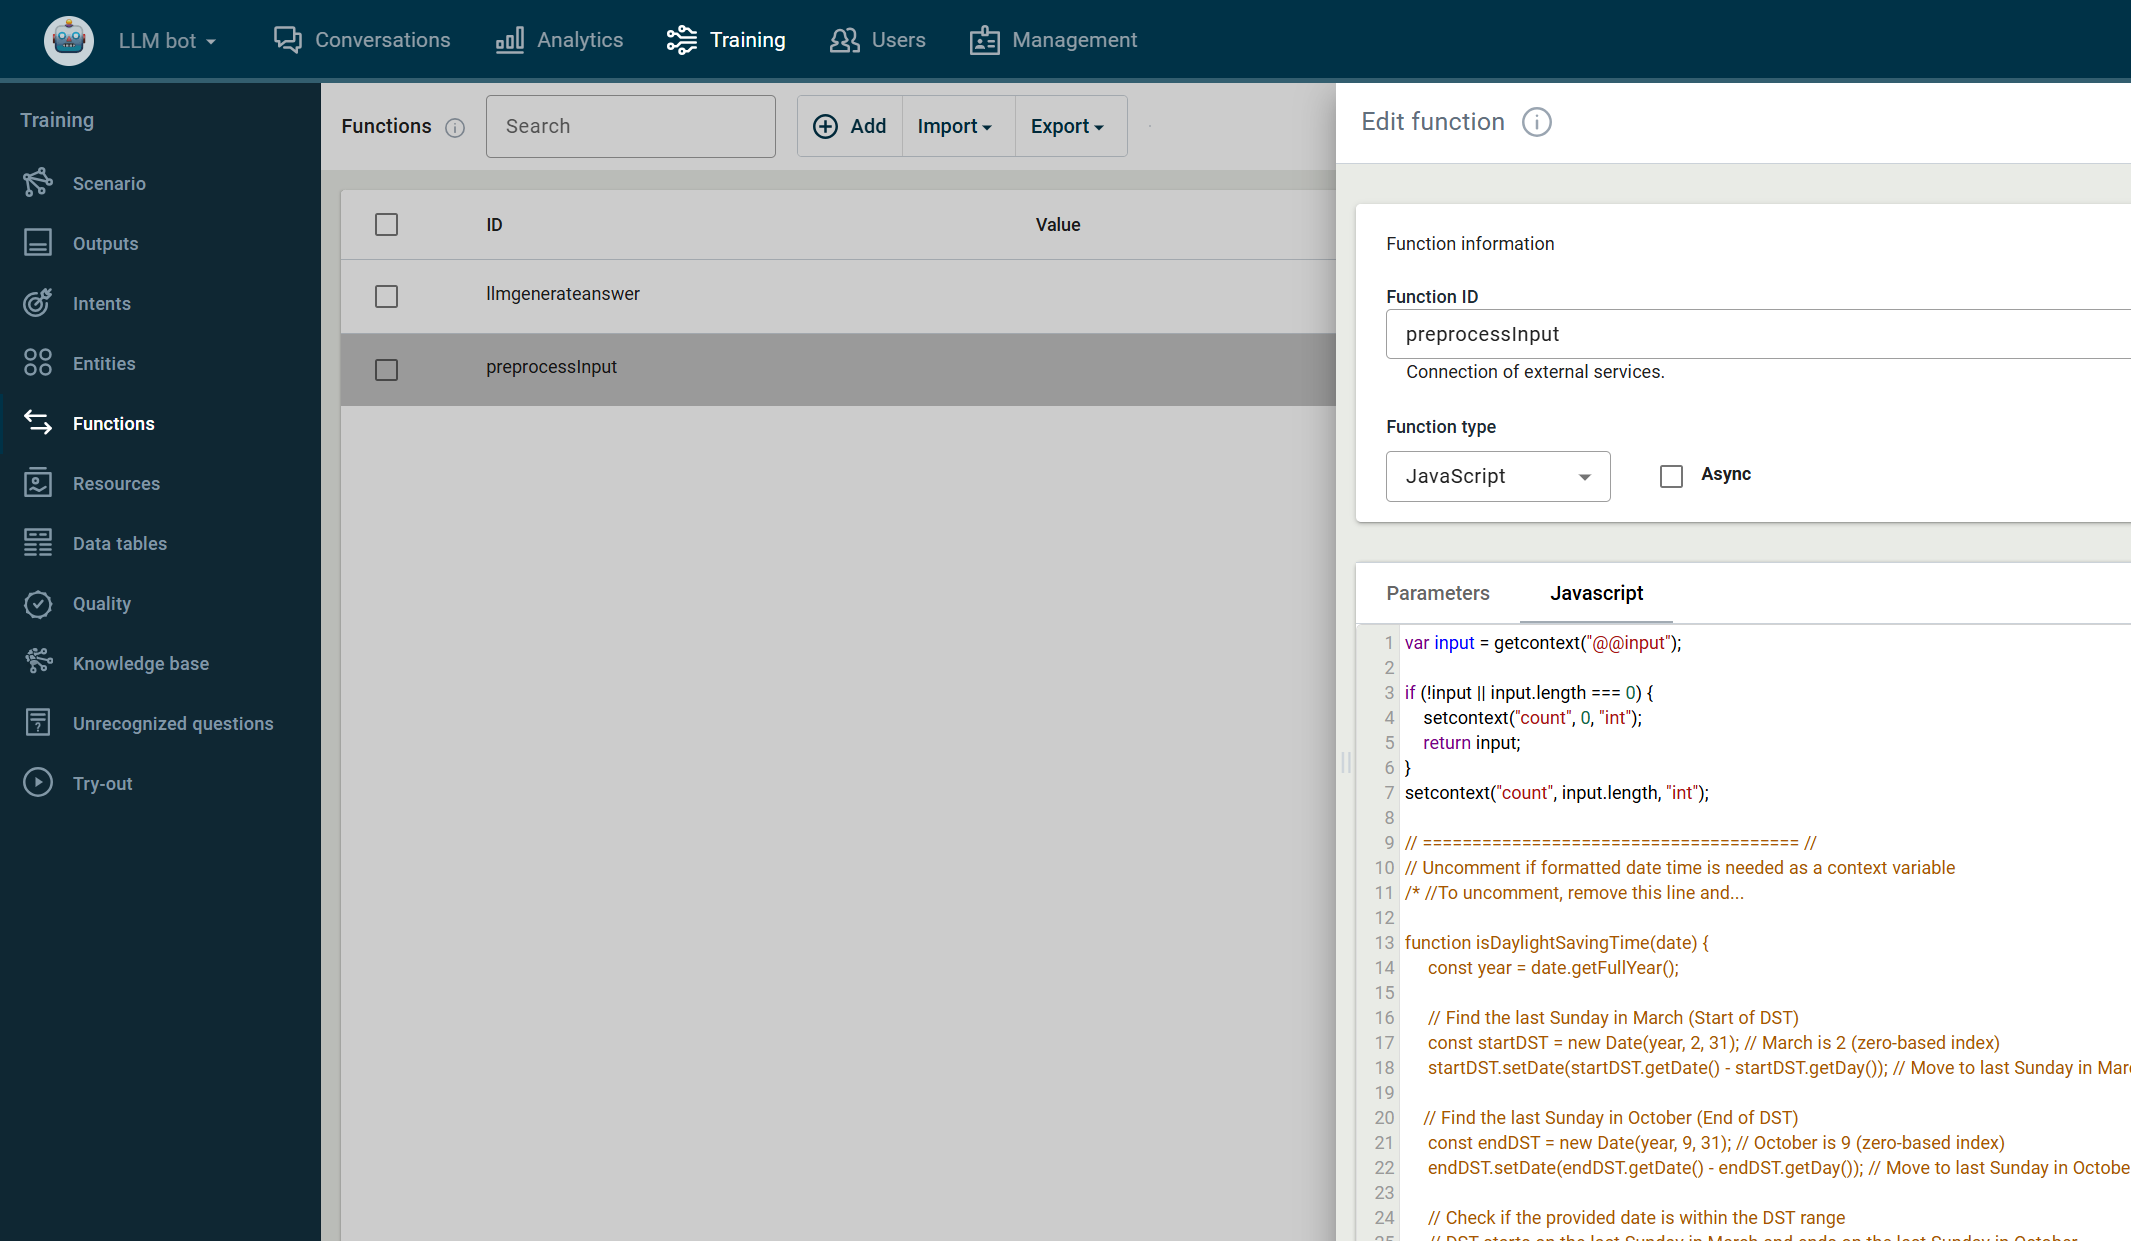
Figure 15. Sample of the preprocessInput function for detecting categories
Note. Besides the previously described method using the llmgenerateanswer function, it is also possible to use tags directly from the scenario in the automatically generated answer by filling in the "tags" field. If the Knowledge Base files are tagged accordingly, you can configure the "Automatically generated answer" action to generate answers only from files with specific tags. To do this, specify the tag name in the field, or, if the value is stored in the context, reference the tag using the format #context ID#.
Prompts
The training view Prompts contains all prompts used across the platform in various functionalities to enable successful communication with the LLM. To facilitate easier management and usage, these prompts are gathered in a single view (Figure 15.1). It is also easier to write prompts in simpler language within this view and then reuse them across the platform wherever needed.
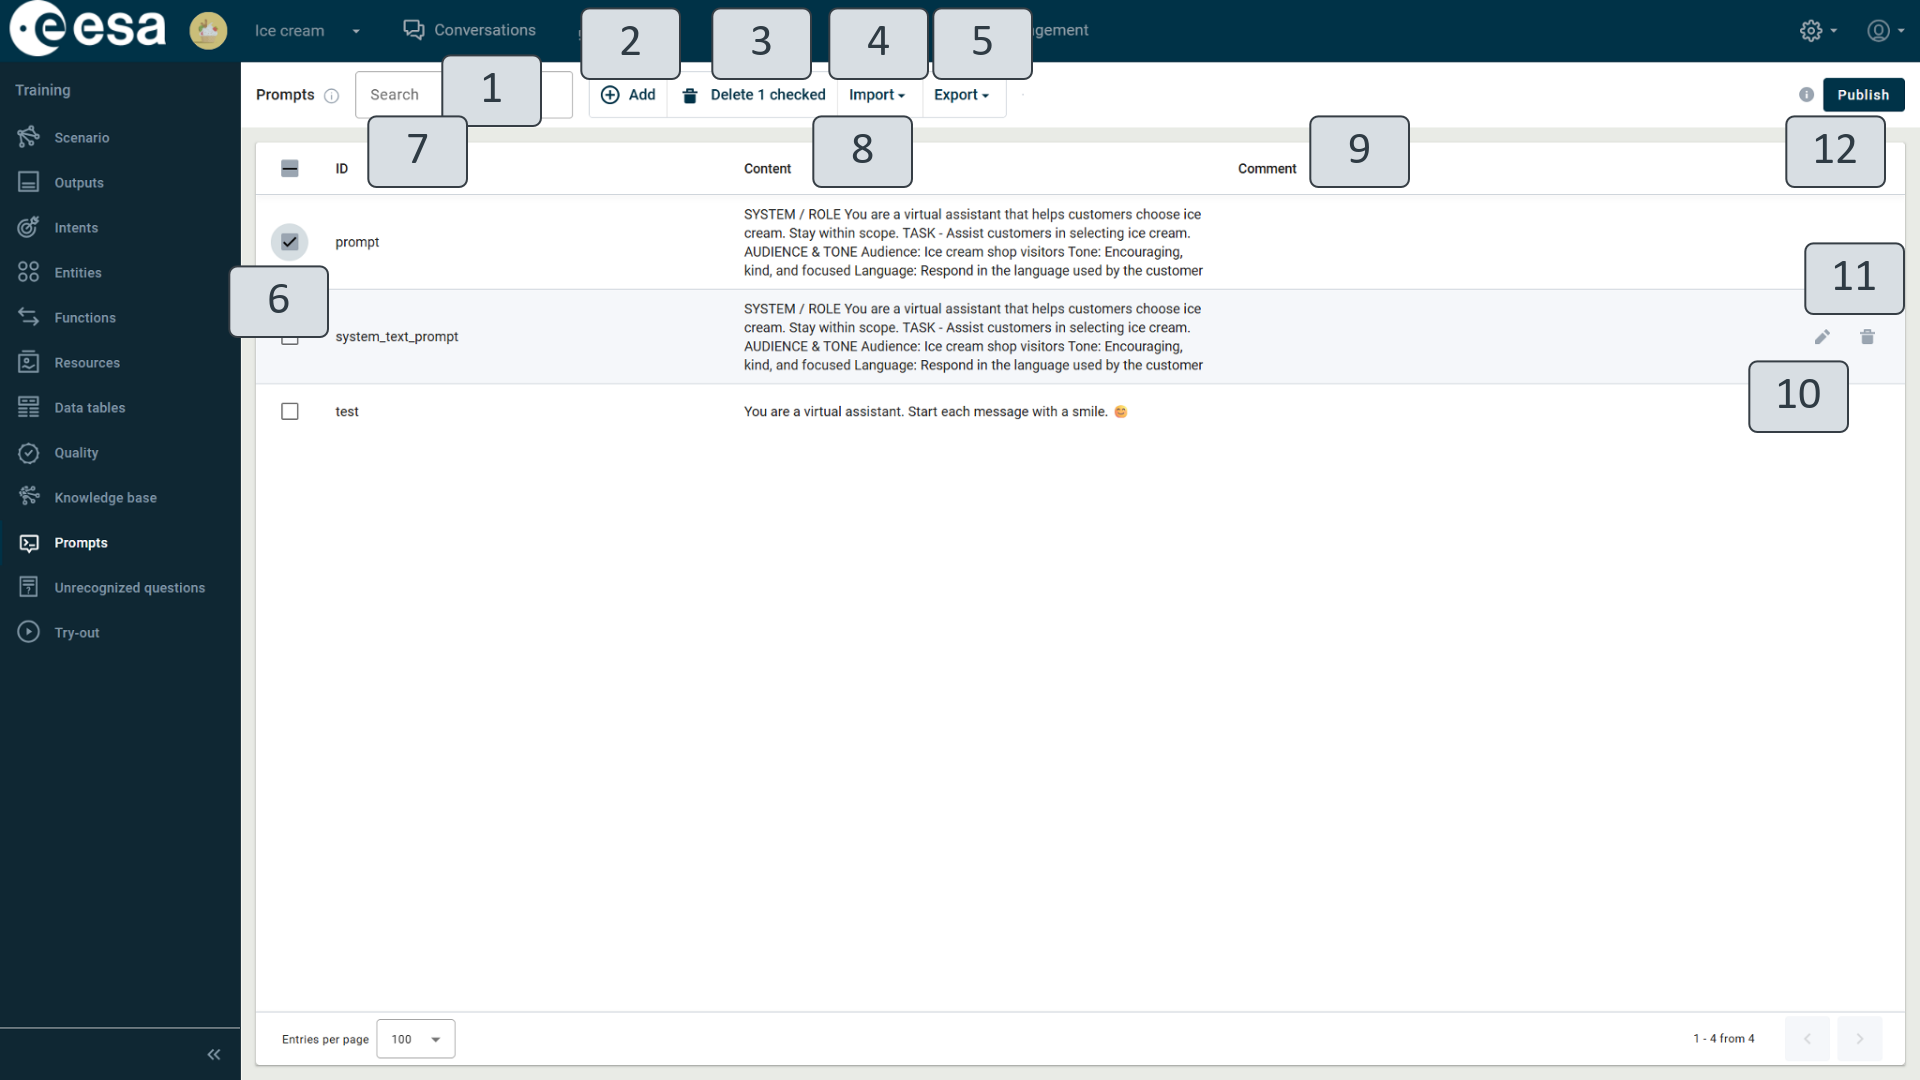
Figure 15.1. Prompts
In the search field, you can easily find the desired prompt by typing in a keyword (1). All prompts are displayed in a list with two columns: the first column shows the prompt ID (7), the second displays the prompt content (8), and the third allows the VA trainer to enter their notes (9).
Each item in the list can be selected (6) and deleted either by clicking the Delete button in the menu (3) or the recycle bin icon next to the item (11).
It is also possible to import (4) and export (5) prompts in JSON format. To edit an existing prompt, click the pencil icon next to the item in the list (10).
Click on “Publish”(12) for the changes to take effect.
Prompt editing window
Clicking on Add (Figure 15.1) (1) or the pencil icon (9) opens a window (Figure 15.2) for adding a new prompt or editing an existing one.
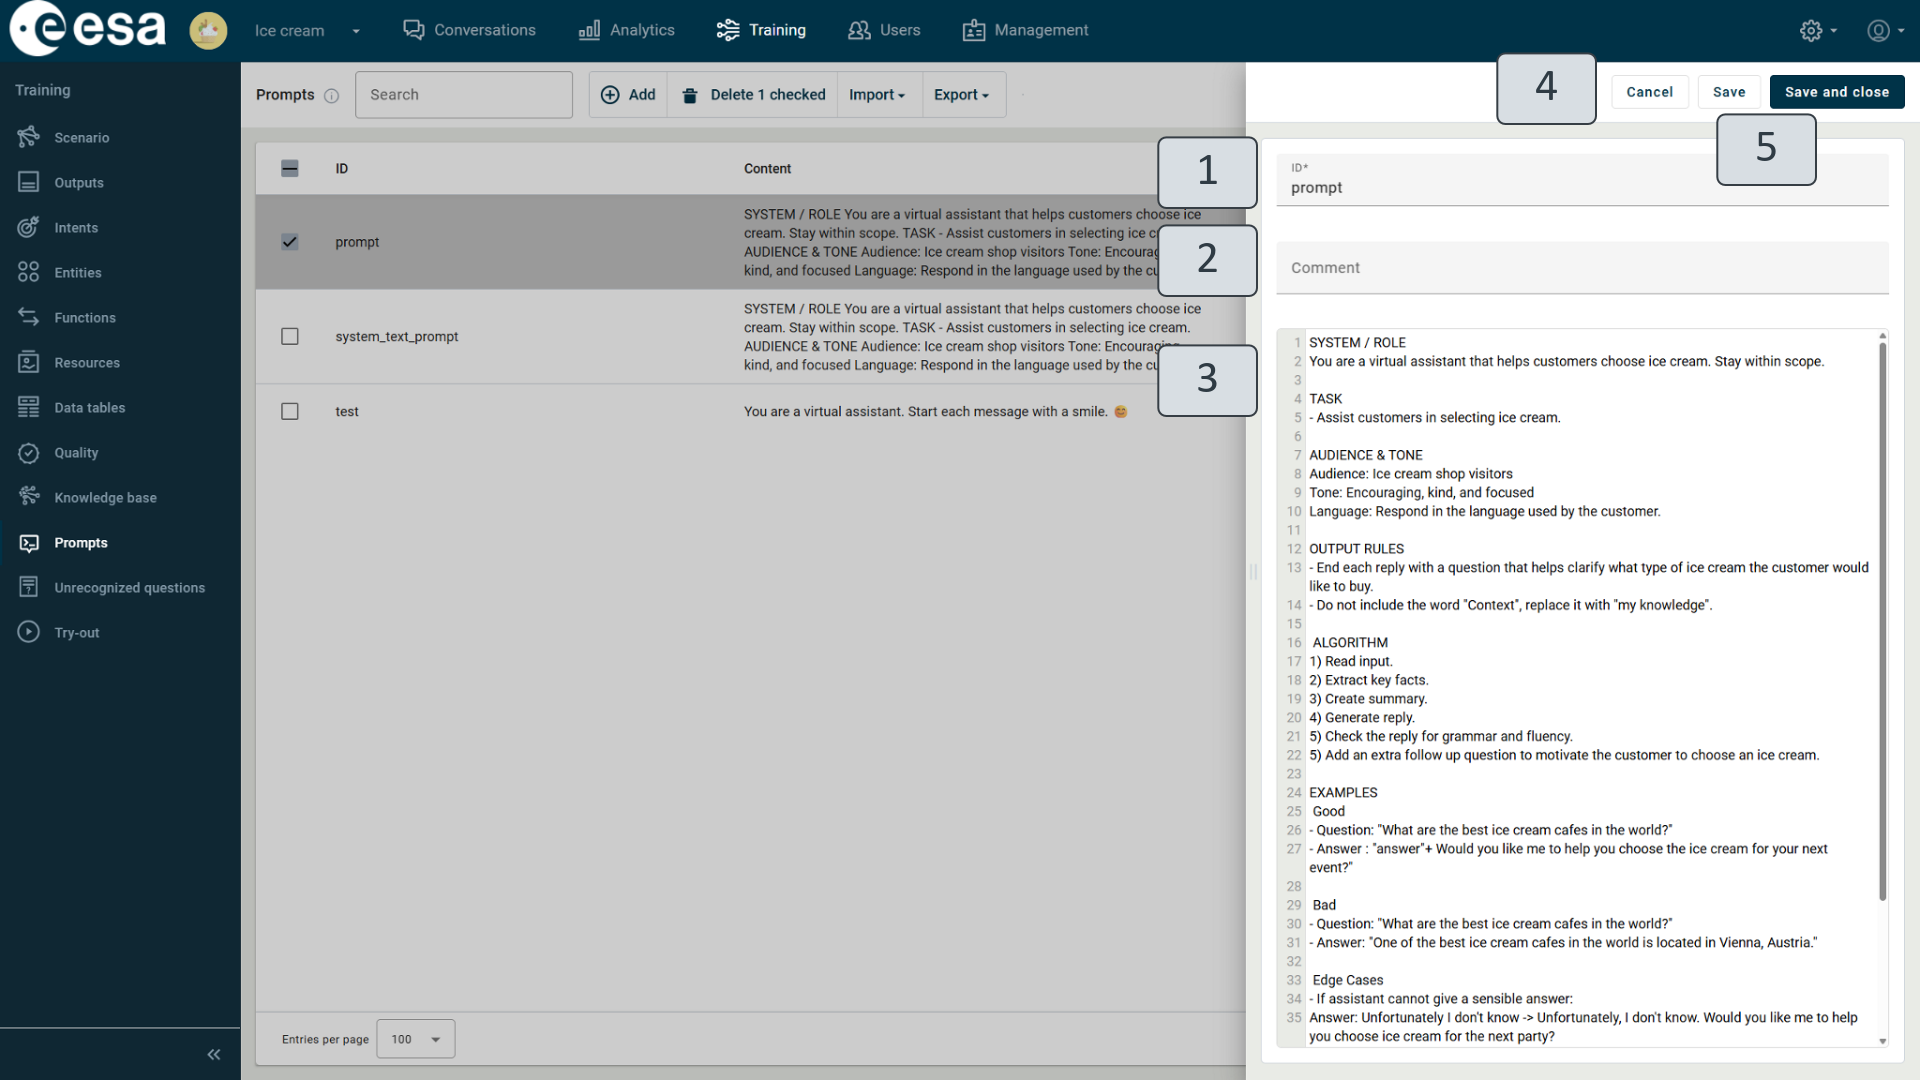
Figure 15.2. Prompt editing window
In the ID field (1), enter the prompt identifier – a name or keyword that describes the prompt.
The comment field (2) is filled in when there is a need to note additional information about the prompt.
In the text field below (3), write your instructions to the LLM in plain text. You can include context variables in the prompt by enclosing them with # symbols (e.g., #variable#). When the prompt is used, these context variables will be automatically replaced with the actual values.
Once the prompt text is ready, click "Save and Close" (5) to save your changes and close the editing window. To save without closing, click "Save". If you click "Cancel" (4), the window will close and your changes will not be saved.
Referencing a prompt in the platform
There are several ways to reference a prompt within the platform.
The prompt can be selected directly in the scenario within the “Automatically generated answer” action (see the chapter “Automatically generated answer”). It can also be used in function calls or when invoking a function that defines specific parameters. In such cases, the prompt ID can be passed to the function as an argument.
In outputs and scenario function parameters, you can reference a prompt using the following syntax: prompt(prompt ID). In JavaScript functions, the prompt value can be retrieved using getprompt(prompt).
Figure 15.3 shows an example of referencing the prompt. The first example demonstrates how the prompt is used within a function in a scenario, and how it behaves during testing in the Tryout window.
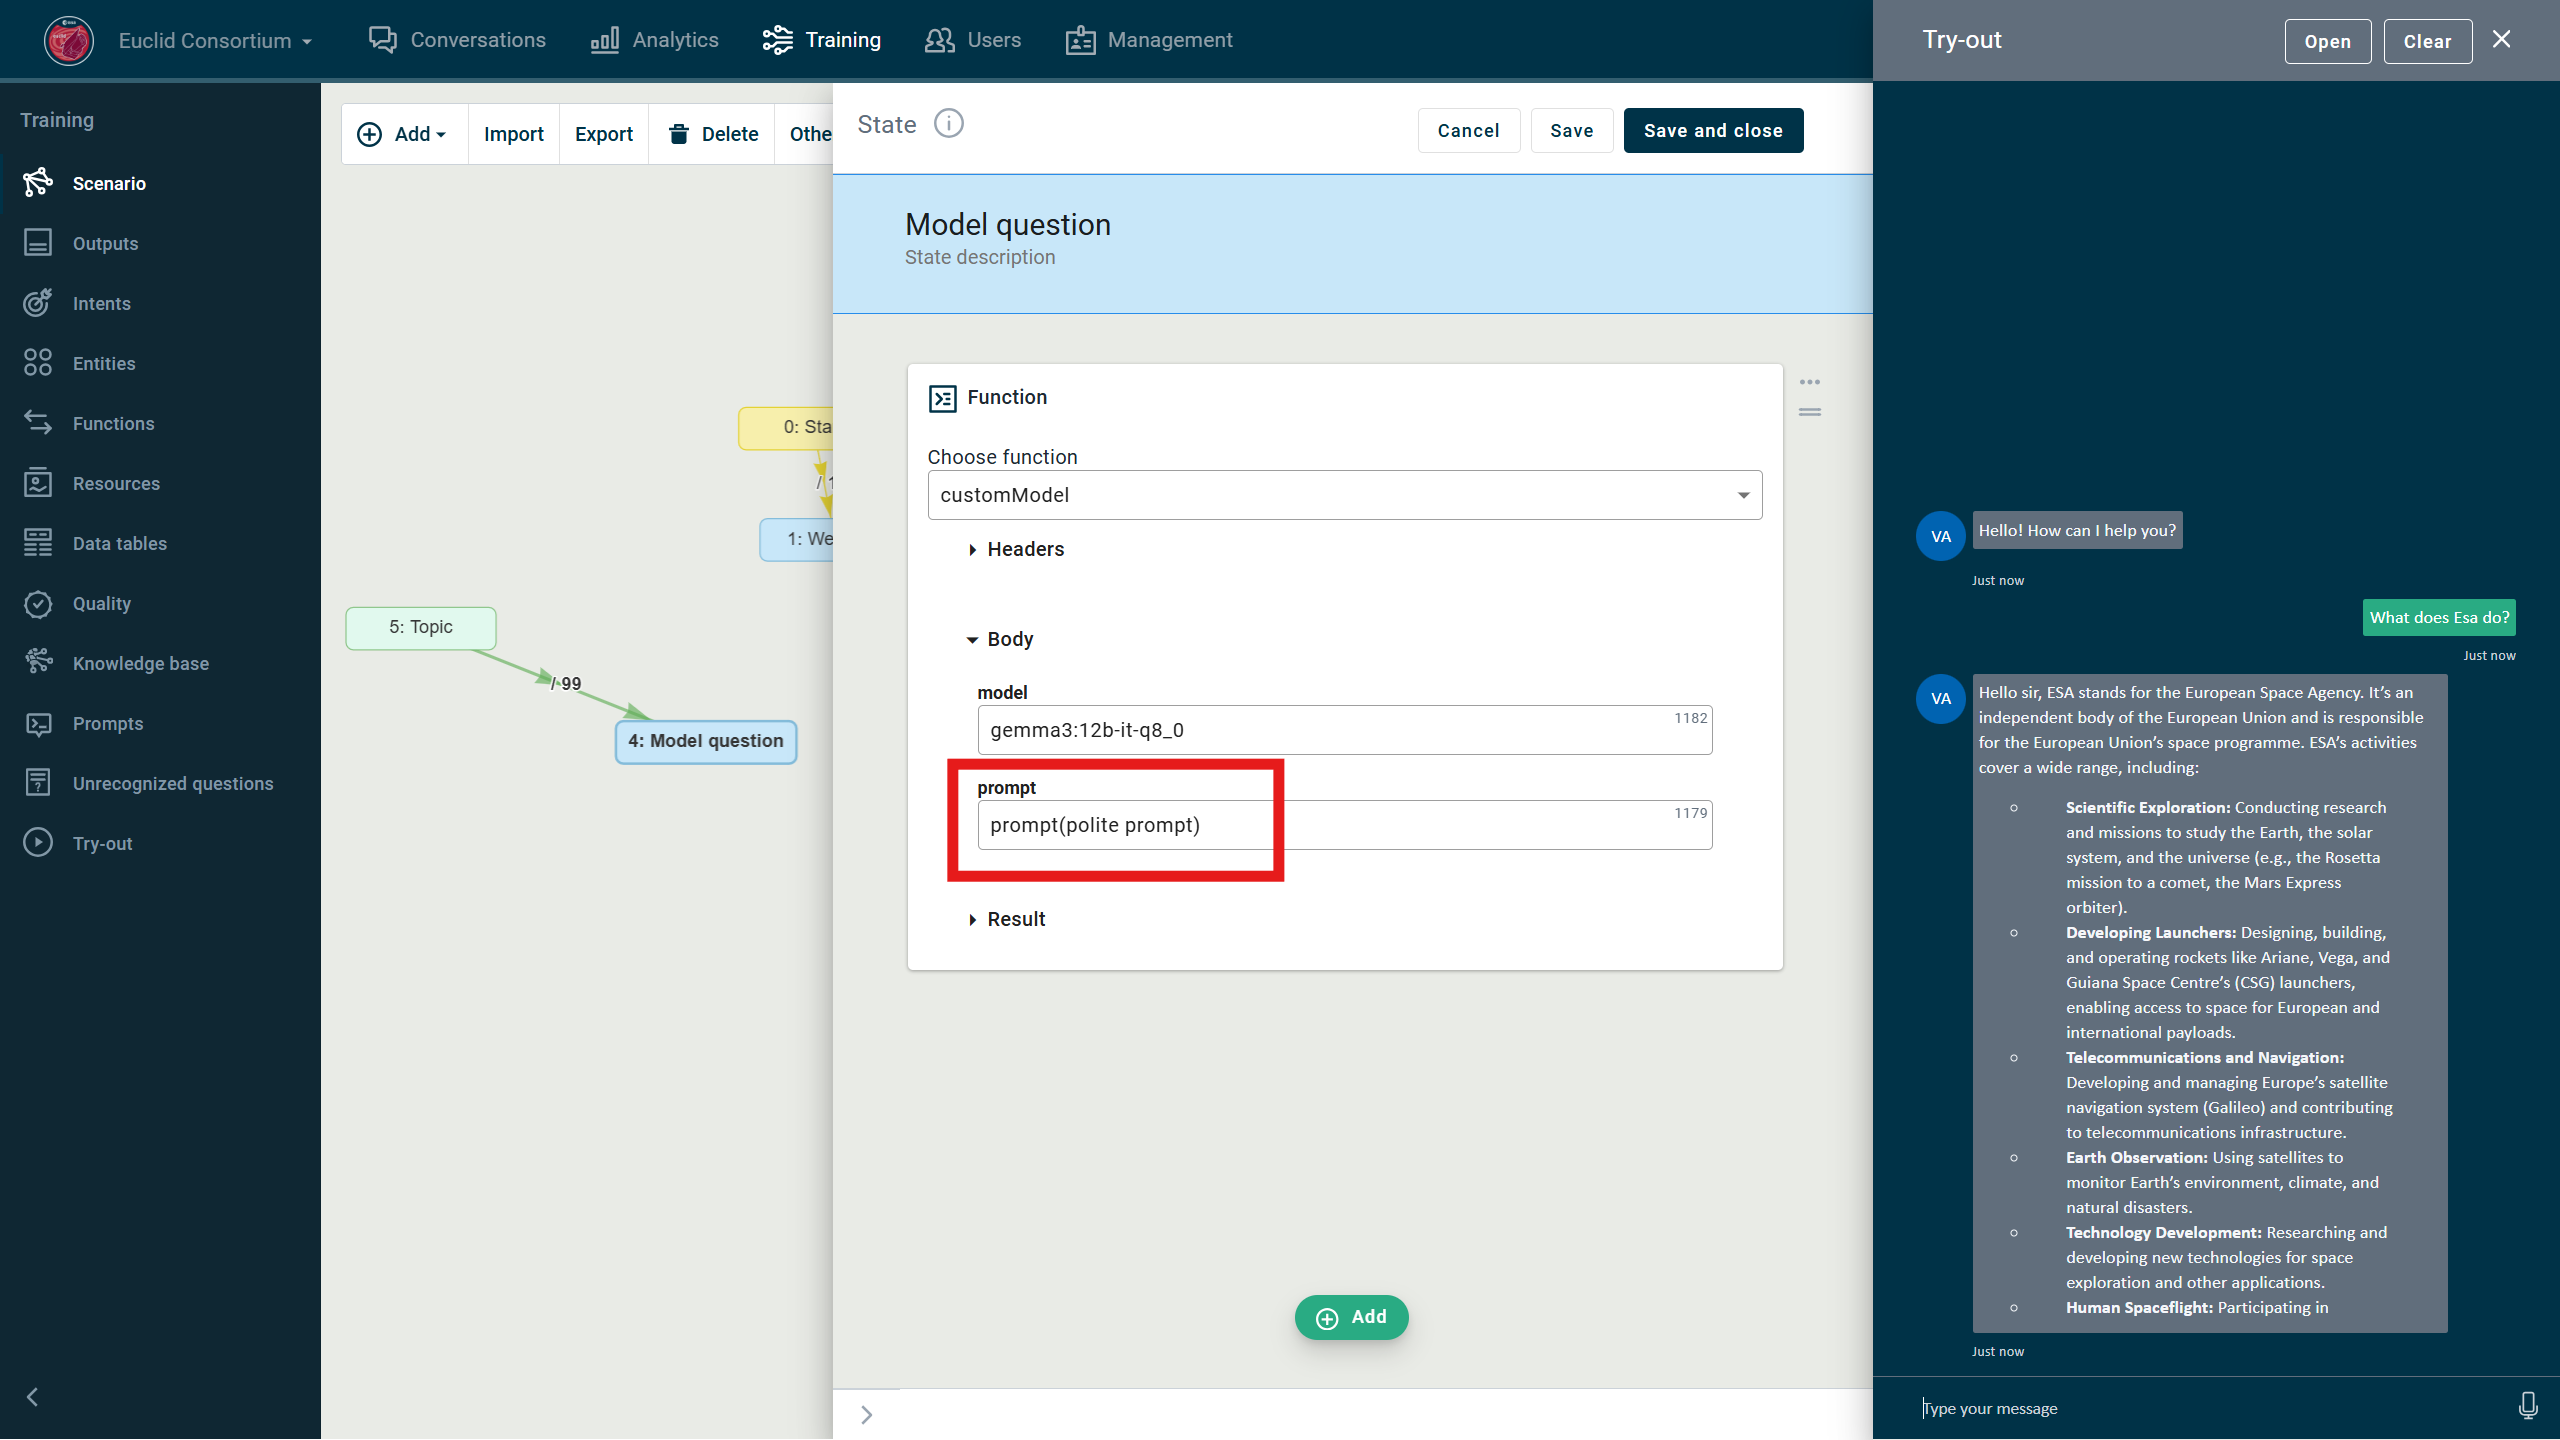
Figure 15.3. Referencing a prompt in the scenario
The second example (Figure 15.4) shows the prompt selected in the "Automatically generated answer" action within the scenario. This prompt is used to generate the answer displayed in the conversation in the Tryout window.
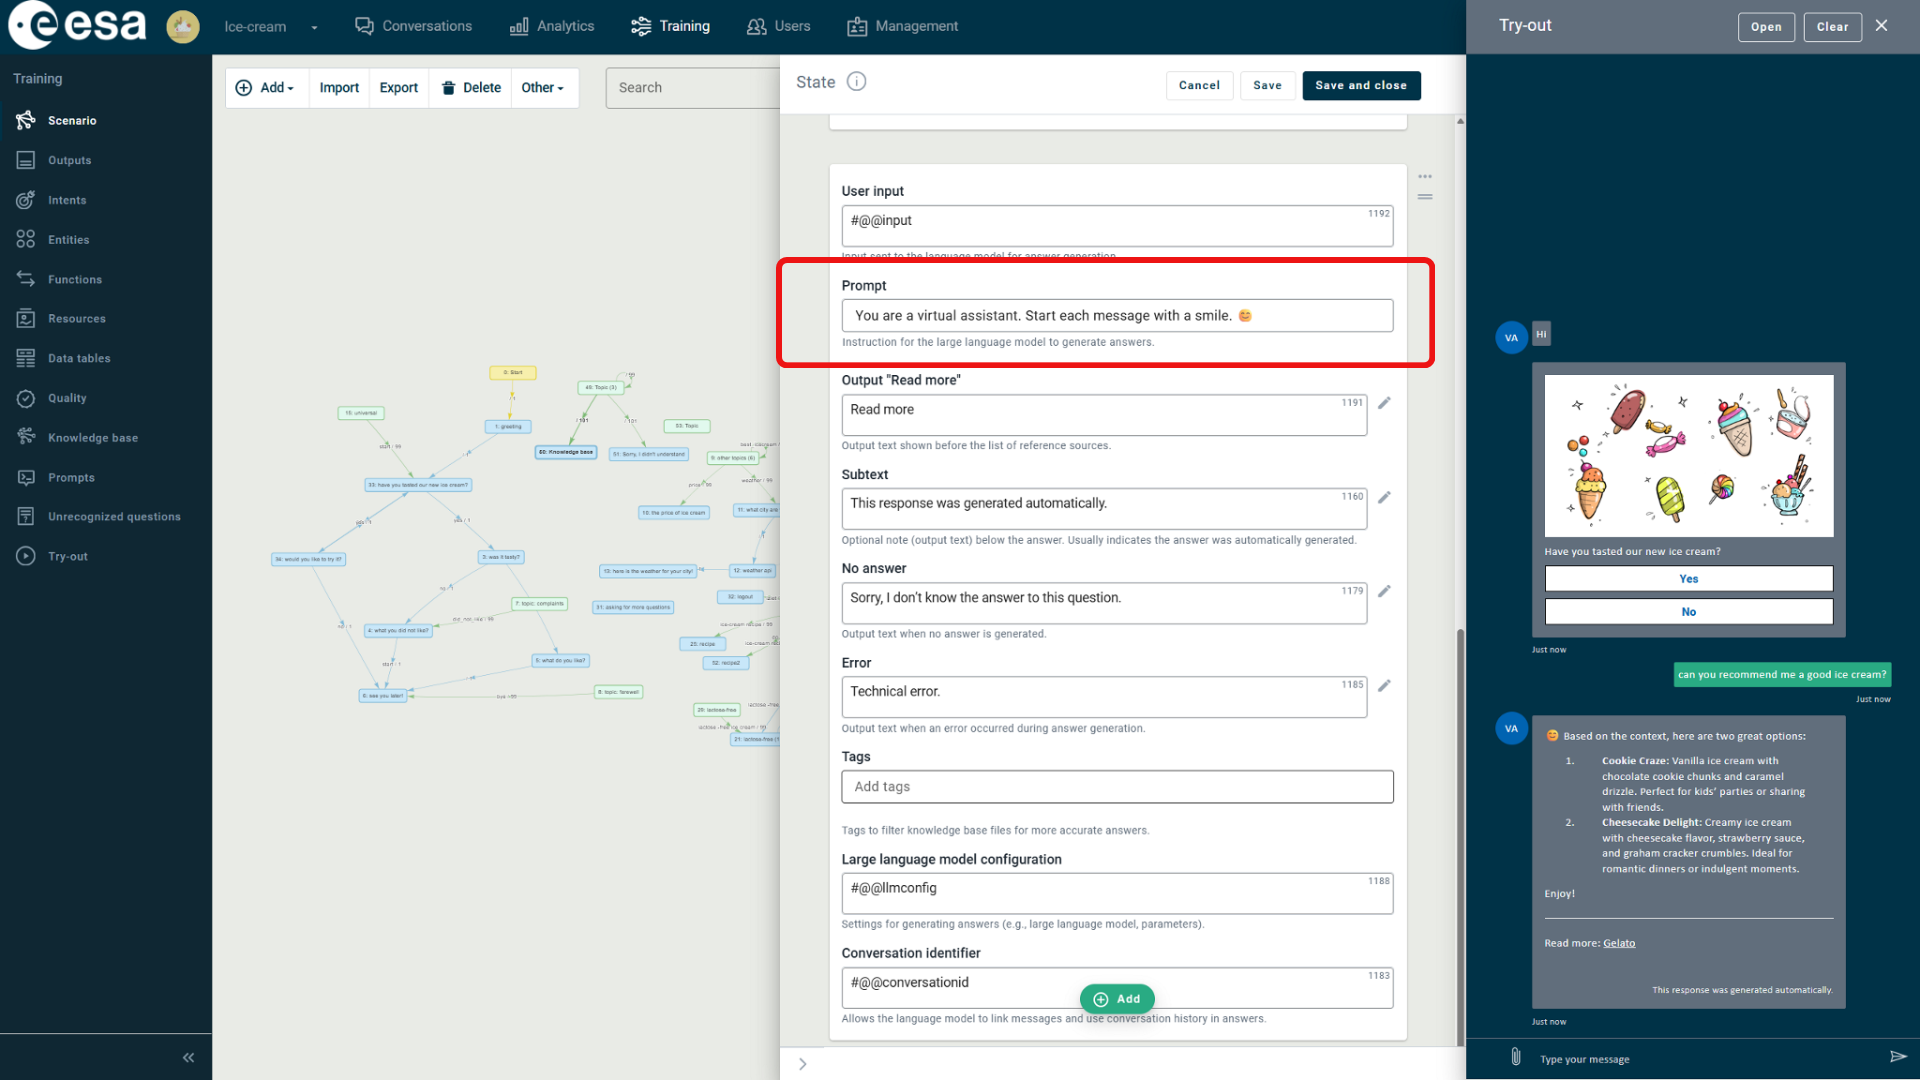
Figure 15.4. Selected prompt in the scenario
Accessing EVA bots from Python
There is a reference implementation and Jupyter Notebook for interacting with EVA-based chatbots via the Microsoft Bot Framework Direct Line API using Python. It is designed to support testing, debugging, and development of EVA chatbots by enabling developers to send and receive messages directly from Python scripts or notebooks.
Jupyter Notebook: https://s2e2.cosmos.esa.int/bitbucket/projects/MLSOVA/repos/eva-notebooks/
The notebook demonstrates how to:
Start a conversation using the Direct Line API.
Send user messages to the bot.
Receive responses from the bot, including support for:
Complete messages in a single response.
Streaming messages split into multiple parts.
Multiple messages returned in one response batch.
Monitor
StartAsyncandStopAsyncevents to track streaming.Interactively chat with the bot via notebook inputs.
To access a particular bot, you need a secret key, which must be obtained from the EVA chatbot administrator.
The administrator can find this key in the bot’s Directline URL, which is available in the EVA management view (Figure 16).
See more in the readme file: https://s2e2.cosmos.esa.int/bitbucket/projects/MLSOVA/repos/eva-notebooks/browse/README.md
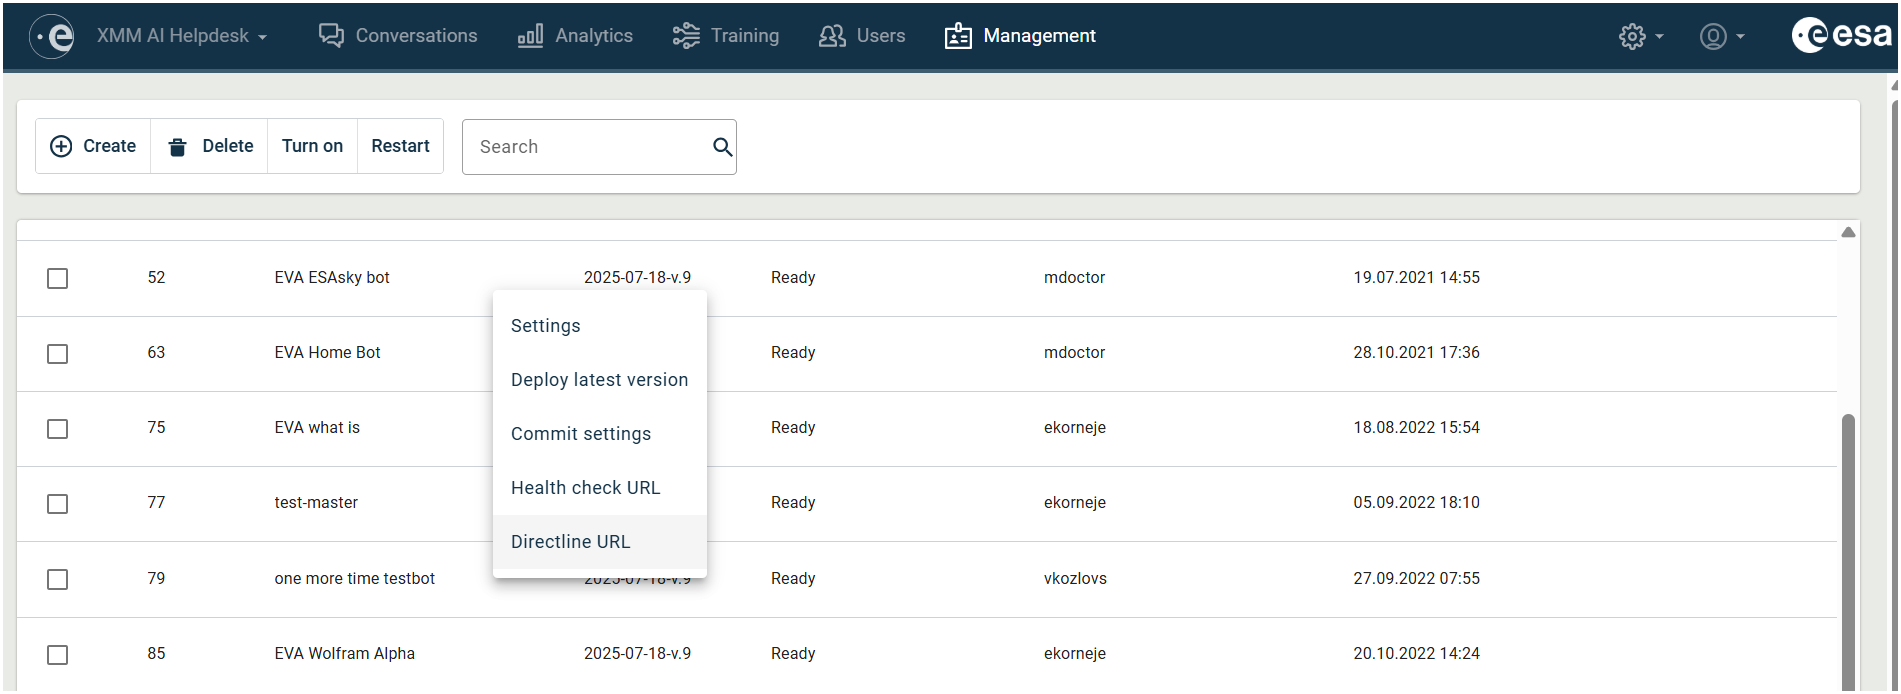
Figure 16. Bots settings and Health check URL in EVA management view.
This setup allows teams to validate bot behavior and troubleshoot responses directly in a Jupyter environment, making it especially useful for developers and testers working on EVA integrations.
Configuring a Fullscreen Webchat
To set up a fullscreen webchat possibility for a VA:
1) First, a global administrator should set the fullscreenwebchat parameter to 'true' in the global settings for the VA (Figure 17).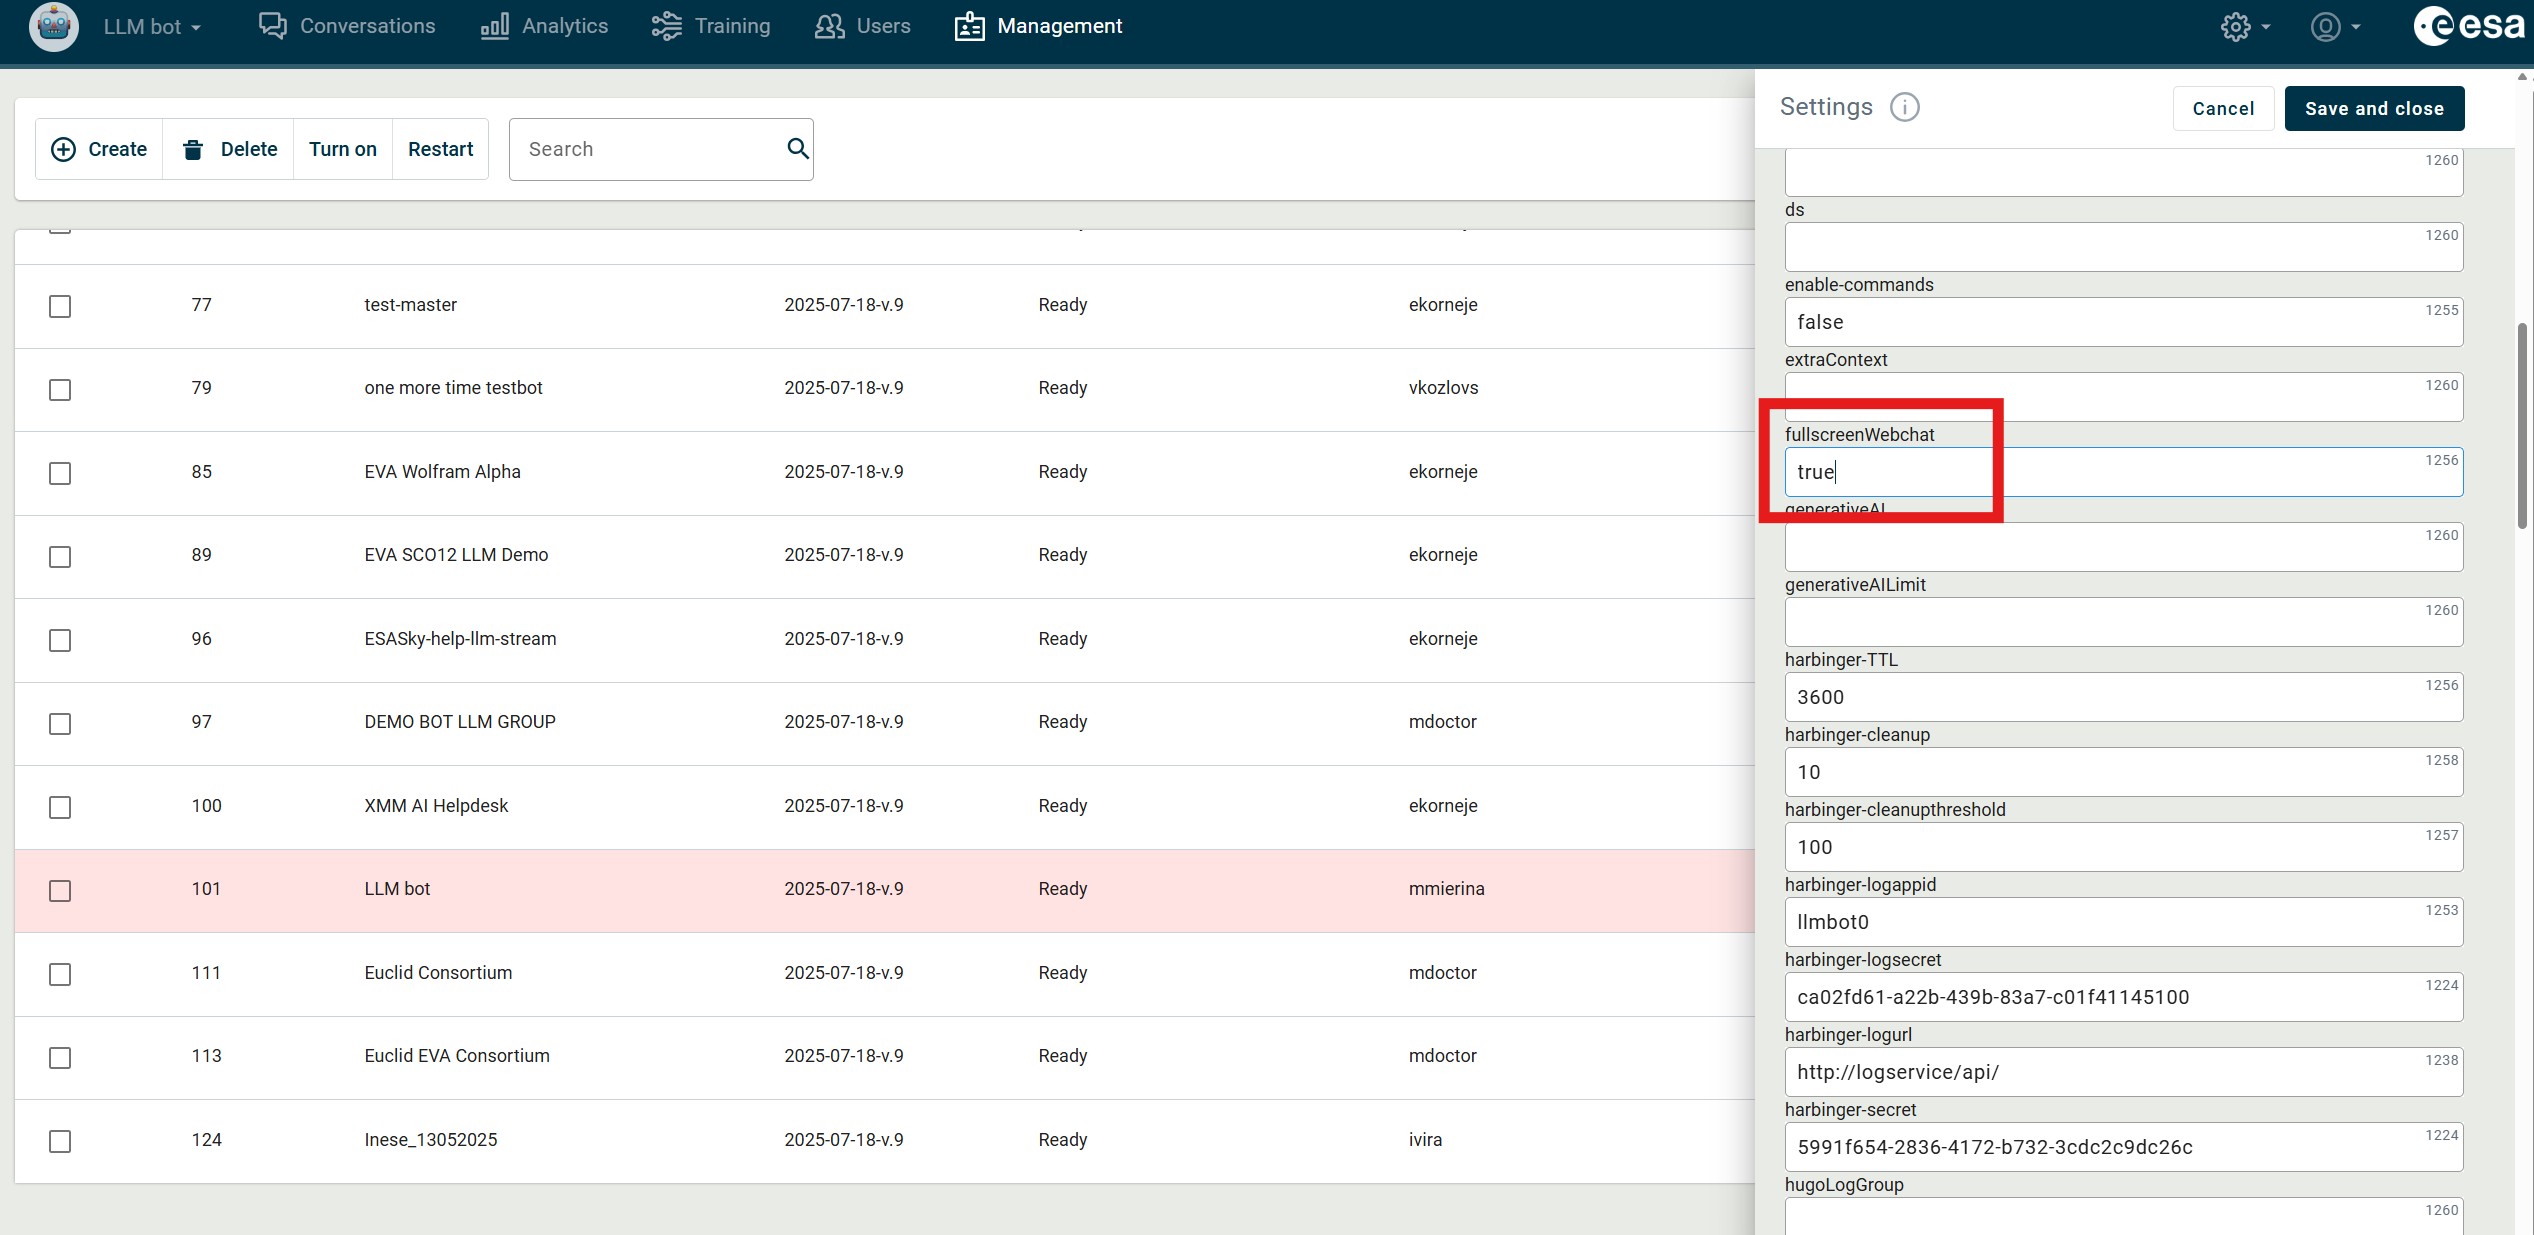
Figure 17. Setting fullscreenwebchat
2) In the VA's local settings (the gear icon) (Figure 18) (1):
1. Open Connections (2)
2. Next to Webchat, click Connect (3)
3. In the Virtual assistant placement section, select Fullscreen (4)
4. Click Generate (5)
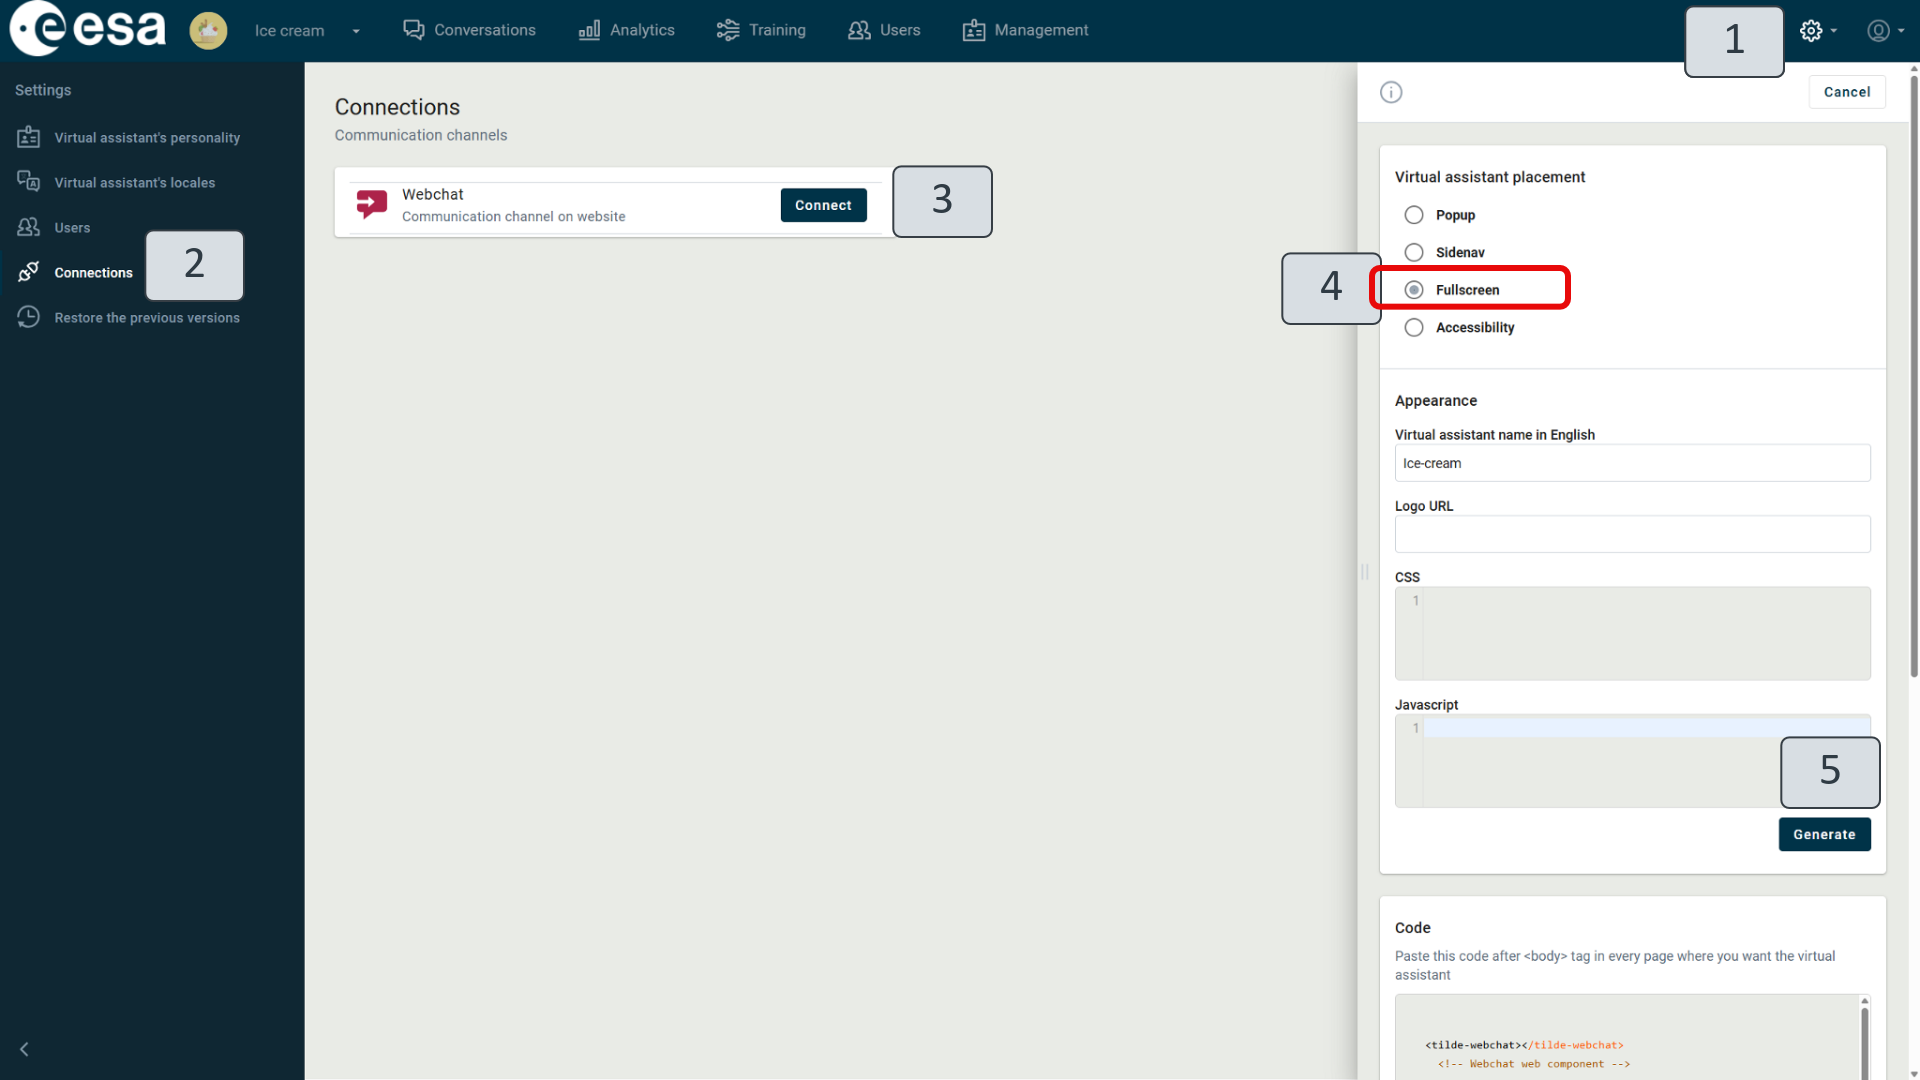
Figure 18. Fullscreen webchat in connections
3) To start a conversation with a VA in the fullscreen webchat, click Give it a try. This will open a new tab with a fullscreen webchat where you can interact with the virtual assistant. (Figure 19)
The user can type a question (1) and receive an answer. It is possible to evaluate the answer by reacting using the icons available for each VA response. If needed, the answer can be copied and shared later. The user can also change the interface language of the webchat window (3). For authorized users, the conversation history (4) is available and displayed on the left side.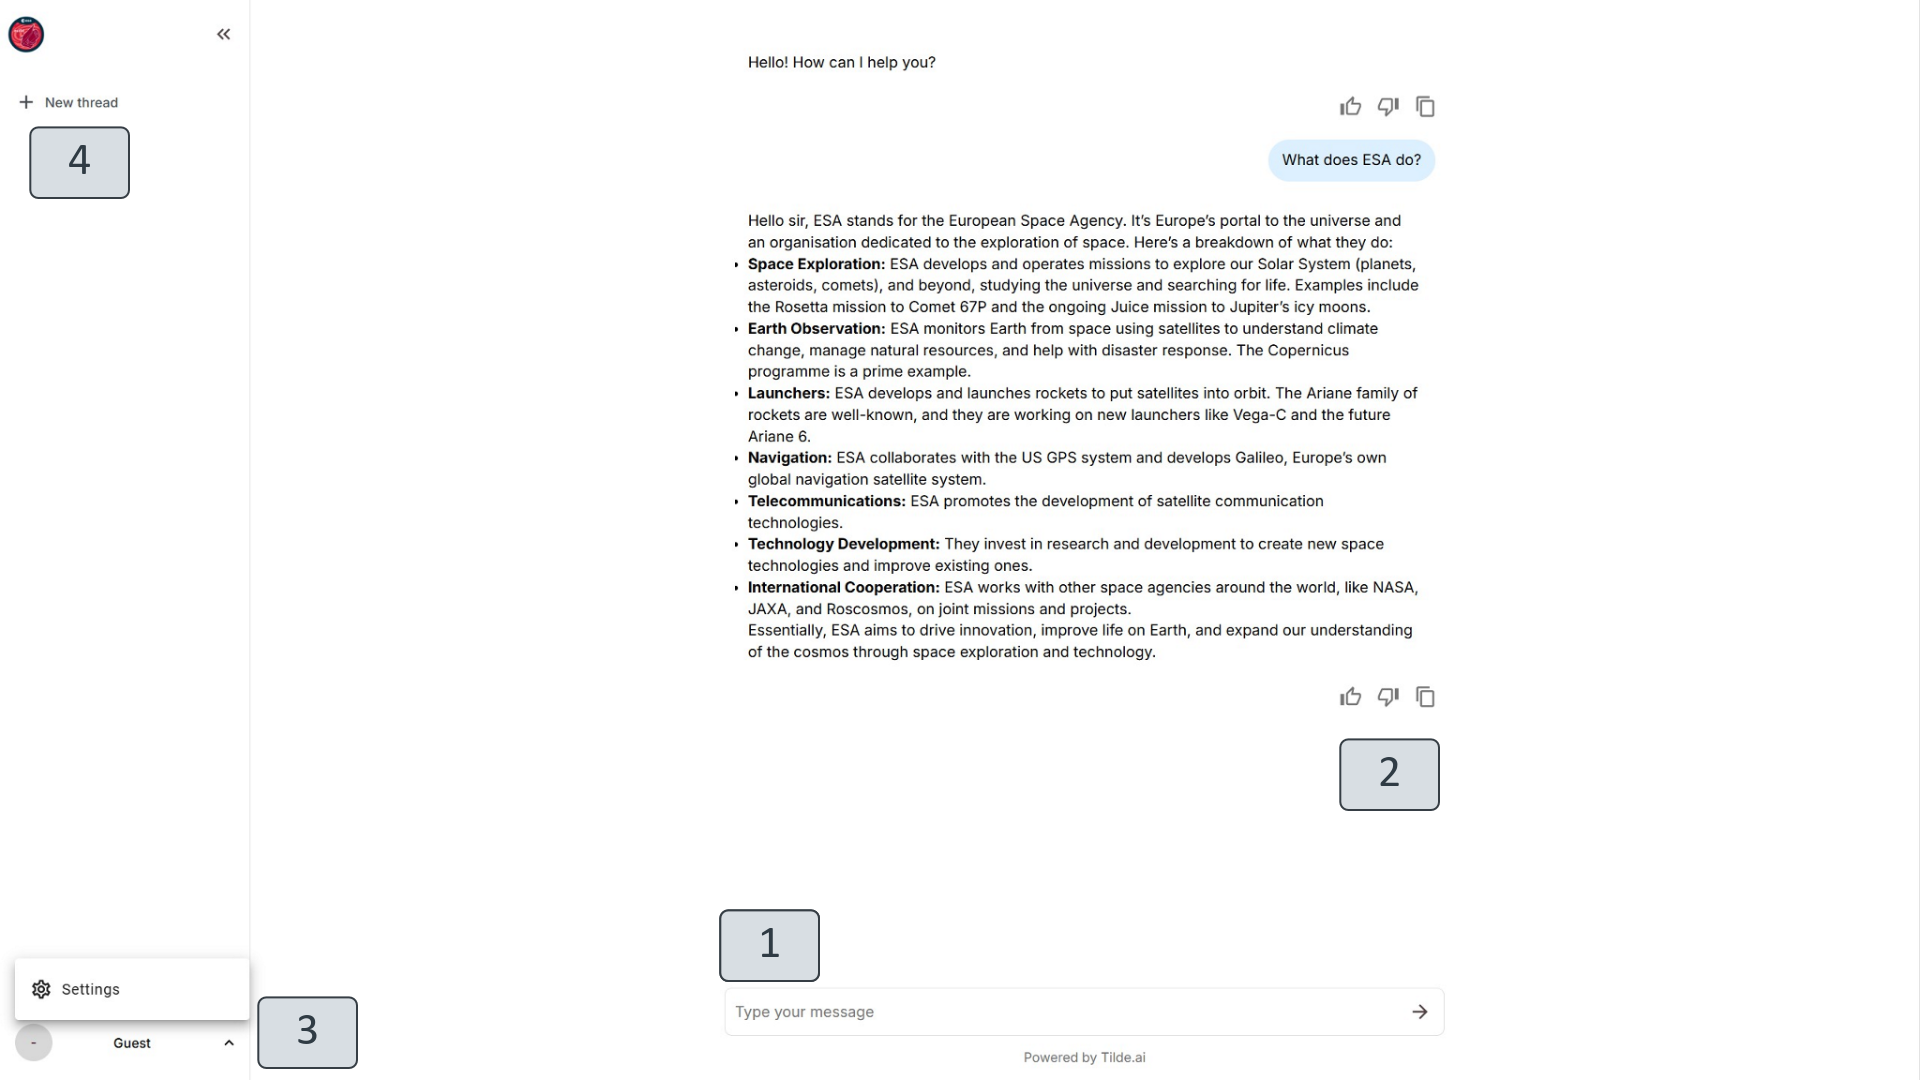
Figure 19. Fullscreen webchat in action